
【源码】RapidJSON 源码剖析(0.1):调试工具 GDB 的使用
【源码】RapidJSON 源码剖析(0.1):调试工具 GDB 的使用
正式开始源码阅读之前,有必要了解一下源码阅读中用到的调试工具 GDB。
GDB(GNU Debugger) 是一种可以运行在多种类 Unix 系统上的,可移植的,适用于多种编程语言的调试器。
(The GNU Debugger (GDB) is a portable debugger that runs on many Unix-like systems and works for many programming languages.)
GDB: The GNU Project Debugger 中对 GDB 有如下描述:
GDB 可以提供以下四种操作来帮助你捕获 bug:
• 启动你的程序,指定可能影响程序运行行为的内容。
• 让你的程序在指定的条件下停止。
• 当你的程序停止时, 检测你的程序发生的事。
• 改变你的程序的内容, 你可以纠正一个 bug 的影响,以便继续研究下一个 bug。
(gdb can do four main kinds of things (plus other things in support of these) to help you catch bugs in the act:
• Start your program, specifying anything that might affect its behavior.
• Make your program stop on specified conditions.
• Examine what has happened, when your program has stopped.
• Change things in your program, so you can experiment with correcting the effects of one bug and go on to learn about another.)
调试工具 GDB 的使用
0. 待调试程序
本文调试的样例程序来自于 RapidJSON 官方文档,具体源代码如下:
// rapidjson/example/simpledom/simpledom.cpp`

#include "rapidjson/document.h"

#include "rapidjson/writer.h"

#include "rapidjson/stringbuffer.h"

#include <iostream>

using namespace rapidjson;

int main()

{

    // 1. 把 JSON 解析至 DOM。

    const char* json = "{\"project\":\"rapidjson\",\"stars\":10}";

    Document d;

    d.Parse(json);

    // 2. 利用 DOM 作出修改。

    Value& s = d["stars"];

    s.SetInt(s.GetInt() + 1);

    // 3. 把 DOM 转换(stringify)成 JSON。

    StringBuffer buffer;

    Writer<StringBuffer> writer(buffer);

    d.Accept(writer);

    // Output {"project":"rapidjson","stars":11}

    std::cout << buffer.GetString() << std::endl;

    return 0;

}
1. 编译
要使编译生成的可执行文件带有可被 GDB 识别的调试信息,需要在编译时加上参数 -g。如:
g++ -g -std=c++11 simpledom.cpp -o simpledom.out2. 用 GDB 启动你的程序
用 gdb <待调试软件名> 命令启动调试待调试软件。如:
gdb simpledom.out3. 显示程序源码
当用 GDB 打开指定的程序后,可以用 list 或 l 命令查看该程序的源码。GDB: The GNU Project Debugger 9. Examining Source Files 对该命令有详细地介绍,这里摘录可能会用到的用法:
| command | description |
|---|---|
| list linenum | Print lines centered around line number linenum in the current source file. |
| list function | Print lines centered around the beginning of function function. |
| list first,last | Print lines from first to last. |
| list ,last | Print lines ending with last. |
| list first, | Print lines starting with first. |
| list filename:linenum | Print lines centered around linenum in the source file filename. |
| list filename:function | Print lines centered around the beginning of the function function in the file filename. |
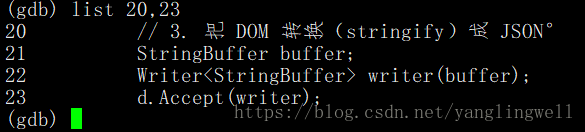
如,显示当前文件的 20 到 23 行:
list 20, 23输出如下:
4. 设置断点,查看断点和取消断点
设置断点是 break 或 b 命令,查看断点用 info break 或 info b 命令,删除断点用 delete 或 d 命令。具体用法如下表:
| command | description |
|---|---|
| break location | Set a breakpoint at the given location, which can specify a function name, a line number, or an address of an instruction. |
| break … if cond | Set a breakpoint with condition cond; evaluate the expression cond each time the breakpoint is reached, and stop only if the value is nonzero—that is, if cond evaluates as true.‘…’ stands for one of the possible arguments described above (or no argument) specifying where to break. |
| info break | Print a table of all breakpoints, watchpoints, and catchpoints set and not deleted. For each breakpoint, following columns are printed: Breakpoint Numbers, Type, Disposition, Enabled(‘y’) or Disabled(‘n’), Address, What. |
| delete breakpoint number | Delete the breakpoint specified by breakpoint number, If no argument is specified, delete all breakpoints. |
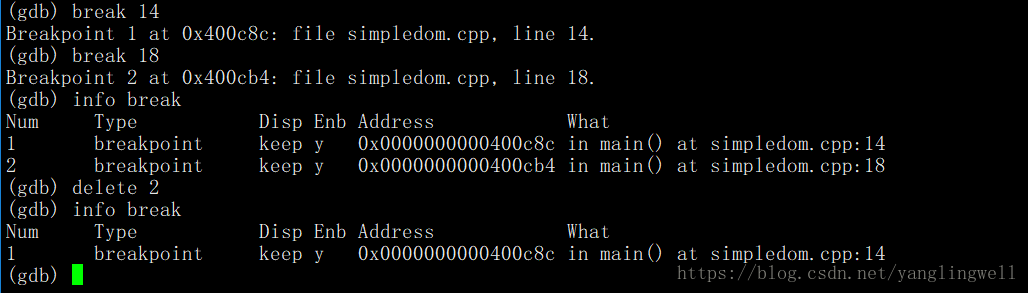
如,在 14 行和 18 行设置断点, 然后查看断点信息,最后取消 18行断点,再查看断点信息:
break 14

break 18

info break

delete 2

info break
输出如下:
5. 开始单步调试,下一步, 继续到下个断点,进入函数,跳出当前函数,查看变量值,查看变量类型。
start 命令从 main 函数开始单步调试。next 或 n 命令进入下一步。continue 或 c 命令继续执行程序到下一个断点。
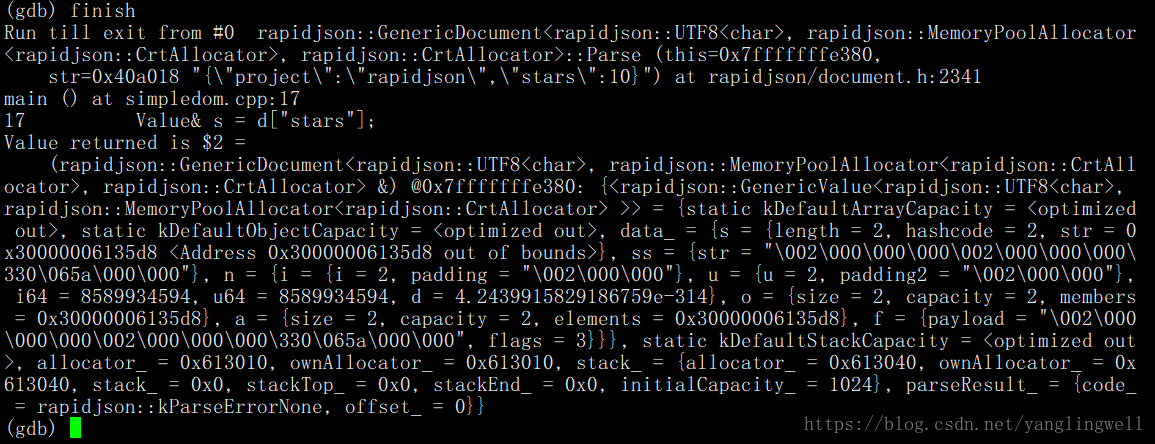
step 或 s 命令进入函数内部, finish 跳出当前函数。
print <变量名> 或 p <变量名> 显示指定变量的值,ptype <变量名> 查看变量的类型。
如,
- 通过
start命令开始单步调试代码
- 进入下一步
- 查看变量
json的值和类型
- 在 14 行处设置一个断点
- 执行到下一个断点(14 行处)
- 跳转进
Parse函数
- 跳出
Parse函数
- 继续执行完整个程序







参考文献
【源码】RapidJSON 源码剖析(0.1):调试工具 GDB 的使用的更多相关文章
- Spring Boot 揭秘与实战 源码分析 - 工作原理剖析
文章目录 1. EnableAutoConfiguration 帮助我们做了什么 2. 配置参数类 – FreeMarkerProperties 3. 自动配置类 – FreeMarkerAutoCo ...
- 保姆级教程——Ubuntu16.04 Server下深度学习环境搭建:安装CUDA8.0,cuDNN6.0,Bazel0.5.4,源码编译安装TensorFlow1.4.0(GPU版)
写在前面 本文叙述了在Ubuntu16.04 Server下安装CUDA8.0,cuDNN6.0以及源码编译安装TensorFlow1.4.0(GPU版)的亲身经历,包括遇到的问题及解决办法,也有一些 ...
- [笔记] Ubuntu 18.04源码编译安装OpenCV 4.0流程
标准常规安装方法安装的OpenCV版本比较低,想尝鲜使用4.0版本,只好源码安装. 安装环境 OS:Ubuntu 18.04 64 bit 显卡:NVidia GTX 1080 CUDA:10.0 c ...
- 修改和编译spring源码,构建jar(spring-context-4.0.2.RELEASE)
上周在定位问题时,发现Spring容器实例化Bean的时候抛出异常,为了查看更详细的信息,决定修改spring-context-4.0.2.RELEASE.jar中的CommonAnnotationB ...
- 大话Spark(6)-源码之SparkContext原理剖析
SparkContext是整个spark程序通往集群的唯一通道,他是程序的起点,也是程序的终点. 我们的每一个spark个程序都需要先创建SparkContext,接着调用SparkContext的方 ...
- EventBus源码解析 源码阅读记录
EventBus源码阅读记录 repo地址: greenrobot/EventBus EventBus的构造 双重加锁的单例. static volatile EventBus defaultInst ...
- ios源码-ios游戏源码-ios源码下载
游戏源码 一款休闲类的音乐小游戏源码 该源码实现了一款休闲类的音乐小游戏源码,该游戏的源码很简单,而且游戏的玩法也很容易学会,只要我们点击视图中的grid,就可以 人气:2943运行环境:/Xco ...
- C#UDP(接收和发送源码)源码完整
C#UDP(接收和发送源码)源码完整 最近做了一个UDP的服务接收和发送的东西.希望能对初学的朋友一点帮助. 源码如下: 一.逻辑--UdpServer.cs using System;using S ...
- android源码-安卓源码-Android源码下载-安卓游戏源码
android源码 高仿精仿金山手机卫士应用源码V1.2 高仿精仿金山手机卫士应用源码,该应用的级别实现了金山卫士的级别功能了,可以说跟现实中我们使用的金山卫士应用的功能几乎差不 人气:9286 ...
- zxing源码分析——QR码部分
Android应用横竖屏切换 zxing源码分析——DataMatrix码部分 zxing源码分析——QR码部分 2013-07-10 17:16:03| 分类: 默认分类 | 标签: |字号大中 ...
随机推荐
- 卸载virtualbox中linux虚拟机的增强工具
报错信息 vboxclient:the virtualbox kernel service is not running 前言 我由virtualbox换到vmware 遇到了这个问题,很烦每次都通知 ...
- Pod控制器详解
Pod控制器详解 7.1 Pod控制器介绍 Pod是kubernetes的最小管理单元,在kubernetes中,按照pod的创建方式可以将其分为两类: 自主式pod:kubernetes直接创建出来 ...
- 关于Qt的QPixmap中不支持jpg文件格式的问题
问题 Qt部分版本存在不支持jpg,JPEG等图像格式的问题 qDebug()<<QImageWriter::supportedImageFormats(); 这行代码可以查看所支持的图像 ...
- 【Java SE】Day02 数据类型转换、运算符、方法入门
一.数据类型转换 1.自动转换 取值范围小在运算时会提升为取值范围大的类型 byte+int=int int+double=double 转换规则:byte.short.char-->int-- ...
- 持续发烧,聊聊Dart语言的并发处理,能挑战Go不?
前言 貌似关于Dart的文章没流量啊,就算在小编关怀上了首页,看得人还是很少的. 算了,今天持续发烧,再来写写如何使用 Dart 语言的并发操作.说起并发操作,玩 Go 的同学该笑了,这就是我们的看家 ...
- npm设置
1.默认安装完node.js后会自己安装npm,通过npm下载全局模块默认安装到C:\Users\wangyc\AppData\Roaming目录下,主要有两个文件夹:npm.npm-cache 2. ...
- vue-cli3打包时vue-cli-service build怎么分不同环境(npm run build:stage和npm run build:prod)
- JavaScript:操作符:正负号和自增自减及其隐式转换数据类型
正负号 正号即加号,负号即减号,运算结果同数学意义一样: 对非数字类型进行正负号运算,会隐式转换为数字,再进行运算: 一些特殊的非数字,转换情况同算术运算符: 自增自减 自增即为++,自减即为--. ...
- 基于U-Net网络的图像分割的MindStudio实践
摘要:本实践是基于Windows版MindStudio 5.0.RC3,远程连接ECS服务器使用,ECS是基于官方分享的CANN6.0.RC1_MindX_Vision3.0.RC3镜像创建的. 本文 ...
- 从工具到实践:如何在GitHub上保障开源项目安全?
1998年,Christine Peterson创造了 "开源软件"这个词.她解释道:"这是刻意为之,为了让其他人更容易理解这个领域".同年,O'Reilly组 ...