基于Face-Recognition的计算机人脸识别安全认证程序
20202411 2020-2021-2 《Python程序设计》实验四报告
基于Face-Recognition的计算机人脸识别安全认证程序
课程:《Python程序设计》
班级: 2024
姓名: 陈书桓
学号:20202411
实验教师:王志强
实验日期:2021年5月24日
必修/选修: 公选课
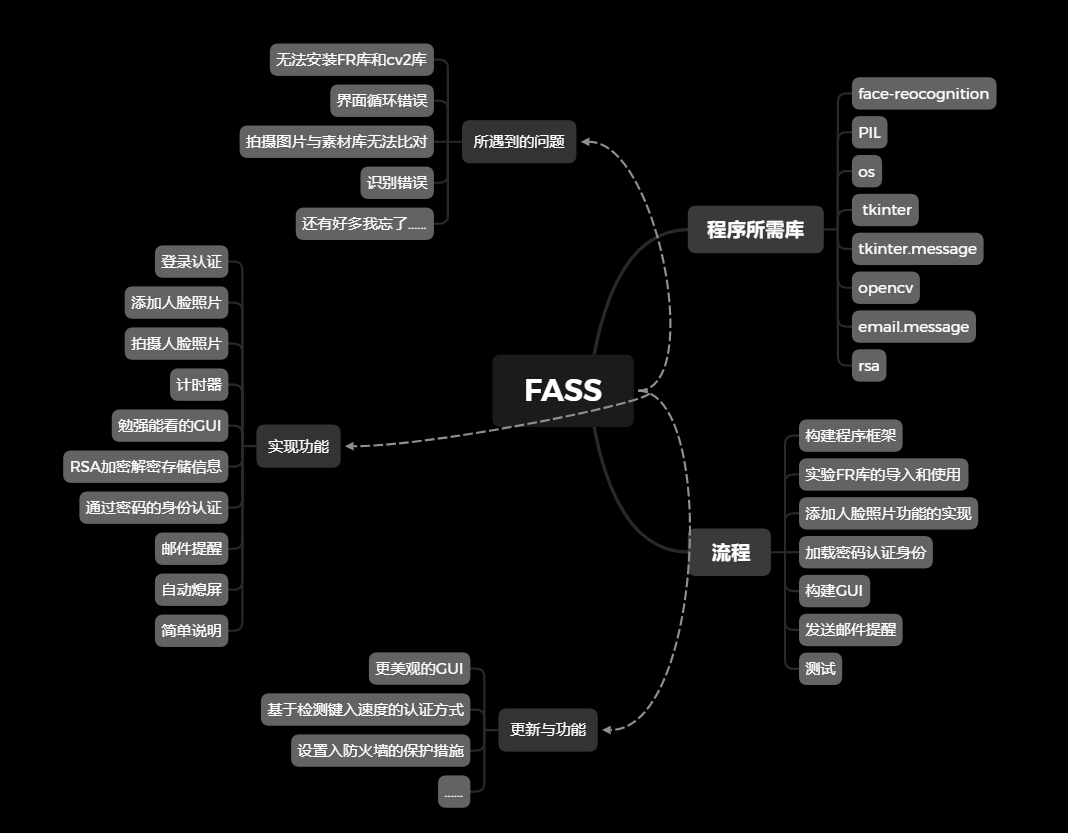
1.实验内容
1.Python综合应用:爬虫、数据处理、可视化、机器学习、神经网络、游戏、网络安全等。
很久以前我注意到一个问题,就是我经常离开电脑时忘记熄屏,虽然可能我离开的时间很短,但是会不会有人动我的电脑(虽然里面也没什么东西可看),但是可能有些人的电脑里有重要文件信息,那他们可能很需要有一款程序来帮助他们。所以我决定写一个人脸识别检测来获取计算机控制权的程序。(不打算写游戏的原因是觉得看到身边的人沉迷游戏,对社会的发展和人类文明的进步没有丝毫的作用)
2.实验过程及结果
1.选择程序所需要的库
凭我现在的水平,想弄一个人脸识别简直就是天方夜谭,但是,python之所以强大,一个充分必要条件就是python的第三方库太多太强大了,上百度上一查就发现了face-recognition库(以下简称FR),网传识别成功率高达99.8%,FR是通过计算面部关键点来进行比对从而实现人脸识别的库,我们可以通过更改FR文件的容错率和敏感度来提高识别的准确度和精度(为下文埋下伏笔)。这样一来我就完成了整个程序最关键的一步。
2.流程
首先就是设计FASS的结构,最初在开始写的时候,并没有考虑这个流程和框架的东西,所以导致了函数运行到这里就不知道下一步该干什么了。后来在MOOC上看python爬虫的课时,主讲老师也是先将对象都写出来,然后再一点一点地将函数写入,逻辑比我清晰,难怪最开始那几天我怎么写都不对。
然后我准备开始导入库,其他库还好,可就是face-recognition和opencv这两个库在安装时出现了问题。opencv安装时是报错pip的问题,我也看不懂cmd讲了什么,就只好百度,结果在更新pip之后,就可以正常安装了。但是FR库就有鬼了。怎么安装都不对,百度上的方法都试了也没用,cmd的报错一下子就一百多行,心态直接爆炸,黄色红色的报错都有,没办法,一行一行看,果然我看到了要求安装visual studio和c++模块才能运行,vs的文件配置我的电脑一直就有问题,从微软官网上下载的exe文件不行,所幸HP自带了visual studio installer,等它自己安装完,再试试,还要安装dlib和一堆配置,才完成了FR库的安装。
又一个难点是cv2的图片获取和PIL的图片存储与读取,尤其是在存储上,因为废物是我,网上的都是大佬,他们只说精华和难点,所以再存储图片的路径上出了大问题,我一直以为image.save()里面填的的文件名,结果应该填写图片名称。裂开。
    def adding_face(self):

        """

        scan user's face

        store them

        match them

        """

        tk.messagebox.showinfo(title='Please Wait', message='Connecting Packages...\nWhen control the Face Capture,\n\

press p to capture a photo and q to quit\nYou can push your photo into file face_database instead')

        capture = cv2.VideoCapture(0, cv2.CAP_DSHOW)

        width = 1000

        height = 618

        w = 360

        capture.set(cv2.CAP_PROP_FRAME_WIDTH, width)

        capture.set(cv2.CAP_PROP_FRAME_HEIGHT, height)

        crop_w_start = (width - w) // 2

        crop_h_start = (height - w) // 2

        while True:

            ret, frame = capture.read()

            frame = frame[crop_h_start:crop_h_start + w,

                    crop_w_start:crop_w_start + w]

            frame = cv2.flip(frame, 1, dst=None)

            cv2.imshow("Face Capture", frame)

            det_bp = cv2.waitKey(1) & 0xFF

            if det_bp == ord('p'):

                way = os.getcwd()

                cv2.imwrite("fdb_face.jpg", cv2.resize(frame, (224, 224)))

                img = Image.open("fdb_face.jpg")

                img.save(way + r'\face_database\fdb_face.jpg')

                os.remove(way + r'\fdb_face.jpg')

                capture.release()

                cv2.destroyAllWindows()

                return False

            elif det_bp == ord('q'):

                capture.release()

                cv2.destroyAllWindows()

                return False
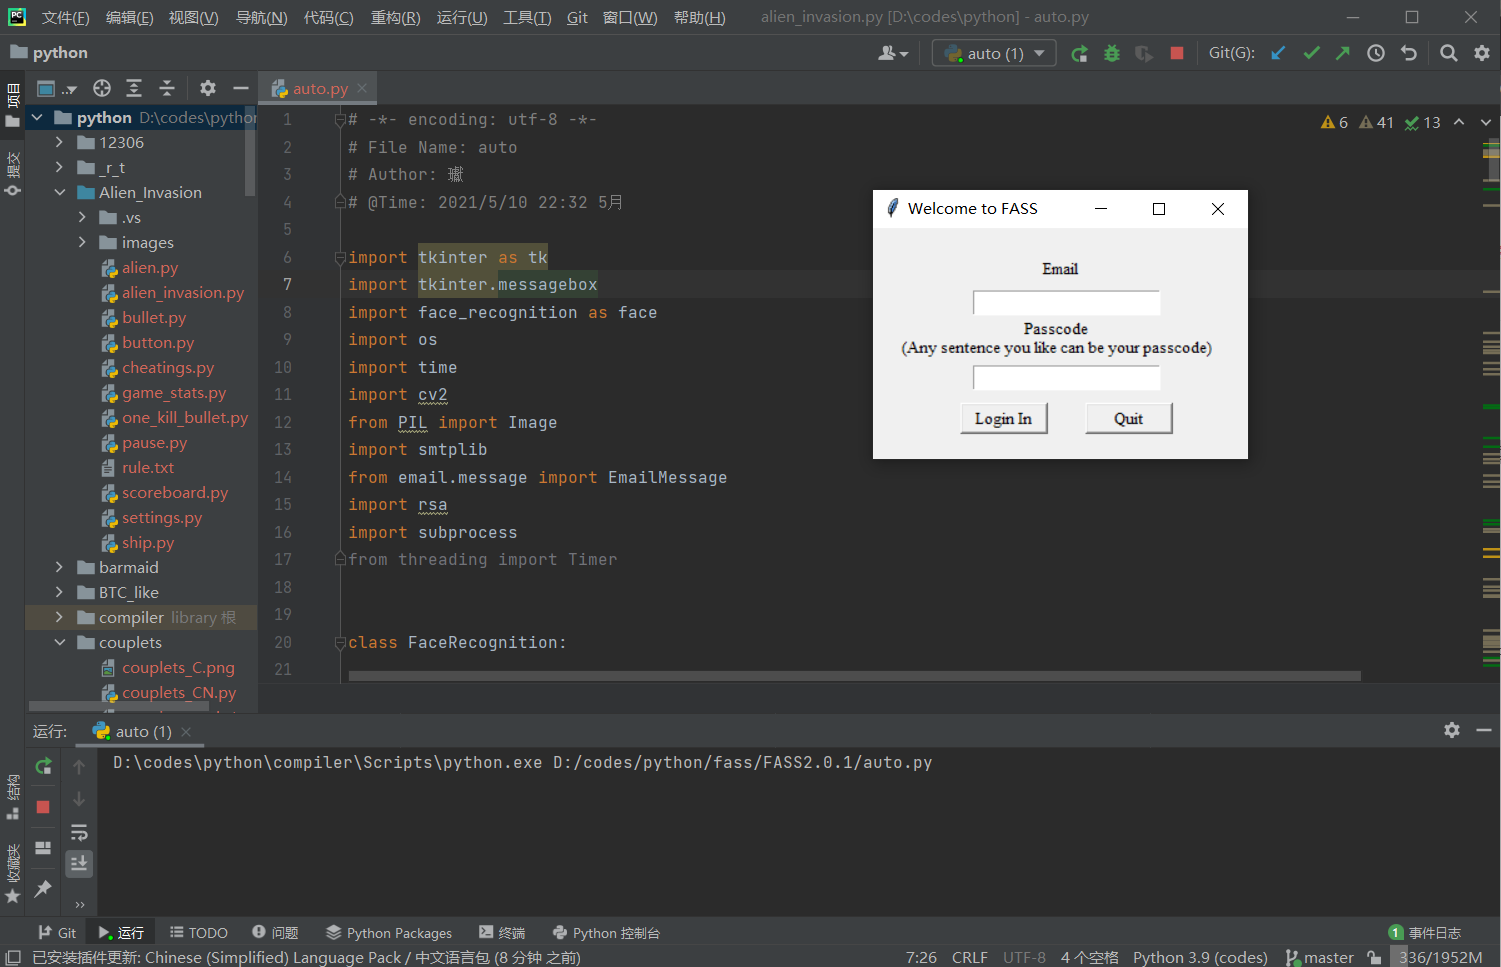
接着是创建GUI,虽然刘子谦学长给我推荐了一个qtdesigner的软件,界面是好设计,但是函数的添加并不熟悉,所以我还是选用了tkinter进行GUI的设计,通过stringvar实现了用户名和密码的输入,button实现了按钮,还有window实现了界面的转化。但是在这里在界面转化的时候发生了循环导致无法关闭的情况,csdn里的大神说,不应该使用window.mainloop,而是应该要定义root,使用root.mainloop实现界面的完全关闭。
    def login__init__(self):

        """

        create login in surface

        including email and passcode input

        passcode replaced with '*'

        and login in and quit choices

        """

        self.window = tk.Tk()

        self.window.title('Welcome to FASS')

        self.window.geometry('300x185')

        tk.Label(self.window, text='Email').place(x=135, y=20)

        tk.Label(self.window, text='Passcode\n(Any sentence you like can be your passcode)').place(x=20, y=70)

        self.var_email = tk.StringVar()

        enter_email = tk.Entry(self.window, textvariable=self.var_email)

        enter_email.place(x=80, y=50)

        self.var_passcode = tk.StringVar()

        enter_passcode = tk.Entry(self.window, textvariable=self.var_passcode, show='*')

        enter_passcode.place(x=80, y=110)

        self.bt_login = tk.Button(self.window, text='Login In', command=self.login)

        self.bt_login.place(x=40, y=140)

        self.bt_quit = tk.Button(self.window, text='Quit', command=self.quit)

        self.bt_quit.place(x=210, y=140)
关于邮件提醒,需要接口的支持,还好我关注了一个叫做“码农升级”的公众号,里面不定期更新一些关于python的文章和小程序。其中就有自动发送邮件的代码。(成也萧何,败也萧何,里面有一些整蛊人的小程序,我将这些代码生成exe文件后发给同学,结果现在请他们帮我测试程序都不帮我了,再也不喊狼来了)
    def email_send(self):

        """

        if verify fails

        send a email to

        owner

        """

        doc = open('email.txt', 'r')

        self.login.email = doc.read()

        email = EmailMessage()

        email['from'] = 'FASS Guard'

        email['to'] = f'{self.email}'

        email['subject'] = 'Warning'

        email.set_content("Your Fass verification failed, Please pay attention to your computer!")

        with smtplib.SMTP(host='smtp.gmail.com', port=587) as smtp:

            smtp.ehlo()

        smtp.starttls()

        smtp.login(f"{self.email}", f"{self.emailpasscode}")

        smtp.send_message(email)
完成了这些,FASS最基本的功能也就基本上完成了,然后进行优化,目前版本是FASS2.0.1,附上完整代码。
# -*- encoding: utf-8 -*-
# File Name: face_recognition_security
# Author: 瓛
# @Time: 2021/3/30 16:38 3月
"""
root.mainloop not set
more pleased UI surface
typing speed verify
settings
firewall
encrypt and decrypt
add face with current time
"""
import tkinter as tk
import tkinter.messagebox
import face_recognition as face
import os
import time
import cv2
from PIL import Image
import smtplib
from email.message import EmailMessage
import rsa
import subprocess
class FaceRecognition:
def __init__(self):
self.run_time = 1
self.add_loop = False
self.number = 0
self.login__init__()
def adding_face(self):
"""
scan user's face
store them
match them
"""
tk.messagebox.showinfo(title='Please Wait', message='Connecting Packages...\nWhen control the Face Capture,\n\
press p to capture a photo and q to quit\nYou can push your photo into file face_database instead')
capture = cv2.VideoCapture(0, cv2.CAP_DSHOW)
width = 1000
height = 618
w = 360
capture.set(cv2.CAP_PROP_FRAME_WIDTH, width)
capture.set(cv2.CAP_PROP_FRAME_HEIGHT, height)
crop_w_start = (width - w) // 2
crop_h_start = (height - w) // 2
while True:
ret, frame = capture.read()
frame = frame[crop_h_start:crop_h_start + w,
crop_w_start:crop_w_start + w]
frame = cv2.flip(frame, 1, dst=None)
cv2.imshow("Face Capture", frame)
det_bp = cv2.waitKey(1) & 0xFF
if det_bp == ord('p'):
way = os.getcwd()
cv2.imwrite("fdb_face.jpg", cv2.resize(frame, (224, 224)))
img = Image.open("fdb_face.jpg")
img.save(way + r'\face_database\fdb_face.jpg')
os.remove(way + r'\fdb_face.jpg')
capture.release()
cv2.destroyAllWindows()
return False
elif det_bp == ord('q'):
capture.release()
cv2.destroyAllWindows()
return False
def run(self):
"""
during the running time
scan faces at regular time
yes timer reset
no run verify
"""
"""capture a picture containing faces"""
capture = cv2.VideoCapture(0, cv2.CAP_DSHOW)
ret, frame = capture.read()
way = os.getcwd()
frame = cv2.flip(frame, 1)
cv2.imwrite("current_face.jpg", frame)
img = Image.open("current_face.jpg")
img.save(way + r"\record\current_face.jpg")
os.remove(way + r"\current_face.jpg")
capture.release()
"""match the current face with those in the database"""
images = os.listdir('face_database')
image_to_be_matched = face.load_image_file(way + r"\record\current_face.jpg")
try:
image_to_be_matched_encoded = face.face_encodings(image_to_be_matched)[0]
for image in images:
current_image = face.load_image_file(way + r"\face_database\\" + image)
current_image_encoded = face.face_encodings(current_image)[0]
result = face.compare_faces([image_to_be_matched_encoded], current_image_encoded)
if result[0]:
# print("MATCHED!")
self.time_reset()
self.run_time = 1
else:
# print("NOT MATCHED!")
self.verify__init__()
self.run_time = 1
continue
except:
if self.run_time <= 5:
# print("CAPTURE IMAGE AGAIN!")
self.run_time += 1
self.run()
else:
self.run_time = 1
self.time_reset()
subprocess.Popen("rundll32 powrprof.dll,SetSuspendState Hibernate")
def time_reset(self):
"""
timer counts down
when comes to zero
rerun
"""
regular_time = 5
count_down = regular_time
while count_down >= 0:
count_down -= 1
time.sleep(1)
if count_down < 0:
self.run()
self.time_reset()
def login__init__(self):
"""
create login in surface
including email and passcode input
passcode replaced with '*'
and login in and quit choices
"""
self.window = tk.Tk()
self.window.title('Welcome to FASS')
self.window.geometry('300x185')
tk.Label(self.window, text='Email').place(x=135, y=20)
tk.Label(self.window, text='Passcode\n(Any sentence you like can be your passcode)').place(x=20, y=70)
self.var_email = tk.StringVar()
enter_email = tk.Entry(self.window, textvariable=self.var_email)
enter_email.place(x=80, y=50)
self.var_passcode = tk.StringVar()
enter_passcode = tk.Entry(self.window, textvariable=self.var_passcode, show='*')
enter_passcode.place(x=80, y=110)
self.bt_login = tk.Button(self.window, text='Login In', command=self.login)
self.bt_login.place(x=40, y=140)
self.bt_quit = tk.Button(self.window, text='Quit', command=self.quit)
self.bt_quit.place(x=210, y=140)
self.loop = True
self.window_loop = True
while self.window_loop:
self.window.mainloop()
def rsaEncrypt(self, str):
"""
encrypt with rsa
not available now
"""
(pubkey, self.privkey) = rsa.newkeys(512)
content = str.encode("utf-8")
crypto = rsa.encrypt(content, pubkey)
return crypto, self.privkey
def rsaDecrypt(self, str, pk):
"""
decrypt with rsa
not available now
"""
content = rsa.decrypt(str, pk)
con = content.decode('utf-8')
return con
def login(self):
"""
let user to login in
when for the first
what user input will be remembered
and when login again
what input will be matched with the first time one
it show welcome and error as well
avoid user input null sentence
"""
email_loop = False
passcode_loop = False
email_exist = True
passcode_exist = True
getemail = self.var_email.get()
getpasscode = self.var_passcode.get()
if self.loop:
if getemail == '':
tk.messagebox.showerror(message='Email can not be empty!')
if getpasscode == '':
tk.messagebox.showerror(message='Passcode can not be empty!')
try:
with open('email.txt', 'r') as email:
user_email = email.read()
if getemail == user_email:
email_loop = True
except FileNotFoundError:
with open('email.txt', 'w') as email:
email.write(getemail)
email_exist = False
try:
with open('passcode.txt', 'r') as passcode:
user_passcode = passcode.read()
if getpasscode == user_passcode:
passcode_loop = True
except FileNotFoundError:
with open('passcode.txt', 'w') as passcode:
passcode.write(getpasscode)
passcode_exist = False
if email_exist and passcode_exist:
if email_loop and passcode_loop:
tk.messagebox.showinfo(title='Welcome', message='Success!')
self.add_loop = True
self.quit()
self.main_choices()
self.time_reset()
else:
tk.messagebox.showerror(title='ERROR', message='Email or passcode is wrong!')
def verify__init__(self):
"""
create verify surface
including enter passcode and enter and quit
"""
self.window = tk.Tk()
self.window.title('Verify')
self.window.geometry('300x185')
tk.Label(self.window, text='Enter your passcode to verify').place(x=50, y=40)
self.vf_passcode = tk.StringVar()
enter_passcode = tk.Entry(self.window, textvariable=self.vf_passcode, show='*')
enter_passcode.place(x=80, y=70)
self.vff_passcode = self.vf_passcode.get()
self.bt_login = tk.Button(self.window, text='Enter', command=self.verify)
self.bt_login.place(x=40, y=100)
self.bt_quit = tk.Button(self.window, text='Quit', command=self.quit)
self.bt_quit.place(x=200, y=100)
self.loop = True
self.window.mainloop()
def verify(self):
"""
when scaning a face FASS does not know
it will let user to verify his identity
for now including passcode-verify
typing-speed will come
"""
while self.number < 2:
doc = open('passcode.txt', 'r')
if self.vff_passcode == doc.read():
self.time_reset()
self.window.destroy()
break
else:
self.number += 1
tk.messagebox.showerror(title='ERROR', message='You can try another ' + str(3 - self.number) + '!')
self.window.destroy()
self.verify__init__()
tk.messagebox.showerror(title='ERROR', message='VERIFY FAILS!')
self.email_send()
subprocess.Popen("rundll32 powrprof.dll,SetSuspendState Hibernate")
def email_send(self):
"""
if verify fails
send a email to
owner
"""
doc = open('email.txt', 'r')
self.login.email = doc.read()
email = EmailMessage()
email['from'] = 'FASS Guard'
email['to'] = f'{self.email}'
email['subject'] = 'Warning'
email.set_content("Your Fass verification failed, Please pay attention to your computer!")
with smtplib.SMTP(host='smtp.gmail.com', port=587) as smtp:
smtp.ehlo()
smtp.starttls()
smtp.login(f"{self.email}", f"{self.emailpasscode}")
smtp.send_message(email)
def quit(self):
"""
close current surfaces
"""
self.window.destroy()
self.window.quit()
def email__init__(self):
"""
create the email login UI surface
with Email and Email passcode
for user to input
which will be used to send email
"""
self.window = tk.Tk()
self.window.title('Email Account')
self.window.geometry('300x185')
tk.Label(self.window, text='Email:').place(x=20, y=40)
tk.Label(self.window, text='Email Passcode:').place(x=20, y=70)
self.email = tk.StringVar()
enter_email = tk.Entry(self.window, textvariable=self.email)
enter_email.place(x=120, y=40)
self.emailpasscode = tk.StringVar()
enter_email = tk.Entry(self.window, textvariable=self.emailpasscode, show='*')
enter_email.place(x=120, y=70)
self.bt_enter = tk.Button(self.window, text='Enter', command=self.enter)
self.bt_enter.place(x=40, y=100)
self.bt_quit = tk.Button(self.window, text='Quit', command=self.quit)
self.bt_quit.place(x=200, y=100)
self.window.mainloop()
def enter(self):
"""
close the current surface
and then run the program
"""
self.window.destroy()
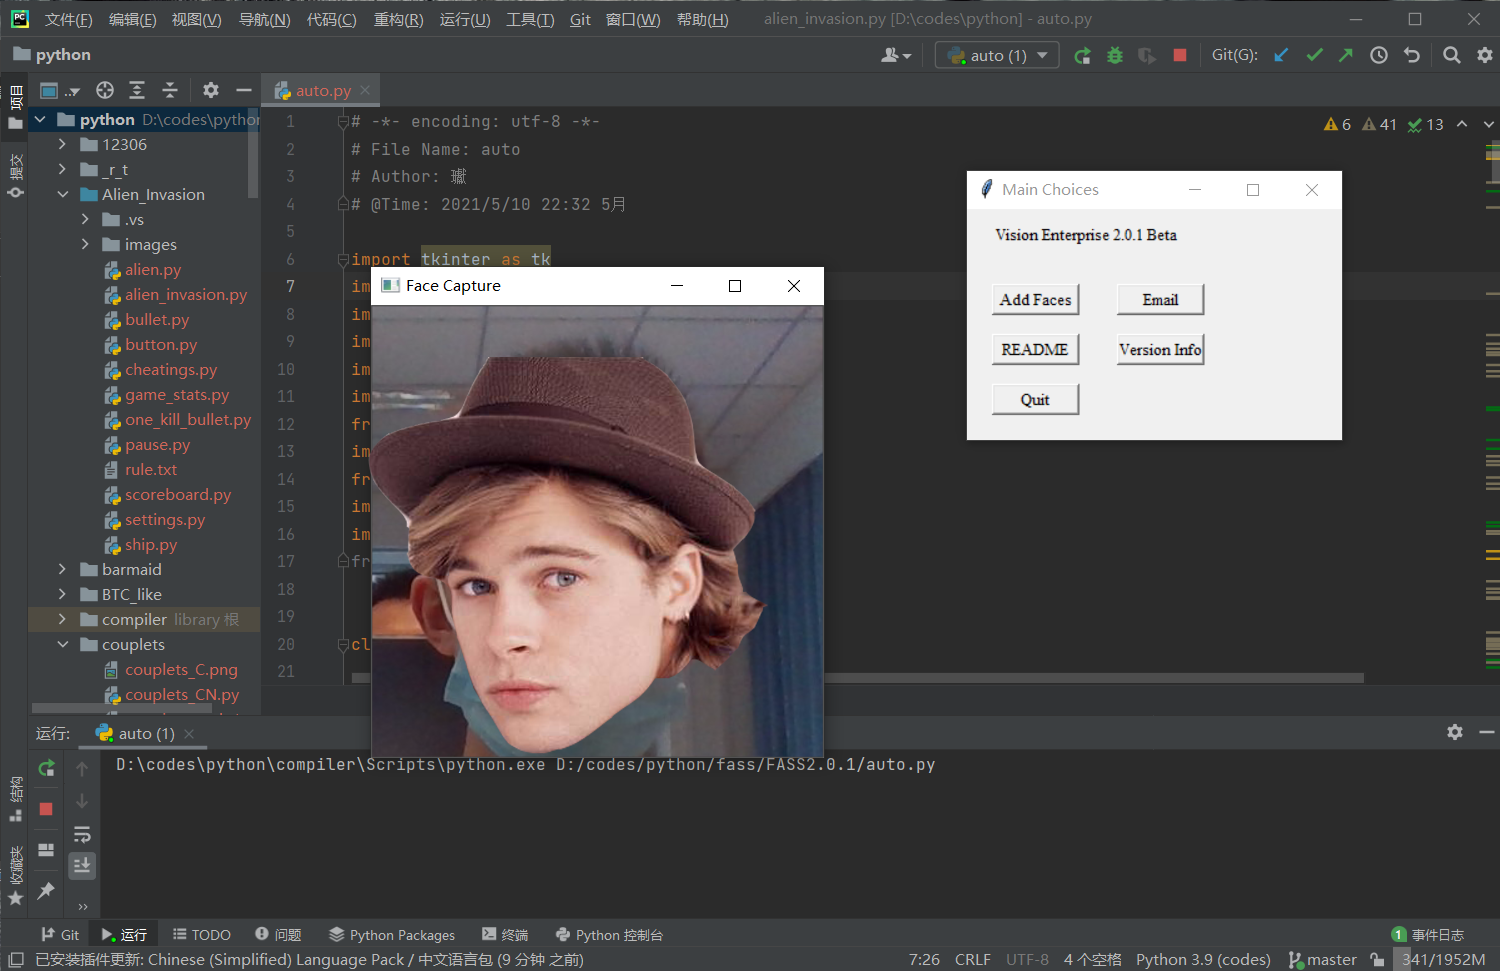
def main_choices(self):
"""
show the main choices UI surface
for now including
add face
quit
readme
"""
self.window = tk.Tk()
self.window.title('Main Choices')
self.window.geometry('300x185')
tk.Label(self.window, text='Vision 1.0.5 More functions are on their ways!').place(x=20, y=10)
self.bt_add_face = tk.Button(self.window, text='Add Faces', command=self.adding_face)
self.bt_add_face.place(x=110, y=60)
self.bt_quit = tk.Button(self.window, text='Quit', command=self.quit)
self.bt_quit.place(x=125, y=140)
self.bt_readme = tk.Button(self.window, text='README', command=self.readme)
self.bt_readme.place(x=115, y=100)
self.bt_email = tk.Button(self.window, text='Email', command=self.email__init__)
self.bt_email.place(x=200, y=100)
self.window.mainloop()
def readme(self):
"""
show README text
"""
doc = open('README.txt', 'r', encoding='utf-8')
tk.messagebox.showinfo(title='README', message=doc.read())
if __name__ == '__main__':
"""
run the program
"""
FR = FaceRecognition()
FR.__init__()
3.结果
附几张图就行,找了一个跟我长得差不多的人的头像遮住我的脸。这只是FASS2.0.1的版本,其中必然还有很多用着不舒服的地方和bug,等我接下来更新出Beta版本并找其他同学进行测试后,我会把exe文件放在网上,虽然学习是前提,源码可以开源,不过其中的法律规定还是要遵守。
附上Gitee地址
FASS 2.0.1
3.实验中遇到的问题和解决过程
Q1:无法安装FR库。
A1:安装visual stdio,并且安装c++模块,所以我怀疑FR库的编写就是使用c++并在visual stdio上使用的,当时确实挺崩溃的。
Q2:拍摄图片无法与素材库进行比对
A2:这个还是对PIL库不熟悉所导致的,在查找相关资料后,还是碰巧发现image.save的用法。并且使用os.listdir()获取当前路径。
Q3:使用window.mainloop时并不能把全部窗口都关闭,导致有些时候需要关好几次才行,简直无法用语言形容测试时的烦躁。
A3:csdn还是好东西,经过大佬的指导,原来是需要root.mainloop()才可以。学到了学到了。
Q4:人脸识别错误。
A4:竟然能把我的脸比对成另一个同学的,甚至还有一个女同学的。还好,在更改了容忍度之后,识别成功了。FR默认的容忍度是0.6,而我把它改成了0.01。然后就成功了。
4.其他
首先还是要感谢王志强老师的授课,在课上也是学到了许多东西和一些平时不会注意的小细节。同时也给我一个理由写下这样一个我一直想写的程序,今后我还会对FASS继续进行升级,增加它的功能,包括更加美观的GUI,基于键入速度的认证识别认证(一个人的打字的速度,在一定程度上是不会改变太多的,所以应该可以理解为一个生物认证),和写入防火墙的设置,实现开机自启动,退出程序需要进行身份认证。
对于课程的建议的话,就是希望能够提供给同学们一个交流的机会,就我个人而言,平时与同学们交流python的机会并不多,而且几乎都是在课堂上。
5.参考资料
基于Face-Recognition的计算机人脸识别安全认证程序的更多相关文章
- Cell期刊论文:为什么计算机人脸识别注定超越人类?(祖母论与还原论之争)
终于找到ML日报的微信链接,抄之...................................... 请拜访原文链接:[祖母论与还原论之争]为什么计算机人脸识别注定超越人类?评价: ...
- 转:基于开源项目OpenCV的人脸识别Demo版整理(不仅可以识别人脸,还可以识别眼睛鼻子嘴等)【模式识别中的翘楚】
文章来自于:http://blog.renren.com/share/246648717/8171467499 基于开源项目OpenCV的人脸识别Demo版整理(不仅可以识别人脸,还可以识别眼睛鼻子嘴 ...
- 关于运行“基于极限学习机ELM的人脸识别程序”代码犯下的一些错误
代码来源 基于极限学习机ELM的人脸识别程序 感谢文章主的分享 我的环境是 win10 anaconda Command line client (version 1.6.5)(conda 4.3.3 ...
- opencv基于PCA降维算法的人脸识别
opencv基于PCA降维算法的人脸识别(att_faces) 一.数据提取与处理 # 导入所需模块 import matplotlib.pyplot as plt import numpy as n ...
- face recognition[翻译][深度人脸识别:综述]
这里翻译下<Deep face recognition: a survey v4>. 1 引言 由于它的非侵入性和自然特征,人脸识别已经成为身份识别中重要的生物认证技术,也已经应用到许多领 ...
- 基于Python与命令行人脸识别项目(系列一)
Face Recognition 人脸识别 摘要:本项目face_recognition是一个强大.简单.易上手的人脸识别开源项目,并且配备了完整的开发文档和应用案例,方便大家使用.对于本项目可以使用 ...
- C#实现基于ffmepg加虹软的人脸识别
关于人脸识别 目前的人脸识别已经相对成熟,有各种收费免费的商业方案和开源方案,其中OpenCV很早就支持了人脸识别,在我选择人脸识别开发库时,也横向对比了三种库,包括在线识别的百度.开源的OpenCV ...
- C#实现基于ffmpeg加虹软的人脸识别demo及开发分享
对开发库的C#封装,屏蔽使用细节,可以快速安全的调用人脸识别相关API.具体见github地址.新增对.NET Core的支持,在Linux(Ubuntu下)测试通过.具体的使用例子和Demo详解,参 ...
- C#实现基于ffmpeg加虹软的人脸识别
关于人脸识别 目前的人脸识别已经相对成熟,有各种收费免费的商业方案和开源方案,其中OpenCV很早就支持了人脸识别,在我选择人脸 识别开发库时,也横向对比了三种库,包括在线识别的百度.开源的OpenC ...
- 基于Dlib、OpenCV开发人脸识别程序的开发建议
前言 在去年十月的时候参加了一个小比赛,做了一个人脸识别程序并很意外地获得省里面的一等奖,视频演示链接在这里,有同学想要做这方面的毕业设计or课程设计,发一篇博客来分享一下当时的开发过程. 视频演示链 ...
随机推荐
- WebSocket 基本使用
1. 引入 WebSocket 包 2. 2.最后测试 WebSocket 谷歌浏览器 F12 ,在 Console 控制台 输入以下测试链接,然后回车测试. ws = new WebSocket() ...
- 使用vue渲染大量数据时应该怎么优化?
Object.freeze 适合一些 big data的业务场景.尤其是做管理后台的时候,经常会有一些超大数据量的 table,或者一个含有 n 多数据的图表,这种数据量很大的东西使用起来最明显的感受 ...
- JAVA集合框架特征介绍
数据结构是以某种形式将数据组织在一起的集合,它不仅存储数据,还支持访问和处理数据的操作.Java提供了几个能有效地组织和操作数据的数据结构,这些数据结构通常称为Java集合框架.在平常的学习开发中,灵 ...
- springboot启动报错 Failed to scan *****/derbyLocale_ja_JP.jar from classloader hierarchy
springboot启动报错 Failed to scan *****/derbyLocale_ja_JP.jar from classloader hierarchy 这两天自己在玩虚拟机,想把 ...
- 【Java学习Day02】基本的Dos命令
基本的Dos命令学习 打开CMD的方式 Windows+S,输入cmd打开命令控制台 鼠标右键单击windows图标,再单击windows终端(管理员)即可以管理员的身份打开PowerShell/CM ...
- 2023 01 19 HW
2023 01 19 HW Okay, then let's start. Okay. Maybe Karina, we start with the C2 design freeze. Yeah, ...
- oracle ebs 加锁
DECLARE -- lock l_lockname VARCHAR2(100); l_lockhandle VARCHAR2(200); l_lock_output NUMBER; l_locked ...
- 实验1task2
<实验结论> #include <stdio.h> #include <stdlib.h> int main() { int n,sum; scanf(" ...
- Python语言基础学习报告
这个学期我们开设了一门新课程---Python,早在很久之前,我就经常在各种有关职场的帖子下面看到这个词,且多为夸赞,因此,尽管大一深受C语言和数据结构两门课的折磨,我还是怀着十分的认真和敬意开始了这 ...
- centons7.2 双网口聚合功能配置和验证
1.启动网络管理器运行systemctl restart NetworkManager2.创建主备绑定连接 nmcli connection add con-name bond0 type bond ...