.net Core5.0使用IdentityServer4 进行权限控制
.net Core5.0使用IdentityServer4 进行权限控制
IdentityServer4 ASP.NET Core的一个包含OpenID Connect和OAuth 2.0协议的框架,提供了单点登录,集中控制,API访问控制等功能。
OpenID 和 OAuth 的区别
OpenID :Authentication,即认证,用户是谁?
OAuth :Authorization,即授权,用户能做哪些操作?
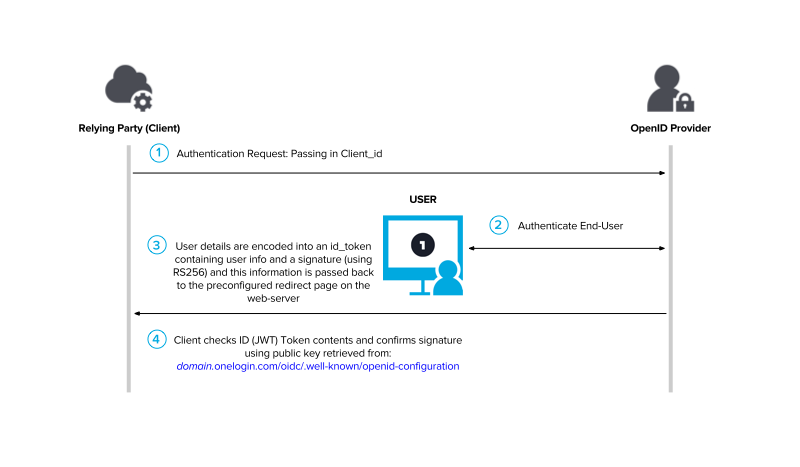
OpenID Connect(OIDC):基于OAuth协议,是“认证”和“授权”的结合。
OAuth2提供了Access Token来解决授权第三方客户端访问受保护资源的问题。 OIDC在这个基础上提供了ID Token来解决第三方客户端标识用户身份认证的问题。
授权模式应用场景(IdentityServer4,NET Core下的安全框架)
客户端模式:适用于和用户无关,机器与机器之间直接交互访问资源的场景。
POST https://api.oauth2server.com/token
grant_type = client_credentials&
client_id = CLIENT_ID&
client_secret = CLIENT_SECRET
密码模式:适用于当前的APP是专门为服务端设计的情况。
POST https://api.oauth2server.com/token
grant_type=password&
username=USERNAME&
password=PASSWORD&
client_id=CLIENT_ID
简化模式:适用于浏览器WEB应用,支持
- 用户认证(JavaScript 应用或传统服务端渲染的Web应用)
- 用户认证+授权(JavaScript应用)
简化模式下ID Token和Access Token都是通过浏览器的前端通道传递的。
所以如果是传统服务端Web应用并且仅是在服务端使用Access Token的话,推荐使用Hybrid Flow。
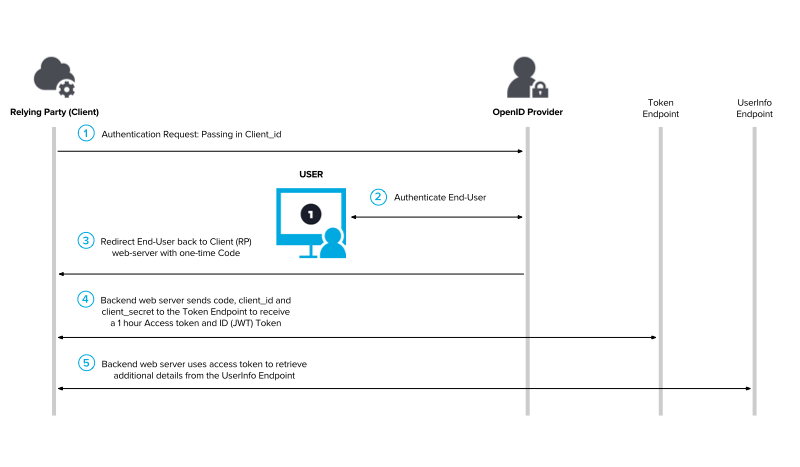
授权码模式:授权码模式通过后台传输Tokens,相对于简化模式会更安全一点。
但每当考虑使用授权码模式的时候,请使用混合模式。混合模式会首先返回一个可验证的ID Token并且有更多其他特性。
混合模式:适用于服务器端 Web 应用程序和原生桌面/移动应用程序。
混合模式是简化模式和授权码模式的组合。混合模式下ID Token通过浏览器的前端通道传递,而Access Token和Refresh Token通过后端通道取得。
下面直接上代码
发布令牌服务 和 验证令牌服务 分成两个服务单独部署同时发布
引用的包 <PackageReference Include="IdentityServer4" Version="3.1.3" />
方式一:
例子一的发布服务
    /// <summary>

    /// 客户端模式

    /// </summary>

    public class ClientInitConfig

    {

        /// <summary>

        /// 定义ApiResource

        /// 这里的资源(Resources)指的就是管理的API

        /// </summary>

        /// <returns>多个ApiResource</returns>

        public static IEnumerable<ApiResource> GetApiResources()

        {

            return new[]

            {

                new ApiResource("UserApi", "用户获取API")

            };

        }

        /// <summary>

        /// 定义验证条件的Client

        /// </summary>

        /// <returns></returns>

        public static IEnumerable<Client> GetClients()

        {

           return new[]

           {

            new Client

            {

                ClientId = "MengLin.Shopping.Web",//客户端惟一标识

                ClientSecrets = new [] { new Secret("MengLin123456".Sha256()) },//客户端密码,进行了加密

                AllowedGrantTypes = GrantTypes.ClientCredentials,//Grant类型

                AllowedScopes = new [] { "UserApi" },//允许访问的资源

                Claims= new List<Claim>()

                {

                    new Claim(IdentityModel.JwtClaimTypes.Role,"Admin"),

                    new Claim(IdentityModel.JwtClaimTypes.NickName,"豆豆爸爸"),

                    new Claim("EMail","menglin2010@126.com")

                }

            }

          };

        }

    }
   public class Startup

    {

        public Startup(IConfiguration configuration)

        {

            Configuration = configuration;

        }

        public IConfiguration Configuration { get; }

        // This method gets called by the runtime. Use this method to add services to the container.

        public void ConfigureServices(IServiceCollection services)

        {

            services.AddIdentityServer()//怎么处理

                .AddDeveloperSigningCredential()

                .AddInMemoryClients(ClientInitConfig.GetClients())//InMemory 内存模式

                .AddInMemoryApiResources(ClientInitConfig.GetApiResources());//能访问啥资源

            services.AddControllers();

        }

        // This method gets called by the runtime. Use this method to configure the HTTP request pipeline.

        public void Configure(IApplicationBuilder app, IWebHostEnvironment env)

        {

            if (env.IsDevelopment())

            {

                app.UseDeveloperExceptionPage();

            }

            //app.UseRouting();

            app.UseIdentityServer();

            app.UseAuthorization();

            //app.UseEndpoints(endpoints =>

            //{

            //    endpoints.MapControllers();

            //});

        }

    }
例子一的验证服务:
   public class Startup

    {

        public Startup(IConfiguration configuration)

        {

            Configuration = configuration;

        }

        public IConfiguration Configuration { get; }

        // This method gets called by the runtime. Use this method to add services to the container.

        public void ConfigureServices(IServiceCollection services)

        {

            //鉴权

            services.AddAuthentication("Bearer")

                .AddJwtBearer("Bearer", options =>

                     {

                         //ids4的地址,目的: 获取公钥,因为获取获取了公钥才能解密

                         options.Authority = "http://localhost:5000";//ids4的地址 不是本地启动的地址

                         options.Audience = "UserApi";

                         options.RequireHttpsMetadata = false;

                         options.TokenValidationParameters = new TokenValidationParameters

                         {

                             ValidateAudience = false

                             //ValidAudiences = new List<string>() { "api1", "api2", "api3" }

                         };

                         IdentityModelEventSource.ShowPII = true;

                     });

            //自定义授权--必须包含Claim client_role & 必须是Admin

            services.AddAuthorization(options =>

            {

                options.AddPolicy("AdminPolicy", policyBuilder => policyBuilder

                     .RequireAssertion(context =>

                     context.User.HasClaim(c => c.Type == "client_role") && context.User.Claims.First(c => c.Type.Equals("client_role")).Value.Equals("Admin")));

            });

            //自定义授权--必须包含Claim client_EMail & 必须qq结尾

            services.AddAuthorization(options =>

            {

                options.AddPolicy("EMailPolicy", policyBuilder => policyBuilder

                     .RequireAssertion(context =>

                     context.User.HasClaim(c => c.Type == "client_EMail") && context.User.Claims.First(c => c.Type.Equals("client_EMail")).Value.EndsWith("@qq.com")));

            });

            services.AddControllers();

        }

        // This method gets called by the runtime. Use this method to configure the HTTP request pipeline.

        public void Configure(IApplicationBuilder app, IWebHostEnvironment env)

        {

            if (env.IsDevelopment())

            {

                app.UseDeveloperExceptionPage();

            }

            app.UseRouting();

            app.UseAuthentication();

            app.UseAuthorization();

            app.UseEndpoints(endpoints =>

            {

                endpoints.MapControllers();

            });

        }

    }
namespace IdentityServer4_02.Controllers

{

    [Route("api/[controller]/[action]")]

    [ApiController]

    public class HomeController : ControllerBase

    {

        [HttpGet]

        [Authorize(Policy = "AdminPolicy")]

        public IActionResult Get()

        {

            return Ok("Get");

        }

        [HttpGet]

        [AllowAnonymous]

        public IActionResult Index()

        {

            return Ok("Index");

        }

        [HttpGet]

        [Authorize(Policy = "EMailPolicy")]

        public IActionResult Set()

        {

            return Ok("Set");

        }

    }

}
方式二:
例子二的发布服务
   public class Startup

    {

        public Startup(IConfiguration configuration)

        {

            Configuration = configuration;

        }

        public IConfiguration Configuration { get; }

        // This method gets called by the runtime. Use this method to add services to the container.

        public void ConfigureServices(IServiceCollection services)

        {

            // configure identity server with in-memory stores, keys, clients and scopes

            services.AddIdentityServer()

                .AddDeveloperSigningCredential()

                .AddInMemoryIdentityResources(Config.GetIdentityResourceResources())

                .AddInMemoryApiResources(Config.GetApiResources())

                .AddInMemoryClients(Config.GetClients())

                .AddTestUsers(Config.GetUsers())

                .AddProfileService<CustomProfileService>()

                .AddResourceOwnerValidator<CustomResourceOwnerPasswordValidator>();

            services.AddControllers();

        }

        // This method gets called by the runtime. Use this method to configure the HTTP request pipeline.

        public void Configure(IApplicationBuilder app, IWebHostEnvironment env)

        {

            if (env.IsDevelopment())

            {

                app.UseDeveloperExceptionPage();

            }

            app.UseIdentityServer();

        }

    }
  public class Config

    {

        public static IEnumerable<IdentityResource> GetIdentityResourceResources()

        {

            var customProfile = new IdentityResource(

                name: "custom.profile",

                displayName: "Custom profile",

                claimTypes: new[] { "role" }

                );

            return new List<IdentityResource>

            {

                new IdentityResources.OpenId(),

                new IdentityResources.Profile(),

                customProfile

            };

            #region 方式二

            //return new[]

            //{

            //    new IdentityResources.OpenId(),

            //    new IdentityResources.Profile(),

            //    new IdentityResources.Email(),

            //    new IdentityResource

            //    {

            //         Name = "role",

            //         UserClaims = new List<string>{"role"}

            //    }

            //};

            #endregion

        }

        // scopes define the API resources in your system

        public static IEnumerable<ApiResource> GetApiResources()

        {

            return new List<ApiResource>

            {

                //new ApiResource("api1", "My API")

                new ApiResource("api1", "My API",new List<string>(){JwtClaimTypes.Role})

            };

        }

        // clients want to access resources (aka scopes)

        public static IEnumerable<Client> GetClients()

        {

            // client credentials client

            return new List<Client>

            {

                new Client

                {

                    ClientId = "client",

                    AllowedGrantTypes = GrantTypes.ClientCredentials,

                    ClientSecrets =

                    {

                        new Secret("secret".Sha256())

                    },

                    AllowedScopes =

                    {

                        "api1" ,

                        IdentityServerConstants.StandardScopes.OpenId,

                        IdentityServerConstants.StandardScopes.Profile

                    }

                },

                // resource owner password grant client

                new Client

                {

                    ClientId = "ro.client",

                    AllowedGrantTypes = GrantTypes.ResourceOwnerPassword,

                    ClientSecrets =

                    {

                        new Secret("secret".Sha256())

                    },

                    AllowedScopes = {

                        "api1" ,

                        IdentityServerConstants.StandardScopes.OpenId,

                        IdentityServerConstants.StandardScopes.Profile,

                        "custom.profile"

                    }

                }

            };

        }

        public static List<TestUser> GetUsers()

        {

            return new List<TestUser>

            {

                new TestUser

                {

                    SubjectId = "1",

                    Username = "alice",

                    Password = "password",

                    Claims = new List<Claim>(){

                        new Claim(JwtClaimTypes.Role,"superadmin")

                    }

                },

                new TestUser

                {

                    SubjectId = "2",

                    Username = "bob",

                    Password = "password",

                    Claims = new List<Claim>(){

                        new Claim(JwtClaimTypes.Role,"admin")

                    },

                }

            };

        }

    }
   public class CustomProfileService : IProfileService

    {

        /// <summary>

        /// The logger

        /// </summary>

        protected readonly ILogger Logger;

        /// <summary>

        /// The users

        /// </summary>

        protected readonly TestUserStore Users;

        /// <summary>

        /// Initializes a new instance of the <see cref="TestUserProfileService"/> class.

        /// </summary>

        /// <param name="users">The users.</param>

        /// <param name="logger">The logger.</param>

        public CustomProfileService(TestUserStore users, ILogger<TestUserProfileService> logger)

        {

            Users = users;

            Logger = logger;

        }

        /// <summary>

        /// 只要有关用户的身份信息单元被请求(例如在令牌创建期间或通过用户信息终点),就会调用此方法

        /// </summary>

        /// <param name="context">The context.</param>

        /// <returns></returns>

        public virtual Task GetProfileDataAsync(ProfileDataRequestContext context)

        {

            context.LogProfileRequest(Logger);

            //判断是否有请求Claim信息

            if (context.RequestedClaimTypes.Any())

            {

                //根据用户唯一标识查找用户信息

                var user = Users.FindBySubjectId(context.Subject.GetSubjectId());

                if (user != null)

                {

                    //调用此方法以后内部会进行过滤,只将用户请求的Claim加入到 context.IssuedClaims 集合中 这样我们的请求方便能正常获取到所需Claim

                    context.AddRequestedClaims(user.Claims);

                }

            }

            context.LogIssuedClaims(Logger);

            return Task.CompletedTask;

        }

        /// <summary>

        /// 验证用户是否有效 例如:token创建或者验证

        /// </summary>

        /// <param name="context">The context.</param>

        /// <returns></returns>

        public virtual Task IsActiveAsync(IsActiveContext context)

        {

            Logger.LogDebug("IsActive called from: {caller}", context.Caller);

            var user = Users.FindBySubjectId(context.Subject.GetSubjectId());

            context.IsActive = user?.IsActive == true;

            return Task.CompletedTask;

        }

    }
   public class CustomResourceOwnerPasswordValidator : IResourceOwnerPasswordValidator

    {

        /// <summary>

        /// 这里为了演示我们还是使用TestUser作为数据源,

        /// 正常使用此处应当传入一个 用户仓储 等可以从

        /// 数据库或其他介质获取我们用户数据的对象

        /// </summary>

        private readonly TestUserStore _users;

        private readonly ISystemClock _clock;

        public CustomResourceOwnerPasswordValidator(TestUserStore users, ISystemClock clock)

        {

            _users = users;

            _clock = clock;

        }

        /// <summary>

        /// 验证

        /// </summary>

        /// <param name="context"></param>

        /// <returns></returns>

        public Task ValidateAsync(ResourceOwnerPasswordValidationContext context)

        {

            //此处使用context.UserName, context.Password 用户名和密码来与数据库的数据做校验

            if (_users.ValidateCredentials(context.UserName, context.Password))

            {

                var user = _users.FindByUsername(context.UserName);

                //验证通过返回结果

                //subjectId 为用户唯一标识 一般为用户id

                //authenticationMethod 描述自定义授权类型的认证方法

                //authTime 授权时间

                //claims 需要返回的用户身份信息单元 此处应该根据我们从数据库读取到的用户信息 添加Claims 如果是从数据库中读取角色信息,那么我们应该在此处添加

                context.Result = new GrantValidationResult(

                    user.SubjectId ?? throw new ArgumentException("Subject ID not set", nameof(user.SubjectId)),

                    OidcConstants.AuthenticationMethods.Password, _clock.UtcNow.UtcDateTime,

                    user.Claims);

            }

            else

            {

                //验证失败

                context.Result = new GrantValidationResult(TokenRequestErrors.InvalidGrant, "invalid custom credential");

            }

            return Task.CompletedTask;

        }

    }
例子二的验证服务
   public class Startup

    {

        public Startup(IConfiguration configuration)

        {

            Configuration = configuration;

        }

        public IConfiguration Configuration { get; }

        // This method gets called by the runtime. Use this method to add services to the container.

        public void ConfigureServices(IServiceCollection services)

        {

            services.AddControllers();

            services.AddAuthentication("Bearer")

                .AddJwtBearer("Bearer", options =>

                {

                    options.Audience = "api1";

                    options.Authority = "http://localhost:5000";

                    options.RequireHttpsMetadata = false;//如果不使用Https,则需要配置这个

                    //options.TokenValidationParameters = new TokenValidationParameters()

                    //{

                    //    ValidAudiences = new List<string>() { "api1", "api2", "api3" }

                    //    ValidateAudience = false

                    //};

                    options.TokenValidationParameters = new TokenValidationParameters

                    {

                        ValidateAudience = false

                    };

                    IdentityModelEventSource.ShowPII = true;

                });

            //services.AddAuthentication("Bearer")

            //    .AddJwtBearer("Bearer", options =>

            //    {

            //        //ids4的地址,目的: 获取公钥,因为获取获取了公钥才能解密

            //        options.Authority = "http://localhost:5001";

            //        options.Audience = "UserApi";

            //        options.RequireHttpsMetadata = false;

            //        //options.TokenValidationParameters = new TokenValidationParameters()

            //        //{

            //        //    ValidAudiences = new List<string>() { "api1", "api2", "api3" }

            //        //};

            //    });

        }

        // This method gets called by the runtime. Use this method to configure the HTTP request pipeline.

        public void Configure(IApplicationBuilder app, IWebHostEnvironment env)

        {

            if (env.IsDevelopment())

            {

                app.UseDeveloperExceptionPage();

            }

            app.UseRouting();

            //app.UseCors("default");

            app.UseAuthentication();

            app.UseAuthorization();

            app.UseEndpoints(endpoints =>

            {

                endpoints.MapControllers();

            });

        }

    }
namespace IdentityServer4_04.Controllers

{

    [Route("api/[controller]/[action]")]

    [ApiController]

    public class HomeController : ControllerBase

    {

        [HttpPost]

        [Authorize]

        public IActionResult Get()

        {

            return Ok("Get");

        }

        [HttpGet]

        [Authorize(Policy = "AdminPolicy")]

        public IActionResult Gets()

        {

            return Ok("Gets");

        }

        [HttpGet]

        [AllowAnonymous]

        public IActionResult Index()

        {

            return Ok("Index");

        }

        [HttpGet]

        [Authorize(Policy = "EMailPolicy")]

        public IActionResult Set()

        {

            return Ok("Set");

        }

    }

}
.net Core5.0使用IdentityServer4 进行权限控制的更多相关文章
- IdentityServer4实现Token认证登录以及权限控制
相关知识点 不再对IdentityServer4做相关介绍,博客园上已经有人出了相关的系列文章,不了解的可以看一下: 蟋蟀大神的:小菜学习编程-IdentityServer4 晓晨Master:Ide ...
- OAuth2.0 原理流程及其单点登录和权限控制
2018年07月26日 07:21:58 kefeng-wang 阅读数:5468更多 所属专栏: Java微服务构架 版权声明:[自由转载-非商用-非衍生-保持署名]-转载请标明作者和出处. h ...
- android:Android 6.0权限控制代码封装
新建的Activity类可以继承这个Activity,这个类封装了关于新版的权限处理相关的代码 使用方法: package com.glsite.phone; import android.conte ...
- yii2.0 引入权限控制插件
权限控制:"mdmsoft/yii2-admin": "~2.0" 教程:http://www.cnblogs.com/zyf-zhaoyafei/p/5825 ...
- Atlas 2.1.0 实践(4)—— 权限控制
Atlas的权限控制非常的丰富,本文将进行其支持的各种权限控制的介绍. 在atlas-application.properties配置文件中,可以设置不同权限的开关. atlas.authentica ...
- AgileConfig轻量级配置中心1.3.0发布,支持多用户权限控制
AgileConfig 当初是设计给我自己用的一个工具,所以只设置了一道管理员密码,没有用户的概念.但是很多同学在使用过后都提出了需要多用户支持的建议.整个团队或者整个公司都使用同一个密码来管理非常的 ...
- Storm对DRPC权限控制Version1.0.1
对Storm的DRPC进行权限控制, 并且设计相应的测试验证. 1.集群安装 请参考Storm集群安装Version1.0.1 2.使用DRPC功能 请参考Storm集群使用DRPC功能Version ...
- yii2.0权限控制 ACF权限
ACF是一种通过yii\filters\AccessControl类来实现的简单授权 有两种角色 ?:未经认证的游客用户 @:已认证的用户 ACF可同过对角色设置权限控制访问 1)记得引入yii\fi ...
- Token认证登录以及权限控制
IdentityServer4实现Token认证登录以及权限控制 相关知识点 不再对IdentityServer4做相关介绍,博客园上已经有人出了相关的系列文章,不了解的可以看一下: 蟋蟀大神的: ...
- springmvc+spring+mybatis+maven项目集成shiro进行用户权限控制【转】
项目结构: 1.maven项目的pom中引入shiro所需的jar包依赖关系 ? 1 2 3 4 5 6 7 8 9 10 11 12 13 14 15 16 17 18 19 20 21 22 ...
随机推荐
- 删除v-for方法生成的组件的方法
一.思路 在vue:data中的数据对象添加布尔类型的属性,用来表明其是否被渲染,如果需要删除组件,就把这个属性设置为false: 在计算属性vue:computed中,根据该布尔属性过滤,生成一个新 ...
- 查询openmp的版本
vim test.cpp #include <unordered_map>#include <cstdio>#include <omp.h> int main(in ...
- 01、kafka常用命令
001.kafka版本 kafka_2.13-3.0.0 kafka_2.12-2.8.0 002.模拟给topic名称是 yikuang 的发一条数据(hello world) ./kafka-co ...
- maven本地安装jar包
mvn install:install-file -Dfile=cs-pay-client-2.0.0.jar -DgroupId=com.test.pay -DartifactId=gh-epay- ...
- ios唤起键盘后,页面不收回导致元素错位的问题.(譬如固定在底部的自定义键盘等)
解决办法 var u = navigator.userAgent; var isiOS = !!u.match(/\(i[^;]+;( U;)? CPU.+Mac OS X/); //ios终端 // ...
- 【2020NOI.AC省选模拟#5】C. 光滑序列
题目链接 原题解: 光滑的序列一定有长度为$K$的循环节. 使用动态规划,设$F(i,j)$为使前$i$个整数的和为$j$的最小修改次数. 记$cost(i,v)$为令$A_i,A_{i+K},A_{ ...
- Git配置新学
Git中的AutoCRLF与SafeCRLF换行符问题 https://zhuanlan.zhihu.com/p/380574688 https://xiaozhuanlan.com/topic/40 ...
- mysql-逗号分隔关联查询
牛逼plus 每天一个知识点 tableA id num 1 1001,1002 2 1002 tableB id num name 1 1001 A 2 1002 B 想要的结果: id name ...
- spring session + redis实现共享session
一.代码 1.pom.xml <!--spring session--> <dependency> <groupId>org.springframework.boo ...
- ssh免密码登录服务器
A机为本地主机(即用于控制其他主机的机器) B机为远程主机(即被控制的机器server)B机:192.168.3.145 假如A机无密码登录B机器 A机上的命令: 1,ssh-keygen - ...