Idea创建Hibernate bean类和.xml文件
Idea通过表结构反向生成Hibernate实体类和映射文件
首先:之前通过Eclipse反向生成Hibernate的实体类,很傻瓜式,基本上不用配置。但是Idea通过表结构反向生成hibernate实体类和映射文件,如果单独生成一张表的实体Bean类,基本上不需要配置。但是针对关联的两张表,涉及到one-to-many和many-to-one的这种情况,Idea需要自己手动配置。对于如何配置,自己也绕了点弯路。此处记录下最终成功的一些操作,仅作参考。
1.准备hibernate.cfg.xml配置文件,放在工程目录的根目录下。例如:
<?xml version='1.0' encoding='utf-8'?>

<!DOCTYPE hibernate-configuration PUBLIC

        "-//Hibernate/Hibernate Configuration DTD 3.0//EN"

        "http://www.hibernate.org/dtd/hibernate-configuration-3.0.dtd">

<hibernate-configuration>

    <session-factory>

        <!-- Database connection settings -->

        <property name="connection.driver_class">oracle.jdbc.driver.OracleDriver</property>

        <property name="connection.url">jdbc:oracle:thin:@localhost::orcl</property>

        <property name="connection.username">lex</property>

        <property name="connection.password">lex</property>

        <!-- SQL dialect -->

        <property name="dialect">org.hibernate.dialect.Oracle10gDialect</property>

        <!-- Enable Hibernate's automatic session context management -->

        <property name="current_session_context_class">thread</property>

        <!-- Echo all executed SQL to stdout -->

        <property name="show_sql">true</property>

        <!-- Drop and re-create the database schema on startup -->

        <property name="hbm2ddl.auto">update</property>

    </session-factory>

</hibernate-configuration
2. Idea工程设置支持hinernate,点击View选择Tool Windows下的Persistence,显示如下效果: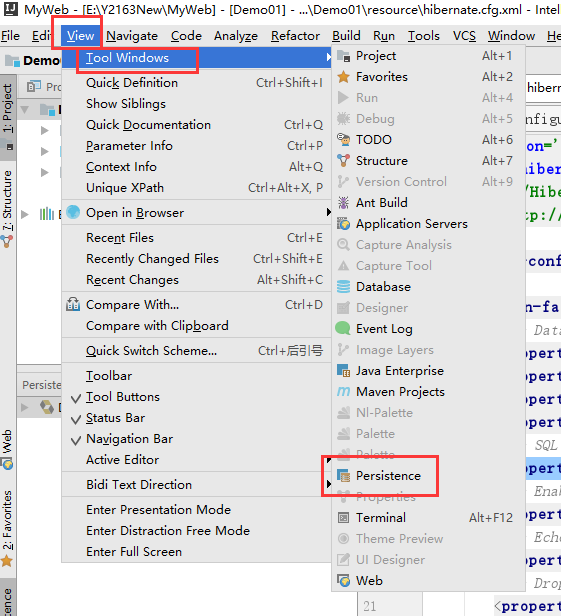
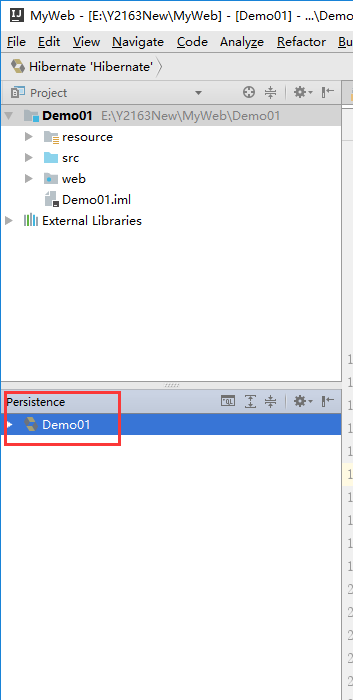
或者点击左下角的图标这样也可以找到我们要的:

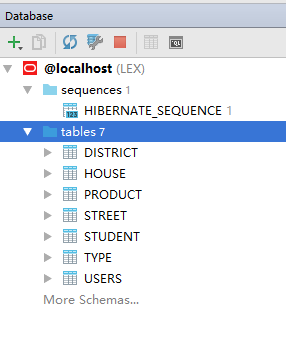
3.数据库配置:从右边的DateBase配置,点击DateBase,选择你所要关联的数据库,在这里我关联的是Oracle数据库,我就以这个为例了。
会出现Data Sources and Drivers页面。

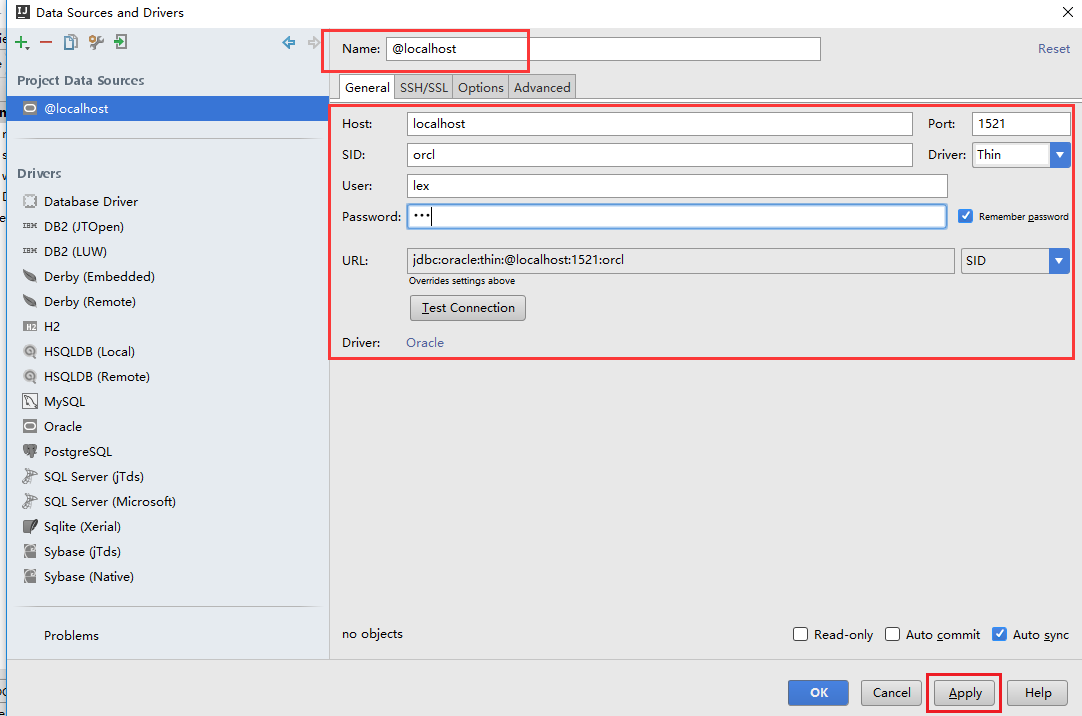
出现如下:
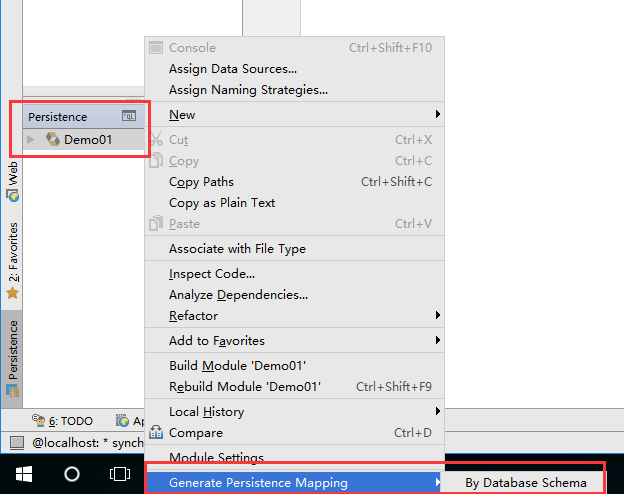
4.Persistence-->Generate persistence mapping-->By database schema

5.配置关联属性。注意:一定要在最底下的Join column中配置两个Bean之间的联系,实属两张表之间的外键映射关系。Eclipse是自动生成映射联系,但是Idea似乎不能,需要自己手动配置。需要注意的是:有些数据类型需要自己更改。
针对add relationship页的配置官方说明:http://www.jetbrains.com/help/idea/2016.1/add-relationship.html?search=add%20re
Use this dialog box to set up a relation between two entities of a persistence unit according to the relation between the corresponding tables of the selected database.

Item    Description

Source / Target    Use these sections to define the source and target parts of a relationship.

Table

In the Source section, this field is read-only and displays the name of the table selected in the Import Database Schema dialog box.

In the Target section, select the desired table from the list of tables available in the current data source.

Attribute name    Specify the names of the fields that will be created in the source and target entities respectively.

Type    Specify the relationship type by selecting appropriate options from the drop-down lists in the Source and Target sections. The list contains Java types, thus enabling you to define the Java code that will be generated for the relationship.

Map Key Column    Select the desired column name from the drop-down list.

Join Table    If this check box is selected, the data will be queried from both tables on the basis of the specified relationship. Select the desired join table from the list of tables available in the data source.

For the many-to-many relationships, this check box is selected by default, and not editable.

Join Columns    Depending on the type of relationship, this table features the following columns:

For one-to-one or one-to-many relationships, the table contains two columns:

Source Column - in this field, specify the foreign key of the source table.

Target Column - in this field, specify the referenced field in the target table.

For multiple relationships, four columns are available:

Source Column

Source Join Column

Target Join Column

Target Column

Use the Add add and Remove delete buttons to manage the list of join columns.
使用此对话框来设置一个持久性单元,根据所选数据库的相应表之间关系的两个实体之间的关系。

项目描述

源 / 目标使用这些部分来定义的源和目标部分的关系。

表

在源部分中,此字段是只读,并显示在导入数据库架构对话框中选定的表的名称。

在目标部分中,从当前的数据源中可用表的列表中选择所需的表。

属性名称指定的字段将在源中创建和分别针对实体名称。

通过选择适当的选项,从下拉列表中的源和目标的部分型关系的类型指定。该列表包含 Java 类型,从而使您能够定义的关系将生成的 Java 代码。

映射键列选择下拉列表中所需的列名称。

联接表如果此复选框处于选中状态,将根据指定的关系两个表中查询的数据。从可用数据源中的表的列表中选择所需的联接表。

对于多对多关系,此复选框是默认情况下,选定,不可编辑。

联接的列取决于关系,此表的类型特点以下各列︰

对于一对一或一对多的关系,此表包含两列︰

源列-在此字段中的,指定源表的外键。

目标列-在这一领域,在目标表中指定引用的字段。

对于多个关系,四列有可用:

源列

源的联接列

目标联接列

目标列

使用添加添加和删除删除按钮来管理的联接列的列表。
选择一张表右键选择Add Relationship: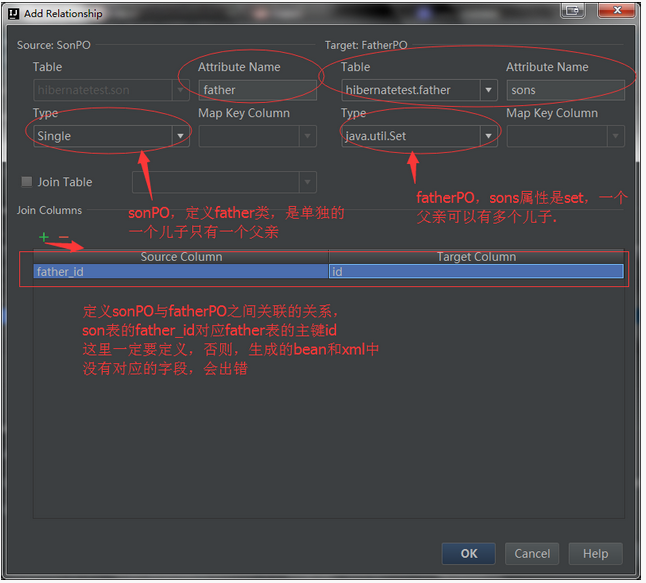
点击OK就可以了。
package cn.lex.entity;

import javax.persistence.*;

import java.util.Set;

/**

 * Created by accp on 2017/1/13.

 */

@Entity

public class Type {

    private long id;

    private String name;

    private Set<House> house;

    @Id

    @Column(name = "ID", nullable = false, precision = )

    public long getId() {

        return id;

    }

    public void setId(long id) {

        this.id = id;

    }

    @Basic

    @Column(name = "NAME", nullable = false, length = )

    public String getName() {

        return name;

    }

    public void setName(String name) {

        this.name = name;

    }

    @Override

    public boolean equals(Object o) {

        if (this == o) return true;

        if (o == null || getClass() != o.getClass()) return false;

        Type type = (Type) o;

        if (id != type.id) return false;

        if (name != null ? !name.equals(type.name) : type.name != null) return false;

        return true;

    }

    @Override

    public int hashCode() {

        int result = (int) (id ^ (id >>> ));

        result =  * result + (name != null ? name.hashCode() : );

        return result;

    }

    @OneToMany(mappedBy = "type")

    public Set<House> getHouse() {

        return house;

    }

    public void setHouse(Set<House> house) {

        this.house = house;

    }

}
<?xml version='1.0' encoding='utf-8'?>

<!DOCTYPE hibernate-mapping PUBLIC

    "-//Hibernate/Hibernate Mapping DTD 3.0//EN"

    "http://www.hibernate.org/dtd/hibernate-mapping-3.0.dtd">

<hibernate-mapping>

    <class name="cn.lex.entity.Type" table="TYPE" schema="LEX">

        <id name="id">

            <column name="ID" sql-type="number(*)" precision=""/>

        </id>

        <property name="name">

            <column name="NAME" sql-type="nvarchar2(50)" length=""/>

        </property>

        <set name="house" inverse="true">

            <key>

                <column name="TYPEID" not-null="true"/>

            </key>

            <one-to-many not-found="ignore" class="cn.lex.entity.House"/>

        </set>

    </class>

</hibernate-mapping>
Idea创建Hibernate bean类和.xml文件的更多相关文章
- Eclipse从数据库逆向生成Hibernate实体类和映射文件(Eclipse插件系列之HibernateTools)
♣下载安装Eclipse插件(HibernateTools) ♣Eclipse连接数据库(Mysql5.7) ♣新建hibernate.properties和hibernate.cfg.xml文件 ♣ ...
- JAXB—Java类与XML文件之间转换
JAXB-Java类与XML文件之间转换 简介 JAXB(Java Architecture for XML Binding) 是一个业界的标准,是一项可以根据XML Schema产生 ...
- Fixflow引擎解析(三)(模型) - 创建EMF模型来读写XML文件
Fixflow引擎解析(四)(模型) - 通过EMF扩展BPMN2.0元素 Fixflow引擎解析(三)(模型) - 创建EMF模型来读写XML文件 Fixflow引擎解析(二)(模型) - BPMN ...
- 简单实体类和xml文件的相互转换
最近写一个题目,要求将一组员工实体类转换成xml文件,或将xml文件转换成一组实体类.题目不难,但写完感觉可以利用泛型和反射将任意一个实体类和xml文件进行转换.于是今天下午立马动手 试了下,做了个简 ...
- 在C#程序中,创建、写入、读取XML文件的方法
一.在C#程序中,创建.写入.读取XML文件的方法 1.创建和读取XML文件的方法,Values为需要写入的值 private void WriteXML(string Values) { //保存的 ...
- 反向生成hibernate实体类和映射文件
工欲善其事,必先利其器.我们可以使用IDE来根据数据库中的表反向生成实体类和映射文件,虽然这些东西手写也并不是难度很大,但是如果存在大量的简单工作需要我们做,也会显得很麻烦. 写在前面 我们反向生成的 ...
- spring的显示装配bean(1)------通过XML文件装配
1:spring环境的简单搭建 (1)导入spring相关的jar包. 2:准备要进行装配的Java类 这里给出两个举例类 (1) (2) 3:配置XML文件 (1)在配置文件的顶部声明多个XML模式 ...
- intellij配置hibernate自动生成hbm.xml文件
1.首先创建一个Java web项目,这里因为已经在整个项目中配置好tomcat了,所以我是直接创建module的,其实和创建project的配置方法一样,创建的时候选择Web Application ...
- 用 Qt 中的 QDomDocument类 处理 XML 文件
XML,全称为 “可扩展标记语言”(extensible markup language).是一种非常方便的数据交换与数据存储的工具. 我们在取得一个XML格式的文件后,需要作句法分析去提取发布方提供 ...
随机推荐
- The server of Nginx(三)——Nginx企业级优化
相信看过我之前apache文章的朋友们,对服务优化也有了一个大概的了解,相比较而言,Nginx企业中应用的更多一些,因此今天也会详细阐述Nginx的优化,有人说,服务器不需要优化,开虚拟化,分分钟成倍 ...
- javascript canvas画订单
前段时间看了某个平台的后台,发现订单显示使用的canvas进行绘画(插件echarts),直观,明了的表达出了订单的走势如下 所以自己心痒痒的,就自己模仿了一个-->贴上代码 <style ...
- python高级(四)—— 文本和字节序列(编码问题)
本文主要内容 字符 字节 结构体和内存视图 字符和字节之间的转换——编解码器 BOM鬼符 标准化Unicode字符串 Unicode文本排序 python高级——目录 文中代码均放在github上: ...
- vue-cli 3.5 解决 typescript cannot find file 问题。
版本: "ts-loader": "^3.5.0","typescript": "^3.3.4000", "v ...
- 停不下来队 Scrum Meeting 博客汇总
停不下来队 Scrum Meeting 博客汇总 一.Alpha阶段 [Alpha]Scrum Meeting#1 [Alpha]Scrum Meeting#2 [Alpha]Scrum Meetin ...
- 通过shell处理多行数据
### 源文件 cat > tmpb <<'EOF' dbname:db_a,start_time::: query_end_time:::,query_total_time:,da ...
- Python数据类型(元组)
文章内容参考了教程:http://www.runoob.com/python/python-basic-syntax.html#commentform Python 元组 Python的元组与列表类似 ...
- mybatis 批量增加 Parameter '__frch_item_0' not found. Available parameters are [list]
当在mybatis用到foreach的时候,会报这个错误Parameter '__frch_item_0' not found. Available parameters are [list]会出现的 ...
- poj 2259 Team Queue
Team Queue Time Limit: 2000MS Memory Limit: 65536K Total Submissions: 2977 Accepted: 1092 Descri ...
- 配置文件详解和核心api讲解
一.配置文件详解 1.映射文件详解 1.映射配置文件的位置和名称没有限制. -建议:位置:和实体类放在统一目录下. 名称:实体类名称.hbm.xml. 2.在映射配置文件中,标签内的name属 ...