fragment的介绍与使用
稍稍摘录一段Fragment.java中的说明文档。
/**

 * A Fragment is a piece of an application's user interface or behavior

 * that can be placed in an {@link Activity}.  Interaction with fragments

 * is done through {@link FragmentManager}, which can be obtained via

 * {@link Activity#getFragmentManager() Activity.getFragmentManager()} and

 * {@link Fragment#getFragmentManager() Fragment.getFragmentManager()}.

 *

 * <p>The Fragment class can be used many ways to achieve a wide variety of

 * results. In its core, it represents a particular operation or interface

 * that is running within a larger {@link Activity}.  A Fragment is closely

 * tied to the Activity it is in, and can not be used apart from one.  Though

 * Fragment defines its own lifecycle, that lifecycle is dependent on its

 * activity: if the activity is stopped, no fragments inside of it can be

 * started; when the activity is destroyed, all fragments will be destroyed.

 *

 * <p>All subclasses of Fragment must include a public empty constructor.

 * The framework will often re-instantiate a fragment class when needed,

 * in particular during state restore, and needs to be able to find this

 * constructor to instantiate it.  If the empty constructor is not available,

 * a runtime exception will occur in some cases during state restore.

 */
其中有一点以前不知道,就是Fragment的子类必须包括一个public的空构造方法,否则可能会发生运行时异常。因为framework经常会在需要的时候(比如状态恢复时),重新实例化Fragment类,这个时候它就会查找这个构造方法来进行实例化。
本文主要是参考官方文档(https://developer.android.com/guide/components/fragments.html),记录下Fragment的使用用法。
Design Philosophy(设计理念)
为了在大小屏间更好的利用空间,更好的动态地设计UI

Figure 1. An example of how two UI modules defined by fragments can be combined into one activity for a tablet design, but separated for a handset design.
Creating a Fragment(创建Fragment对象)
方法:创建子类继承自Fragment(或者已存在的子类)
那接下来不得不讨论的就是Fragment的生命周期了。
| 方法 | 说明 |
| onAttach() | called once the fragment is associated with its activity. |
| onCreate() | called to do initial creation of the fragment. |
| onCreateView() |
creates and returns the view hierarchy associated with the fragment. |
| onActivityCreated() |
tells the fragment that its activity has completed its own {@link Activity#onCreate Activity.onCreate()}. |
| onStart() |
makes the fragment visible to the user (based on its containing activity being started). |
| onResume() |
makes the fragment interacting with the user (based on its containing activity being resumed). |
| onPause() |
fragment is no longer interacting with the user either because its activity is being paused or a fragment operation is modifying it in the activity. |
| onStop() |
fragment is no longer visible to the user either because its activity is being stopped or a fragment operation is modifying it in the activity. |
| onDestroyView() |
allows the fragment to clean up resources associated with its View. |
| onDestroy() | called to do final cleanup of the fragment's state. |
| onDetach() |
called immediately prior to the fragment no longer being associated with its activity. |

Adding a user interface(为Fragment添加用户界面)
Fragment一般都是将自己作为Activity的一部分,并在Activity上显示自己的界面。而Fragment中实例化UI界面的操作是在onCreateView方法中。下面这个例子,在onCreateView方法中加载了xml布局文件:
public static class ExampleFragment extends Fragment {

    @Override

    public View onCreateView(LayoutInflater inflater, ViewGroup container,

                             Bundle savedInstanceState) {

        // Inflate the layout for this fragment

        return inflater.inflate(R.layout.example_fragment, container, false);

    }

}
onCreateView方法参数解析:
1.inflater
调用其inflate方法,最终会返回一个View对象。inflate方法参数说明:
(1)想要扩展的布局文件的资源id
(2)ViewGroup对象,加载参数1的布局
(3)boolean变量,表明是否将参数1的布局添加到参数2的ViewGroup中(这里为false,是因为系统已经将该布局添加到container了)
2.container
container是存放fragment的layout的ViewGroup对象。抽象么?换种说法:Activity的布局,暂称为A;Fragment的布局,暂称为F。因为Fragment会嵌套到Activity中,布局F自然需要加入到布局A里面。所以这里的container就是指布局A中用来加载布局F的ViewGroup(比如LinearLayout)。
3.savedInstanceState
Bundle对象,保存先前的fragment的实例等数据,用来恢复。
OK,为Fragment添加界面就结束了,总结:在onCreateView方法中,加入layout布局文件。接下来就是添加Fragment到Activity了。
Adding a fragment to an activity(添加Fragment到Activity)
two methods:
* Declare the fragment inside the activity's layout file. (在Activity的布局文件中添加Fragment,通过<fragment ...>标签)
<?xml version="1.0" encoding="utf-8"?>

<LinearLayout xmlns:android="http://schemas.android.com/apk/res/android"

    android:orientation="horizontal"

    android:layout_width="match_parent"

    android:layout_height="match_parent">

    <fragment android:name="com.example.news.ArticleListFragment"

            android:id="@+id/list"

            android:layout_weight="1"

            android:layout_width="0dp"

            android:layout_height="match_parent" />

    <fragment android:name="com.example.news.ArticleReaderFragment"

            android:id="@+id/viewer"

            android:layout_weight="2"

            android:layout_width="0dp"

            android:layout_height="match_parent" />

</LinearLayout>
说明:
1.<fragment>中的android:name指明了具体的Fragment类。当系统创建Activity的布局时,它会检查每个<fragment>,并调用指明的Fragment类的onCreateView方法。当onCreateView返回一个View对象后,系统会用该View替换<fragment ...>标签指代的内容。
Note:每个Fragment都需要一个唯一标识符ID,用来在Activity restart 的时候恢复Fragment。有三种方法可以提供ID:
(1)android:id a unique ID
(2)android:tag a unique string
(3)container view的ID 当(1)(2)都没有设置的话
* Or, programmatically add the fragment to an existing ViewGroup.(在代码中,动态添加fragment到一个已存在的ViewGroup中)
想要在Activity中动态添加(替换/删除)Fragment,需要FragmentTransaction类的实例。该类的实例可通过下面方法获得:
FragmentManager fragmentManager = getFragmentManager()

FragmentTransaction fragmentTransaction = fragmentManager.beginTransaction();
添加Fragment:通过add()方法 (当然还有replace/remove等方法,具体参考官方文档)
ExampleFragment fragment = new ExampleFragment();

fragmentTransaction.add(R.id.fragment_container, fragment);

fragmentTransaction.commit();
Note:add方法的第一个参数是ViewGroup对象的ID,用来添加fragment。 当操作完成后,还需要调用FragmentTransaction::commit方法,才能奏效。
Adding a fragment without a UI(添加一个无UI的fragment,这个情况我没用过,官方文档说 比如进行后台操作的时候,就不用界面了)
通过 add(Fragment, String)方法添加此Fragment对象。第二个参数是一个字符串,作为tag,唯一识别该Fragment。因为没有UI,就无法设置android:id这类的属性了,就只能通过这里的tag来获取该Fragment了(使用方法 findFragmentByTag (String tag) 来获取Fragment)。
上面讲完了”创建Fragment“ / ”加载Fragment到Activity“后,接下来说说如何管理Fragment
Managing Fragments(管理Fragment)
最开始需要先获取 FragmentManager类对象,通过getFragmentManager() 方法。FragmentManager对象可以做以下几件事情:
- Get fragments that exist in the activity, with
findFragmentById()(for fragments that provide a UI in the activity layout) orfindFragmentByTag()(for fragments that do or don't provide a UI). - Pop fragments off the back stack, with
popBackStack()(simulating a Back command by the user). - Register a listener for changes to the back stack, with
addOnBackStackChangedListener().
Performing Fragment Transactions(操作Fragment)
在Activity中使用Fragment很大的特征就是添加/删除/替换。每次把对Fragment所作的操作被称为一个transaction。当commit 这个 transaction 到Activity里时,需要另一个类 FragmentTransaction。该类对象的获取方法如下:
FragmentManager fragmentManager = getFragmentManager();

FragmentTransaction fragmentTransaction = fragmentManager.beginTransaction();
然后进行add(), remove(), and replace() 等方法。然后通过commit() 提交transaction到Activity中。
Note:当调用commit()方法前,可以调用addToBackStack()方法将transaction添加到 back stack 中(这个back stack是由Activity管理的)。当用户按返回键后,就可以返回到Fragment执行transaction之前的状态了。
// Create new fragment and transaction

Fragment newFragment = new ExampleFragment();

FragmentTransaction transaction = getFragmentManager().beginTransaction();

// Replace whatever is in the fragment_container view with this fragment,

// and add the transaction to the back stack

transaction.replace(R.id.fragment_container, newFragment);

transaction.addToBackStack(null);

// Commit the transaction

transaction.commit();
当提交”删除Fragment“的transaction时,如果不调用addToBackStack方法,那么这个Fragment就destroyed了,用户就回不到之前的Fragment了。但反之,调用了addToBackStack方法后再调用commit方法,那么 这个Fragment只是处于stopped状态,按返回键后,就可以resume该Fragment。
当然,如果你一次性对Fragment进行很多操作,然后调用一次commit()方法,系统还是会将这一系列操作作为一次transaction的。
Communicating with the Activity(与Activity交互)
Activity中:通过调用getFragmentManager方法,获得FragmentManager实例。然后通过 findFragmentById() or findFragmentByTag()方法获得Fragment。
Fragment中:通过getActivity方法获得Activity的Context,然后通过findViewById方法获得Activity布局中的控件。
Creating event callbacks to the activity(让Activity响应Fragment的事件)
一个很好的方法就是:
1.在Fragment中实现一个接口,包含一些回调方法。
2.让Activity实现这个接口。
public static class FragmentA extends ListFragment {

    ...

    // Container Activity must implement this interface

    public interface OnArticleSelectedListener {

        public void onArticleSelected(Uri articleUri);

    }

    ...

}
这样,当Activity接受到回调方法时,就能够获得Fragment的信息,并且能将信息传递给其他Fragment了。
那怎么在Fragment中怎么调用Activity的实例,为它设置回调方法呢?可以通过getActivity方法,但是更好的是在onAttach方法中,因为onAttach方法的参数就是Fragment所在的Activity的实例。那么,就可以在onAttach方法中将Activity实例强制转换成接口对象了。
public static class FragmentA extends ListFragment {

    OnArticleSelectedListener mListener;

    ...

    @Override

    public void onAttach(Activity activity) {

        super.onAttach(activity);

        try {

            mListener = (OnArticleSelectedListener) activity;

        } catch (ClassCastException e) {

            throw new ClassCastException(activity.toString() + " must implement OnArticleSelectedListener");

        }

    }

    ...

}
--------------------------------------------------------------------------------------------------
OK,就讲到这里了,下面给出一个小例子,先上图:
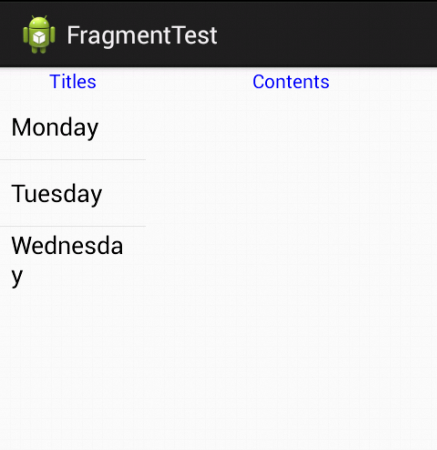
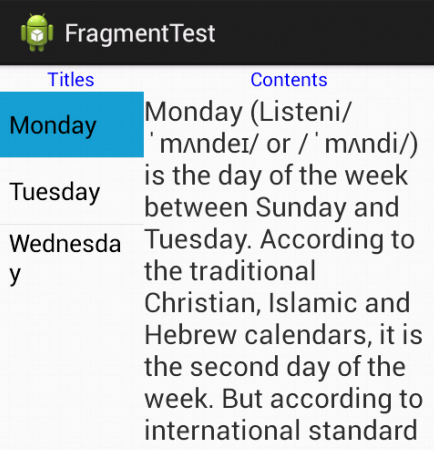
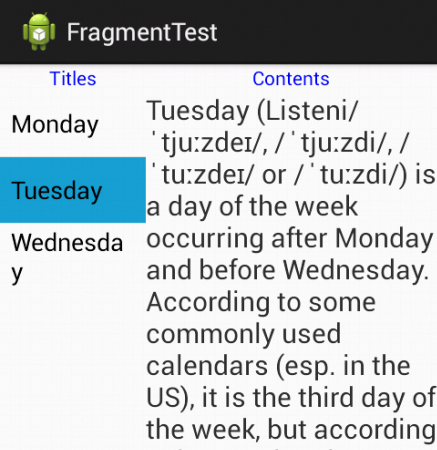
代码结构截图:
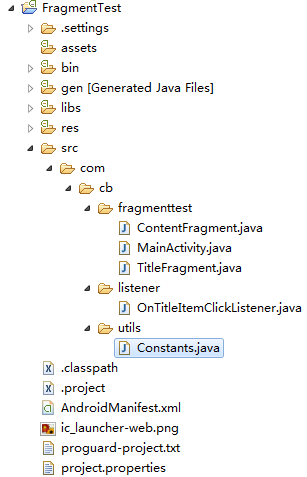
代码如下:
 package com.cb.fragmenttest;

 import com.cb.listener.OnTitleItemClickListener;

 import android.os.Bundle;

 import android.app.Activity;

 import android.app.Fragment;

 import android.app.FragmentManager;

 import android.util.Log;

 public class MainActivity extends Activity implements OnTitleItemClickListener {

     private static final String TAG = "MainActivity";

     @Override

     protected void onCreate(Bundle savedInstanceState) {

         super.onCreate(savedInstanceState);

         setContentView(R.layout.activity_main);

         Log.d(TAG, "onCreate");

     }

     @Override

     public void onItemClick(int position) {

         Log.d(TAG, "onItemClick: position is "+position);

         ContentFragment contentFragment = (ContentFragment) getFragmentManager().findFragmentById(R.id.content_fragment);

         contentFragment.updateContent(position);

     }

 }
主Activity::MainActivity.java
 <LinearLayout xmlns:android="http://schemas.android.com/apk/res/android"

     android:layout_width="match_parent"

     android:layout_height="match_parent"

     android:orientation="horizontal" >

     <fragment

         android:id="@+id/title_fragment"

         android:name="com.cb.fragmenttest.TitleFragment"

         android:layout_width="0dp"

         android:layout_height="match_parent"

         android:layout_weight="1" />

     <fragment

         android:id="@+id/content_fragment"

         android:name="com.cb.fragmenttest.ContentFragment"

         android:layout_width="0dp"

         android:layout_height="match_parent"

         android:layout_weight="2" />

 </LinearLayout>
MainActivity::activity_main.xml
两个Fragment:TitleFragment、ContentFragment
 package com.cb.fragmenttest;

 import com.cb.listener.OnTitleItemClickListener;

 import com.cb.utils.Constants;

 import android.app.Activity;

 import android.app.Fragment;

 import android.os.Bundle;

 import android.util.Log;

 import android.view.LayoutInflater;

 import android.view.View;

 import android.view.ViewGroup;

 import android.widget.AdapterView;

 import android.widget.AdapterView.OnItemClickListener;

 import android.widget.ArrayAdapter;

 import android.widget.ListView;

 public class TitleFragment extends Fragment implements OnItemClickListener {

     private static final String TAG = "TitleFragment";

     private ListView mListView;

     private OnTitleItemClickListener mCallback;

     @Override

     public void onActivityCreated(Bundle savedInstanceState) {

         super.onActivityCreated(savedInstanceState);

         Log.d(TAG, "onActivityCreated");

     }

     @Override

     public void onAttach(Activity activity) {

         super.onAttach(activity);

         Log.d(TAG, "onAttach: " + activity);

         try {

             mCallback = (OnTitleItemClickListener) activity;

         } catch (ClassCastException e) {

             e.printStackTrace();

         }

     }

     @Override

     public void onCreate(Bundle savedInstanceState) {

         super.onCreate(savedInstanceState);

         Log.d(TAG, "onCreate");

     }

     @Override

     public View onCreateView(LayoutInflater inflater, ViewGroup container, Bundle savedInstanceState) {

         Log.d(TAG, "onCreateView");

         View view = inflater.inflate(R.layout.title_fragment, container, false);

         mListView = (ListView) view.findViewById(R.id.list);

         ArrayAdapter<String> adapter = new ArrayAdapter<String>(getActivity(), android.R.layout.simple_list_item_1, Constants.mTitle);

         mListView.setAdapter(adapter);

         mListView.setOnItemClickListener(this);

         return view;

     }

     @Override

     public void onItemClick(AdapterView<?> arg0, View arg1, int arg2, long arg3) {

         Log.d(TAG, "onItemClick: arg2 is "+arg2);

         mCallback.onItemClick(arg2);

     }

 }
TitleFragment.java
 <LinearLayout xmlns:android="http://schemas.android.com/apk/res/android"

     android:id="@+id/linear2"

     android:layout_width="match_parent"

     android:layout_height="match_parent"

     android:orientation="vertical" >

     <TextView

         android:layout_width="wrap_content"

         android:layout_height="wrap_content"

         android:layout_gravity="center_horizontal"

         android:text="Titles"

         android:textColor="#0000ff" />

     <ListView

         android:id="@+id/list"

         android:layout_width="match_parent"

         android:layout_height="wrap_content" />

 </LinearLayout>
TitleFragment::title_fragment.xml
 package com.cb.fragmenttest;

 import com.cb.utils.Constants;

 import android.app.Activity;

 import android.app.Fragment;

 import android.os.Bundle;

 import android.util.Log;

 import android.view.LayoutInflater;

 import android.view.View;

 import android.view.ViewGroup;

 import android.widget.TextView;

 public class ContentFragment extends Fragment{

     private static final String TAG = "ContentFragment";

     private TextView mTextView;

     @Override

     public View onCreateView(LayoutInflater inflater, ViewGroup container, Bundle savedInstanceState) {

         Log.d(TAG, "onCreateView");

         View view = inflater.inflate(R.layout.content_fragment, container, false);

         mTextView = (TextView)view.findViewById(R.id.text);

         return view;

     }

     public void updateContent(int position) {

         Log.d(TAG, "updateContent, mContent["+position+"] is "+Constants.mContent[position]);

         mTextView.setText(Constants.mContent[position]);

     }

 }
ContentFragment.java
 <LinearLayout xmlns:android="http://schemas.android.com/apk/res/android"

     android:id="@+id/linear2"

     android:layout_width="match_parent"

     android:layout_height="match_parent"

     android:orientation="vertical" >

     <TextView

         android:layout_width="wrap_content"

         android:layout_height="wrap_content"

         android:layout_gravity="center_horizontal"

         android:text="Contents"

         android:textColor="#0000ff"

         android:textIsSelectable="true" />

     <ScrollView

         android:layout_width="wrap_content"

         android:layout_height="wrap_content">

     <TextView

         android:id="@+id/text"

         android:layout_width="wrap_content"

         android:layout_height="wrap_content"

         android:textSize="20sp" />

     </ScrollView>

 </LinearLayout>
ContentFragment::content_fragment.xml
接口文件
 package com.cb.listener;

 public interface OnTitleItemClickListener {

     void onItemClick(int position);

 }
MainActivity需要实现的接口
常量类
 package com.cb.utils;

 public class Constants {

     public static final String[] mTitle = { "Monday", "Tuesday", "Wednesday" };

     public static final String[] mContent = {

             "Monday (Listeni/ˈmʌndeɪ/ or /ˈmʌndi/) is the day of the week between Sunday and Tuesday. According to the traditional Christian, Islamic and Hebrew calendars, it is the second day of the week. But according to international standard ISO 8601 it is the first day of the week. The name of Monday is derived from Old English Mōnandæg and Middle English Monenday, which means \"moon day\".",

             "Tuesday (Listeni/ˈtjuːzdeɪ/, /ˈtjuːzdi/, /ˈtuːzdeɪ/ or /ˈtuːzdi/) is a day of the week occurring after Monday and before Wednesday. According to some commonly used calendars (esp. in the US), it is the third day of the week, but according to international standard ISO 8601, it is the second day of the week. The English name is derived from Old English Tiwesdæg and Middle English Tewesday, meaning \"Tīw's Day\", the day of Tiw or Týr, the god of single combat, victory and heroic glory in Norse mythology. Tiw was equated with Mars in the interpretatio romana, and the name of the day is a translation of Latin dies Martis.",

             "Wednesday (Listeni/ˈwɛdənzdeɪ/, Listeni/ˈwɛnzdeɪ/[1] or /ˈwɛnzdi/[2]) is the day of the week between Tuesday and Thursday. According to international standard ISO 8601 adopted in most western countries it is the third day of the week. In countries that use the Sunday-first convention Wednesday is defined as the fourth day of the week. It is the fourth day of the week in the Judeo-Christian calendar as well, and was defined so in the ancient Mesopotamian and biblical calendars. The name is derived from Old English Wōdnesdæg and Middle English Wednesdei, \"day of Wodanaz\", ultimately a calque of dies Mercurii \"day of Mercury\"." +

             "Wednesday is in the middle of the common Western five-day workweek that starts on Monday and finishes on Friday." };

 }
用到的一些常量
fragment的介绍与使用的更多相关文章
- Android开发之Fragment的介绍、使用及生命周期
Fragment官网介绍-http://developer.android.com/guide/components/fragments.html 郭大神的使用实例文章:http://blog.csd ...
- Android Fragment的介绍与使用(案例Demo)
应用场景: 众所了解Android上的界面展示都是通过Activity实现的,可是Activity也有它的局限性,相同的界面在手机上显示可能非常好看,在平板上就未必了.为了让界面能够在平板上更好地展示 ...
- Fragment之介绍(转)
http://www.cnblogs.com/plokmju/p/3239265.html 前言 开门见山开篇名义,本篇博客将讲解一下Android中Fragment的内容,必要的地方会提供相应的演示 ...
- Android Fragment 基本介绍
Fragment 源码:http://www.jinhusns.com/Products/Download/?type=xcj Android是在Android 3.0 (API level 11)开 ...
- Android Fragment 基本介绍[转]
Fragment Android是在Android 3.0 (API level 11)开始引入Fragment的. 可以把Fragment想成Activity中的模块,这个模块有自己的布局,有自己的 ...
- 【转】Android Fragment 基本介绍--不错
原文网址:http://www.cnblogs.com/mengdd/archive/2013/01/08/2851368.html Fragment Android是在Android 3.0 (AP ...
- android的fragment基本介绍
可以分为下面的几部分: 使用支持库 创建一个Fragment 创建一个动态UI 多个Fragment之间的通信 1.使用支持库 如果您的应用需要运行在3.0及以上的版本,可以忽略这部分内容. 如果您的 ...
- [原]Android Fragment 入门介绍
Fragment Fragment 产生,优点,用途,使用方法简介 1 Fragmeng简介 自从Android 3.0中引入fragments 的概念,根据词海的翻译可以译为:碎片.片段.其上的是为 ...
- Fragment基本介绍
1.生命周期 onCreateView() :创建视图 onActivityCreate():activity创建完成的时候调用 onDestoryView():销毁视图 onDetach():与ac ...
随机推荐
- vue-router笔记
1.vue-router 安装 在安装webpack模块时就安装了 eg: vue init webpack demo (安装webpack模块并取名为demo) 在安装模块时没有安装的话 ...
- python__基础 : 多继承中方法的调用顺序 __mro__方法
在多继承中,如果一个子类继承了两个平级的父类,而这两个父类有两个相同名字的方法,那么一般先继承谁,调用方法就调用先继承的那个父类的方法.如: class A: def test(self): prin ...
- [Doctrine Migrations] 数据库迁移组件的深入解析二:自定义集成
自定义命令脚本 目录结构 目前的项目结构是这样的(参照代码库): 其中,db/migrations文件夹是迁移类文件夹,config/db.php是我们项目原有的db配置,migrations.php ...
- ASA 5.0/8.0/9.0 杂记
ASA 10.0 之前的版本都是使用odbc方式连接,由于某个项目的需求,无奈学习一下这些老掉牙的技巧. 1.新建 数据源 (不会的话,自行搜索一下) 2.使用 快捷方式 或者 其他方式 执行 C:\ ...
- 《AngularJS学习整理》系列分享专栏
<AngularJS学习整理>系列分享专栏 <AngularJS学习整理>已整理成PDF文档,点击可直接下载至本地查阅https://www.webfalse.com/re ...
- Go编写一个比特币交易自动出价程序
语言环境为>=go1.10 go语言环境不多说 实现目的能与BitMEX api进行交互自动交易,目前虚拟币平台很多,平台API实现也很容易.后续会加上其它平台和自动交易算法策略,具体看平台交易 ...
- 007---TCP VS UDP
- vim 粘贴文本,格式混乱 tab
粘贴的代码如上.修改方法: 方法一: set paste 贴完后,设置 set nopaste 恢复代码缩进. 方法二:修改配置文件 vim /etc/vim/vimrc set pastetoggl ...
- mysql库地址
https://dev.mysql.com/downloads/connector/
- Chrome浏览器保存微信公众号文章中的图片
用chrome浏览器打开微信公众号文章中时,另存为图片时保存的是640.webp,不是图片本身,用IE则没有此问题.大部分chrome插件也无法保存图片. 经过多番尝试,找到一款插件可以批量保存微信公 ...