
eclipse创建java和web工程
JAVA
Eclipse→File→New→Project..
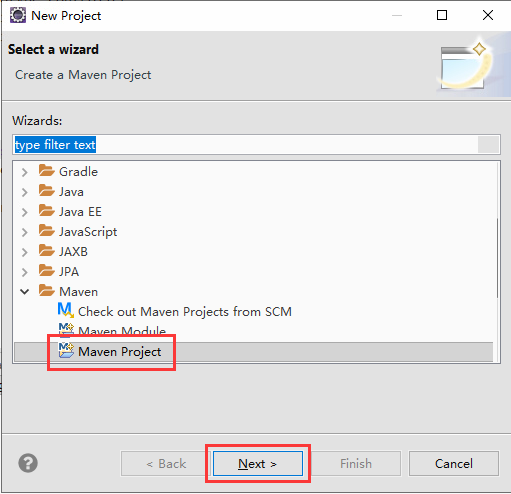
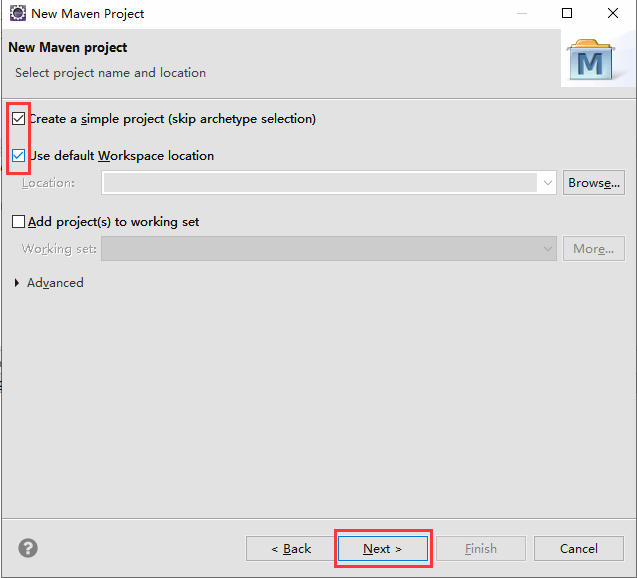
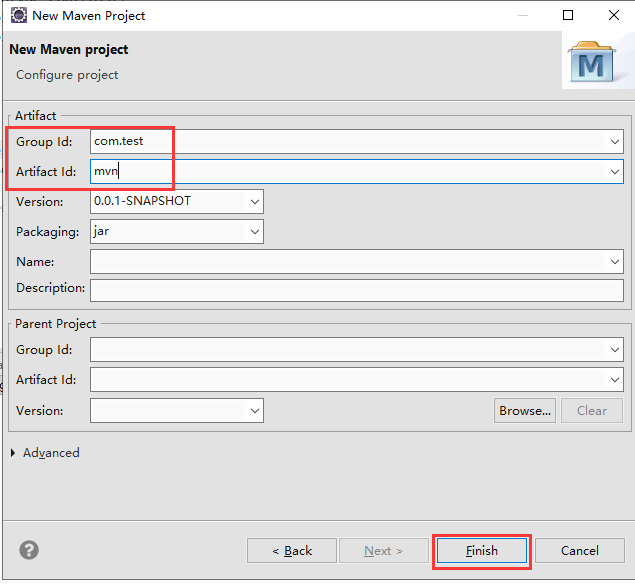
WEB
右键mvn项目→Properties

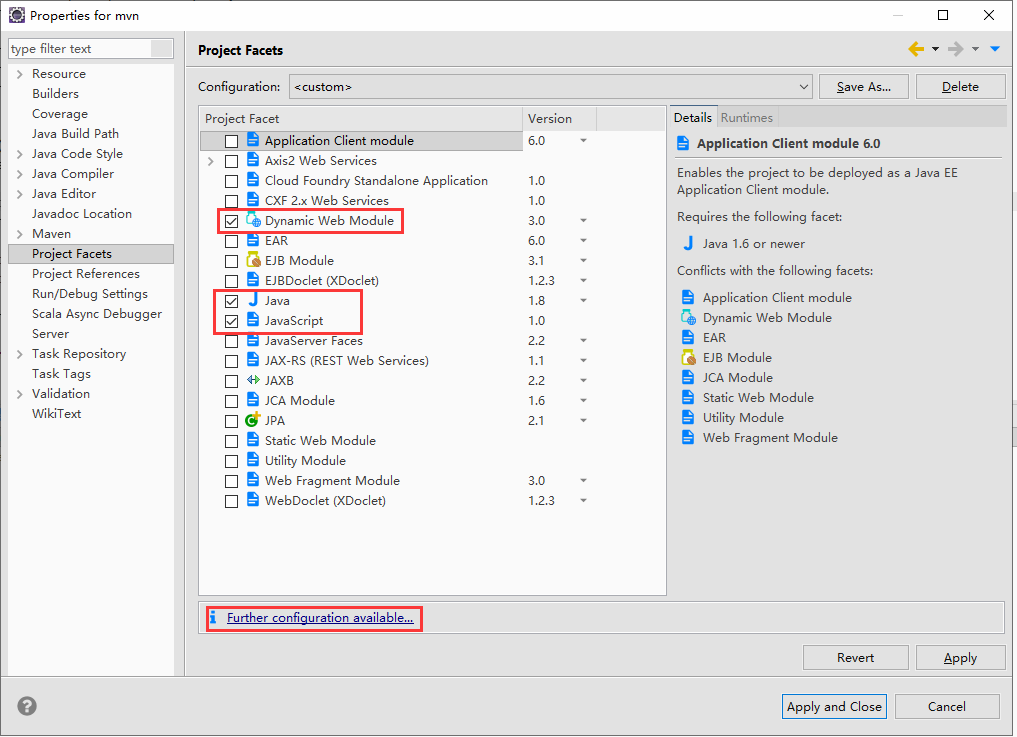
src/main/webapp
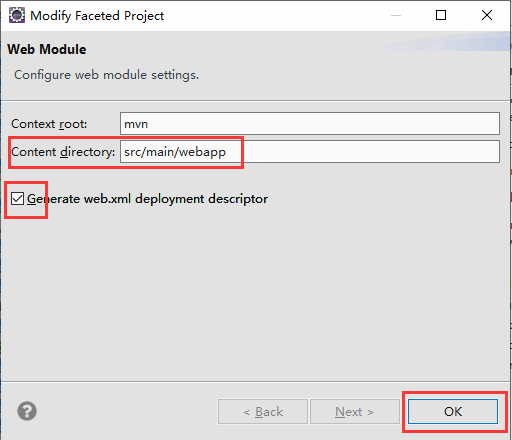
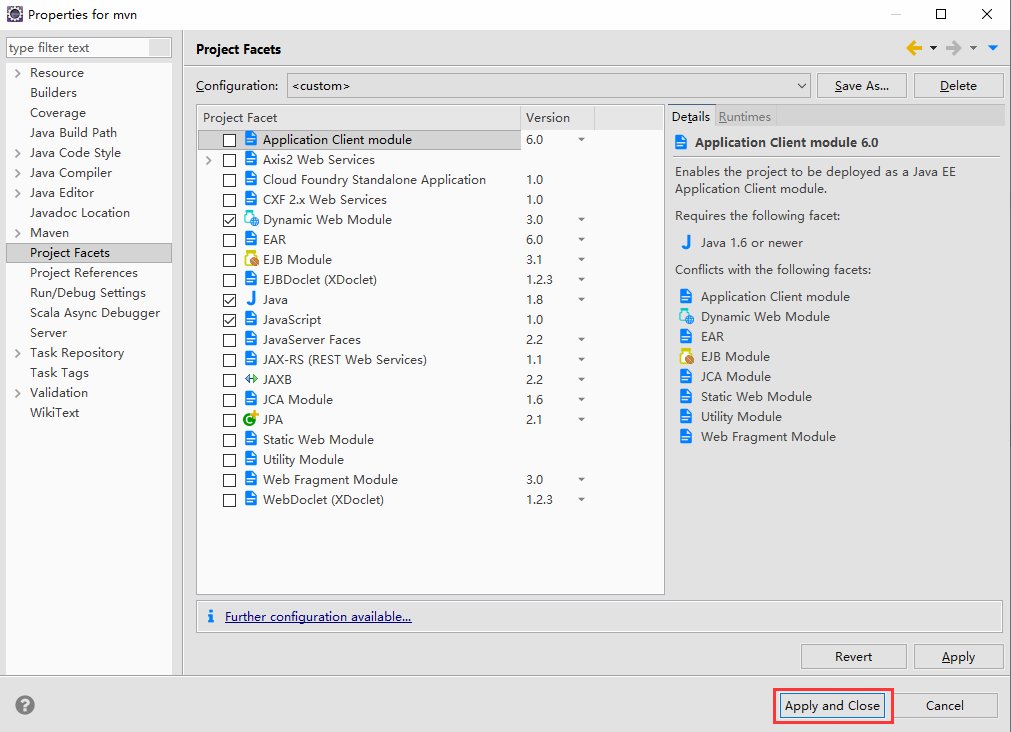
pom.xml
<project xmlns="http://maven.apache.org/POM/4.0.0" xmlns:xsi="http://www.w3.org/2001/XMLSchema-instance" xsi:schemaLocation="http://maven.apache.org/POM/4.0.0 http://maven.apache.org/xsd/maven-4.0.0.xsd">

  <modelVersion>4.0.0</modelVersion>

  <groupId>com.test</groupId>

  <artifactId>mvn</artifactId>

  <version>0.0.1-SNAPSHOT</version>

  <dependencies>

    <dependency>

      <groupId>javax.servlet</groupId>

      <artifactId>javax.servlet-api</artifactId>

      <version>4.0.1</version>

      <scope>provided</scope>

    </dependency>

    <dependency>

      <groupId>org.springframework</groupId>

      <artifactId>spring-webmvc</artifactId>

      <version>4.3.25.RELEASE</version>

    </dependency>

    <dependency>

      <groupId>org.aspectj</groupId>

      <artifactId>aspectjweaver</artifactId>

      <version>1.7.4</version>

    </dependency>

  </dependencies>

  <properties>

    <project.build.sourceEncoding>UTF-8</project.build.sourceEncoding>

    <project.reporting.outputEncoding>UTF-8</project.reporting.outputEncoding>

    <maven.compiler.encoding>UTF-8</maven.compiler.encoding>

  </properties>

</project>
web.xml
<?xml version="1.0" encoding="UTF-8"?>

<web-app id="WebApp_ID" version="3.0"

    xmlns="http://java.sun.com/xml/ns/javaee" xmlns:xsi="http://www.w3.org/2001/XMLSchema-instance"

    xsi:schemaLocation="http://java.sun.com/xml/ns/javaee http://java.sun.com/xml/ns/javaee/web-app_3_0.xsd">

  <context-param>

    <param-name>contextConfigLocation</param-name>

    <param-value>classpath:applicationContext.xml</param-value>

  </context-param>

  <listener>

    <listener-class>

      org.springframework.web.context.ContextLoaderListener

    </listener-class>

  </listener>

  <filter>

      <filter-name>httpPutFormContentFilter</filter-name>

      <filter-class>org.springframework.web.filter.HttpPutFormContentFilter</filter-class>

  </filter>

  <filter>

      <filter-name>characterEncoding</filter-name>

      <filter-class>org.springframework.web.filter.CharacterEncodingFilter</filter-class>

      <init-param>

          <param-name>encoding</param-name>

          <param-value>UTF-8</param-value>

      </init-param>

  </filter>

  <filter-mapping>

      <filter-name>httpPutFormContentFilter</filter-name>

      <url-pattern>/*</url-pattern>

  </filter-mapping>

  <filter-mapping>

      <filter-name>characterEncoding</filter-name>

      <url-pattern>/*</url-pattern>

  </filter-mapping>

  <servlet>

      <servlet-name>SpringMVC</servlet-name>

      <servlet-class>org.springframework.web.servlet.DispatcherServlet</servlet-class>

      <init-param>

          <param-name>contextConfigLocation</param-name>

          <param-value>classpath:springmvc-servlet.xml</param-value>

      </init-param>

      <load-on-startup>1</load-on-startup>

  </servlet>

  <servlet-mapping>

      <servlet-name>SpringMVC</servlet-name>

      <url-pattern>/</url-pattern>

  </servlet-mapping>

  <session-config>

    <session-timeout>10</session-timeout>

  </session-config>

<!--   <welcome-file-list>

    <welcome-file>index.html</welcome-file>

  </welcome-file-list> -->

</web-app>
applicationContext.xml
<beans xmlns="http://www.springframework.org/schema/beans"

    xmlns:xsi="http://www.w3.org/2001/XMLSchema-instance" xmlns:aop="http://www.springframework.org/schema/aop"

    xmlns:context="http://www.springframework.org/schema/context" xmlns:tx="http://www.springframework.org/schema/tx"

    xsi:schemaLocation="http://www.springframework.org/schema/beans

                           http://www.springframework.org/schema/beans/spring-beans-4.0.xsd

                           http://www.springframework.org/schema/tx

                           http://www.springframework.org/schema/tx/spring-tx-4.0.xsd

                           http://www.springframework.org/schema/aop

                           http://www.springframework.org/schema/aop/spring-aop-4.0.xsd

                           http://www.springframework.org/schema/context

                           http://www.springframework.org/schema/context/spring-context-4.0.xsd">

    <!-- 扫描指定目录下的注解,将@Service,@Repository,@Controller,@Component等这些注解的类注册为bean

        如果配置了<context:component-scan>那么<context:annotation-config/>标签就可以不用在xml中再配置了,前者包含后者

        注:在注解后加上例如@Component(value=”abc”)时,注册的这个类的bean的id就是adc -->

    <context:component-scan base-package="com.test" />

    <!--

    <bean id="iservice" class="com.project.OTHER.db.Access" factory-method="getService"></bean>

     -->

</beans>
springmvc-servlet.xml
<?xml version="1.0" encoding="UTF-8"?>

<beans xmlns="http://www.springframework.org/schema/beans"

    xmlns:xsi="http://www.w3.org/2001/XMLSchema-instance"

    xmlns:mvc="http://www.springframework.org/schema/mvc"

    xmlns:context="http://www.springframework.org/schema/context"

    xmlns:aop="http://www.springframework.org/schema/aop"

    xmlns:tx="http://www.springframework.org/schema/tx"

    xsi:schemaLocation="http://www.springframework.org/schema/beans

                        http://www.springframework.org/schema/beans/spring-beans-4.0.xsd

                        http://www.springframework.org/schema/mvc

                        http://www.springframework.org/schema/mvc/spring-mvc-4.0.xsd

                        http://www.springframework.org/schema/context

                        http://www.springframework.org/schema/context/spring-context-4.0.xsd

                        http://www.springframework.org/schema/aop

                        http://www.springframework.org/schema/aop/spring-aop-4.0.xsd

                        http://www.springframework.org/schema/tx

                        http://www.springframework.org/schema/tx/spring-tx-4.0.xsd">

    <!-- 自动注册RequestMappingHandlerMapping与RequestMappingHandlerAdapter两个Bean,这是Spring MVC为@Controller分发请求所必需的 -->

    <mvc:annotation-driven/>

    <!-- 配置了  context:component-scan就不用配置这个了

    <context:annotation-config/> -->

    <!-- 使用默认的Servlet来响应静态文件  -->

    <mvc:default-servlet-handler/>

    <!-- 设置使用注解的类所在的jar包 -->

    <context:component-scan base-package="com.test.controller" />

    <!-- 启动对@AspectJ注解的支持 log begin-->

    <!-- proxy-target-class等于true是强制使用cglib代理,proxy-target-class默认是false,如果你的类实现了接口 就走JDK代理,如果没有,走cglib代理  -->

    <!-- 注:对于单例模式建议使用cglib代理,虽然JDK动态代理比cglib代理速度快,但性能不如cglib -->

    <!--如果不写proxy-target-class="true"这句话也没问题-->

    <aop:aspectj-autoproxy proxy-target-class="true"/>

    <!--切面-->

    <!--添加页面视图解析器-->

<!--     <bean class="org.springframework.web.servlet.view.InternalResourceViewResolver">

        <property name="prefix" value="/html/"/>

        <property name="suffix" value=".html"/>

        <property name="contentType" value="text/html;charset=UTF-8"/>

    </bean> -->

</beans>
TestController.java
package com.test.controller;

import javax.servlet.http.HttpServletRequest;

import javax.servlet.http.HttpServletResponse;

import org.springframework.stereotype.Controller;

import org.springframework.web.bind.annotation.RequestMapping;

import org.springframework.web.bind.annotation.RequestMethod;

@Controller

@RequestMapping(value = "/test")

public class TestController {

//    @Resource

//    private IService iservice;

    @RequestMapping(value = "/test", method = RequestMethod.GET)

    public String logingui(HttpServletRequest request, HttpServletResponse response) {

        try {

            response.setCharacterEncoding("UTF-8");

            response.getWriter().print("success");

        } catch (Exception e) {

            e.printStackTrace();

        }

        return null;

    }

}

eclipse创建java和web工程的更多相关文章
- 使用Eclipse创建动态的web工程
使用Eclipse创建动态的web工程 作者:尹正杰 版权声明:原创作品,谢绝转载!否则将追究法律责任. 一.修改工作区的编码 1>.点击Window选择Preferences 2>.将默 ...
- MAVEN创建JAVA的Web工程
maven命令:http://blog.csdn.net/edward0830ly/article/details/8748986 1.创建MAVEN的Web工程 mvn archetype:gene ...
- 【Java_SSM】(二)使用eclipse创建一个Maven web工程
这篇博文我们介绍一下如何利用eclipse创件一个maven web工程. (1)File--New--Other--Maven--Maven project 此处我们快速创建一个maven工程 点击 ...
- 使用eclipse创建spring mvc web工程并部署
创建maven工程
- IDEA 创建JAVA Maven Web 工程
转载自https://www.cnblogs.com/1314wamm/p/7475771.html 步骤一:首先先创建一个project,上次我说过了创建一个project就是一个工作空间,在这里就 ...
- IDEA 创建JAVA Maven Web 工程 不能建Sevlet文件
JAVA目录下建包而不是文件夹 需要添加依赖 <dependency> <groupId>javax.servlet</groupId> <artifactI ...
- Eclipse创建java web工程
Eclipse创建java web工程 eclipse版本:eclipse-jee-4.5-win32-x64 tomcat版本:apache-tomcat-7.0.63-windows-x64 jd ...
- eclipse: eclipse创建java web项目
Eclipse创建java web工程 eclipse版本:eclipse-jee-4.5-win32-x64 tomcat版本:apache-tomcat-7.0.63-windows-x64 jd ...
- 使用Java EE 在eclipse 开发动态的Web工程(Java web项目)
1.使用Java EE 在eclipse 开发动态的Web工程(Java web项目)1)开发开发选项切换到JavaEE2)可以在Windows->show view中找到package exp ...
随机推荐
- 「 优质资源20190409 」Java最新精选优质资源!
资源导读 经过小编精心整理,java最新优质资源出炉 不想看书,可以看视频,比较生动有趣,好的视频教程是一个好老师! 资源来自于网络,请勿用于商业用途 资源目录 1.Java Spring 技术栈构建 ...
- mybatis增强工具MyBatis-plus
如果你正在用mybatis,那MyBatis-plus你不能错过,配合使用可极大简化开发.提高效率! 简介 MyBatis-Plus(简称 MP)是一个 MyBatis 的增强工具,在 MyBatis ...
- vijos 分梨子
点击打开题目 很有(wei)趣(suo)的一道题 暴力解法也不难,枚举大小下限与甜度下限,在一个一个地试 显然 O(n^3) 炸掉 但如何将其缩短,只好从那个式子来入手了: C1⋅(ai−a0)+C2 ...
- POJ Expanding Rods
点击打开题目 题目大意 给定L,n,C,L为红色线段,L(1+n*C)为绿色弧,求两者中点的距离 二分圆心角度数,接下来就是几何的能力了 根据正弦定理,可得: Lsinθ=rsin(90°−θ) 则弧 ...
- [ZJOI2006]书架(权值splay)
[ZJOI2006]书架(luogu) Description 题目描述 小T有一个很大的书柜.这个书柜的构造有些独特,即书柜里的书是从上至下堆放成一列.她用1到n的正整数给每本书都编了号. 小T在看 ...
- Object Detection API error: “ImportError: cannot import name anchor_generator_pb2”
Configuring the Object Detection API on Windows is a tricky task. You will find the answer in the fo ...
- 通过openjdk源码分析ObjectMonitor底层实现
通过openjdk源码分析ObjectMonitor底层实现 Hotspot JDK只是部分开源,将底层的调用C++的native方法的具体实现屏蔽了,而openjdk则将这部分也开源了,接下来我们通 ...
- ORALCE逻辑存储结构
ORACLE逻辑存储结构块: 数据块 他是最基础的逻辑存储单元,数据以行的形式存储到我么的数据块中 区 :多个块的集合 并且区组成了物理的数据文件 段 :(表 索引 物化视图 物化视图日志 大对象 大 ...
- 阿里云Redis性能测试结果(1个集合存300万数据,查询能几秒返回结果)
现状: 1.买了一台主从的阿里云Redis,内存就1GB. 2.查询了阿里云的帮助,没有找到性能相关的说明, 有的也是4GB版本的并发性能 3.提工单问客服 一个集合里有300万数据,单次查询性能大概 ...
- Solaris磁盘镜像恢复
注:此文章笔者实验记录,欢迎大家指正 Solaris磁盘镜像恢复方法一: 系统启动,开机提示子镜像需要维护: 查看磁盘镜像信息 进入系统后,metastat -pc 和metadb #查看镜像状态与m ...