python实现的简单点对点(p2p)聊天
点对点聊天首先是基于多线程的网络编程,其次就是将每一个连接都保存为一个具有独一属性的对象并添加到连接列表中,对于每一个连接对象发送过来的信息必须要包含主要的三项内容(from,to,messages),这样当信息发送到服务器之后服务器根据to的连接对象遍历连接列表找到目标对象将信息发送给目标,目标拿到信息后就知道是谁发过来的,然后根据id号码进行回复。。此实现将会继续完善,后续新加功能将会在我个人github主页展现
服务器端实现:
#coding:utf-8

'''

file:server.py

date:2017/9/10 12:43

author:lockey

email:lockey@123.com

platform:win7.x86_64 pycharm python3

desc:p2p communication serverside

'''

import socketserver,json

import subprocess

connLst = []

##  连接列表,用来保存一个连接的信息(代号 地址和端口 连接对象)

class Connector(object):#连接对象类

    def __init__(self,account,password,addrPort,conObj):

        self.account = account

        self.password = password

        self.addrPort = addrPort

        self.conObj = conObj

class MyServer(socketserver.BaseRequestHandler):

    def handle(self):

        print("got connection from",self.client_address)

        register = False

        while True:

            conn = self.request

            data = conn.recv(1024)

            if not data:

                continue

            dataobj = json.loads(data.decode('utf-8'))

            #如果连接客户端发送过来的信息格式是一个列表且注册标识为False时进行用户注册

            if type(dataobj) == list and not register:

                account = dataobj[0]

                password = dataobj[1]

                conObj = Connector(account,password,self.client_address,self.request)

                connLst.append(conObj)

                register = True

                continue

            print(connLst)

            #如果目标客户端在发送数据给目标客服端

            if len(connLst) > 1 and type(dataobj) == dict:

                sendok = False

                for obj in connLst:

                    if dataobj['to'] == obj.account:

                        obj.conObj.sendall(data)

                        sendok = True

                if sendok == False:

                    print('no target valid!')

            else:

                conn.sendall('nobody recevied!'.encode('utf-8'))

                continue

if __name__ == '__main__':

    server = socketserver.ThreadingTCPServer(('192.168.1.4',8022),MyServer)

    print('waiting for connection...')

    server.serve_forever()
- 1
- 2
- 3
- 4
- 5
- 6
- 7
- 8
- 9
- 10
- 11
- 12
- 13
- 14
- 15
- 16
- 17
- 18
- 19
- 20
- 21
- 22
- 23
- 24
- 25
- 26
- 27
- 28
- 29
- 30
- 31
- 32
- 33
- 34
- 35
- 36
- 37
- 38
- 39
- 40
- 41
- 42
- 43
- 44
- 45
- 46
- 47
- 48
- 49
- 50
- 51
- 52
- 53
- 54
- 55
- 56
- 57
- 58
- 59
- 60
客户端实现:
#coding:utf-8

'''

file:client.py.py

date:2017/9/10 11:01

author:lockey

email:lockey@123.com

platform:win7.x86_64 pycharm python3

desc:p2p communication clientside

'''

from socket import *

import threading,sys,json,re

HOST = '192.168.1.4'  ##

PORT=8022

BUFSIZ = 1024  ##缓冲区大小  1K

ADDR = (HOST,PORT)

tcpCliSock = socket(AF_INET,SOCK_STREAM)

tcpCliSock.connect(ADDR)

userAccount = None

def register():

    myre = r"^[_a-zA-Z]\w{0,}"

    #正则验证用户名是否合乎规范

    accout = input('Please input your account: ')

    if not re.findall(myre, accout):

        print('Account illegal!')

        return None

    password1  = input('Please input your password: ')

    password2 = input('Please confirm your password: ')

    if not (password1 and password1 == password2):

        print('Password not illegal!')

        return None

    global userAccount

    userAccount = accout

    return (accout,password1)

class inputdata(threading.Thread):

    def run(self):

        while True:

            sendto = input('to>>:')

            msg = input('msg>>:')

            dataObj = {'to':sendto,'msg':msg,'froms':userAccount}

            datastr = json.dumps(dataObj)

            tcpCliSock.send(datastr.encode('utf-8'))

class getdata(threading.Thread):

    def run(self):

        while True:

            data = tcpCliSock.recv(BUFSIZ)

            dataObj = json.loads(data.decode('utf-8'))

            print('{} -> {}'.format(dataObj['froms'],dataObj['msg']))

def main():

    while True:

        regInfo = register()

        if  regInfo:

            datastr = json.dumps(regInfo)

            tcpCliSock.send(datastr.encode('utf-8'))

            break

    myinputd = inputdata()

    mygetdata = getdata()

    myinputd.start()

    mygetdata.start()

    myinputd.join()

    mygetdata.join()

if __name__ == '__main__':

    main()
- 1
- 2
- 3
- 4
- 5
- 6
- 7
- 8
- 9
- 10
- 11
- 12
- 13
- 14
- 15
- 16
- 17
- 18
- 19
- 20
- 21
- 22
- 23
- 24
- 25
- 26
- 27
- 28
- 29
- 30
- 31
- 32
- 33
- 34
- 35
- 36
- 37
- 38
- 39
- 40
- 41
- 42
- 43
- 44
- 45
- 46
- 47
- 48
- 49
- 50
- 51
- 52
- 53
- 54
- 55
- 56
- 57
- 58
- 59
- 60
- 61
- 62
- 63
- 64
- 65
- 66
- 67
- 68
- 69
- 70
- 71
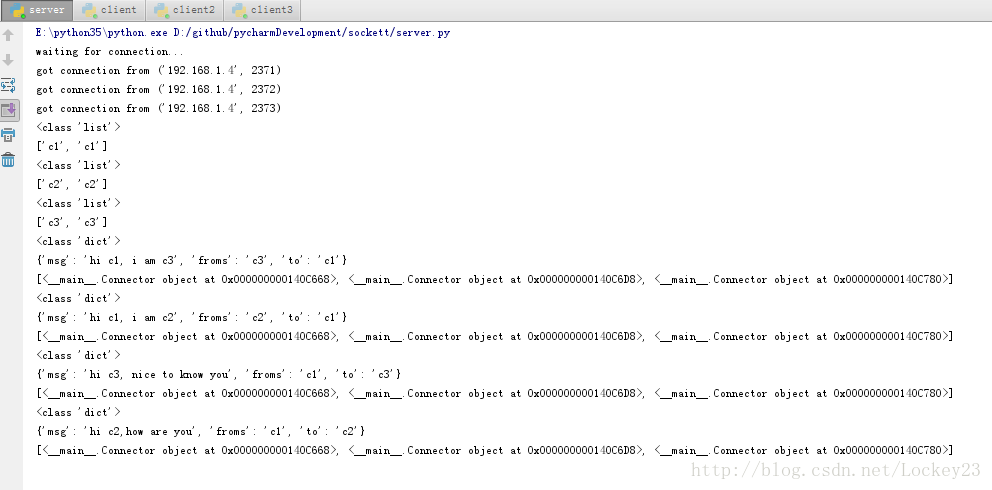
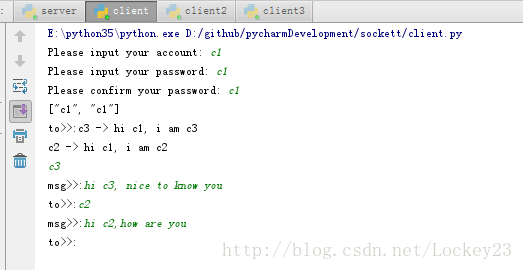
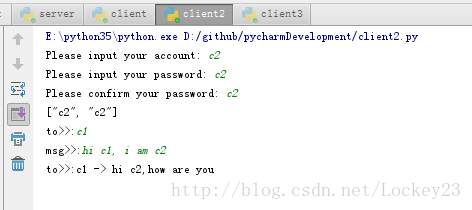
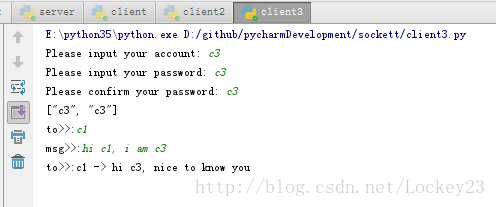
运行结果示例:
服务器端结果:
客户端1:
客户端2:
客户端3:
如果运行出错请检查平台以及python版本号
python实现的简单点对点(p2p)聊天的更多相关文章
- python实现一个简单的网络聊天程序
一.Linux Socket 1.Linux Socke基本上就是BSD Socket(伯克利套接字) 伯克利套接字的应用编程接口(API)是采用C语言的进程间通信的库,经常用在计算机网络间的通信.B ...
- python socket编程 实现简单p2p聊天程序
目标是写一个python的p2p聊天的项目,这里先说一下python socket的基础课程 一.Python Socket 基础课程 Socket就是套接字,作为BSD UNIX的进程通信机制,取后 ...
- 通过python 构建一个简单的聊天服务器
构建一个 Python 聊天服务器 一个简单的聊天服务器 现在您已经了解了 Python 中基本的网络 API:接下来可以在一个简单的应用程序中应用这些知识了.在本节中,将构建一个简单的聊天服务器.使 ...
- Python练习3-XML-RPC实现简单的P2P文件共享
XML-RPC实现简单的P2P文件共享 先来个百度百科: XML-RPC的全称是XML Remote Procedure Call,即XML(标准通用标记语言下的一个子集)远程过程调用.它是一套允许运 ...
- python 全栈开发,Day130(多玩具端的遥控功能, 简单的双向聊天,聊天记录存放数据库,消息提醒,玩具主动发起消息,玩具主动发起点播)
先下载github代码,下面的操作,都是基于这个版本来的! https://github.com/987334176/Intelligent_toy/archive/v1.3.zip 注意:由于涉及到 ...
- 百行go代码构建p2p聊天室
百行go代码构建p2p聊天室 百行go代码构建p2p聊天室 1. 上手使用 2. whisper 原理 3. 源码解读 3.1 参数说明 3.1 连接主节点 3.2 我的标识 3.2 配置我的节点 3 ...
- 以太坊系列之十八: 百行go代码构建p2p聊天室
百行go代码构建p2p聊天室 百行go代码构建p2p聊天室 1. 上手使用 2. whisper 原理 3. 源码解读 3.1 参数说明 3.1 连接主节点 3.2 我的标识 3.2 配置我的节点 3 ...
- python之pandas简单介绍及使用(一)
python之pandas简单介绍及使用(一) 一. Pandas简介1.Python Data Analysis Library 或 pandas 是基于NumPy 的一种工具,该工具是为了解决数据 ...
- 使用Servlet和JSP实现一个简单的Web聊天室系统
1 问题描述 利用Java EE相关技术实现一个简单的Web聊天室系统,具体要求如下. (1)编写一个登录 ...
随机推荐
- spring boot(一)入门
什么是spring boot Spring Boot是由Pivotal团队提供的全新框架,其设计目的是用来简化新Spring应用的初始搭建以及开发过程.该框架使用了特定的方式来进行配置,从而使开发人员 ...
- 子类父类(虚函数下的 引用指针 对象)->看来没有子类指针这回事
#include<iostream> using namespace std; class Father { public: Father() { cout << " ...
- hadoop中发送文件的脚本
多台主机执行相同的命令 [xcall] [/usr/local/bin] sudo nano xcall ----------------------------------------------- ...
- Oracle 11.2.0.4.0 Dataguard部署和日常维护(1)-数据库安装篇
本次测试环境 系统版本 CentOS release 6.8 主机名 ec2t-userdata-01 ec2t-userdata-01 IP地址 10.189.102.118 10.189.100. ...
- ActiveMQ 的线程池
ActiveMQ 的线程池实质上也是 ThreadPoolExecutor,不过它的任务模型有自己的特点,我们先看一个例子: public static void main(String[] args ...
- ActiveMQ 消息的重新投递
正常情况下:consumer 消费完消息后,会发送"标准确认"给 broker,这个确认对象以 MessageAck 类表征: // 省略其他代码.类中定义了各种确认的类型 pub ...
- Qt绘制字体并获取文本宽度
参考资料: https://blog.csdn.net/liang19890820/article/details/51227894 QString text("abc");QPa ...
- 微信小程序FAQ
1. 图片名注意大小写. 不然本地预览是可以看到的.上传后用手机就看不到了. 2. bindtap等事件传参 wxml <view id="tapTest" data-hi= ...
- powerdesidgner1
'******************************************************************************'* File: comment2name ...
- Regex Password Validation
You need to write regex that will validate a password to make sure it meets the follwing criteria: A ...