安卓开发笔记——关于开源项目SlidingMenu的使用介绍(仿QQ5.0侧滑菜单)
记得去年年末的时候写过这个侧滑效果,当时是利用自定义HorizontalScrollView来实现的,效果如下:
有兴趣的朋友可以看看这篇文件《安卓开发笔记——自定义HorizontalScrollView控件(实现QQ5.0侧滑效果)》
今天换一种实现方式,来说下GitHub上非常优秀的开源项目SlidingMenu的使用,它是一种比较新的界面效果,在主界面左滑或右滑出现设置界面效果,能方便的进行各种操作。市面上很多优秀的APP都采用了这种界面方案,像facebook、人人网、everynote、Google+等。

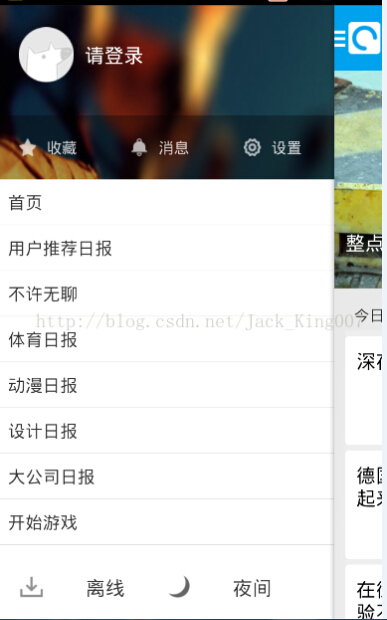
再来看看今天要实现的效果图:
直接进入主题吧,先来说下准备工作:
1、既然是要使用这个开源项目,那首先当然是要下载它了,这是SlidingMenu的下载地址:https://github.com/jfeinstein10/SlidingMenu
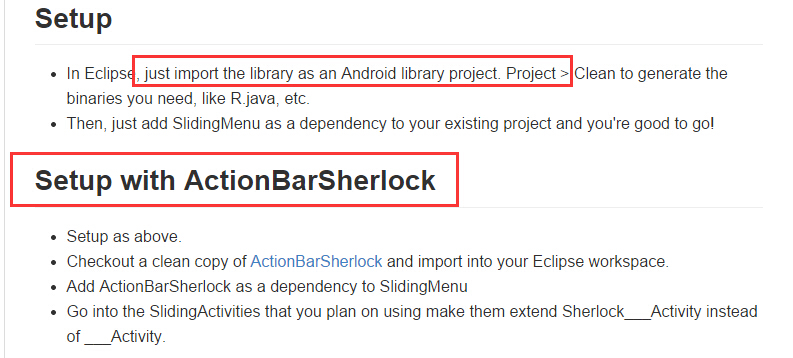
在这个项目介绍中,我们可以发现这样的两句话,首先SlidingMenu它只是作为一个库文件引入,再来它需要依赖ActionBarSherlock,所以这里我们还需要另外去下载它,安卓4.0以上可以忽略,但在我们实际开发中,最低版本一般还是要求2.2或者2.3以上,这也是为了向下兼容ActionBar。这是ActionBarSherlock的下载地址:https://github.com/JakeWharton/ActionBarSherlock
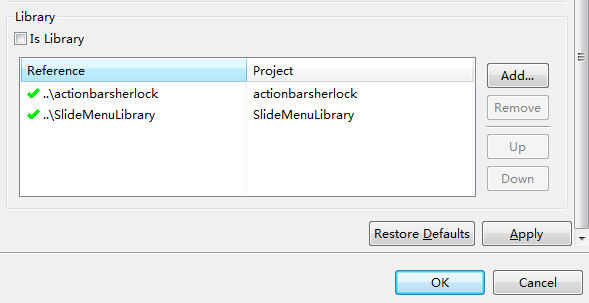
2、既然下载好了所需要的文件,那么就将其导入项目吧,在这里只需要导入2个文件夹
(1)SlidingMenu里的library (2)ActionBarSherlock里的actionbarsherlock
引用这2个库文件:(注意点:不管是导入库还是自己建的项目,android-support-v4.jar的版本一定要一致,最好复制一份,集体覆盖一遍)
接着就可以开始进入开发工作了,这里的SlidingMenu你可以仅仅只作为一个View进入,直接将它的实现写在Activity。为了不使Activity那么的冗余,我这里借助Fragment来实现,这也更接近我们日常的开发环境,把Activity当做容器,上面装载着两个Fragment,一个是侧滑菜单SlideMenu,一个是主界面内容。
先来看下XML布局文件:
1、主Activity界面,里面装了一个FrameLayout布局,便于一会需要主界面布局和菜单布局来覆盖替换它。
 <RelativeLayout xmlns:android="http://schemas.android.com/apk/res/android"

     xmlns:tools="http://schemas.android.com/tools"

     android:layout_width="match_parent"

     android:layout_height="match_parent">

 <FrameLayout

     android:id="@+id/fl_main"

     android:layout_width="fill_parent"

     android:layout_height="fill_parent"

     ></FrameLayout>

 </RelativeLayout>
2、侧滑菜单布局
 <?xml version="1.0" encoding="utf-8"?>

 <RelativeLayout xmlns:android="http://schemas.android.com/apk/res/android"

     android:id="@+id/leftmenu"

     android:layout_width="match_parent"

     android:layout_height="match_parent"

     android:background="@drawable/img_frame_background"

     >

     <LinearLayout

         android:layout_width="match_parent"

         android:layout_height="match_parent"

         android:orientation="vertical" >

         <RelativeLayout

             android:layout_width="match_parent"

             android:layout_height="wrap_content"

             android:layout_centerInParent="true" >

             <ImageView

                 android:id="@+id/menuimage1"

                 android:layout_width="50dp"

                 android:layout_height="50dp"

                 android:layout_centerVertical="true"

                 android:layout_marginLeft="20dp"

                 android:layout_marginTop="20dp"

                 android:src="@drawable/img_1" />

             <TextView

                 android:id="@+id/menutext1"

                 android:layout_width="wrap_content"

                 android:layout_height="wrap_content"

                 android:layout_centerVertical="true"

                 android:layout_marginLeft="20dp"

                 android:layout_marginTop="20dp"

                 android:layout_toRightOf="@id/menuimage1"

                 android:text="菜单一"

                 android:textColor="@android:color/white"

                 android:textSize="20dp" />

         </RelativeLayout>

                 <RelativeLayout

             android:layout_width="match_parent"

             android:layout_height="wrap_content"

             android:layout_centerInParent="true" >

             <ImageView

                 android:id="@+id/menuimage2"

                 android:layout_width="50dp"

                 android:layout_height="50dp"

                 android:layout_centerVertical="true"

                 android:layout_marginLeft="20dp"

                 android:layout_marginTop="20dp"

                 android:src="@drawable/img_2" />

             <TextView

                 android:id="@+id/menutext2"

                 android:layout_width="wrap_content"

                 android:layout_height="wrap_content"

                 android:layout_centerVertical="true"

                 android:layout_marginLeft="20dp"

                 android:layout_marginTop="20dp"

                 android:layout_toRightOf="@id/menuimage2"

                 android:text="菜单二"

                 android:textColor="@android:color/white"

                 android:textSize="20dp" />

         </RelativeLayout>

                         <RelativeLayout

             android:layout_width="match_parent"

             android:layout_height="wrap_content"

             android:layout_centerInParent="true" >

             <ImageView

                 android:id="@+id/menuimage3"

                 android:layout_width="50dp"

                 android:layout_height="50dp"

                 android:layout_centerVertical="true"

                 android:layout_marginLeft="20dp"

                 android:layout_marginTop="20dp"

                 android:src="@drawable/img_3" />

             <TextView

                 android:id="@+id/menutext3"

                 android:layout_width="wrap_content"

                 android:layout_height="wrap_content"

                 android:layout_centerVertical="true"

                 android:layout_marginLeft="20dp"

                 android:layout_marginTop="20dp"

                 android:layout_toRightOf="@id/menuimage3"

                 android:text="菜单三"

                 android:textColor="@android:color/white"

                 android:textSize="20dp" />

         </RelativeLayout>

                                 <RelativeLayout

             android:layout_width="match_parent"

             android:layout_height="wrap_content"

             android:layout_centerInParent="true" >

             <ImageView

                 android:id="@+id/menuimage4"

                 android:layout_width="50dp"

                 android:layout_height="50dp"

                 android:layout_centerVertical="true"

                 android:layout_marginLeft="20dp"

                 android:layout_marginTop="20dp"

                 android:src="@drawable/img_4" />

             <TextView

                 android:id="@+id/menutext4"

                 android:layout_width="wrap_content"

                 android:layout_height="wrap_content"

                 android:layout_centerVertical="true"

                 android:layout_marginLeft="20dp"

                 android:layout_marginTop="20dp"

                 android:layout_toRightOf="@id/menuimage4"

                 android:text="菜单四"

                 android:textColor="@android:color/white"

                 android:textSize="20dp" />

         </RelativeLayout>

                                         <RelativeLayout

             android:layout_width="match_parent"

             android:layout_height="wrap_content"

             android:layout_centerInParent="true" >

             <ImageView

                 android:id="@+id/menuimage5"

                 android:layout_width="50dp"

                 android:layout_height="50dp"

                 android:layout_centerVertical="true"

                 android:layout_marginLeft="20dp"

                 android:layout_marginTop="20dp"

                 android:src="@drawable/img_5" />

             <TextView

                 android:id="@+id/menutext5"

                 android:layout_width="wrap_content"

                 android:layout_height="wrap_content"

                 android:layout_centerVertical="true"

                 android:layout_marginLeft="20dp"

                 android:layout_marginTop="20dp"

                 android:layout_toRightOf="@id/menuimage5"

                 android:text="菜单五"

                 android:textColor="@android:color/white"

                 android:textSize="20dp" />

         </RelativeLayout>

     </LinearLayout>

 </RelativeLayout>
3、主界面布局,只为演示Demo用,这里只存放了一张背景图
 <RelativeLayout xmlns:android="http://schemas.android.com/apk/res/android"

     xmlns:tools="http://schemas.android.com/tools"

     android:layout_width="match_parent"

     android:layout_height="match_parent"

         android:background="@drawable/qq" >

 </RelativeLayout>
然后我们需要两个Fragment,一个主界面,一个侧滑菜单
1、主界面
 package com.rabbit.slidemenu.ui;

 import android.os.Bundle;

 import android.support.annotation.Nullable;

 import android.support.v4.app.Fragment;

 import android.view.LayoutInflater;

 import android.view.View;

 import android.view.ViewGroup;

 import com.example.slidemenutest.R;

 public class MainFragment extends Fragment {

     @Override

     public View onCreateView(LayoutInflater inflater, @Nullable ViewGroup container, @Nullable Bundle savedInstanceState) {

         return inflater.inflate(R.layout.main, container, false);

     }

 }
2、侧滑菜单
 package com.rabbit.slidemenu.ui;

 import android.os.Bundle;

 import android.support.annotation.Nullable;

 import android.support.v4.app.Fragment;

 import android.view.LayoutInflater;

 import android.view.View;

 import android.view.ViewGroup;

 import com.example.slidemenutest.R;

 public class MenuFragment extends Fragment {

     @Override

     public View onCreateView(LayoutInflater inflater, @Nullable ViewGroup container, @Nullable Bundle savedInstanceState) {

         return inflater.inflate(R.layout.leftmenu, container, false);

     }

 }
3、主Activity(重点),代码非常简单,大家看注释就可以了。
 package com.rabbit.slidemenu.ui;

 import android.os.Bundle;

 import android.support.v4.app.FragmentActivity;

 import android.view.KeyEvent;

 import com.example.slidemenutest.R;

 import com.jeremyfeinstein.slidingmenu.lib.SlidingMenu;

 public class MainActivity extends FragmentActivity {

     //声明Slidemenu对象

     private SlidingMenu slidingMenu;

     @Override

     protected void onCreate(Bundle savedInstanceState) {

         super.onCreate(savedInstanceState);

         setContentView(R.layout.activity_main);

         //替换主界面内容

         getSupportFragmentManager().beginTransaction().replace(R.id.fl_main, new MainFragment()).commit();

         //实例化菜单控件

         slidingMenu=new SlidingMenu(this);

         //设置相关属性

         slidingMenu.setMode(SlidingMenu.LEFT);//菜单靠左

         slidingMenu.setTouchModeAbove(SlidingMenu.TOUCHMODE_FULLSCREEN);//全屏支持触摸拖拉

         slidingMenu.setBehindOffset(200);//设置菜单大小

         slidingMenu.attachToActivity(this, SlidingMenu.SLIDING_CONTENT);//不包含ActionBar

         slidingMenu.setMenu(R.layout.leftmenu);

         //替换掉菜单内容

         getSupportFragmentManager().beginTransaction().replace(R.id.leftmenu, new MenuFragment()).commit();

     }

     @Override

     public boolean onKeyDown(int keyCode, KeyEvent event) {

         //重写了Menu监听,实现按下手机Menu键弹出和关闭侧滑菜单

         if(keyCode==KeyEvent.KEYCODE_MENU){

             slidingMenu.toggle();

         }

         return super.onKeyDown(keyCode, event);

     }

 }
再来看下关于SlidingMenu 的一些介绍和API:
1、得到侧滑菜单
SlidingMenu sm = getSlidingMenu();
2、设置侧滑菜单是从左边出来还是从右边出来
sm.setMode(SlidingMenu.LEFT);
3、设置滑动菜单出来之后,内容页 , 显示的剩余宽度
sm.setBehindWidthRes(R.dimen.slidingmenu_offset);
4、设置滑动菜单的阴影, 设置阴影,阴影需要开始的时候,特别暗,慢慢的变淡
sm.setShadowDrawble(R.drawable.shadow);
5、设置阴影的宽度
sm.setShadowWidth(R.dimen.shadow_width);
6、设置滑动菜单的范围
//第一个参数SlidingMenu.TOUCHMODE_FULLSCREEN 可以全屏滑动
// 第二个参数SlidingMenu.TOUCHMODE_MARGIN 只能在边沿滑动
//三 个参数SlidingMenu.TOUCHMODE_NONE 不能滑动
sm.setTouchModeAbove( SlidingMenu.TOUCHMODE_FULLSCREEN );
7、设置SldingMenu自动判断当前是打开还是关闭
sm.toggle();
其他一些这里就不一一列出了,具体大家看官网https://github.com/jfeinstein10/slidingmenu吧,所有东西都在上面了。
最后还有个需要注意的地方,GitHub上面的介绍也指出了:
NOTE : you cannot use both behindOffset and behindWidth. You will get an exception if you try.
不要同时设置behindOffset和behindWidth,否则会导致异常。
作者:Balla_兔子
出处:http://www.cnblogs.com/lichenwei/
本文版权归作者和博客园共有,欢迎转载,但未经作者同意必须保留此段声明,且在文章页面明显位置给出原文链接。
正在看本人博客的这位童鞋,我看你气度不凡,谈吐间隐隐有王者之气,日后必有一番作为!旁边有“推荐”二字,你就顺手把它点了吧,相得准,我分文不收;相不准,你也好回来找我!
安卓开发笔记——关于开源项目SlidingMenu的使用介绍(仿QQ5.0侧滑菜单)的更多相关文章
- 安卓开发笔记——关于开源组件PullToRefresh实现下拉刷新和上拉加载(一分钟搞定,超级简单)
前言 以前在实现ListView下拉刷新和上拉加载数据的时候都是去继承原生的ListView重写它的一些方法,实现起来非常繁杂,需要我们自己去给ListView定制下拉刷新和上拉加载的布局文件,然后添 ...
- 【Android UI设计与开发】9:滑动菜单栏(一)开源项目SlidingMenu的使用和示例
一.SlidingMenu简介 相信大家对SlidingMenu都不陌生了,它是一种比较新的设置界面或配置界面的效果,在主界面左滑或者右滑出现设置界面效果,能方便的进行各种操作.很多优秀的应用都采用了 ...
- Android开源项目SlidingMenu本学习笔记(两)
我们已经出台SlidingMenu使用:Android开源项目SlidingMenu本学习笔记(一个),接下来再深入学习下.依据滑出项的Menu切换到相应的页面 文件夹结构: watermark/2/ ...
- 【Android UI设计与开发】第17期:滑动菜单栏(二)开源项目SlidingMenu的示例
通过上一篇文章的讲解,相信大家对于开源项目SlidingMenu都有了一个比较初步的了解(不了解的可以参考上 一篇文章),那么从这一章开始,博主将会以SlidingMenu为重心,给大家带来非常丰富的 ...
- 安卓开发笔记——自定义广告轮播Banner(实现无限循环)
关于广告轮播,大家肯定不会陌生,它在现手机市场各大APP出现的频率极高,它的优点在于"不占屏",可以仅用小小的固定空位来展示几个甚至几十个广告条,而且动态效果很好,具有很好的用户& ...
- 滑动菜单栏(一)开源项目SlidingMenu的使用
本帖最后由 user1 于 2013-7-16 21:56 编辑 一.SlidingMenu简介相信大家对SlidingMenu都不陌生了,它是一种比较新的设置界面或配置界面的效果,在主界面左滑或者右 ...
- 滑动菜单栏之开源项目SlidingMenu的使用
一.SlidingMenu简介 相信大家对SlidingMenu都不陌生了,它是一种比较新的设置界面或配置界面的效果,在主界面左滑或者右滑出现设置界面效果,能方便的进行各种操作.很多优秀的应用都采用了 ...
- 安卓开发笔记——深入Activity
在上一篇文章<安卓开发笔记——重识Activity >中,我们了解了Activity生命周期的执行顺序和一些基本的数据保存操作,但如果只知道这些是对于我们的开发需求来说是远远不够的,今天我 ...
- 配置开源项目 SlidingMenu 的问题
最近想研究一下开源项目 SlidingMenu,单是配置项目就花了好长的时间,断断续续的尝试,终于配置成功了,写下来和大家分享一下经验. Step 1:导入依赖的项目和例子 打开项目 File -&g ...
随机推荐
- [NOIp2013普及组]车站分级
思路: 对于每一趟车,将区间内所有经停的站和所有未经停的站连一条边,表示前者优先级一定高于后者,然后用Kahn跑一遍拓扑排序即可.然而这样会创造大量多余的边,会TLE1个点.考虑一种优化:因为每趟车本 ...
- bzoj 4084 双旋转字符串
给两个集合A,B,找满足要求的(a,b)的对数,可以计算对于a,哪些b成立. 还有就是字符串hash的使用,感觉平时用字符串hash太少了. /**************************** ...
- java.net.SocketException四大异常解决方案
java.net.SocketException如何才能更好的使用呢?这个就需要我们先要了解有关这个语言的相关问题.希望大家有所帮助.那么我们就来看看有关java.net.SocketExceptio ...
- mybatis批量插入数据
Mybatis在执行批量插入时,如果使用的是for循环逐一插入,那么可以正确返回主键id.如果使用动态sql的foreach循环,那么返回的主键id列表,可能为null,这让很多人感到困惑:本文将分析 ...
- hadoop三种运行模式
1.单机模式:安装简单,几乎不用做任何配置,但仅限于调试用途 2.伪分布模式:在单节点上同时启动namenode.datanode.jobtracker.tasktracker.secondaryna ...
- eclipse-在编译项目时js特别慢的问题
eclipse在编译项目时,当项目中导入了很多第三方js库时,eclipse在验证js时会消耗大量的时间,而我们却完全不用考虑那些js是否有错误 步骤: 去除eclipse的JS验证: 1.将wind ...
- android 异常:ScrollView can host only one direct child
android 采用ScrollView布局时出现异常:ScrollView can host only one direct child. 主要是ScrollView内部只能有一个子元素,即不能并列 ...
- [Python设计模式] 第7章 找人帮忙追美眉——代理模式
github地址:https://github.com/cheesezh/python_design_patterns 题目1 Boy追求Girl,给Girl送鲜花,送巧克力,送洋娃娃. class ...
- 使用Guava的ComparisonChain实现自定义的排序
可以看到使用比较器前,先要写一个实体类,还要实现comparable接口,实现compareTo方法.这个方法一般会返回-1 0 1三个int类型数字,分别表示,对象和传入的对象比较,排序应该在传入的 ...
- excel随机函数
=D7+RAND()*(8000-4250) 含义: 1.在D7数值的基础上,随机加一个数值,该数值的随机范围为4250——8000. 2.注意8000和4250要反着写