
Centos 6 之samba 搭建
学习linux从实践做起。
实验环境:vmware,cenots 6,xshell
注意:使用vmware 时,网络连接设置成桥接,和宿主机位于同一个网段。
实验需求:模拟实际公司文件服务器。 新建SHARE 文件夹,权限所有人公开
新建IT 文件夹,只对IT部门员工开放
新建DE文件夹,对于DE部门员工开放
实验步骤:
1:由于selinux设置不懂,和iptables 只了解皮毛,为了不必要的麻烦:
关闭selinux :
 [root@localhost ~]# vi /etc/selinux/config

 # This file controls the state of SELinux on the system.

 # SELINUX= can take one of these three values:

 #     enforcing - SELinux security policy is enforced.

 #     permissive - SELinux prints warnings instead of enforcing.

 #     disabled - No SELinux policy is loaded.

 SELINUX=disabled

 # SELINUXTYPE= can take one of these two values:

 #     targeted - Targeted processes are protected,

 #     mls - Multi Level Security protection.

 SELINUXTYPE=targeted
关闭iptables:
 [root@localhost ~]# service iptables stop;chkconfig iptables off;chkconfig --list | grep iptables

 iptables: Setting chains to policy ACCEPT: filter          [  OK  ]

 iptables: Flushing firewall rules:                         [  OK  ]

 iptables: Unloading modules:                               [  OK  ]

 iptables           :off    :off    :off    :off    :off    :off    :off
2:reboot,查看并且确保生效
 [root@localhost ~]# reboot

 之后,继续查看

 [root@localhost ~]# chkconfig --list | grep iptables

 iptables           :off    :off    :off    :off    :off    :off    :off
3:新建SHARE,IT,DE文件夹并设置权限
 [root@localhost ~]# mkdir -m  /home/SHARE /home/IT /home/DE

 [root@localhost ~]# ls -l /home/

 total

 drwxrwx---.  root root  Dec  : DE

 drwxrwx---.  root root  Dec  : IT

 drwxrwx---.  root root  Dec  : SHARE
4:新建用户组SHARE,IT,DE,新建IT1,IT2用户,新建DE1,DE2用户(IT1,IT2,DE1,DE2属于SHARE组,IT1,IT2属于IT组,DE1,DE2属于IT组)
 [root@localhost ~]#  groupadd SHARE;groupadd IT;groupadd DE

 [root@localhost ~]# cat /etc/group

 ...

 SHARE:x::

 IT:x::

 DE:x::
[root@localhost ~]# useradd IT1;usermod -s /sbin/nologin IT1 ;gpasswd -a IT1 IT; useradd IT2;usermod-s /sbin/nologin IT2 ;gpasswd -a IT2 IT; useradd DE1;usermod  -s /sbin/nologin DE1 ;gpasswd -a DE1 DE;useradd DE2 ;usermod -s /sbin/nologin DE2 ;gpasswd -a DE2 DE; gpasswd -a IT1 SHARE ;gpasswd -a IT2 SHARE;gpasswd -a DE1 SHARE; gpasswd -a DE2 SHARE

[root@localhost ~]# cat /etc/group

...

public:x::IT1,IT2,DE1,DE2

IT:x::IT1,IT2

DE:x::DE1,DE2

IT1:x::

IT2:x::

DE1:x::

DE2:x::
5:安装samba
[root@localhost ~]# yum -y install samba samba-client samba-swat
 [root@localhost ~]# rpm -qa | grep samba

 samba-winbind-clients-3.6.-.el6_7.x86_64

 samba-swat-3.6.-.el6_7.x86_64

 samba-client-3.6.-.el6_7.x86_64

 samba-3.6.-.el6_7.x86_64

 samba-winbind-3.6.-.el6_7.x86_64

 samba-common-3.6.-.el6_7.x86_64
6:备份smb.conf
[root@localhost ~]# cp /etc/samba/smb.conf /etc/samba/smb.conf.bk
7:将用户账户添加到samba账户
 [root@localhost ~]# smbpasswd -a IT1

 New SMB password:

 Retype new SMB password:

 Added user IT1.

 [root@localhost ~]# smbpasswd -a IT2

 New SMB password:

 Retype new SMB password:

 Added user IT2.

 [root@localhost ~]# smbpasswd -a DE1

 New SMB password:

 Retype new SMB password:

 Added user DE1.

 [root@localhost ~]# smbpasswd -a DE2

 New SMB password:

 Retype new SMB password:

 Added user DE2.
查看samba服务中,注册了哪些用户
 [root@localhost ~]# pdbedit -L

 IT1::

 DE1::

 IT2::

 DE2::
8:修改smb.conf配置文件
   [SHARE]

       comment = share

       path = /home/SHARE

       valid users = @SHARE

       read only = No

       create mask =

       directory mask =

   [IT]

      comment = IT

      path = /home/IT

      valid users = @IT

      read only = No

      create mask =

  [DE]

      comment = DE

      path = /home/DE

      valid users = @DE

      read only = No

      create mask =

      directory mask =
9:重启samba服务:
 [root@supker ~]# service smb restart

 Shutting down SMB services:                                [  OK  ]

 Starting SMB services:                                     [  OK  ]

 [root@supker ~]# service nmb restart

 Shutting down NMB services:                                [  OK  ]

 Starting NMB services:                                     [  OK  ]
《此处,请允许我感慨一声,真是日了狗了,测试半天,都是没有权限新建文件,然而reboot一下,就可以了!》
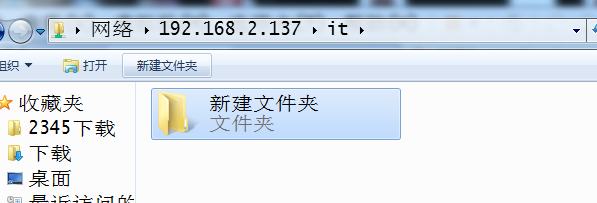
10:测试结果展示:
提示:断开共享盘连接的windows CMD命令:net use * /del /y



Centos 6 之samba 搭建的更多相关文章
- Centos 基础开发环境搭建之Maven私服nexus
hmaster 安装nexus及启动方式 /usr/local/nexus-2.6.3-01/bin ./nexus status Centos 基础开发环境搭建之Maven私服nexus . 软件 ...
- 如何在Fedora或CentOS上使用Samba共享
如今,无论在家里或者是办公场所,不同的电脑之间共享文件夹已不是什么新鲜事了.在这种趋势下,现代操作系统通过网络文件系统的方式使得电脑间数据的交换变得简单而透明.如果您工作的环境中既有微软的Window ...
- CentOS 5.5 Samba服务器安装总结
centos 5.5 samba服务器安装总结先来介绍一下基本的内容windows和linux共享主要利用samba服务器,所谓SMB就是指server message block 的缩写,它是Lin ...
- CentOS 6.2下搭建Web服务器
1Centos 6.2下搭建web服务器 如今,Linux在Web应用越来越广,许多企业都采用Linux来搭建Web服务器,这样即节省了购买正版软件的费用,而且还能够提高服务器的安全性. 之前我们介绍 ...
- 在CentOS上配置SAMBA共享目录(转载)
在CentOS上配置SAMBA共享目录 From: https://blog.csdn.net/qiumei1101381170/article/details/53265341 2016年11月21 ...
- CentOS 6.3下搭建Web服务器
准备前的工作: 1.修改selinux配置文件(/etc/sysconfig/selinux) 关闭防火墙 (1)把SELINUX=enforcing注释掉 (2)并添加SELINUX=disable ...
- CentOS 7设置Samba共享目录
1. 安装Samba服务 yum -y install samba # 查看yum源中Samba版本 yum list | grep samba # 查看samba的安装情况 rpm -qa | gr ...
- 手把手教你在CentOS 7.4下搭建Zabbix监控(转)
Linux系统版本:CentOS 7.4 1.安装前需要先关闭selinux和firewall. 1.1 [root@zabbix ~]# vi /etc/selinux/config 将SELINU ...
- centos set up samba
原文中文链接:https://wiki.centos.org/zh/HowTos/SetUpSamba 原文英文链接:https://wiki.centos.org/HowTos/SetUpSamba ...
随机推荐
- 【winform 学习】C# 转换成JSON对象
C#里面对json的处理有2种,JavaScriptSerializer和DataContractJsonSerializer. JavaScriptSerializer读出来就是key-value ...
- (spring-第18回【AOP基础篇】) 创建切面
一. 在创建增强一节中,增强被织入到目标类的所有方法中,假设我们希望有选择地织入到目标类某些特定的方法中,就需要使用切点进行目标连接点的定位. 二. spring通过org.springfra ...
- JSP 动作元素
JSP动作元素 1. 动作元素分类 用来动态的包含文件.网页跳转及使用JavaBean组件等. 语法:<jsp:XXX />或者<jsp:XXX></jsp:XXX&g ...
- [Spring] - Property注入
使用Spring注入Properies文件方法: 1.src中新建一个settings.properties文件,内容如下: db_driverClassName=com.mysql.jdbc.Dri ...
- java 读写JSON(一)
算是第一次正式接触Json,没有深入研究,先贴上java的代码,日后才说! package priv.chenhy.datehandle; import java.io.BufferedReader; ...
- Java-->Json解析网页数据
--> 官方解析jar包: 链接:http://pan.baidu.com/s/1pKDnXKv 密码:694d --> 离线Json格式检测工具: 链接:http://pan.baidu ...
- Oracle函数--字符串拼接
常用的字符串聚合(拼接)函数介绍 1.WMSYS.WM_CONCAT 从oracle 10G开始支持,使用案例如下: select deptno,wmsys.wm_concat(ename) from ...
- 安装thrift全过程
为了研究基于thrift的RPC框架,其实,是想自己基于thrift写一个微服务的platform.首先就是安装Thrift,便于IDL架构生成java的接口文件.多的不说了,开始install的过程 ...
- oracle case when 在查询时候的用法。
select count(1), features_level from (SELECT i.features_level, i.features, T.BASEAMINE_ID, T.COLUMN_ ...
- 解决php的“It is not safe to rely on the system’s timezone settings”问题
PHP调试的时候出现了警告: It is not safe to rely on the system解决方法,其实就是时区设置不正确造成的,本文提供了3种方法来解决这个问题. 实 际上,从PHP 5 ...