
Django JWT Token RestfulAPI用户认证
一般情况下我们Django默认的用户系统是满足不了我们的需求的,那么我们会对他做一定的扩展
创建用户项目
python manage.py startapp users
添加项目apps
 INSTALLED_APPS = [

     ...

     'users.apps.UsersConfig',

 ]

 添加AUTH_USRE_MODEL 替换默认的user

 AUTH_USER_MODEL = 'users.UserProfile'

 如果说想用全局认证需要在配置文件中添加

 # 全局认证from rest_framework.authentication import TokenAuthentication,BasicAuthentication,SessionAuthentication

 REST_FRAMEWORK = {

     'DEFAULT_AUTHENTICATION_CLASSES': (

         # 'rest_framework_jwt.authentication.JSONWebTokenAuthentication', # 全局认证,开源jwt

         'rest_framework.authentication.BasicAuthentication',

         'rest_framework.authentication.SessionAuthentication',

         # 'rest_framework.authentication.TokenAuthentication', #全局认证drf 自带的

     )

 }
settings.py
编写model
 from django.contrib.auth.models import AbstractUser

 from django.db import models

 class UserProfile(AbstractUser):

     """

     用户

     """

     name = models.CharField(max_length=30, null=True, blank=True, verbose_name="姓名")

     birthday = models.DateField(null=True, blank=True, verbose_name="出生年月")

     gender = models.CharField(max_length=6, choices=(("male", u"男"), ("female", "女")), default="female", verbose_name="性别")

     mobile = models.CharField(null=True, blank=True, max_length=11, verbose_name="电话")

     email = models.EmailField(max_length=100, null=True, blank=True, verbose_name="邮箱")

     class Meta:

         verbose_name = "用户"

         verbose_name_plural = verbose_name

     def __str__(self):

         return self.username
扩展User model
编写serializers.py
 from rest_framework import serializers

 from users.models import VerifyCode

 class VerifyCodeSerializer(serializers.ModelSerializer):

     class Meta:

         model = VerifyCode

         fields = "__all__"
serializers.py
编写views 动态验证不同的请求使用不同的验证
 from django.shortcuts import render

 from rest_framework import mixins, viewsets

 from rest_framework.views import APIView

 from users.models import VerifyCode

 from .serializers import VerifyCodeSerializer

 # Create your views here.

 from rest_framework.authentication import TokenAuthentication,BasicAuthentication,SessionAuthentication

 from rest_framework_jwt.authentication import JSONWebTokenAuthentication

 class VerifyCodeListViewSet(mixins.ListModelMixin,mixins.RetrieveModelMixin, viewsets.GenericViewSet):

     """

     验证码列表

     """

     queryset = VerifyCode.objects.all()

     serializer_class = VerifyCodeSerializer

     # authentication_classes = [TokenAuthentication, ]

     # authentication_classes = [JSONWebTokenAuthentication, ]

     # JWT 认证 加密,过期时间

     def get_authenticators(self):

         """

         Instantiates and returns the list of authenticators that this view can use.

         # 修改验证

         """

         # 动态认证

         print(self.authentication_classes)

         print([JSONWebTokenAuthentication, ])

         if self.action_map['get'] == "retrieve":

             self.authentication_classes = [BasicAuthentication,SessionAuthentication,]

         elif self.action_map['get'] == "list":

             self.authentication_classes = [JSONWebTokenAuthentication,]

         return [auth() for auth in self.authentication_classes]

     # DRF 自带的认证 不过期,易发生xss攻击

     # def get_authenticators(self):

     #     """

     #     Instantiates and returns the list of authenticators that this view can use.

     #     # 修改验证

     #     """

     #     print(self.authentication_classes)

     #     print([JSONWebTokenAuthentication, ])

     #     if self.action_map['get'] == "retrieve":

     #         self.authentication_classes = [BasicAuthentication,SessionAuthentication,]

     #     elif self.action_map['get'] == "list":

     #         self.authentication_classes = [JSONWebTokenAuthentication,]

     #     return [auth() for auth in self.authentication_classes]

     def get_queryset(self):

      # 取出认证信息

         print(self.request.auth)

         # print(self.action)

         return self.queryset

  # url

 """untitled URL Configuration

 The `urlpatterns` list routes URLs to views. For more information please see:

     https://docs.djangoproject.com/en/1.10/topics/http/urls/

 Examples:

 Function views

     1. Add an import:  from my_app import views

     2. Add a URL to urlpatterns:  url(r'^$', views.home, name='home')

 Class-based views

     1. Add an import:  from other_app.views import Home

     2. Add a URL to urlpatterns:  url(r'^$', Home.as_view(), name='home')

 Including another URLconf

     1. Import the include() function: from django.conf.urls import url, include

     2. Add a URL to urlpatterns:  url(r'^blog/', include('blog.urls'))

 """

 from rest_framework.authtoken import views

 from rest_framework_jwt.views import obtain_jwt_token

 from django.conf.urls import url, include

 from django.contrib import admin

 from rest_framework import routers

 from users.views import VerifyCodeListViewSet

 router   = routers.DefaultRouter()

 router.register(r'codes', VerifyCodeListViewSet, 'codes')

 urlpatterns = [

     url(r'^admin/', admin.site.urls),

     url(r'^api-auth/', include('rest_framework.urls'))

 ]

 urlpatterns += [

     # drf 自带的

     url(r'^api-token-auth/', views.obtain_auth_token),

     # jwt 认证

     url(r'^jwt_auth/', obtain_jwt_token),

 ]

 urlpatterns += router.urls
views.py
测试
1. debug模式启动

2. 使用postmain测试
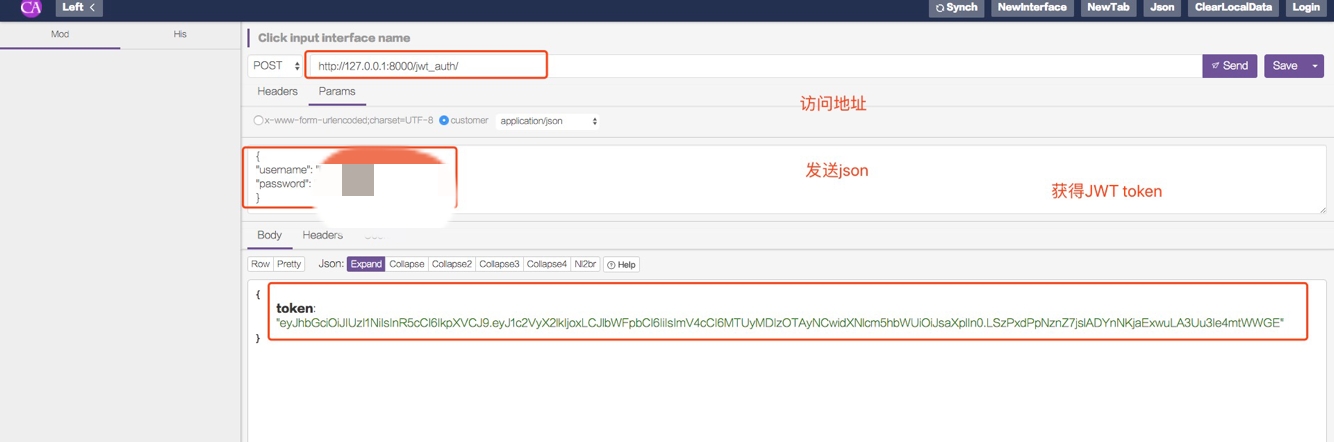
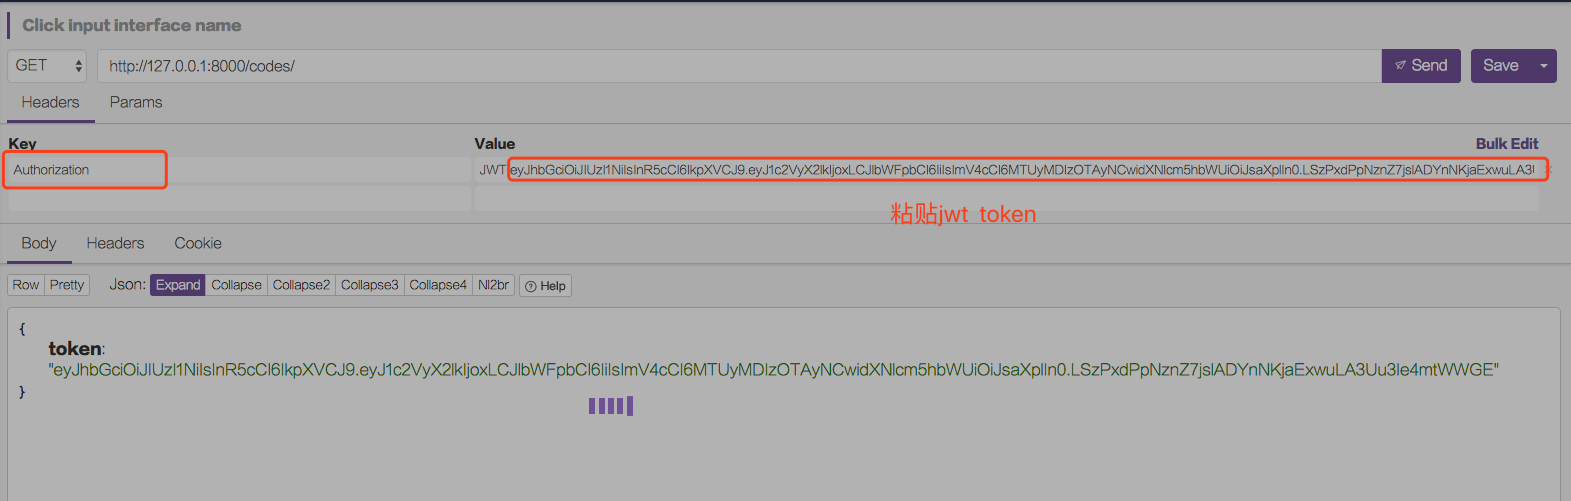
粘贴jwt token 到header中法功请求获取codes列表数据
查看request 中的user可以看到用户代表成功request.auth 可以获得token
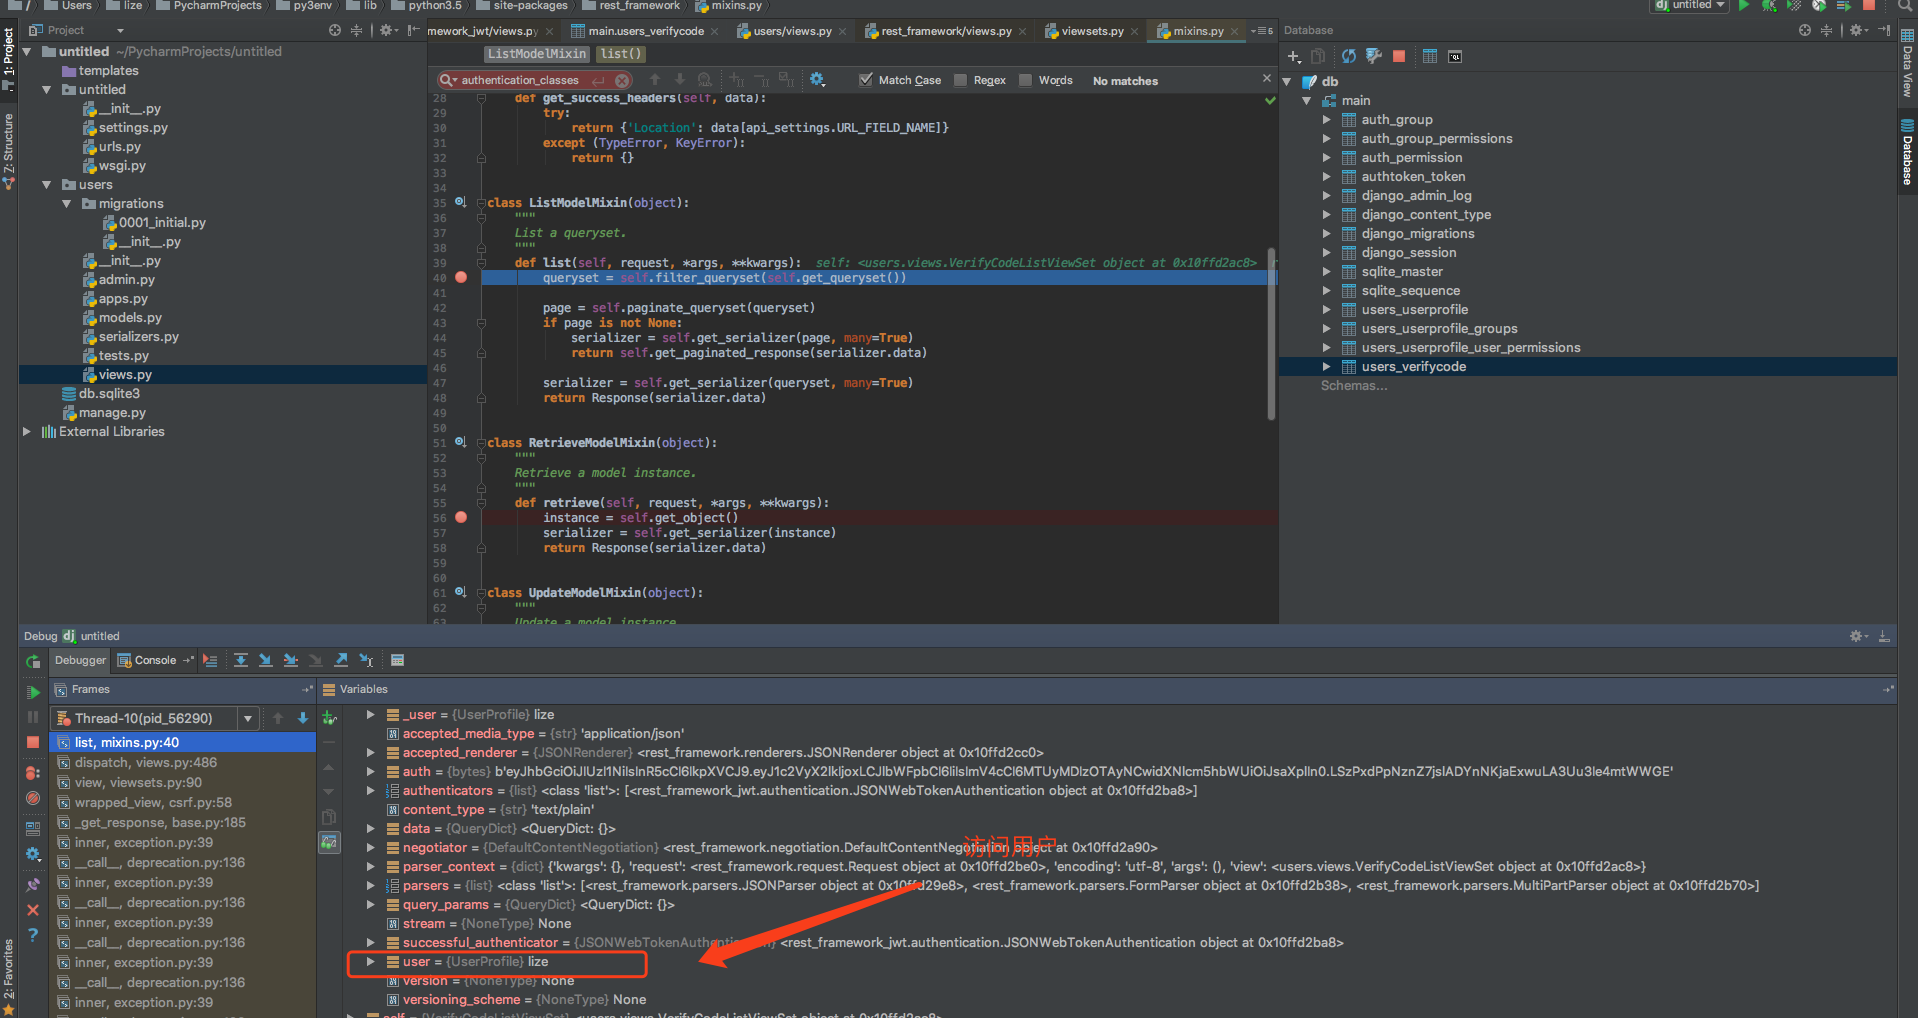
调试结束后可以看到结果
Django JWT Token RestfulAPI用户认证的更多相关文章
- (30)auth模块(django自带的用户认证模块)
Auth模块是Django自带的用户认证模块: 我们在开发一个网站的时候,无可避免的需要设计实现网站的用户系统.此时我们需要实现包括用户注册.用户登录.用户认证.注销.修改密码等功能,这还真是个麻烦的 ...
- Django之auth模块用户认证模块
一.Auth模块 1)auth模块是什么.登录后台使用的账号密码,则就是使用的auth模块创建的表 Auth模块是Django自带的用户认证模块: 我们在开发一个网站的时候,无可避免的需要设计实现网站 ...
- Django自带的用户认证
1. 创建超级用户 python manage.py createsuperuser 2. 认证 校验用户名和密码 obj = auth.authenticate(request,user ...
- Django框架 之 Auth用户认证
Django框架 之 Auth用户认证 浏览目录 auth模块 user对象 一.auth模块 1 from django.contrib import auth django.contrib.aut ...
- 5分钟搞懂:基于token的用户认证
https://www.qikegu.com/easy-understanding/880 用户认证 用户认证或者说用户登录是确认某人确实是某人的过程,生活中靠身份证,网络上就要靠账号和密码.用户提供 ...
- 6月29日学习总结 Django自带的用户认证
Django自带的用户认证 我们在开发一个网站的时候,无可避免的要设计.实现网站的用户系统.此时我们需要实现包括但不限于用户注册.用户登录.用户认证.注销.修改密码等功能,这还真是个麻烦的事情呢. D ...
- 基于JWT标准的用户认证接口实现
前面的话 实现用户登录认证的方式常见的有两种:一种是基于 cookie 的认证,另外一种是基于 token 的认证 .本文以基于cookie的认证为参照,详细介绍JWT标准,并实现基于该标签的用户认证 ...
- JWT token 跨域认证
JSON Web Token(缩写 JWT),是目前最流行的跨域认证解决方案. session登录认证方案:用户从客户端传递用户名.密码等信息,服务端认证后将信息存储在session中,将sessio ...
- Django内置的用户认证
认证登陆 在进行用户登陆验证的时候,如果是自己写代码,就必须要先查询数据库,看用户输入的用户名是否存在于数据库中: 如果用户存在于数据库中,然后再验证用户输入的密码,这样一来就要自己编写大量的代码. ...
随机推荐
- linux top指令信息表示
top指令: PID ==== 进程号 USER ==== 进程所有者 PR ==== 进程优先级 NI ==== 进程优先级别数值 VIRT ==== 进程占用的虚拟内存 RES ==== ...
- 双目深度估计传统算法流程及OpenCV的编译注意事项
起因: 1. 双目立体视觉中双目深度估计是非常重要且基础的部分,而传统的立体视觉的算法基本上都在opencv中有相对优秀的实现.同时考虑了性能和效率.因此,学习使用opencv接口是非常重要的. 2. ...
- maven到Gradle,一些对比和分享
Gradle作为一款基于Groovy语言的构建工具,已经吸引众多的ant,maven使用者转投gradle的怀抱,和Gradle相比,ant显得冗余复杂,maven显得有些死板落后,而gradle基于 ...
- Fortran程序调试中的“吐核”错误
在CentOS7上安装了PGI编译器,但是调试过程中遇到的“段错误(吐核)”一直让人很头疼. 通常采用在程序中增加屏幕输出代码的方式来追踪和定位出错的变量,比如下面这个样例程序就在第16行和第18行增 ...
- 小程序二层嵌套循环数据:微信小程序开发(交流QQ群:604788754)
WXML: <view class="martop15"> <view class="titlebox"> .二层嵌套循环 </v ...
- A context-aware personalized travel recommendation system based on geotagged social media data mining
文章简介:利用社交网站Flickr上照片的geotag信息将这些照片聚类发现城市里的旅游景点,通过各照片的拍照时间得到用户访问某景点时的时间上下文和天气上下文(利用时间和public API of W ...
- java接口特性
java接口特性 (1)接口可以被实例化 ,常作为类型使用 (2)实现类必须实现接口的所有方法 ,抽象类除外 (3)实现类可以实现多个几口 java中的多继承 (4)接口中的变量都是静态变量
- 初遇sass的两个小问题
关于sass大家都知道是一种css的开发工具,原本的css没有变量 参数一类的东西,所以比较死 效率较慢. sass就是在css里面加入了一些编程的元素如变量等,让css能够更灵活,提高效率. 刚接触 ...
- 字符编码 ASCII、Unicode和UTF-8的关系
摘抄自廖雪峰 教程 字符编码 我们已经讲过了,字符串也是一种数据类型,但是,字符串比较特殊的是还有一个编码问题. 因为计算机只能处理数字,如果要处理文本,就必须先把文本转换为数字才能处理.最早的计算机 ...
- Oracle 11g OGG mgr定期清理tail 文件
OGG mgr定期清理tail 文件 2018-06-11 11:58 440 0 原创 GoldenGate 本文链接:https://www.cndba.cn/leo1990/article/28 ...