
nova boot from volume代码分析
首先要创建一个bootable volume
curl -i http://16.158.166.197:8776/v1/c24c59846a7f44538d958e7548cc74a3/volumes -X POST -H "X-Auth-Project-Id: openstack" -H "User-Agent: python-cinderclient" -H "Content-Type: application/json" -H "Accept: application/json" -H "X-Auth-Token: +LTVfKHOFjX824qV-" -d '{"volume": {"status": "creating", "availability_zone": null, "source_volid": null, "display_description": null, "snapshot_id": null, "user_id": null, "size": 10, "display_name": "ubuntuvolumefromimage1", "imageRef": "d96b0e41-8264-41de-8dbb-6b31ce9bfbfc", "attach_status": "detached", "volume_type": null, "project_id": null, "metadata": {}}}'
1) 会调用到/usr/lib/python2.7/dist-packages/cinder/api/v1/volumes.py的类VolumeController的create函数
在这个函数中,它会获得指定的size
volume = body['volume']
得到image id
image_href = volume.get('imageRef')
最后调用
new_volume = self.volume_api.create(context, size, volume.get('display_name'), volume.get('display_description'), **kwargs)
来创建volume
2) 在/usr/lib/python2.7/dist-packages/cinder/volume/api.py中有函数
def create(self, context, size, name, description, snapshot=None, image_id=None, volume_type=None, metadata=None, availability_zone=None, source_volume=None, scheduler_hints=None, backup_source_volume=None):
会调用cinder.volume.flows.api.create_volume.get_flow函数创建一个流程flow_engine,然后通过flow_engine.run来执行这个流程完成volume的创建。
使用flow engine是cinder的一个特点
在/usr/lib/python2.7/dist-packages/cinder/volume/flows/api/create_volume.py的get_flow函数中,为新创建的flow添加了一系列的task,从注释中,我们可以知道他们做些什么:
This flow will do the following:
1. Inject keys & values for dependent tasks.
2. Extracts and validates the input keys & values.
3. Reserves the quota (reverts quota on any failures).
4. Creates the database entry.
5. Commits the quota.
6. Casts to volume manager or scheduler for further processing.
其中最后一步由VolumeCastTask完成,这个task的execute函数最终调用
self.scheduler_rpcapi.create_volume(
context,
CONF.volume_topic,
volume_id,
snapshot_id=snapshot_id,
image_id=image_id,
request_spec=request_spec,
filter_properties=filter_properties)
3)在/usr/lib/python2.7/dist-packages/cinder/scheduler/manager.py的中有函数
def create_volume(self, context, topic, volume_id, snapshot_id=None,
image_id=None, request_spec=None,
filter_properties=None):
他调用cinder.scheduler.flows.create_volume.get_flow生成一个flow。
在/usr/lib/python2.7/dist-packages/cinder/scheduler/flows/create_volume.py的get_flow函数生成的flow执行下面的流程
This flow will do the following:
1. Inject keys & values for dependent tasks.
2. Extracts a scheduler specification from the provided inputs.
3. Attaches 2 activated only on *failure* tasks (one to update the db status and one to notify on the MQ of the failure that occurred).
4. Uses provided driver to to then select and continue processing of volume request.
最后一步执行schedule_create_volume函数
函数中调用driver.schedule_create_volume(context, request_spec, filter_properties)
driver可以在配置文件中配置scheduler_driver
默认是cinder.scheduler.filter_scheduler.FilterScheduler
4)在/usr/lib/python2.7/dist-packages/cinder/scheduler/filter_scheduler.py中有函数
def schedule_create_volume(self, context, request_spec, filter_properties):
它首先会调用
weighed_host = self._schedule(context, request_spec, filter_properties)对所有运行了cinder-volume的机器进行排序,选出最牛的host
然后调用那个选中的cinder-volume进行具体的操作
self.volume_rpcapi.create_volume(context, updated_volume, host,
request_spec, filter_properties,
allow_reschedule=True,
snapshot_id=snapshot_id,
image_id=image_id)
在_schedule函数中,对host的权重计算是通过host manger来的
weighed_hosts = self.host_manager.get_weighed_hosts(hosts, filter_properties)
host manager可以在配置文件中配置scheduler_host_manager,默认是cinder.scheduler.host_manager.HostManager
/usr/lib/python2.7/dist-packages/cinder/scheduler/host_manager.py中实现
我们可以再配置文件中定义一系列的filter
cfg.ListOpt('scheduler_default_filters',
default=[
'AvailabilityZoneFilter',
'CapacityFilter',
'CapabilitiesFilter'
],
help='Which filter class names to use for filtering hosts '
'when not specified in the request.'),
也可以定义一个用于计算权重的weighter
cfg.ListOpt('scheduler_default_weighers',
default=[
'CapacityWeigher'
],
help='Which weigher class names to use for weighing hosts.')
在文件/usr/lib/python2.7/dist-packages/cinder/scheduler/weights/capacity.py中weighter有两种
1. Capacity Weigher. Weigh hosts by their available capacity.
The default is to spread volumes across all hosts evenly. If you prefer
stacking, you can set the 'capacity_weight_multiplier' option to a negative
number and the weighing has the opposite effect of the default.
2. Allocated Capacity Weigher. Weigh hosts by their allocated capacity.
The default behavior is to place new volume to the host allocated the least
space. This weigher is intended to simulate the behavior of SimpleScheduler.
If you prefer to place volumes to host allocated the most space, you can
set the 'allocated_capacity_weight_multiplier' option to a positive number
and the weighing has the opposite effect of the default.
5)在/usr/lib/python2.7/dist-packages/cinder/volume/manager.py中有下面的函数
def create_volume(self, context, volume_id, request_spec=None,
filter_properties=None, allow_reschedule=True,
snapshot_id=None, image_id=None, source_volid=None):
还是flow机制
cinder.volume.flows.manager.create_volume.get_flow函数生成flow
在/usr/lib/python2.7/dist-packages/cinder/volume/flows/manager/create_volume.py中的get_flow函数生成的flow做下面的事情
This flow will do the following:
1. Determines if rescheduling is enabled (ahead of time).
2. Inject keys & values for dependent tasks.
3. Selects 1 of 2 activated only on *failure* tasks (one to update the db
status & notify or one to update the db status & notify & *reschedule*).
4. Extracts a volume specification from the provided inputs.
5. Notifies that the volume has start to be created.
6. Creates a volume from the extracted volume specification.
7. Attaches a on-success *only* task that notifies that the volume creation
has ended and performs further database status updates.
其中第五步会生成CreateVolumeFromSpecTask(db, driver)
其中driver在配置文件中配置volume_driver,默认为cinder.volume.drivers.lvm.LVMISCSIDriver
它的_create_from_image函数会首先调用
model_update, cloned = self.driver.clone_image(volume_ref, image_location, image_id, image_meta)
试图直接clone这个image到volume
然而LVM不支持
所以对于LVM,则执行下面的操作
创建一个logic volume
model_update = self.driver.create_volume(volume_ref)
volume_ref = self.db.volume_update(context,
volume_ref['id'], updates)
将image写入volume
self._copy_image_to_volume(context, volume_ref,
image_id, image_location, image_service)
6)最终调用LVMISCSIDriver
LVMISCSIDriver继承于LVMVolumeDriver,他有函数
def copy_image_to_volume(self, context, volume, image_service, image_id):
"""Fetch the image from image_service and write it to the volume."""
//from cinder.image import image_utils
image_utils.fetch_to_raw(context,
image_service,
image_id,
self.local_path(volume),
self.configuration.volume_dd_blocksize,
size=volume['size'])
在/usr/lib/python2.7/dist-packages/cinder/image/image_utils.py中fetch_to_raw
def fetch_to_raw(context, image_service,
image_id, dest, blocksize,
user_id=None, project_id=None, size=None):
fetch_to_volume_format(context, image_service, image_id, dest, 'raw',
blocksize, user_id, project_id, size)
在fetch_to_volume_format中
先生成一个临时文件tmp
fetch(context, image_service, image_id, tmp, user_id, project_id)从glance下载image到tmp
查看image文件信息
data = qemu_img_info(tmp)
如果image virtual size大于volume的size,则错误
如果有backing file,则错误
convert_image(tmp, dest, volume_format)讲image写入volume
def convert_image(source, dest, out_format):
"""Convert image to other format."""
cmd = ('qemu-img', 'convert', '-O', out_format, source, dest)
utils.execute(*cmd, run_as_root=True)
至此,一个bootable volume就生成了。
7)手动模拟上述的过程
我们已经创建了一个logic volume了,extend到足够的大小
root@escto-bj-hp-z620:~# lvextend -L 20G /dev/cinder-volumes/lv_cliu8_test
Extending logical volume lv_cliu8_test to 20.00 GiB
Logical volume lv_cliu8_test successfully resized
lvdisplay
--- Logical volume ---
LV Path /dev/cinder-volumes/lv_cliu8_test
LV Name lv_cliu8_test
VG Name cinder-volumes
LV UUID Fg1uLV-Rdfc-p33c-1m03-GMrn-QgJ4-mpMelP
LV Write Access read/write
LV Creation host, time escto-bj-hp-z620, 2014-07-02 23:20:27 +0800
LV Status available
# open 1
LV Size 20.00 GiB
Current LE 5120
Segments 2
Allocation inherit
Read ahead sectors auto
- currently set to 256
Block device 252:6
将image写入
qemu-img convert -O raw /home/cliu8/images/ubuntu-14.04.qcow2 /dev/cinder-volumes/lv_cliu8_test
8)启动虚拟机从这个volume启动
有了这个bootable volume, 我们可以按照
手动模拟attach cinder volume的过程
将这个volume用isici export到nova-compute节点上
root@escto-bj-hp-z620:~# iscsiadm -m session
tcp: [2] 16.158.166.197:3260,1 iqn.2010-10.org.openstack:volume-cliu8-test
tcp: [3] 16.158.166.197:3260,1 iqn.2010-10.org.openstack:volume-640a10f7-3965-4a47-9641-002a94526444
tcp: [4] 16.158.166.197:3260,1 iqn.2010-10.org.openstack:volume-f6ba87f7-d0b6-4fdb-ac82-346371e78c48
我们定义下面的xml
root:/home/cliu8/images# cat bootfromvolume.xml
<domain type='kvm'>
<name>bootfromvolume</name>
<uuid>0f0806ab-531d-6134-5def-c5b495529289</uuid>
<memory unit='KiB'>2097152</memory>
<currentMemory unit='KiB'>2097152</currentMemory>
<vcpu placement='static'>1</vcpu>
<os>
<type arch='x86_64' machine='pc-i440fx-trusty'>hvm</type>
<boot dev='hd'/>
</os>
<features>
<acpi/>
<apic/>
<pae/>
</features>
<clock offset='utc'/>
<on_poweroff>destroy</on_poweroff>
<on_reboot>restart</on_reboot>
<on_crash>restart</on_crash>
<devices>
<emulator>/usr/bin/kvm-spice</emulator>
<disk type='block' device='disk'>
<driver name='qemu' type='raw' cache='none'/>
<source dev='/dev/disk/by-path/ip-16.158.166.197:3260-iscsi-iqn.2010-10.org.openstack:volume-cliu8-test-lun-1'/>
<target dev='vda' bus='virtio'/>
<serial>640a10f7-3965-4a47-9641-002a94526445</serial>
<alias name='virtio-disk0'/>
<address type='pci' domain='0x0000' bus='0x00' slot='0x04' function='0x0'/>
</disk>
<controller type='usb' index='0'>
<address type='pci' domain='0x0000' bus='0x00' slot='0x01' function='0x2'/>
</controller>
<controller type='pci' index='0' model='pci-root'/>
<controller type='ide' index='0'>
<address type='pci' domain='0x0000' bus='0x00' slot='0x01' function='0x1'/>
</controller>
<interface type='network'>
<mac address='52:54:00:9b:d5:cc'/>
<source network='default'/>
<model type='rtl8139'/>
<address type='pci' domain='0x0000' bus='0x00' slot='0x03' function='0x0'/>
</interface>
<serial type='pty'>
<target port='0'/>
</serial>
<console type='pty'>
<target type='serial' port='0'/>
</console>
<input type='mouse' bus='ps2'/>
<input type='keyboard' bus='ps2'/>
<graphics type='vnc' port='-1' autoport='yes' listen='0.0.0.0'>
<listen type='address' address='0.0.0.0'/>
</graphics>
<video>
<model type='cirrus' vram='9216' heads='1'/>
<address type='pci' domain='0x0000' bus='0x00' slot='0x02' function='0x0'/>
</video>
<memballoon model='virtio'>
<address type='pci' domain='0x0000' bus='0x00' slot='0x05' function='0x0'/>
</memballoon>
</devices>
</domain>
定义这个domain
root:/home/cliu8/images# virsh define bootfromvolume.xml
Domain bootfromvolume defined from bootfromvolume.xml
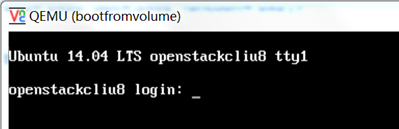
启动这个domain
root:/home/cliu8/images# virsh start bootfromvolume
Domain bootfromvolume started
root@escto-bj-hp-z620:/home/cliu8/images# ps aux | grep bootfromvolume
libvirt+ 28294 97.7 0.5 5178452 340896 ? Sl 03:45 0:07 qemu-system-x86_64 -enable-kvm -name bootfromvolume -S -machine pc-i440fx-trusty,accel=kvm,usb=off -m 2048 -realtime mlock=off -smp 1,sockets=1,cores=1,threads=1 -uuid 0f0806ab-531d-6134-5def-c5b495529289 -no-user-config -nodefaults -chardev socket,id=charmonitor,path=/var/lib/libvirt/qemu/bootfromvolume.monitor,server,nowait -mon chardev=charmonitor,id=monitor,mode=control -rtc base=utc -no-shutdown -boot strict=on -device piix3-usb-uhci,id=usb,bus=pci.0,addr=0x1.0x2 -drive file=/dev/disk/by-path/ip-16.158.166.197:3260-iscsi-iqn.2010-10.org.openstack:volume-cliu8-test-lun-1,if=none,id=drive-virtio-disk0,format=raw,serial=640a10f7-3965-4a47-9641-002a94526445,cache=none -device virtio-blk-pci,scsi=off,bus=pci.0,addr=0x4,drive=drive-virtio-disk0,id=virtio-disk0,bootindex=1 -netdev tap,fd=34,id=hostnet0 -device rtl8139,netdev=hostnet0,id=net0,mac=52:54:00:9b:d5:cc,bus=pci.0,addr=0x3 -chardev pty,id=charserial0 -device isa-serial,chardev=charserial0,id=serial0 -vnc 0.0.0.0:9 -device cirrus-vga,id=video0,bus=pci.0,addr=0x2 -device virtio-balloon-pci,id=balloon0,bus=pci.0,addr=0x5
nova boot from volume代码分析的更多相关文章
- Nova rebuild for boot from volume issue
目录 文章目录 目录 Nova boot from volume Rebuild Instance Rebuild for boot from volume Nova boot from volume ...
- nova boot添加volume_type参数支持
早前由于添加了全SSD的高性能Ceph集群,区别于现有的HDD集群,在OpenStack端需要能够选择使用两种集群.Cinder配置多Ceph后端的文档早已整理,整理文件夹时发现这篇为nova boo ...
- Nova创建虚拟机的底层代码分析
作为个人学习笔记分享.有不论什么问题欢迎交流! 在openstack中创建虚拟机的底层实现是nova使用了libvirt,代码在nova/virt/libvirt/driver.py. #image_ ...
- ironic-conductor与ipa交互clean部分代码分析
clean的动作会在provide和delete阶段才会触发 从代码分析: 对节点执行的node provide/deleted/clean会先发送到ironicclient ironicclient ...
- OpenStack 虚拟机冷/热迁移的实现原理与代码分析
目录 文章目录 目录 前文列表 冷迁移代码分析(基于 Newton) Nova 冷迁移实现原理 热迁移代码分析 Nova 热迁移实现原理 向 libvirtd 发出 Live Migration 指令 ...
- 虚拟机创建流程中neutron代码分析(三)
前言: 当neutron-server创建了port信息,将port信息写入数据库中.流程返回到nova服务端,接着nova创建的流程继续走.在计算节点中neutron-agent同样要完成很多的工作 ...
- Boot from Volume - 每天5分钟玩转 OpenStack(61)
Volume 除了可以用作 instance 的数据盘,也可以作为启动盘(Bootable Volume),那么如何使 volume 成为 bootable 呢? 现在我们打开 instance 的 ...
- 完整全面的Java资源库(包括构建、操作、代码分析、编译器、数据库、社区等等)
构建 这里搜集了用来构建应用程序的工具. Apache Maven:Maven使用声明进行构建并进行依赖管理,偏向于使用约定而不是配置进行构建.Maven优于Apache Ant.后者采用了一种过程化 ...
- boot from volume
nova boot --flavor 1 --block-device source=image,id=<image_id>,dest=volume,size=5,shutdown=pre ...
随机推荐
- linux部署dns内网服务器
安装: yum -y install bind* 编辑named.conf vim /etc/named.conf options { listen-on port { any; }; listen- ...
- SQL语句完整的执行顺序(01)
一.sql语句的执行步骤: 1)语法分析,分析语句的语法是否符合规范,衡量语句中各表达式的意义. 2) 语义分析,检查语句中涉及的所有数据库对象是否存在,且用户有相应的权限. 3)视图转换,将涉 ...
- [原创]Xilinx Vivado 2017.4/2018.3/2016.4/2015.4/ISE14.7下载及其安装
最新版本Vivado 2018.3下载地址 链接:https://pan.baidu.com/s/17aE-vICRQYN27bD2sXCLxg提取码:ilg5 由于工程需要,下载VIVADO2018 ...
- mysql 服务器负载过高的解决分析之路
最近我们有台 mysql 服务器一直报负载过高,不停的收到阿里云的报警短信,让我很抓狂,登陆上服务器,看下一下,慢查询日志 发现有60多万的慢查询日志,一看这个就知道是搜索带来的,一直想把搜索的服务给 ...
- 分布式缓存技术之Redis_01数据结构分析
目录 官网 1. 分布式缓存技术的应用 2. Redis的安装指引 官网 redis.io redisDoc 1. 分布式缓存技术的应用 2. Redis的安装指引 官网下载安装包 redis-5 ...
- pygame学习之绘制圆
import pygame from pygame.locals import * pygame.init() screen = pygame.display.set_mode((600, 500)) ...
- hashMap源码学习记录
hashMap作为java开发面试最常考的一个题目之一,有必要花时间去阅读源码,了解底层实现原理. 首先,让我们看看hashMap这个类有哪些属性 // hashMap初始数组容量 static fi ...
- sql查询单表之中大于2条的数据
SELECT COUNT(字段)AS COUNT,字段FROM 表名 GROUP BY 字段 HAVING COUNT >=
- Spark环境搭建(五)-----------Spark生态圈概述与Hadoop对比
Spark:快速的通用的分布式计算框架 概述和特点: 1) Speed,(开发和执行)速度快.基于内存的计算:DAG(有向无环图)的计算引擎:基于线程模型: 2)Easy of use,易用 . 多语 ...
- SpringInAction学习笔记(一):核心概念
Spring自带了多种应用上下文 AnnotationConfigApplicationContext:从一个或多个java配置类中加载应用上下文 AnnotationConfigWebApplica ...