
varnish 测试
安装
通过epel 源 yum 安装
[root@localhost varnish]# rpm -ql varnish

/etc/logrotate.d/varnish

/etc/varnish

/etc/varnish/default.vcl

/etc/varnish/varnish.params

/run/varnish.pid

/usr/bin/varnishadm

/usr/bin/varnishhist

/usr/bin/varnishlog

/usr/bin/varnishncsa

/usr/bin/varnishstat

/usr/bin/varnishtest

/usr/bin/varnishtop

/usr/lib/systemd/system/varnish.service

/usr/lib/systemd/system/varnishlog.service

/usr/lib/systemd/system/varnishncsa.service

/usr/sbin/varnish_reload_vcl

/usr/sbin/varnishd

/usr/share/doc/varnish-4.0.

/usr/share/doc/varnish-4.0./LICENSE

/usr/share/doc/varnish-4.0./README

/usr/share/doc/varnish-4.0./builtin.vcl

/usr/share/doc/varnish-4.0./changes.rst

/usr/share/doc/varnish-4.0./example.vcl

/usr/share/man/man1/varnishadm..gz

/usr/share/man/man1/varnishd..gz

/usr/share/man/man1/varnishhist..gz

/usr/share/man/man1/varnishlog..gz

/usr/share/man/man1/varnishncsa..gz

/usr/share/man/man1/varnishstat..gz

/usr/share/man/man1/varnishtest..gz

/usr/share/man/man1/varnishtop..gz

/usr/share/man/man3/vmod_directors..gz

/usr/share/man/man3/vmod_std..gz

/usr/share/man/man7/varnish-cli..gz

/usr/share/man/man7/varnish-counters..gz

/usr/share/man/man7/vcl..gz

/usr/share/man/man7/vsl-query..gz

/usr/share/man/man7/vsl..gz

/var/lib/varnish

/var/log/varnish

[root@localhost varnish]#
配置varnish的三种应用
       1、varnishd应用程序的命令行参数;

                监听的socket, 使用的存储类型等等;额外的配置参数;

                    -p param=value

                    -r param,param,... : 设定只读参数列表;

                    /etc/varnish/varnish.params

            、-p选项指明的参数:

                运行时参数:

                    也可在程序运行中,通过其CLI进行配置;

            、vcl:配置缓存系统的缓存机制;

                通过vcl配置文件进行配置;

                    先编译,后应用;

                        依赖于c编译器;
启动varnish:
Starting Varnish(启动varnish)

         假设varnishd在您的环境变量中,您可能需要运行pkill varnishd来确定varnish没有运行。然后使用root执行下面的命令。

         varnishd  -f /usr/local/etc/varnish/default.vcl  -s malloc,1G -T 127.0.0.1: -a 0.0.0.0:

         我添加了一些选项,现在来详细分析他们:

         -f /usr/local/etc/varnish/default.vcl

         这个 –f 选项指定varnishd使用哪个配置文件。

         -s malloc,1G

         这个 –s 选项用来确定varnish使用的存储类型和存储容量,我使用的是malloc类型(malloc是一个C函数,用于分配内存空间), 1G 定义多少内存被malloced,1G = 1gigabyte。

         -T 127.0.0.1:

         Varnish有一个基于文本的管理接口,启动它的话可以在不停止varnish的情况下来管理varnish。您可以指定管理软件监听哪个接口。当然您不能让全世界的人都能访问您的varnish管理接口,因为他们可以很轻松的通过访问varnish管理接口来获得您的root访问权限。我推荐只让它监听本机端口。如果您的系统里有您不完全信任的用户,您可以通过防火墙规则来限制他访问varnish的管理端口。

         -a 0.0.0.0:

         这一句的意思是制定varnish监听所有IP发给8080端口的http请求,如果在生产环境下,您应该让varnish监听80,这也是默认的。

*********#/etc/varnish/varnish.params 配置文件定义了默认的运行参数,可以直接通过命令行指定,也可以通过修改配置文件配置
*********#/etc/varnish/default.vcl   配置文件定义了缓存系统的配置
命令行工具:

            varnishadm -S /etc/varnish/secret -T IP:PORT

            Log:

                varnishlog

                varnishncsa

            Statistics

                varnishstat

            Top:

                varnishtop
数据处理流程:
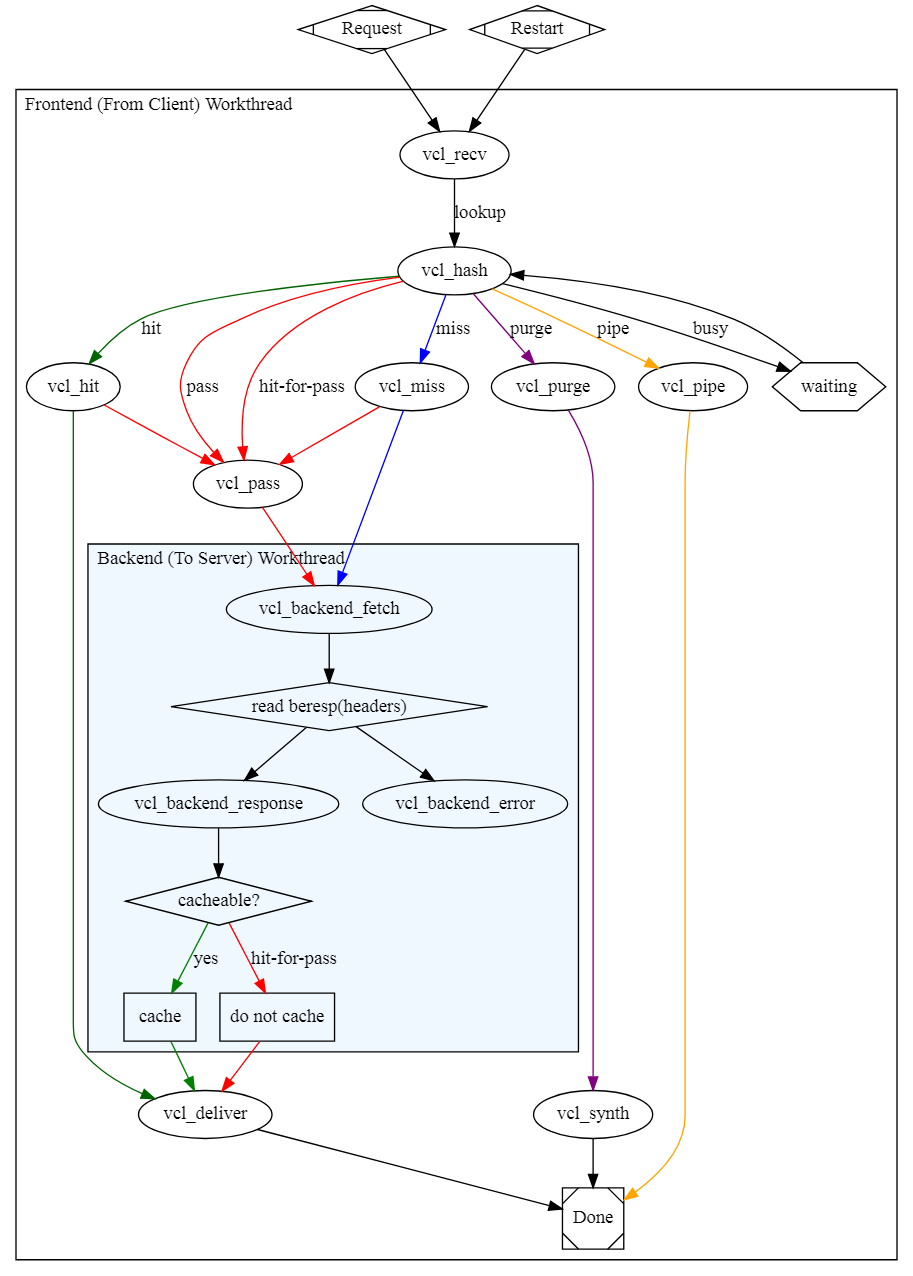
    vcl各状态引擎的功用:

        vcl_recv

        vcl_fetch

        vcl_pipe: 用于将请求直接发往后端主机;

        vcl_hash: 自定义hash生成时的数据来源

        vcl_pass: 用于将请求直接传递至后端主机;

        vcl_hit: 从缓存中查找到缓存对象时要执行的操作;

        vcl_miss: 从缓存中款查找到缓存对象时要执行的操作;

        vcl_deliver: 将用户请求的内容响应给客户端时用到的方法;

        vcl_error: 在varnish端合成错误响应而时;
配置文件介绍:
#

# This is an example VCL file for Varnish.

#

# It does not do anything by default, delegating control to the

# builtin VCL. The builtin VCL is called when there is no explicit

# return statement.

#

# See the VCL chapters in the Users Guide at https://www.varnish-cache.org/docs/

# and http://varnish-cache.org/trac/wiki/VCLExamples for more examples.

# Marker to tell the VCL compiler that this VCL has been adapted to the

# new 4.0 format.

vcl 4.0;

# Default backend definition. Set this to point to your content server.

backend default {         #定义后端服务器主机

   # .host = "127.0.0.1";

   # .port = "";

     .host = "192.168.100.103";

     .port = "";

}

sub vcl_recv {

    # Happens before we check if we have this in cache already.

    #

    # Typically you clean up the request here, removing cookies you don't need,

    # rewriting the request, etc.

                    if (req.method == "PRI") {        #自己添加官网部分

                        /* We do not support SPDY or HTTP/2.0 */

                        return (synth(405));

                    }

                    if (req.method != "GET" &&

                      req.method != "HEAD" &&

                      req.method != "PUT" &&

                      req.method != "POST" &&

                      req.method != "TRACE" &&

                      req.method != "OPTIONS" &&

                      req.method != "DELETE") {

                        /* Non-RFC2616 or CONNECT which is weird. */

                        return (pipe);

                    }

                    if (req.method != "GET" && req.method != "HEAD") {

                        /* We only deal with GET and HEAD by default */

                        return (pass);

                    }

                    if (req.http.Authorization || req.http.Cookie) {

                        /* Not cacheable by default */

                        return (pass);

                    }

                    return (hash);

}

sub vcl_backend_response {

    # Happens after we have read the response headers from the backend.

    #

    # Here you clean the response headers, removing silly Set-Cookie headers

    # and other mistakes your backend does.

}

sub vcl_deliver {

    # Happens when we have all the pieces we need, and are about to send the

    # response to the client.

    #

    # You can do accounting or modifying the final object here.

if (obj.hits>0) {     #定义在vcl_deliver中,向响应给客户端的报文添加一个自定义首部X-Cache;

   set resp.http.X-Cache = "HIT";

   } else {

   set resp.http.X-Cahce = "MISS";

 }

}
重新加载配置:
varnish> vcl.list

active           boot

varnish> vcl.load test1 default.vcl

VCL compiled.

varnish> vcl.use test1

VCL 'test1' now active

varnish> vcl.list

available        boot

active           test1
    varnish中的内置变量:

            变量种类:

                client

                server

                req

                resp

                bereq

                beresp

                obj

                storage

                bereq

                    bereq.http.HEADERS: 由varnish发往backend server的请求报文的指定首部;

                    bereq.request:请求方法;

                    bereq.url:

                    bereq.proto:

                    bereq.backend:指明要调用的后端主机;

                beresp

                    beresp.proto

                    beresp.status:后端服务器的响应的状态码

                    beresp.reason:原因短语;

                    beresp.backend.ip

                    beresp.backend.name

                    beresp.http.HEADER: 从backend server响应的报文的首部;

                    beresp.ttl:后端服务器响应的内容的余下的生存时长;

                obj

                    obj.ttl: 对象的ttl值;

                    obj.hits:此对象从缓存中命中的次数;

                server

                    server.ip

                    server.hostname

                req

                resp
访问测试:
[root@localhost /]# curl -I http://192.168.100.100:6081/test1.html

HTTP/1.1  OK

Date: Sun,  Mar  :: GMT

Server: Apache/2.4. (CentOS)

Last-Modified: Sun,  Mar  :: GMT

ETag: "8-583bfea477f63"

Content-Length:

Content-Type: text/html; charset=UTF-

X-Varnish:

Age:

Via: 1.1 varnish-v4

X-Cahce: MISS192.168.100.100

Connection: keep-alive

[root@localhost /]# curl -I http://192.168.100.100:6081/test1.html

HTTP/1.1  OK

Date: Sun,  Mar  :: GMT

Server: Apache/2.4. (CentOS)

Last-Modified: Sun,  Mar  :: GMT

ETag: "8-583bfea477f63"

Content-Length:

Content-Type: text/html; charset=UTF-

X-Varnish:

Age:

Via: 1.1 varnish-v4

test-Cache: HIT192.168.100.100

Connection: keep-alive
定义vcl 集群:
vcl 4.0;

backend b1 {

    .host = "...";

    .port = "...";

}

backend b2 {

    .host = "...";

    .port = "...";

}

sub vcl_init {

    new cluster1 = directors.round_robin();

    cluster1.add_backend(b1, 1.0);

    cluster1.add_backend(b2, 1.0);

}

sub vcl_recv {

    set req.backend_hint = cluster1.backend();

}
backend server的定义:

        backend name {

            .attribute = "value";

        }

        .host: BE主机的IP;

        .port:BE主机监听的PORT;

        .probe: 对BE做健康状态检测;

        .max_connections:并连接最大数量;

    后端主机的健康状态检测方式:

        probe name {

             .attribute = "value";

        }

        .url: 判定BE健康与否要请求的url;

        .expected_response:期望响应状态码;默认为200;

        示例1:

            backend websrv1 {

                .host = "172.16.100.68";

                .port = "";

                .probe = {

                    .url = "/test1.html";

                }

            }

            backend websrv2 {

                .host = "172.16.100.69";

                .port = "";

                .probe = {

                    .url = "/test1.html";

                }

            }
配置文件详解:
[root@localhost varnish]# cat default.vcl

#

# This is an example VCL file for Varnish.

#

# It does not do anything by default, delegating control to the

# builtin VCL. The builtin VCL is called when there is no explicit

# return statement.

#

# See the VCL chapters in the Users Guide at https://www.varnish-cache.org/docs/

# and http://varnish-cache.org/trac/wiki/VCLExamples for more examples.

# Marker to tell the VCL compiler that this VCL has been adapted to the

# new 4.0 format.

vcl 4.0;

# Default backend definition. Set this to point to your content server.

backend default {         #定义后端服务器主机

   # .host = "127.0.0.1";

   # .port = "";

     .host = "192.168.100.101";

     .port = "";

}

backend web1 {

     .host = "192.168.100.101";

     .port = "";

     .probe = {

    .url = "/tan.jpg";

}

}

backend web2  {

     .host = "192.168.100.103";

     .port = "";

     .probe = {

    .url = "/tan.jpg";

}

}

import directors;

sub vcl_init {    #定义后端服务器集群

    new cluster1 = directors.round_robin();

    cluster1.add_backend(web1);

    cluster1.add_backend(web2);

}

*******************************************************************************************
vcl_recv是在Varnish完成对请求报文的解码为基本数据结构后第一个要执行的子例程,它通常有四个主要用途:
(1)修改客户端数据以减少缓存对象差异性;比如删除URL中的www.等字符;
(2)基于客户端数据选用缓存策略;比如仅缓存特定的URL请求、不缓存POST请求等;
(3)为某web应用程序执行URL重写规则;
(4)挑选合适的后端Web服务器;
可以使用下面的终止语句,即通过return()向Varnish返回的指示操作:
pass:绕过缓存,即不从缓存中查询内容或不将内容存储至缓存中;
pipe:不对客户端进行检查或做出任何操作,而是在客户端与后端服务器之间建立专用“管道”,并直接将数据在二者之间进行传送;此时,keep-alive连接中后续传送的数据也都将通过此管道进行直接传送,并不会出现在任何日志中;
lookup:在缓存中查找用户请求的对象,如果缓存中没有其请求的对象,后续操作很可能会将其请求的对象进行缓存;
error:由Varnish自己合成一个响应报文,一般是响应一个错误类信息、重定向类信息或负载均衡器返回的后端web服务器健康状态检查类信息;
vcl_recv也可以通过精巧的策略完成一定意义上的安全功能,以将某些特定的攻击扼杀于摇篮中。同时,它也可以检查出一些拼写类的错误并将其进行修正等。
Varnish默认的vcl_recv专门设计用来实现安全的缓存策略,它主要完成两种功能:
(1)仅处理可以识别的HTTP方法,并且只缓存GET和HEAD方法;
(2)不缓存任何用户特有的数据;
安全起见,一般在自定义的vcl_recv中不要使用return()终止语句,而是再由默认vcl_recv进行处理,并由其做出相应的处理决策。
**********************************************************************************************************************************************
sub vcl_recv {
    # Happens before we check if we have this in cache already.

    #

    # Typically you clean up the request here, removing cookies you don't need,

    # rewriting the request, etc.

                    if (req.url ~ "(?i)\.(jpg|png|gif)$") {

                    set req.backend_hint = web1;

                } else {

                    set req.backend_hint = web2;

                }

                    if (req.method == "PRI") {    #如果是http 2.0 不缓存

                        /* We do not support SPDY or HTTP/2.0 */

                        return (synth());

                    }

                    set req.backend_hint = cluster1.backend();     #设置默认的后端缓存集群

                    if (req.method != "GET" &&

                      req.method != "HEAD" &&

                      req.method != "PUT" &&

                      req.method != "POST" &&

                      req.method != "TRACE" &&

                      req.method != "OPTIONS" &&

                      req.method != "DELETE") {

                        /* Non-RFC2616 or CONNECT which is weird. */

                        return (pipe);    #如果请求方法都不是上面这些,就直接发到pipe,对客户端进行检查或做出任何操作,而是在客户端与后端服务器之间建立专用“管道”,并直接将数据在二者之间进行传送;此时,keep-alive连接中后续传送的数据也都将通过此管道进行直接传送,并不会出现在任何日志中;

                    }

                    if (req.method != "GET" && req.method != "HEAD") {

                        /* We only deal with GET and HEAD by default */

                        return (pass);          #绕过缓存,即不从缓存中查询内容或不将内容存储至缓存中;

                    }

                    if (req.http.Authorization || req.http.Cookie) {

                        /* Not cacheable by default */

                        return (pass);          #绕过缓存,即不从缓存中查询内容或不将内容存储至缓存中;
}
 return (hash);                   #交给hash 处理,判断是否能够缓存
}
sub vcl_backend_response {
# Happens after we have read the response headers from the backend.
#
 # Here you clean the response headers, removing silly Set-Cookie headers
 # and other mistakes your backend does.
if (beresp.http.cache-control !~ "s-maxage") {   #定义varnish 定义对于特定资源的缓存时间
if (bereq.url ~ "(?i)\.jpg$") {
set beresp.ttl = 3600s;
unset beresp.http.Set-Cookie;
 }
if (bereq.url ~ "(?i)\.css$") {
 set beresp.ttl = 600s;
 unset beresp.http.Set-Cookie;
}
}
}
 *******************************************************************************************
5、vcl_fetch
如前面所述,相对于vcl_recv是根据客户端的请求作出缓存决策来说,vcl_fetch则是根据服务器端的响应作出缓存决策。在任何VCL状态引擎中返回的pass操作都将由vcl_fetch进行后续处理。vcl_fetch中有许多可用的内置变量,比如最常用的用于定义某对象缓存时长的beresp.ttl变量。通过return()返回给varnish的操作指示有:
(1)deliver:缓存此对象,并将其发送给客户端(经由vcl_deliver);
(2)hit_for_pass:不缓存此对象,但可以导致后续对此对象的请求直接送达到vcl_pass进行处理;
(3)restart:重启整个VCL,并增加重启计数;超出max_restarts限定的最大重启次数后将会返回错误信息;
(4)error code [reason]:返回指定的错误代码给客户端并丢弃此请求;
默认的vcl_fetch放弃了缓存任何使用了Set-Cookie首部的响应。
***************************************************************************************************************

sub vcl_deliver {

    # Happens when we have all the pieces we need, and are about to send the

    # response to the client.

    #

    # You can do accounting or modifying the final object here.

if (obj.hits>) {              #判断在响应客户端时,如果命中缓存就响应HIT ,否则  MISS

   set resp.http.test-Cache = "HIT" + server.ip;

   } else {

   set resp.http.X-Cahce = "MISS"   + server.ip;

 }

}

[root@localhost varnish]#
varnish 测试的更多相关文章
- varnish与squid缓存效率对比实例
前提:安装varnish.squid.webbench(压测工具) 注:varnish和squid机都未安装其他多余服务,服务器绑定域名为www.dannylinux.top (为同一台服务器,测试 ...
- Varnish快速安装及测试
实验环境: slave-147: 192.168.75.147 slave-148: 192.168.75.148 两台机器均已关闭selinux,关闭iptables. varnish部署 ...
- 利用varnish做Discuz论坛的缓存服务器
实验背景:公司有一台BBS服务器,用的是LNMP的架构搭建的.正好手头有一台空闲的虚拟机,于是想着给BBS前端加一台缓存服务器.于是选定了varnish,搜了很多教程,跌跌撞撞的完成了配置.这其中很多 ...
- [转]在windows环境中使用varnish
varnish 的windows 版本下载地址: http://sourceforge.net/projects/cygvarnish/files/windows-zip-bundle/ 启动:var ...
- Varnish简介
Varnish介绍: Varnish是一个反向HTTP代理,有时也被称为HTTP的加速器或网络加速器:它存在于真实服务器的前面(可能有多级代理),将来自于客户端的请求中的部分内容存储在自身的内存中,以 ...
- 学习varnish随笔
Varnish是一款高性能.开源的反向代理服务器和缓存服务器.Varnish使用内存缓存文件来减少响应时间和网络带宽消耗.这个项目是由挪威的一家报纸Verdens Gang的网络分支起始的,其架构设计 ...
- varnish
html,body,div,span,applet,object,iframe,h1,h2,h3,h4,h5,h6,p,blockquote,pre,a,abbr,acronym,address,bi ...
- Nginx+Varnish 实现动静分离,为服务器分流,降低服务器负载
相必大家在看加快网站响应速度方面的文章时,都提过这么一条:动静分离.那怎样实现动静分离呢,这里笔者就亲自搭建相关服务实现动静分离. 动静分离是一种架构,就是把静态文件,比如JS.CSS.图片甚至有些静 ...
- Varnish 4.0 实战(转)
简介 Varnish 是一款高性能且开源的反向代理服务器和 HTTP 加速器,其采用全新的软件体系机构,和现在的硬件体系紧密配合,与传统的 squid 相比,varnish 具有性能更高.速度更快.管 ...
随机推荐
- python 中的类
1.1 类里面包括:类的属性.方法 OO的特征(Object Oriented) 封装:信息隐蔽技术 继承:继承是子类自动共享父类之间数据和方法的机制 >>> class MyCla ...
- GenericServlet
Generic-汉语意思:类的adj GenericServlet是一个抽象类,它的源码很容易看懂,继承Servlet接口和ServletConfig接口 所有它里面有父接口里面的方法,所以它就是在S ...
- jQuery中的$.getJSON、$.ajax、$.get、$.post的区别
jQuery中的$.getJSON.$.ajax.$.get.$.post的区别 使用见Flask(python)异步(ajax)返回json格式数据 ①.$.getJSON $.getJSON()是 ...
- Ch07 包和引入 - 练习
1. 编写示例程序,展示为什么 package com.horstmann.impatient 不同于 package com package horstmann package impatien ...
- Error: Cannot find module 'webpack/schemas/WebpackOptions.json' 问题解决
webpack 和 webpack-dev-server的版本问题,需要版本配套才行.现在webpack最新版本是4.16.1了,最新的webpack应该有WebpackOptions.json文件 ...
- 扫黑除恶Team second
团队介绍: 团队序号:② 团队名称:扫黑除恶 团队项目:飞机大战游戏 团队码云地址:https://gitee.com/MrLiu199903/seflash/branches 撰写人:刘新飞 学号: ...
- IntelliJ IDEA安装scala插件并创建scala示例
1.http://blog.csdn.net/a2011480169/article/details/52712421 2.http://blog.csdn.net/stark_summer/arti ...
- Docker容器和本机之间的文件传输
docker cp 本地文件路径 ID全称:容器路径
- 简单的Json数据
<!DOCTYPE HTML PUBLIC "-//W3C//DTD HTML 4.01 Transitional//EN"> <html> <hea ...
- 轻量级集群管理软件-ClusterShell
如果集群数量不多的话,选择一个轻量级的集群管理软件就显得非常有必要了.ClusterShell就是这样一种小的集群管理工具,原理是利用ssh,可以说是Linux系统下非常好用的运维工具 cluste ...