mask_rcnn训练自己的数据集
1、首先从官方下载mask_rcnn源码https://github.com/matterport/Mask_RCNN
2、当制作自己的数据集的时候,图片的大小一定要记得修改,长宽都要修改为修改为2的6次方的倍数,不然训练的时候会报错,来看源代码:

2、首先将demo.ipynb转换成demo.py,这里我顺便更改为适用于我自己数据集:
import os

import sys

import random

import math

import numpy as np

import skimage.io

import matplotlib

import matplotlib.pyplot as plt

import cv2

import time

from mrcnn.config import Config

from datetime import datetime

# Root directory of the project

ROOT_DIR = os.path.abspath("../")

# Import Mask RCNN

sys.path.append(ROOT_DIR)  # To find local version of the library

from mrcnn import utils

import mrcnn.model as modellib

from mrcnn import visualize

# Import COCO config

sys.path.append(os.path.join(ROOT_DIR, "samples/coco/"))  # To find local version

import coco

# Directory to save logs and trained model

MODEL_DIR = os.path.join(ROOT_DIR, "logs/shapes20190425T0816")

# Local path to trained weights file

COCO_MODEL_PATH = os.path.join(MODEL_DIR ,"mask_rcnn_shapes_0030.h5")

# Download COCO trained weights from Releases if needed

if not os.path.exists(COCO_MODEL_PATH):

    utils.download_trained_weights(COCO_MODEL_PATH)

    print("cuiwei***********************")

# Directory of images to run detection on

IMAGE_DIR = os.path.join(ROOT_DIR, "images")

class ShapesConfig(Config):

    """Configuration for training on the toy shapes dataset.

    Derives from the base Config class and overrides values specific

    to the toy shapes dataset.

    """

    # Give the configuration a recognizable name

    NAME = "shapes"

    # Train on 1 GPU and 8 images per GPU. We can put multiple images on each

    # GPU because the images are small. Batch size is 8 (GPUs * images/GPU).

    GPU_COUNT = 1

    IMAGES_PER_GPU = 1

    # Number of classes (including background)

    NUM_CLASSES = 1 + 4  # background + 3 shapes

    # Use small images for faster training. Set the limits of the small side

    # the large side, and that determines the image shape.

    IMAGE_MIN_DIM = 320

    IMAGE_MAX_DIM = 384

    # Use smaller anchors because our image and objects are small

    RPN_ANCHOR_SCALES = (8 * 6, 16 * 6, 32 * 6, 64 * 6, 128 * 6)  # anchor side in pixels

    # Reduce training ROIs per image because the images are small and have

    # few objects. Aim to allow ROI sampling to pick 33% positive ROIs.

    TRAIN_ROIS_PER_IMAGE =100

    # Use a small epoch since the data is simple

    STEPS_PER_EPOCH = 100

    # use small validation steps since the epoch is small

    VALIDATION_STEPS = 50

class InferenceConfig(ShapesConfig):

    # Set batch size to 1 since we'll be running inference on

    # one image at a time. Batch size = GPU_COUNT * IMAGES_PER_GPU

    GPU_COUNT = 1

    IMAGES_PER_GPU = 1

config = InferenceConfig()

config.display()

# Create model object in inference mode.

model = modellib.MaskRCNN(mode="inference", model_dir=MODEL_DIR, config=config)

# Load weights trained on MS-COCO

model.load_weights(COCO_MODEL_PATH, by_name=True)

# COCO Class names

# Index of the class in the list is its ID. For example, to get ID of

# the teddy bear class, use: class_names.index('teddy bear')

class_names = ['BG', 'a','b','c','e']

# Load a random image from the images folder

#file_names = next(os.walk(IMAGE_DIR))[2]

#image = skimage.io.imread(os.path.join(IMAGE_DIR, random.choice(file_names)))

cap = cv2.VideoCapture(0)

while(1):

    # get a frame

    ret, frame = cap.read()

    # show a frame

    start =time.clock()

    results = model.detect([frame], verbose=1)

    r = results[0]

    #cv2.imshow("capture", frame)

    visualize.display_instances(frame, r['rois'], r['masks'], r['class_ids'],

                            class_names, r['scores'])

    end = time.clock()

    print(end-start)

    if cv2.waitKey(1) & 0xFF == ord('q'):

        break

cap.release()

cv2.destroyAllWindows()

#image= cv2.imread("C:\\Users\\18301\\Desktop\\Mask_RCNN-master\\images\\9.jpg")

## Run detection

#

#results = model.detect([image], verbose=1)

#

#print(end-start)

## Visualize results

#r = results[0]

#visualize.display_instances(image, r['rois'], r['masks'], r['class_ids'],

#                            class_names, r['scores'])
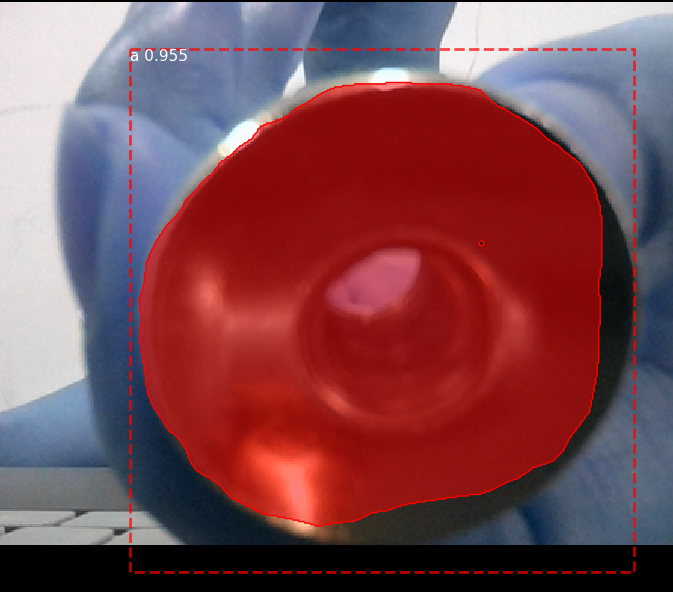
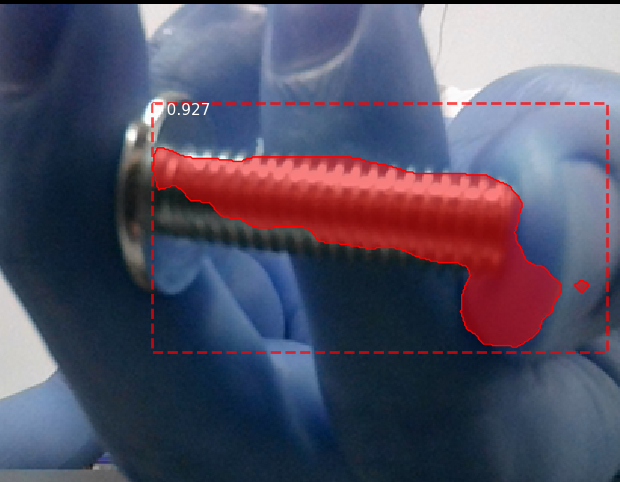
以上这段代码可以调用摄像头拍摄图片进行目标识别。
以下为训练文件:
# -*- coding: utf-8 -*-

import os

import sys

import random

import math

import re

import time

import numpy as np

import cv2

import matplotlib

import matplotlib.pyplot as plt

import tensorflow as tf

from mrcnn.config import Config

#import utils

from mrcnn import model as modellib,utils

from mrcnn import visualize

import yaml

from mrcnn.model import log

from PIL import Image

#os.environ["CUDA_VISIBLE_DEVICES"] = "0"

# Root directory of the project

ROOT_DIR = os.getcwd()

#ROOT_DIR = os.path.abspath("../")

# Directory to save logs and trained model

MODEL_DIR = os.path.join(ROOT_DIR, "logs")

iter_num=0

# Local path to trained weights file

COCO_MODEL_PATH = os.path.join(ROOT_DIR, "mask_rcnn_coco.h5")

# Download COCO trained weights from Releases if needed

if not os.path.exists(COCO_MODEL_PATH):

    utils.download_trained_weights(COCO_MODEL_PATH)

class ShapesConfig(Config):

    """Configuration for training on the toy shapes dataset.

    Derives from the base Config class and overrides values specific

    to the toy shapes dataset.

    """

    # Give the configuration a recognizable name

    NAME = "shapes"

    # Train on 1 GPU and 8 images per GPU. We can put multiple images on each

    # GPU because the images are small. Batch size is 8 (GPUs * images/GPU).

    GPU_COUNT = 1

    IMAGES_PER_GPU = 1

    # Number of classes (including background)

    NUM_CLASSES = 1 + 4  # background + 3 shapes

    # Use small images for faster training. Set the limits of the small side

    # the large side, and that determines the image shape.

    IMAGE_MIN_DIM = 320

    IMAGE_MAX_DIM = 384

    # Use smaller anchors because our image and objects are small

    RPN_ANCHOR_SCALES = (8 * 6, 16 * 6, 32 * 6, 64 * 6, 128 * 6)  # anchor side in pixels

    # Reduce training ROIs per image because the images are small and have

    # few objects. Aim to allow ROI sampling to pick 33% positive ROIs.

    TRAIN_ROIS_PER_IMAGE = 100

    # Use a small epoch since the data is simple

    STEPS_PER_EPOCH = 100

    # use small validation steps since the epoch is small

    VALIDATION_STEPS = 50

config = ShapesConfig()

config.display()

class DrugDataset(utils.Dataset):

    # 得到该图中有多少个实例(物体)

    def get_obj_index(self, image):

        n = np.max(image)

        return n

    # 解析labelme中得到的yaml文件,从而得到mask每一层对应的实例标签

    def from_yaml_get_class(self, image_id):

        info = self.image_info[image_id]

        with open(info['yaml_path']) as f:

            temp = yaml.load(f.read())

            labels = temp['label_names']

            del labels[0]

        return labels

    # 重新写draw_mask

    def draw_mask(self, num_obj, mask, image,image_id):

        #print("draw_mask-->",image_id)

        #print("self.image_info",self.image_info)

        info = self.image_info[image_id]

        #print("info-->",info)

        #print("info[width]----->",info['width'],"-info[height]--->",info['height'])

        for index in range(num_obj):

            for i in range(info['width']):

                for j in range(info['height']):

                    #print("image_id-->",image_id,"-i--->",i,"-j--->",j)

                    #print("info[width]----->",info['width'],"-info[height]--->",info['height'])

                    at_pixel = image.getpixel((i, j))

                    if at_pixel == index + 1:

                        mask[j, i, index] = 1

        return mask

    # 重新写load_shapes,里面包含自己的自己的类别

    # 并在self.image_info信息中添加了path、mask_path 、yaml_path

    # yaml_pathdataset_root_path = "/tongue_dateset/"

    # img_floder = dataset_root_path + "rgb"

    # mask_floder = dataset_root_path + "mask"

    # dataset_root_path = "/tongue_dateset/"

    def load_shapes(self, count, img_floder, mask_floder, imglist, dataset_root_path):

        """Generate the requested number of synthetic images.

        count: number of images to generate.

        height, width: the size of the generated images.

        """

        # Add classes

        self.add_class("shapes", 1, "a")

        self.add_class("shapes", 2, "b")

        self.add_class("shapes", 3, "c")

        self.add_class("shapes", 4, "e")

        for i in range(count):

            # 获取图片宽和高

            filestr = imglist[i].split(".")[0]

            #print(imglist[i],"-->",cv_img.shape[1],"--->",cv_img.shape[0])

            #print("id-->", i, " imglist[", i, "]-->", imglist[i],"filestr-->",filestr)

            # filestr = filestr.split("_")[1]

            mask_path = mask_floder + "/" + filestr + ".png"

            yaml_path = dataset_root_path + "labelme_json/" + filestr + "_json/info.yaml"

            print(dataset_root_path + "labelme_json/" + filestr + "_json/img.png")

            cv_img = cv2.imread(dataset_root_path + "labelme_json/" + filestr + "_json/img.png")

            self.add_image("shapes", image_id=i, path=img_floder + "/" + imglist[i],

                           width=cv_img.shape[1], height=cv_img.shape[0], mask_path=mask_path, yaml_path=yaml_path)

    # 重写load_mask

    def load_mask(self, image_id):

        """Generate instance masks for shapes of the given image ID.

        """

        global iter_num

        print("image_id",image_id)

        info = self.image_info[image_id]

        count = 1  # number of object

        img = Image.open(info['mask_path'])

        num_obj = self.get_obj_index(img)

        mask = np.zeros([info['height'], info['width'], num_obj], dtype=np.uint8)

        mask = self.draw_mask(num_obj, mask, img,image_id)

        occlusion = np.logical_not(mask[:, :, -1]).astype(np.uint8)

        for i in range(count - 2, -1, -1):

            mask[:, :, i] = mask[:, :, i] * occlusion

            occlusion = np.logical_and(occlusion, np.logical_not(mask[:, :, i]))

        labels = []

        labels = self.from_yaml_get_class(image_id)

        labels_form = []

        for i in range(len(labels)):

            if labels[i].find("a") != -1:

                labels_form.append("a")

            elif labels[i].find("b") != -1:

                labels_form.append("b")

            elif labels[i].find("c") != -1:

                labels_form.append("c")

            elif labels[i].find("e") != -1:

                labels_form.append("e")

        class_ids = np.array([self.class_names.index(s) for s in labels_form])

        return mask, class_ids.astype(np.int32)

def get_ax(rows=1, cols=1, size=8):

    """Return a Matplotlib Axes array to be used in

    all visualizations in the notebook. Provide a

    central point to control graph sizes.

    Change the default size attribute to control the size

    of rendered images

    """

    _, ax = plt.subplots(rows, cols, figsize=(size * cols, size * rows))

    return ax

#基础设置

dataset_root_path="train_data/"

img_floder = dataset_root_path + "pic"

mask_floder = dataset_root_path + "cv2_mask"

#yaml_floder = dataset_root_path

imglist = os.listdir(img_floder)

count = len(imglist)

#train与val数据集准备

dataset_train = DrugDataset()

dataset_train.load_shapes(count, img_floder, mask_floder, imglist,dataset_root_path)

dataset_train.prepare()

#print("dataset_train-->",dataset_train._image_ids)

dataset_val = DrugDataset()

dataset_val.load_shapes(7, img_floder, mask_floder, imglist,dataset_root_path)

dataset_val.prepare()

#print("dataset_val-->",dataset_val._image_ids)

# Load and display random samples

#image_ids = np.random.choice(dataset_train.image_ids, 4)

#for image_id in image_ids:

#    image = dataset_train.load_image(image_id)

#    mask, class_ids = dataset_train.load_mask(image_id)

#    visualize.display_top_masks(image, mask, class_ids, dataset_train.class_names)

# Create model in training mode

model = modellib.MaskRCNN(mode="training", config=config,

                          model_dir=MODEL_DIR)

# Which weights to start with?

init_with = "coco"  # imagenet, coco, or last

if init_with == "imagenet":

    model.load_weights(model.get_imagenet_weights(), by_name=True)

elif init_with == "coco":

    # Load weights trained on MS COCO, but skip layers that

    # are different due to the different number of classes

    # See README for instructions to download the COCO weights

    model.load_weights(COCO_MODEL_PATH, by_name=True,

                       exclude=["mrcnn_class_logits", "mrcnn_bbox_fc",

                                "mrcnn_bbox", "mrcnn_mask"])

elif init_with == "last":

    # Load the last model you trained and continue training

    model.load_weights(model.find_last()[1], by_name=True)

# Train the head branches

# Passing layers="heads" freezes all layers except the head

# layers. You can also pass a regular expression to select

# which layers to train by name pattern.

model.train(dataset_train, dataset_val,

            learning_rate=config.LEARNING_RATE,

            epochs=10,

            layers='heads')

# Fine tune all layers

# Passing layers="all" trains all layers. You can also

# pass a regular expression to select which layers to

# train by name pattern.

model.train(dataset_train, dataset_val,

            learning_rate=config.LEARNING_RATE / 10,

            epochs=30,

            layers="all")
以下为测试代码:
# -*- coding: utf-8 -*-

import os

import sys

import random

import math

import numpy as np

import skimage.io

import matplotlib

import matplotlib.pyplot as plt

import cv2

import time

from mrcnn.config import Config

from datetime import datetime

# Root directory of the project

ROOT_DIR = os.getcwd()

# Import Mask RCNN

sys.path.append(ROOT_DIR)  # To find local version of the library

from mrcnn import utils

import mrcnn.model as modellib

from mrcnn import visualize

# Import COCO config

sys.path.append(os.path.join(ROOT_DIR, "samples/coco/"))  # To find local version

from samples.coco import coco

# Directory to save logs and trained model

MODEL_DIR = os.path.join(ROOT_DIR, "logs/shapes20190425T0816/")

# Local path to trained weights file

COCO_MODEL_PATH = os.path.join(MODEL_DIR ,"mask_rcnn_shapes_0030.h5")

# Download COCO trained weights from Releases if needed

if not os.path.exists(COCO_MODEL_PATH):

    utils.download_trained_weights(COCO_MODEL_PATH)

    print("wancheng***********************")

# Directory of images to run detection on

IMAGE_DIR = os.path.join(ROOT_DIR, "images")

class ShapesConfig(Config):

    """Configuration for training on the toy shapes dataset.

    Derives from the base Config class and overrides values specific

    to the toy shapes dataset.

    """

    # Give the configuration a recognizable name

    NAME = "shapes"

    # Train on 1 GPU and 8 images per GPU. We can put multiple images on each

    # GPU because the images are small. Batch size is 8 (GPUs * images/GPU).

    GPU_COUNT = 1

    IMAGES_PER_GPU = 1

    # Number of classes (including background)

    NUM_CLASSES = 1 + 4 # background + 3 shapes

    # Use small images for faster training. Set the limits of the small side

    # the large side, and that determines the image shape.

    IMAGE_MIN_DIM = 320

    IMAGE_MAX_DIM = 384

    # Use smaller anchors because our image and objects are small

    RPN_ANCHOR_SCALES = (8 * 6, 16 * 6, 32 * 6, 64 * 6, 128 * 6)  # anchor side in pixels

    # Reduce training ROIs per image because the images are small and have

    # few objects. Aim to allow ROI sampling to pick 33% positive ROIs.

    TRAIN_ROIS_PER_IMAGE =100

    # Use a small epoch since the data is simple

    STEPS_PER_EPOCH = 100

    # use small validation steps since the epoch is small

    VALIDATION_STEPS = 50

#import train_tongue

#class InferenceConfig(coco.CocoConfig):

class InferenceConfig(ShapesConfig):

    # Set batch size to 1 since we'll be running inference on

    # one image at a time. Batch size = GPU_COUNT * IMAGES_PER_GPU

    GPU_COUNT = 1

    IMAGES_PER_GPU = 1

config = InferenceConfig()

model = modellib.MaskRCNN(mode="inference", model_dir=MODEL_DIR, config=config)

# Create model object in inference mode.

model = modellib.MaskRCNN(mode="inference", model_dir=MODEL_DIR, config=config)

# Load weights trained on MS-COCO

model.load_weights(COCO_MODEL_PATH, by_name=True)

# COCO Class names

# Index of the class in the list is its ID. For example, to get ID of

# the teddy bear class, use: class_names.index('teddy bear')

class_names = ['BG', 'a','b','c','e']

# Load a random image from the images folder

file_names = next(os.walk(IMAGE_DIR))[2]

image = skimage.io.imread(os.path.join(IMAGE_DIR, random.choice(file_names)))

a=datetime.now()

# Run detection

results = model.detect([image], verbose=1)

b=datetime.now()

# Visualize results

print("shijian",(b-a).seconds)

r = results[0]

visualize.display_instances(image, r['rois'], r['masks'], r['class_ids'],

                            class_names, r['scores'])

# Load a random image from the images folder

#file_names = next(os.walk(IMAGE_DIR))[2]

#image = skimage.io.imread(os.path.join(IMAGE_DIR, random.choice(file_names)))

#cap = cv2.VideoCapture(0)

#

#while(1):

#    # get a frame

#    ret, frame = cap.read()

#    # show a frame

#    start =time.clock()

#    results = model.detect([frame], verbose=1)

#    r = results[0]

#    #cv2.imshow("capture", frame)

#    visualize.display_instances(frame, r['rois'], r['masks'], r['class_ids'],

#                            class_names, r['scores'])

#    end = time.clock()

#    print(end-start)

#    if cv2.waitKey(1) & 0xFF == ord('q'):

#        break

#

#cap.release()

#cv2.destroyAllWindows()

#image= cv2.imread("C:\\Users\\18301\\Desktop\\Mask_RCNN-master\\images\\9.jpg")

## Run detection

#

#results = model.detect([image], verbose=1)

#

#print(end-start)

## Visualize results

#r = results[0]

#visualize.display_instances(image, r['rois'], r['masks'], r['class_ids'],

#                            class_names, r['scores'])

## Root directory of the project

#ROOT_DIR = os.getcwd()

#

## Directory to save logs and trained model

#MODEL_DIR = os.path.join(ROOT_DIR, "logs/shapes20180713T1554")

#

## Local path to trained weights file

#COCO_MODEL_PATH = os.path.join(ROOT_DIR, "mask_rcnn_coco.h5")

## Download COCO trained weights from Releases if needed

#if not os.path.exists(COCO_MODEL_PATH):

#    utils.download_trained_weights(COCO_MODEL_PATH)

#

## Directory of images to run detection on

#IMAGE_DIR = os.path.join(ROOT_DIR, "images")

#

#class ShapesConfig(Config):

#    """Configuration for training on the toy shapes dataset.

#    Derives from the base Config class and overrides values specific

#    to the toy shapes dataset.

#    """

#    # Give the configuration a recognizable name

#    NAME = "shapes"

#

#    # Train on 1 GPU and 8 images per GPU. We can put multiple images on each

#    # GPU because the images are small. Batch size is 8 (GPUs * images/GPU).

#    GPU_COUNT = 1

#    IMAGES_PER_GPU = 1

#

#    # Number of classes (including background)

#    NUM_CLASSES = 1 + 1  # background + 3 shapes

#

#    # Use small images for faster training. Set the limits of the small side

#    # the large side, and that determines the image shape.

#    IMAGE_MIN_DIM = 320

#    IMAGE_MAX_DIM = 384

#

#    # Use smaller anchors because our image and objects are small

#    RPN_ANCHOR_SCALES = (8 * 6, 16 * 6, 32 * 6, 64 * 6, 128 * 6)  # anchor side in pixels

#

#    # Reduce training ROIs per image because the images are small and have

#    # few objects. Aim to allow ROI sampling to pick 33% positive ROIs.

#    TRAIN_ROIS_PER_IMAGE =100

#

#    # Use a small epoch since the data is simple

#    STEPS_PER_EPOCH = 100

#

#    # use small validation steps since the epoch is small

#    VALIDATION_STEPS = 50

#

##import train_tongue

##class InferenceConfig(coco.CocoConfig):

#class InferenceConfig(ShapesConfig):

#    # Set batch size to 1 since we'll be running inference on

#    # one image at a time. Batch size = GPU_COUNT * IMAGES_PER_GPU

#    GPU_COUNT = 1

#    IMAGES_PER_GPU = 1

#

#config = InferenceConfig()

#

#model = modellib.MaskRCNN(mode="inference", model_dir=MODEL_DIR, config=config)

#

## Load weights trained on MS-COCO

## model.load_weights(COCO_MODEL_PATH, by_name=True)

#model_path = model.find_last()[0]

#

## Load trained weights (fill in path to trained weights here)

#assert model_path != "", "Provide path to trained weights"

#print("Loading weights from ", model_path)

#model.load_weights(model_path, by_name=True)

#

#class_names = ['BG', 'tank']

#

## Load a random image from the images folder

#file_names = next(os.walk(IMAGE_DIR))[2]

#image = skimage.io.imread(os.path.join(IMAGE_DIR, random.choice(file_names)))

#

## Run detection

#results = model.detect([image], verbose=1)

#

## Visualize results

#r = results[0]

#visualize.display_instances(image, r['rois'], r['masks'], r['class_ids'],

#                            class_names, r['scores'])
修改代码中的路径及数据集即可正常训练出自己的数据集
mask_rcnn训练自己的数据集的更多相关文章
- 【Tensorflow系列】使用Inception_resnet_v2训练自己的数据集并用Tensorboard监控
[写在前面] 用Tensorflow(TF)已实现好的卷积神经网络(CNN)模型来训练自己的数据集,验证目前较成熟模型在不同数据集上的准确度,如Inception_V3, VGG16,Inceptio ...
- 目标检测算法SSD之训练自己的数据集
目标检测算法SSD之训练自己的数据集 prerequesties 预备知识/前提条件 下载和配置了最新SSD代码 git clone https://github.com/weiliu89/caffe ...
- 可变卷积Deforable ConvNet 迁移训练自己的数据集 MXNet框架 GPU版
[引言] 最近在用可变卷积的rfcn 模型迁移训练自己的数据集, MSRA官方使用的MXNet框架 环境搭建及配置:http://www.cnblogs.com/andre-ma/p/8867031. ...
- caffe训练自己的数据集
默认caffe已经编译好了,并且编译好了pycaffe 1 数据准备 首先准备训练和测试数据集,这里准备两类数据,分别放在文件夹0和文件夹1中(之所以使用0和1命名数据类别,是因为方便标注数据类别,直 ...
- 使用yolo3模型训练自己的数据集
使用yolo3模型训练自己的数据集 本项目地址:https://github.com/Cw-zero/Retrain-yolo3 一.运行环境 1. Ubuntu16.04. 2. TensorFlo ...
- Win10中用yolov3训练自己的数据集全过程(VS、CUDA、CUDNN、OpenCV配置,训练和测试)
在Windows系统的Linux系统中用yolo训练自己的数据集的配置差异很大,今天总结在win10中配置yolo并进行训练和测试的全过程. 提纲: 1.下载适用于Windows的darknet 2. ...
- TensorFlow学习笔记——LeNet-5(训练自己的数据集)
在之前的TensorFlow学习笔记——图像识别与卷积神经网络(链接:请点击我)中了解了一下经典的卷积神经网络模型LeNet模型.那其实之前学习了别人的代码实现了LeNet网络对MNIST数据集的训练 ...
- YOLO训练自己的数据集的一些心得
YOLO训练自己的数据集 YOLO-darknet训练自己的数据 [Darknet][yolo v2]训练自己数据集的一些心得----VOC格式 YOLO模型训练可视化训练过程中的中间参数 项目开源代 ...
- YOLO V3训练自己的数据集
数据的输入几乎和Faster rcnn一样,标签格式xml是一样的. 相比Faster rcnn,数据多了一步处理,通过voc_annotation.py将图片路径和bbox+class存储在txt下 ...
随机推荐
- golang rc4加密
package main import "crypto/rc4" import "fmt" func main() { key := []byte(" ...
- Django多表查询
一.前言 1.什么是ORM? ORM,即Object-Relational Mapping(对象关系映射),它的作用是在关系型数据库和业务实体对象之间作一个映射,这样,我们在具体的操作业务对象的时候, ...
- jsp中的绝对路径、相对路径和访问jsp的方式
1.jsp的绝对路径 绝对路径在复制jsp时不用修改路径都会正常显示,但是绝对路径${pageContext.request.contextPath}只有jsp可以识别 例如:相对路径:image/l ...
- xueping wang 记录
https://www.bbsmax.com/A/lk5aVBod1O/ https://pkgs.org/statistics/ 在firefox的调试控制台, 下面有一个独立的分割的控制台窗口, ...
- EJB 笔记
EJB(Enterprise JavaBean)是J2EE服务器端的组件模型,EJB包括会话Bean(Session Bean).实体Bean(Entity Bean).消息驱动Bean(Messag ...
- js原生实现网页广告条飞舞的效果
<html> <head> <meta http-equiv="Content-Type" content="text/html; char ...
- heap_sort
(from wikipedia) 构建步骤: 建成一个大顶堆 第一个元素依次和最后一个元素交换,由于交换后新的堆顶元素可能违反大根堆的性质,因此需要对当前无序区(1,2,...,n-1)调整为新堆 不 ...
- API测试:Chai & Mocha
(一)Chai($npm install chai)https://www.chaijs.com/ 安装到devDependencies中,线上不用,开发用 Chai is a BDD(行为驱动开发 ...
- Maven项目下的Mybatis逆向工程
IDEA Maven项目的Mybatis逆向工程 1.配置.pom 如果是在多模块开发下,该文件逆向工程要生成的那个模块下的pom文件. <build> <plugins> & ...
- Java JDK下载、安装和验证
1.JDK下载地址: http://www.oracle.com/technetwork/java/javase/downloads/index.html,点开链接看到如下图所示的界面: 2.点击上图 ...