【数字图像分析】基于Python实现 Canny Edge Detection(Canny 边缘检测算法)
Canny 边缘检测算法
Steps:
- 高斯滤波平滑
- 计算梯度大小和方向
- 非极大值抑制
- 双阈值检测和连接
代码结构:
Canny Edge Detection

|	Gaussian_Smoothing

|		|	convolution.py

|		|	|	convolution()

|		|	gaussion_smoothing.py

|		|	|	dnorm()

|		|	|	gaussian_kernel()

|		|	|	gaussian_blur()

|	Sobel_Filter

|		|	sobel.py

|		|	|	sobel_edge_detection()

|	Canny.py

|		|	non_max_suppression()

|		|	threshold()

|		|	hysteresis()

|		|	main()
代码解读:
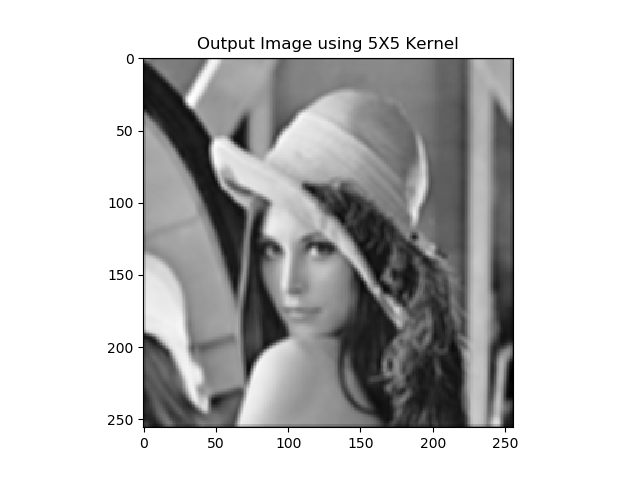
1. 高斯滤波平滑
创建一个高斯核(kernel_size=5):
执行卷积和平均操作(以下均以 lenna 图为例)
2. 计算梯度大小和方向
水平方向和竖直方向
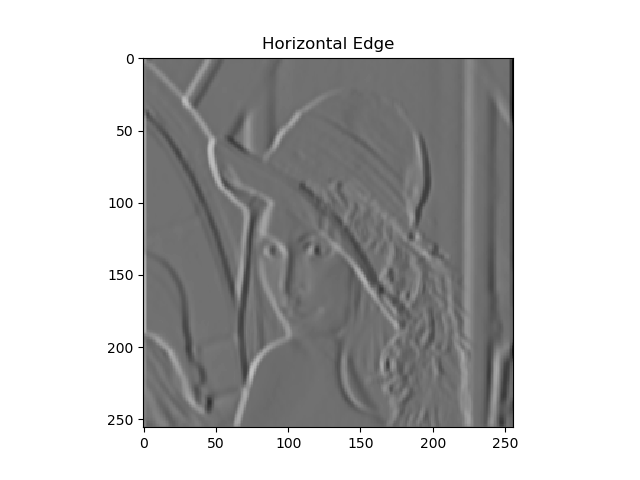
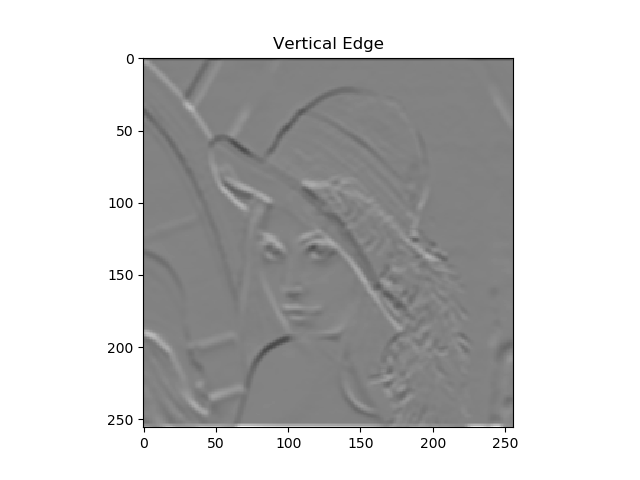
梯度图:

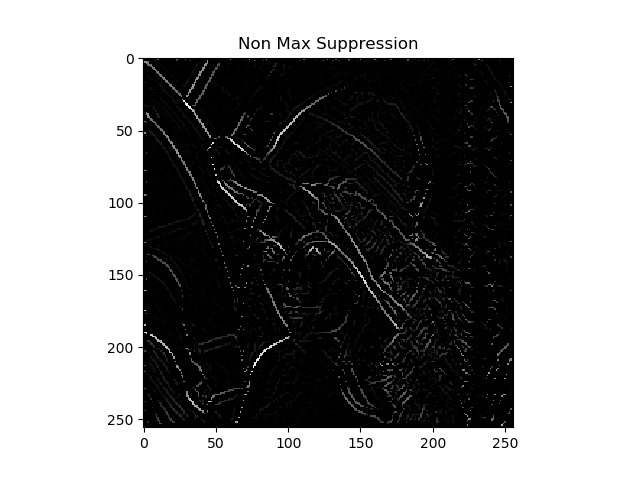
3. 非极大值抑制
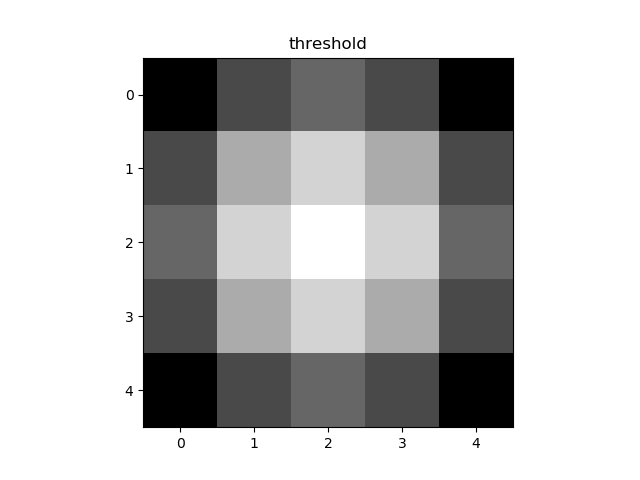
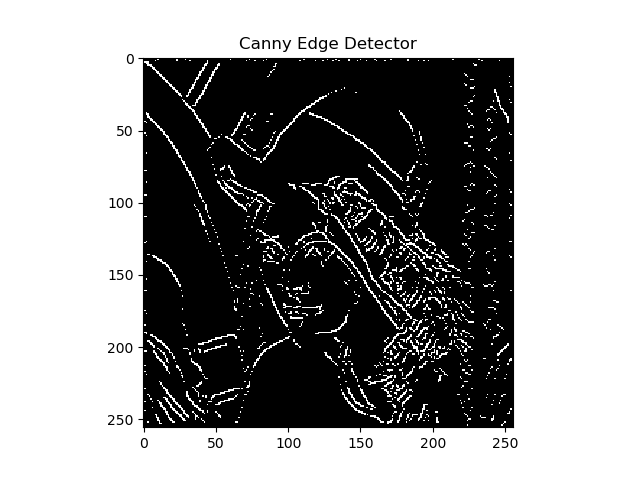
4. 双阈值检测和连接
以下是代码:
import numpy as np

import cv2

import argparse

from Computer_Vision.Canny_Edge_Detection.sobel import sobel_edge_detection

from Computer_Vision.Canny_Edge_Detection.gaussian_smoothing import gaussian_blur

import matplotlib.pyplot as plt

def non_max_suppression(gradient_magnitude, gradient_direction, verbose):

    image_row, image_col = gradient_magnitude.shape

    output = np.zeros(gradient_magnitude.shape)

    PI = 180

    for row in range(1, image_row - 1):

        for col in range(1, image_col - 1):

            direction = gradient_direction[row, col]

            if (0 <= direction < PI / 8) or (15 * PI / 8 <= direction <= 2 * PI):

                before_pixel = gradient_magnitude[row, col - 1]

                after_pixel = gradient_magnitude[row, col + 1]

            elif (PI / 8 <= direction < 3 * PI / 8) or (9 * PI / 8 <= direction < 11 * PI / 8):

                before_pixel = gradient_magnitude[row + 1, col - 1]

                after_pixel = gradient_magnitude[row - 1, col + 1]

            elif (3 * PI / 8 <= direction < 5 * PI / 8) or (11 * PI / 8 <= direction < 13 * PI / 8):

                before_pixel = gradient_magnitude[row - 1, col]

                after_pixel = gradient_magnitude[row + 1, col]

            else:

                before_pixel = gradient_magnitude[row - 1, col - 1]

                after_pixel = gradient_magnitude[row + 1, col + 1]

            if gradient_magnitude[row, col] >= before_pixel and gradient_magnitude[row, col] >= after_pixel:

                output[row, col] = gradient_magnitude[row, col]

    if verbose:

        plt.imshow(output, cmap='gray')

        plt.title("Non Max Suppression")

        plt.show()

    return output

def threshold(image, low, high, weak, verbose=False):

    output = np.zeros(image.shape)

    strong = 255

    strong_row, strong_col = np.where(image >= high)

    weak_row, weak_col = np.where((image <= high) & (image >= low))

    output[strong_row, strong_col] = strong

    output[weak_row, weak_col] = weak

    if verbose:

        plt.imshow(output, cmap='gray')

        plt.title("threshold")

        plt.show()

    return output

def hysteresis(image, weak):

    image_row, image_col = image.shape

    top_to_bottom = image.copy()

    for row in range(1, image_row):

        for col in range(1, image_col):

            if top_to_bottom[row, col] == weak:

                if top_to_bottom[row, col + 1] == 255 or top_to_bottom[row, col - 1] == 255 or top_to_bottom[row - 1, col] == 255 or top_to_bottom[

                    row + 1, col] == 255 or top_to_bottom[

                    row - 1, col - 1] == 255 or top_to_bottom[row + 1, col - 1] == 255 or top_to_bottom[row - 1, col + 1] == 255 or top_to_bottom[

                    row + 1, col + 1] == 255:

                    top_to_bottom[row, col] = 255

                else:

                    top_to_bottom[row, col] = 0

    bottom_to_top = image.copy()

    for row in range(image_row - 1, 0, -1):

        for col in range(image_col - 1, 0, -1):

            if bottom_to_top[row, col] == weak:

                if bottom_to_top[row, col + 1] == 255 or bottom_to_top[row, col - 1] == 255 or bottom_to_top[row - 1, col] == 255 or bottom_to_top[

                    row + 1, col] == 255 or bottom_to_top[

                    row - 1, col - 1] == 255 or bottom_to_top[row + 1, col - 1] == 255 or bottom_to_top[row - 1, col + 1] == 255 or bottom_to_top[

                    row + 1, col + 1] == 255:

                    bottom_to_top[row, col] = 255

                else:

                    bottom_to_top[row, col] = 0

    right_to_left = image.copy()

    for row in range(1, image_row):

        for col in range(image_col - 1, 0, -1):

            if right_to_left[row, col] == weak:

                if right_to_left[row, col + 1] == 255 or right_to_left[row, col - 1] == 255 or right_to_left[row - 1, col] == 255 or right_to_left[

                    row + 1, col] == 255 or right_to_left[

                    row - 1, col - 1] == 255 or right_to_left[row + 1, col - 1] == 255 or right_to_left[row - 1, col + 1] == 255 or right_to_left[

                    row + 1, col + 1] == 255:

                    right_to_left[row, col] = 255

                else:

                    right_to_left[row, col] = 0

    left_to_right = image.copy()

    for row in range(image_row - 1, 0, -1):

        for col in range(1, image_col):

            if left_to_right[row, col] == weak:

                if left_to_right[row, col + 1] == 255 or left_to_right[row, col - 1] == 255 or left_to_right[row - 1, col] == 255 or left_to_right[

                    row + 1, col] == 255 or left_to_right[

                    row - 1, col - 1] == 255 or left_to_right[row + 1, col - 1] == 255 or left_to_right[row - 1, col + 1] == 255 or left_to_right[

                    row + 1, col + 1] == 255:

                    left_to_right[row, col] = 255

                else:

                    left_to_right[row, col] = 0

    final_image = top_to_bottom + bottom_to_top + right_to_left + left_to_right

    final_image[final_image > 255] = 255

    return final_image

if __name__ == '__main__':

    ap = argparse.ArgumentParser()

    ap.add_argument("-i", "--image", required=True, help="Path to the image")

    ap.add_argument("-v", "--verbose", type=bool, default=False, help="Path to the image")

    args = vars(ap.parse_args())

    image = cv2.imread(args["image"])

    blurred_image = gaussian_blur(image, kernel_size=9, verbose=False)

    edge_filter = np.array([[-1, 0, 1], [-2, 0, 2], [-1, 0, 1]])

    gradient_magnitude, gradient_direction = sobel_edge_detection(blurred_image, edge_filter, convert_to_degree=True, verbose=args["verbose"])

    new_image = non_max_suppression(gradient_magnitude, gradient_direction, verbose=args["verbose"])

    weak = 50

    new_image = threshold(new_image, 5, 20, weak=weak, verbose=args["verbose"])

    new_image = hysteresis(new_image, weak)

    plt.imshow(new_image, cmap='gray')

    plt.title("Canny Edge Detector")

    plt.show()
References
hahahha
【数字图像分析】基于Python实现 Canny Edge Detection(Canny 边缘检测算法)的更多相关文章
- 猜数字游戏--基于python
"""题目:练习使用python写一个猜数字的游戏,数字范围0-100,每次猜错,需要给出缩小后的范围,每个人只有10次的猜测机会,猜测机会用完游戏结束!"&q ...
- 【笔记】基于Python的数字图像处理
[博客导航] [Python相关] 前言 基于Python的数字图像处理,离不开相关处理的第三方库函数.搜索网络资源,列出如下资源链接. Python图像处理库到底用哪家 python计算机视觉编程— ...
- Image Processing and Analysis_8_Edge Detection:Scale-space and edge detection using anisotropic diffusion——1990
此主要讨论图像处理与分析.虽然计算机视觉部分的有些内容比如特 征提取等也可以归结到图像分析中来,但鉴于它们与计算机视觉的紧密联系,以 及它们的出处,没有把它们纳入到图像处理与分析中来.同样,这里面也有 ...
- Image Processing and Analysis_8_Edge Detection:A Computational Approach to Edge Detection——1986
此主要讨论图像处理与分析.虽然计算机视觉部分的有些内容比如特 征提取等也可以归结到图像分析中来,但鉴于它们与计算机视觉的紧密联系,以 及它们的出处,没有把它们纳入到图像处理与分析中来.同样,这里面也有 ...
- Image Processing and Analysis_8_Edge Detection:Theory of Edge Detection ——1980
此主要讨论图像处理与分析.虽然计算机视觉部分的有些内容比如特 征提取等也可以归结到图像分析中来,但鉴于它们与计算机视觉的紧密联系,以 及它们的出处,没有把它们纳入到图像处理与分析中来.同样,这里面也有 ...
- 计算机视觉中的边缘检测Edge Detection in Computer Vision
计算机视觉中的边缘检测 边缘检测是计算机视觉中最重要的概念之一.这是一个很直观的概念,在一个图像上运行图像检测应该只输出边缘,与素描比较相似.我的目标不仅是清晰地解释边缘检测是怎样工作的,同时也提 ...
- Image Processing and Analysis_8_Edge Detection:Edge Detection Revisited ——2004
此主要讨论图像处理与分析.虽然计算机视觉部分的有些内容比如特 征提取等也可以归结到图像分析中来,但鉴于它们与计算机视觉的紧密联系,以 及它们的出处,没有把它们纳入到图像处理与分析中来.同样,这里面也有 ...
- Image Processing and Analysis_8_Edge Detection:Local Scale Control for Edge Detection and Blur Estimation——1998
此主要讨论图像处理与分析.虽然计算机视觉部分的有些内容比如特 征提取等也可以归结到图像分析中来,但鉴于它们与计算机视觉的紧密联系,以 及它们的出处,没有把它们纳入到图像处理与分析中来.同样,这里面也有 ...
- Image Processing and Analysis_8_Edge Detection: Optimal edge detection in two-dimensional images ——1996
此主要讨论图像处理与分析.虽然计算机视觉部分的有些内容比如特 征提取等也可以归结到图像分析中来,但鉴于它们与计算机视觉的紧密联系,以 及它们的出处,没有把它们纳入到图像处理与分析中来.同样,这里面也有 ...
随机推荐
- Java死锁演示
Java死锁演示 在线程中嵌套获取锁导致死锁.思路,尽量不要嵌套获取锁. package com.mozq.demo.demo; public class DeadLockDemo { private ...
- [Vue 牛刀小试]:第十三章 - Vue Router 基础使用再探(命名路由、命名视图、路由传参)
一.前言 在上一章的学习中,我们简单介绍了前端路由的概念,以及如何在 Vue 中通过使用 Vue Router 来实现我们的前端路由.但是在实际使用中,我们经常会遇到路由传参.或者一个页面是由多个组件 ...
- typescript与nodejs(一)最简单的webserver
安装nodejs tsc cnpm vscode 这些略 如果网络慢,可以考虑使用CNPM 一. 基本WebServer模块环境 1. 命令行 npm init 初始化一个目录为nodejs项目 2 ...
- 计算机网络知识(TCP连接,TCP/UDP区别,HTTP与HTTPS,Socket原理等等)
1.网络七层协议包含,物理层.数据链路层.网络层(ip协议).传输层(TCP传输控制协议.UDP用户数据报协议).会话层.表示层.应用层(http协议).是一个提供的概念架构协议. 2.TCP/IP协 ...
- ASP.NET MVC教程八:_ViewStart.cshtml
一.引言 _ViewStart.cshtml是在ASP.NET MVC 3.0及更高版本以后出现的,用Razor模板引擎新建项目后,Views目录下面会出现一个这样的文件: 打开_ViewStart. ...
- SpringCloud(五):断路器(Hystrix)和hystrixdashboard图实现链路追踪
第一:关于服务调用和熔断安全: ribbon和Feign: 1. 相当于nigx+doubbe,微服务间的服务调用,API网关的请求转发等内容2. Feign整合了Ribbon和Hystrix Hy ...
- 利用Azure虚拟机安装Dynamics 365 Customer Engagement之一:准备工作
我是微软Dynamics 365 & Power Platform方面的工程师罗勇,也是2015年7月到2018年6月连续三年Dynamics CRM/Business Solutions方面 ...
- OpenCV:图像的水平、垂直、水平垂直翻转
首先导入相关的库: import cv2 import matplotlib.pyplot as plt 自定义展示图片的函数: def show(image): plt.imshow(image) ...
- DOM CSS
DOM CSS HTML DOM 允许 JavaScript 改变 HTML 元素的样式. 改变 HTML 样式 如需改变 HTML 元素的样式,请使用这个语法: document.getElemen ...
- iOS sqlite ORM框架-LKDBHelper
LKDBHelper 一个sqlite ORM(全自动操作数据库)框架. 线程安全.不再担心递归锁死的问题 安装要求 iOS 4.3+ 仅支持 ARC FMDB 添加到你的项目 如果你使用 Cocoa ...