
Spring-Boot - 初步搭建
official document:http://projects.spring.io/spring-boot/
项目代码: https://github.com/Ryan-Miao/springboot-test
一、简介
SpringMVC是非常伟大的框架,开源,发展迅速。优秀的设计必然会划分、解耦。所以,spring有很多子项目,比如core、context、bean、mvc等。这对知根底的人来说很简单明了,然而springmvc就是为了傻瓜式的操作而发明的。对于初学springmvc的人来说,想要入手就开发需要拷贝一连串的dependency而不知道这个是干嘛,不知道是不是少了依赖。像我刚接触springmvc的时候到处百度教程而发现各有不同,于是复制了一个又一个代码却不能自己设置,根本原因是不了解各个依赖的包。
Spring-Boot 正是为了解决繁复的代码配置而产生的。Spring-Boot 也是基于java-base 开发的代码,及不用xml文件配置,所有代码都由java来完成。还可以加入Groovy的动态语言执行。
本文只是Springboot的初始化用法,更多详情,参阅[Java Web 之 Springboot](http://www.cnblogs.com/woshimrf/p/java-web-springboot.html)
二、搭建一个基本的web-mvc 项目
2.1 Configure environment
- java 1.8+
- maven 3.3+
- spring-boot 1.3.5
- idea 15
- Thymeleaf 3
2.2 Start
在idea中,选择new-》maven创建一个空的maven项目,比如名字springboot-test。
2.2.1pom.xml
设定java版本:
<properties>

        <java.version>1.8</java.version>

</properties>
添加依赖版本管理dependencyManagement
<dependencyManagement>

        <dependencies>

            <dependency>

                <!-- Import dependency management from Spring Boot -->

                <groupId>org.springframework.boot</groupId>

                <artifactId>spring-boot-dependencies</artifactId>

                <version>1.3.5.RELEASE</version>

                <type>pom</type>

                <scope>import</scope>

            </dependency>

        </dependencies>

</dependencyManagement>
添加spring-web项目依赖
<dependencies>

        <dependency>

            <groupId>org.springframework.boot</groupId>

            <artifactId>spring-boot-starter-web</artifactId>

        </dependency>

    <dependency>

        <groupId>org.springframework.boot</groupId>

        <artifactId>spring-boot-devtools</artifactId>

        <optional>true</optional>

    </dependency>

</dependencies>
添加build-plugin
<build>

        <plugins>

            <plugin>

                <groupId>org.springframework.boot</groupId>

                <artifactId>spring-boot-maven-plugin</artifactId>

                <configuration>

                    <fork>true</fork>

                </configuration>

            </plugin>

        </plugins>

</build>
如此,一个简单的restful的webservice的项目就搭建好了。如果想要支持视图渲染,即jsp、freeMark、velocity等,添加对应的依赖即可。比如,我使用Thymeleaf模板:
<dependency>

            <groupId>org.springframework.boot</groupId>

            <artifactId>spring-boot-starter-thymeleaf</artifactId>

</dependency>
2.2.2 创建java代码
如果新建项目的名字是:springboot-test. 则创建包springboot-test/src/main/java/com/test.
com

 +- example

     +- myproject

         +- Application.java

         |

         +- domain

         |   +- Customer.java

         |   +- CustomerRepository.java

         |

         +- service

         |   +- CustomerService.java

         |

         +- web

             +- CustomerController.java
com.test是我们的基本包名。下面创建配置类com.test.AppConfig。
package com.test;

import org.springframework.boot.SpringApplication;

import org.springframework.boot.autoconfigure.SpringBootApplication;

/**

 * Created by miaorf on 2016/6/19.

 */

@SpringBootApplication

public class AppConfig {

    public static void main(String[] args) {

        SpringApplication.run(AppConfig.class);

    }

}
@SpringBootApplication 标注启动配置入口,可以发现通过一个main方法启动。使用这个注解的类必须放置于最外层包中,因为默认扫描这个类以下的包。否则需要自己配置@ComponentScan。
这样,配置基本完成了。下面开发控制层controller:
创建com.test.controller.HelloController。
package com.test.controller;

import org.springframework.stereotype.Controller;

import org.springframework.ui.Model;

import org.springframework.web.bind.annotation.RequestMapping;

import org.springframework.web.bind.annotation.ResponseBody;

import java.util.HashMap;

import java.util.Map;

/**

 * Created by miaorf on 2016/6/19.

 */

@Controller

public class HelloController {

    @RequestMapping("/index")

    public String index(Model model){

        model.addAttribute("name","Ryan");

        return "index";

    }

    @RequestMapping("/json")

    @ResponseBody

    public Map<String,Object> json(){

        Map<String,Object> map = new HashMap<String,Object>();

        map.put("name","Ryan");

        map.put("age","18");

        map.put("sex","man");

        return map;

    }

}
创建视图代码:
视图默认放在springboot-test\src\main\resources\templates**.
所以创建springboot-test\src\main\resources\templates\index.html
<!DOCTYPE HTML>

<html xmlns:th="http://www.thymeleaf.org">

<head>

    <title>Getting Started: Serving Web Content</title>

    <meta http-equiv="Content-Type" content="text/html; charset=UTF-8" />

</head>

<body>

<p th:text="'Hello, ' + ${name} + '!'" />

</body>

</html>
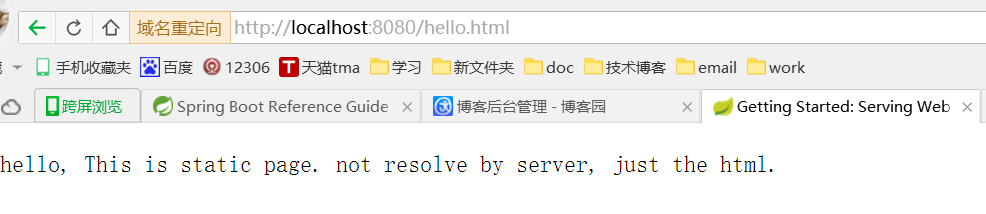
D:\workspace\springboot\springboot-test\src\main\webapp\hello.html
<!DOCTYPE HTML>

<html>

<head>

    <title>Getting Started: Serving Web Content</title>

    <meta http-equiv="Content-Type" content="text/html; charset=UTF-8" />

</head>

<body>

hello, This is static page. not resolve by server, just the html.

</body>

</html>
2.2.3 run
启动方式多种,可以启动main方法,也可以通过命令行启动:
D:\temp\springboot-test>mvn spring-boot:run

[INFO] Scanning for projects...

[WARNING]

[WARNING] Some problems were encountered while building the effective model for com.test:springboot-test:jar:1.0-SNAPSHOT

[WARNING] 'build.plugins.plugin.version' for org.springframework.boot:spring-boot-maven-plugin is missing. @ line 49, column 21

[WARNING]

[WARNING] It is highly recommended to fix these problems because they threaten the stability of your build.

[WARNING]

[WARNING] For this reason, future Maven versions might no longer support building such malformed projects.

[WARNING]

[INFO]

[INFO] ------------------------------------------------------------------------

[INFO] Building springboot-test 1.0-SNAPSHOT

[INFO] ------------------------------------------------------------------------

[INFO]

[INFO] >>> spring-boot-maven-plugin:1.3.5.RELEASE:run (default-cli) > test-compile @ springboot-test >>>

[INFO]

[INFO] --- maven-resources-plugin:2.6:resources (default-resources) @ springboot-test ---

[WARNING] Using platform encoding (GBK actually) to copy filtered resources, i.e. build is platform dependent!

[INFO] Copying 2 resources

[INFO]

[INFO] --- maven-compiler-plugin:3.1:compile (default-compile) @ springboot-test ---

[INFO] Nothing to compile - all classes are up to date

[INFO]

[INFO] --- maven-resources-plugin:2.6:testResources (default-testResources) @ springboot-test ---

[WARNING] Using platform encoding (GBK actually) to copy filtered resources, i.e. build is platform dependent!

[INFO] skip non existing resourceDirectory D:\temp\springboot-test\src\test\resources

[INFO]

[INFO] --- maven-compiler-plugin:3.1:testCompile (default-testCompile) @ springboot-test ---

[INFO] No sources to compile

[INFO]

[INFO] <<< spring-boot-maven-plugin:1.3.5.RELEASE:run (default-cli) < test-compile @ springboot-test <<<

[INFO]

[INFO] --- spring-boot-maven-plugin:1.3.5.RELEASE:run (default-cli) @ springboot-test ---

[INFO] Attaching agents: []

  .   ____          _            __ _ _

 /\\ / ___'_ __ _ _(_)_ __  __ _ \ \ \ \

( ( )\___ | '_ | '_| | '_ \/ _` | \ \ \ \

 \\/  ___)| |_)| | | | | || (_| |  ) ) ) )

  '  |____| .__|_| |_|_| |_\__, | / / / /

 =========|_|==============|___/=/_/_/_/

 :: Spring Boot ::        (v1.3.5.RELEASE)
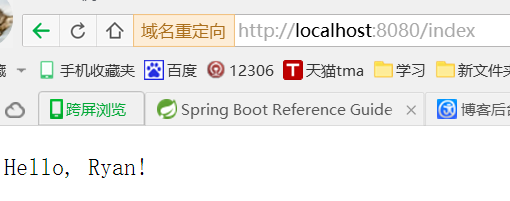
浏览器访问:localhost:8080/index

Spring-Boot - 初步搭建的更多相关文章
- Spring boot -环境搭建 ,初步接触(1)
1. Eclipse 创建 maven project 项目目录如下: 2. pom.xml 配置文件 <project xmlns="http://maven.apache.or ...
- Spring Boot+CXF搭建WebService(转)
概述 最近项目用到在Spring boot下搭建WebService服务,对Java语言下的WebService了解甚少,而今抽个时间查阅资料整理下Spring Boot结合CXF打架WebServi ...
- Spring Boot 项目学习 (三) Spring Boot + Redis 搭建
0 引言 本文主要介绍 Spring Boot 中 Redis 的配置和基本使用. 1 配置 Redis 1. 修改pom.xml,添加Redis依赖 <!-- Spring Boot Redi ...
- Spring boot项目搭建及简单实例
Spring boot项目搭建 Spring Boot 概述 Build Anything with Spring Boot:Spring Boot is the starting point for ...
- spring boot+mybatis搭建项目
一.创建spring boot项目 1.File->New->Project 2.选择 Spring Initializr ,然后选择默认的 url 点击[Next]: 3.修改项目信息 ...
- 寻找写代码感觉(一)之使用 Spring Boot 快速搭建项目
写在前面 现在已经是八月份了,我已经荒废了半年居多,不得不说谈恋爱确实是个麻烦的事,谈好了皆大欢喜,分手了就是萎靡不振,需要很长一段时间才能缓过来. 人还是要有梦想的,至于实现只不过是一个契机,但凡不 ...
- [读书笔记] 一、Spring boot项目搭建与配置文件
读书笔记:[JavaEE开发的颠覆者 Spring Boot实战] 作者:汪云飞 从今天开始坚持读书,并记录下此读书笔记. 一,初接触 Spring boot 项目Hello world搭建 1.po ...
- Vue + Spring Boot从零开始搭建个人网站(一) 之 项目前端Vue.js环境搭建
前言: 最近在考虑搭建个人网站,想了想决定采用前后端分离模式 前端使用Vue,负责接收数据 后端使用Spring Boot,负责提供前端需要的API 就这样开启了我边学习边实践之旅 Vue环境搭建步骤 ...
- Spring Boot 入门搭建
一.前言 Spring Boot 的设计目的是用来简化新 Spring 应用的初始搭建以及开发过程.该框架使用了特定的方式来进行配置,从而使开发人员不再需要定义样板化的配置. 二.环境搭建 创建一个 ...
- Spring Boot项目搭建
1.Spring Boot概述 Spring Boot是由Pivotal团队提供的全新框架,其设计目的是用来简化新Spring应用的初始搭建以及开发过程.该框架使用了特定的方式来进行配置,从而使开发人 ...
随机推荐
- java 获取中文字符的首字母
原理: GB2312编码中的中文是按照拼音排序的 注意: 一些生僻的字无法获得正确的首字母,原因是这些字都是后加入的. import java.io.UnsupportedEncodingExcept ...
- 玩转SQL Server复制回路の变更数据类型、未分区表转为分区表
玩转SQL Server复制回路の变更数据类型.未分区表转为分区表 复制的应用: 初级应用:读写分离.数据库备份 高级应用:搬迁大型数据库(跨机房).变更数据类型.未分区表转为分区表 京东的复制专家 ...
- SQL Server : Browser服务
SQL Server : Browser服务是SQL Server 2005新增的,简单的说,如果一个物理服务器上面有多个SQL Server实例,那么为了确保客户端能访问到正确的实例,所以SQL S ...
- 安卓动态调试七种武器之孔雀翎 – Ida Pro
安卓动态调试七种武器之孔雀翎 – Ida Pro 作者:蒸米@阿里聚安全 0x00 序 随着移动安全越来越火,各种调试工具也都层出不穷,但因为环境和需求的不同,并没有工具是万能的.另外工具是死的,人是 ...
- Hadoop学习笔记—9.Partitioner与自定义Partitioner
一.初步探索Partitioner 1.1 再次回顾Map阶段五大步骤 在第四篇博文<初识MapReduce>中,我们认识了MapReduce的八大步凑,其中在Map阶段总共五个步骤,如下 ...
- 七天学会ASP.NET MVC (四)——用户授权认证问题
小编应各位的要求,快马加鞭,马不停蹄的终于:七天学会 Asp.Net MVC 第四篇出炉,在第四天的学习中,我们主要了学习如何在MVC中如何实现认证授权等问题,本节主要讲了验证错误时的错误值,客户端验 ...
- [ASP.NET MVC 小牛之路]12 - Section、Partial View 和 Child Action
概括的讲,View中的内容可以分为静态和动态两部分.静态内容一般是html元素,而动态内容指的是在应用程序运行的时候动态创建的内容.给View添加动态内容的方式可归纳为下面几种: Inline cod ...
- 使用PM2将Node.js的集群变得更加容易
介绍 众所周知,Node.js运行在Chrome的JavaScript运行时平台上,我们把该平台优雅地称之为V8引擎.不论是V8引擎,还是之后的Node.js,都是以单线程的方式运行的,因此,在多核心 ...
- Android开发学习之路-Volley源码解析
从简单的StringRequest入手看看Volley的工作机制. 先简单说下Volley的用法: ① 获取一个RequestQueue mRequestQueue = Volley.newReque ...
- iOS-证书申请
本文讲述发布证书的申请 首先登陆https://developer.apple.com(99美元账号) a.点击页面右上角 b.进入 c.选择证书类型 distribution,选择添加 d.点击+后 ...