跟着ALEX 学python day3集合 文件操作 函数和函数式编程 内置函数
声明 :
文档内容学习于
http://www.cnblogs.com/xiaozhiqi/
一、 集合
集合是一个无序的,不重复的数据组合,主要作用如下
1.去重 把一个列表变成集合 ,就自动去重了
2.关系测试,测试2组数据的之前的交集,差集,并集等关系
去重,直接将列表变成集合
[root@master day3]# cat set.py

#!/usr/bin/env python3

list = [1,2,5,8,5,6,7,7]

list = set(list)

print (list,type(list))

[root@master day3]# ./set.py

{1, 2, 5, 6, 7, 8} <class 'set'>   #直接去重了
交集, intersection 。 就是将2个列表中,相同的取出来
下面list 和list2中 5和 8是重复,可以直接将他们取出。
[root@master day3]# cat set.py

#!/usr/bin/env python3

list = [1,2,5,8,5,6,7,7]

list = set(list)

list2 = set([5,555,256,777,8])

print ( list.intersection(list2))

[root@master day3]# ./set.py

{8, 5}
并集(合集), union 2个列表合并去重
[root@master day3]# cat set.py

#!/usr/bin/env python3

list = [1,2,5,8,5,6,7,7]

list = set(list)

list2 = set([5,555,256,777,8])

print ( list.union(list2))

[root@master day3]# ./set.py

{256, 1, 2, 5, 6, 7, 8, 777, 555}
差集,difference 就是2个列表,对比。打印独有部分
[root@master day3]# cat ./set.py

#!/usr/bin/env python3

list = [1,2,5,8,5,6,7,7]

list = set(list)

list2 = set([5,555,256,777,8])

print ( list.difference(list2))    #将list和list2对比。打印只有list中独有的部分

[root@master day3]# ./set.py

{1, 2, 6, 7}
对称差集
就是将2个列表中,相互没有的都取出来了。
[root@master day3]# cat ./set.py

#!/usr/bin/env python3

list = [1,2,5,8,5,6,7,7]

list = set(list)

list2 = set([5,555,256,777,8])

print ( list.symmetric_difference(list2))

[root@master day3]# ./set.py

{256, 1, 2, 6, 7, 777, 555}
子集,父集
是否存在包含的关系
[root@master day3]# cat ./set.py

#!/usr/bin/env python3

list = [1,2,5,8,5,6,7,7]

list3 = set([1,7])

list = set(list)

list2 = set([5,555,256,777,8])

print ( list.issubset(list2))                       #子集,是否被包含

print ( list3.issubset(list))

print ( list.issuperset(list2))                     #父集,是否包含

print ( list.issuperset(list3))

[root@master day3]# ./set.py

False

True

False

True
判断是否有交集 isdisjoint
如果2个列表没有交集, 就返回ture。
[root@master day3]# cat set.py

#!/usr/bin/env python3

list = [1,2,5,8,5,6,7,7]

list = set(list)

list2 = set([5,555,256,777,8])

list3 = set([1,6])

print ( list3.isdisjoint(list))

print ( list3.isdisjoint(list2))

[root@master day3]# ./set.py

False

True
也可以使用以下字符串进行操作
s | t   s和t的并集

s & t   s和t的交集

s - t   求差集

s ^ t   求对称差集

len(s)  集合中项数

max(s)  最大值

min(s)  最小值
添加
add 添加一项
[root@master day3]# cat set.py

#!/usr/bin/env python3

list = [1,2,5,8,5,6,7,7]

list = set(list)

list.add("ssdd")

print ( list )

[root@master day3]# ./set.py

{1, 2, 5, 6, 7, 8, 'ssdd'}
update 添加多项
[root@master day3]# cat set.py

#!/usr/bin/env python3

list = [1,2,5,8,5,6,7,7]

list = set(list)

list.update([555,666,888])

print ( list )

[root@master day3]# ./set.py

{1, 2, 5, 6, 7, 8, 555, 888, 666}
删除
remove,因为集合本生就是去重的,所以,删除的话。就是都删除了 。
[root@master day3]# cat set.py

#!/usr/bin/env python3

list = [1,2,5,8,5,6,7,7]

list = set(list)

list.remove(2)

print ( list )

[root@master day3]# ./set.py

{1, 5, 6, 7, 8}
pop 随机删除 。
[root@master day3]# cat set.py

#!/usr/bin/env python3

list = [1,2,5,8,5,6,7,7]

list = set(list)

list.pop()

print (list)

[root@master day3]# ./set.py

{2, 5, 6, 7, 8}
discard
也是删除,和remove相似,但是remove指定一个不存在的值的时候会报错、discard不会报错
[root@master day3]# cat set.py

#!/usr/bin/env python3

list = [1,2,5,8,5,6,7,7]

list = set(list)

list.discard(555)               #指定不存在的值,程序也不会报错。

list.discard(8)

print (list)

[root@master day3]# ./set.py

{1, 2, 5, 6, 7}
文件操作
文件操作步骤
1. 打开文件
2.通过文件句柄进行操作
3.关闭文件
基本的文化操作
读取文件
linux中
当文件和脚本在同一个目录下时, 可以直接打开
[root@localhost python]# ls

dictionary.py  file_op.py  guess.py  name2.py  name.py  tuple.py  yesterday.txt

[root@localhost python]# cat file_op.py

#!/usr/bin/env python3

data = open ("yesterday.txt").read()                   #直接打开文件

print (data)

[root@localhost python]#
windows中
因为windows 默认是 GBK的编码格式, 所以在windows中打开的话。需要定义编码字符集
# Author ricky

data = open("yesterday",encoding="utf-8" ).read()   #  定义字符集

print (data )
否则会报错
Traceback (most recent call last):

  File "E:/个人/python/day3/file_op.py", line 3, in <module>

    data = open("yesterday").read()

UnicodeDecodeError: 'gbk' codec can't decode byte 0x80 in position 124: illegal multibyte sequence
这是读取了文件,一般情况下,如果要修改。就是会将打开这个文件写成一个变量。
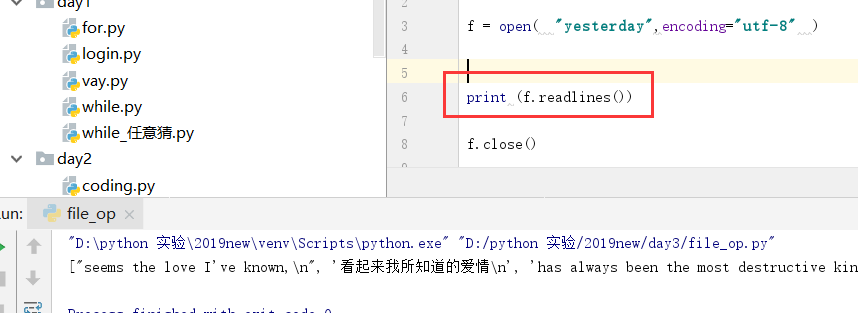
f = open("yesterday",encoding="utf-8")

data = f.read()

print (data )
f.close() # 关闭文件
然后读取文件的话,其实就是加载文件到内存中。 然后你的程序的光标,其实就是第一次读的内存指针。所以当有第二个变量指过去的时候。其实还是现实是之前的内存指针。
[root@localhost python]# cat yesterday.txt

aaaaaa

bbbbbb

ccccc

[root@localhost python]# cat ./file_op.py

#!/usr/bin/env python3

f = open ("yesterday.txt")

data = f.read()

data2 = f.read()

print ( data )

print ( "data2==============", data2 )

[root@localhost python]# ./file_op.py

aaaaaa

bbbbbb

ccccc

data2==============
逐行读取 readline
read是读取全部文件, readline 是逐行读取
[root@master day3]# cat yesterday.txt

seems the love I've known,

看起来我所知道的爱情

has always been the most destructive kind.

好像总是变成破坏性的那种

I guess that's why now I feel so old before my time.

我猜这就是为什么我感到如此苍老,比起我的真实年龄

Yesterday When I was young

往日当我还年轻时

The taste of life was sweet

生命的感受如此美好

As rain upon my tongue

就像雨滴滴落我的舌尖

I teased at life as if

[root@master day3]# cat file_op.py

#!/usr/bin/env  python3

f = open("yesterday.txt")

print (f.readline())

[root@master day3]# ./file_op.py

seems the love I've known,
读取前5行
可以用for循环+ readline实现
[root@master day3]# cat  file_op.py

#!/usr/bin/env  python3

f = open("yesterday.txt")

for i in range(5):

    print (f.readline())

f.close()

[root@master day3]# ./file_op.py

seems the love I've known,

看起来我所知道的爱情

has always been the most destructive kind.

好像总是变成破坏性的那种

I guess that's why now I feel so old before my time.
打印全部文件
可以直接用for进行循环
这种循环效率最好。他就是加载一行,打印一行,然后内存中再去除一行 。
[root@master day3]# cat file_op.py

#!/usr/bin/env  python3

f = open("yesterday.txt")

for i in f:

  print  ( i.strip() )

f.close()

[root@master day3]# ./file_op.py

seems the love I've known,

看起来我所知道的爱情

has always been the most destructive kind.

好像总是变成破坏性的那种

I guess that's why now I feel so old before my time.

我猜这就是为什么我感到如此苍老,比起我的真实年龄

Yesterday When I was young

往日当我还年轻时

The taste of life was sweet

生命的感受如此美好

As rain upon my tongue

就像雨滴滴落我的舌尖

I teased at life as if
指定打印到某一行。 将这行进行输出(---------)。
可以自己写个计数器,然后进行判断
[root@master day3]# cat file_op.py

#!/usr/bin/env  python3

f = open("yesterday.txt")

count = 0

for i  in f :

    if count == 5:

        print ("=====================")

    print ( i.strip() )

    count += 1

f.close()

[root@master day3]# ./file_op.py

seems the love I've known,

看起来我所知道的爱情

has always been the most destructive kind.

好像总是变成破坏性的那种

I guess that's why now I feel so old before my time.

=====================

我猜这就是为什么我感到如此苍老,比起我的真实年龄

Yesterday When I was young

往日当我还年轻时

The taste of life was sweet

生命的感受如此美好

As rain upon my tongue

就像雨滴滴落我的舌尖

I teased at life as if
打印5到 10行
[root@master day3]# cat file_op.py

#!/usr/bin/env  python3

f = open("yesterday.txt")

count = 0

for i  in f :

    if count >= 5 and  count <= 10 :

        print ( i.strip() )

    count += 1

f.close()

[root@master day3]# ./file_op.py

我猜这就是为什么我感到如此苍老,比起我的真实年龄

Yesterday When I was young

往日当我还年轻时

The taste of life was sweet

生命的感受如此美好

As rain upon my tongue
还有一种方法
可以使用readlines
注意 是readlines 不是readline。
readlines 将文件内容,变成了列表。 所以他每次都会将整个文件进行转换。 如果是大文件。会影响性能。所以不推荐。
但是 , 因为列表有下标。 所以。在处理小文件的时候。 可能会写起来方便点。 但是不推荐。
[root@master day3]# cat file_op.py

#!/usr/bin/env  python3

f = open("yesterday.txt")

for i  in  f.readlines():

    print ( i.strip() )   # 可以使用 strip  去掉多于的空行和空格

f.close()


[root@master day3]# ./file_op.py

seems the love I've known,

看起来我所知道的爱情

has always been the most destructive kind.

好像总是变成破坏性的那种

I guess that's why now I feel so old before my time.

我猜这就是为什么我感到如此苍老,比起我的真实年龄

Yesterday When I was young

往日当我还年轻时

The taste of life was sweet

生命的感受如此美好

As rain upon my tongue

就像雨滴滴落我的舌尖

I teased at life as if
指定打印到某一行。 将这行进行输出(---------)。
其实 readlines 是将文件变成了 列表。 所以每个元素都是都下标。我们可以使用下标进行判断,来实现。
[root@master day3]# cat file_op.py

#!/usr/bin/env  python3

f = open("yesterday.txt")

for index,line in enumerate(f.readlines()):

    if index == 5 :

        print ( "-------------------------" )

    print  (  line.strip() )

f.close()

[root@master day3]# ./file_op.py

seems the love I've known,

看起来我所知道的爱情

has always been the most destructive kind.

好像总是变成破坏性的那种

I guess that's why now I feel so old before my time.

-------------------------

我猜这就是为什么我感到如此苍老,比起我的真实年龄

Yesterday When I was young

往日当我还年轻时

The taste of life was sweet

生命的感受如此美好

As rain upon my tongue

就像雨滴滴落我的舌尖

I teased at life as if
这样也可以实现,打印5-10的内容
注意下标是从 0 开始的。 所以要算好行数。
[root@master day3]# cat file_op.py

#!/usr/bin/env  python3

f = open("yesterday.txt")

for index,line in enumerate(f.readlines()):

    if index  > 5 and  index < 10:

        print  (  index , line.strip() )

f.close()

[root@master day3]# ./file_op.py

6 Yesterday When I was young

7 往日当我还年轻时

8 The taste of life was sweet

9 生命的感受如此美好
写文件
在python中。 如果打开文件后,需要制定操作类型, 读了 就不能写。 写了就不能读。
r 读取文件
[root@localhost python]# cat  file_op.py

#!/usr/bin/env python3

f = open ("yesterday.txt","r")

data = f.read()

data2 = f.read()

print ( data )

print ( "data2==============", data2 )

[root@localhost python]# ./file_op.py

aaaaaa

bbbbbb

ccccc

data2==============
w 写文件
这边需要注意,写文件的话,w参数每次写都是覆盖。 会将原本的文件内容删除。
[root@localhost python]# cat yesterday.txt

aaa

bbb

ccc

[root@localhost python]# cat file_op.py

#!/usr/bin/env python3

f = open ("yesterday.txt","w")

f.write ("123456789")

[root@localhost python]# ./file_op.py

[root@localhost python]# cat yesterday.txt

123456789[root@localhost python]#
同时 他也可以创建新的文件
[root@localhost python]# ls

dictionary.py  file_op.py  guess.py  name2.py  name.py  tuple.py  yesterday.txt

[root@localhost python]# cat file_op.py

#!/usr/bin/env python3

f = open ("tomorrow.txt","w")

f.write ("123456789")

[root@localhost python]# ./file_op.py

[root@localhost python]# ls

dictionary.py  file_op.py  guess.py  name2.py  name.py  tomorrow.txt  tuple.py  yesterday.txt
a append 追加写
[root@localhost python]# cat yesterday.txt

123456789

[root@localhost python]# cat file_op.py

#!/usr/bin/env python3

f = open ("yesterday.txt","a")

f.write ("ppp\n")

f.write ("ooo\n")

[root@localhost python]# ./file_op.py

[root@localhost python]# cat yesterday.txt

123456789

ppp

ooo
其他的一些使用方法
tell
就是告诉你现在的文件指针位置的。 注意:它不是按行来算的,是字符串的位置来算的。
[root@master day3]# cat file_op.py

#!/usr/bin/env  python3

f = open("yesterday.txt")

print (f.tell())

print(f.readline().strip())

print (f.tell())

f.close()

[root@master day3]# ./file_op.py

0

seems the love I've known,

27
seek
指定文件指正到固定位置。实际情况中,因为使用中,因为你不能确定,具体的字符串的位置。所以一般都是指向0。
[root@master day3]# cat file_op.py

#!/usr/bin/env  python3

f = open("yesterday.txt")

print (f.tell())

print(f.readline().strip())

print (f.tell())

f.seek(0)

print (f.tell())

print(f.readline().strip())

f.close()

[root@master day3]# ./file_op.py

0

seems the love I've known,

27

0

seems the love I've known,
flush
一般我们写,读文件都是先存储到内存中的 ,当到了一定的量之后,它才会写到磁盘上面。 flush就是可以使 立刻将内存中的内容写到磁盘上面。
这个在window上进行测试
E:\>python

Python 2.7.13 (v2.7.13:a06454b1afa1, Dec 17 2016, 20:53:40) [MSC v.1500 64 bit (

AMD64)] on win32

Type "help", "copyright", "credits" or "license" for more information.

>>> f = open("111.txt",'w')

>>> f.write("hello")
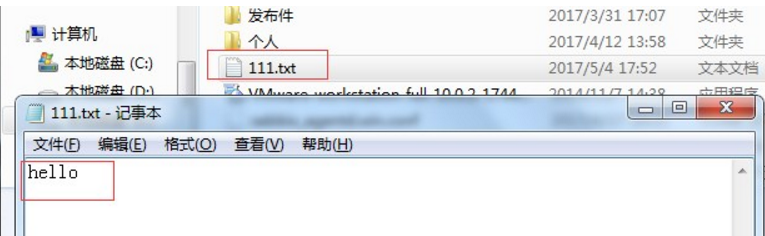
再次打开,发现文件还是空的。
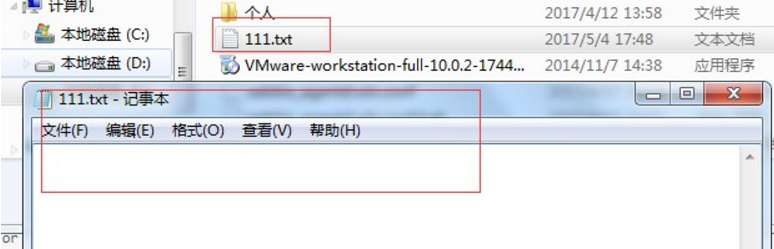
这个时候输入
>>> f.flush()
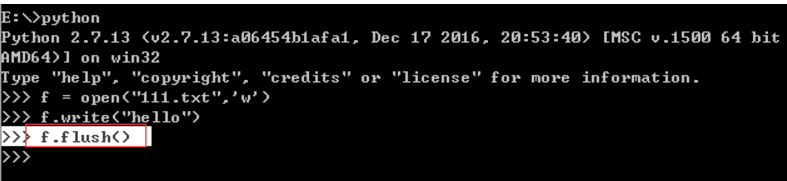
再次打开文件, 发现文件有内容了。
可以用来打印进度条 ,可以试试下面的代码。
# Author ricky

import sys,time

for  i in range(20):

    sys.stdout.write ( "#")                 # 用sys模块  标准输出,写。

    sys.stdout.flush()                      # 时时刷新

    time.sleep(0.1)                         # 使用time模块。延时
truncate
截断
我们现在有这个一个文件,
[root@localhost day3]# cat yesterday2.txt

When I was young

当我小时候

I'd listen to the radio

聆听收音机

Waitng for my favorite songs

等着我最喜欢的歌曲

When they played I'd sing along

当歌曲播放时我和着它轻轻吟唱

[root@localhost day3]# cat file_op.py

#!/usr/bin/env python3

f = open ("yesterday2.txt",'a')

f.truncate()                                                 # 直接使用的话,看不出效果,因为没有指定从哪里截断。

[root@localhost day3]# ./file_op.py

[root@localhost day3]#

[root@localhost day3]# cat yesterday2.txt

When I was young

当我小时候

I'd listen to the radio

聆听收音机

Waitng for my favorite songs

等着我最喜欢的歌曲

When they played I'd sing along

当歌曲播放时我和着它轻轻吟唱
这边输入数字, 从哪个字段开始截断
[root@localhost day3]# cat yesterday2.txt

When I was young

当我小时候

I'd listen to the radio

聆听收音机

Waitng for my favorite songs

等着我最喜欢的歌曲

When they played I'd sing along

当歌曲播放时我和着它轻轻吟唱

[root@localhost day3]# cat file_op.py

#!/usr/bin/env python3

f = open ("yesterday2.txt",'a')

f.truncate(10)                                #从第10个字段开始截断

[root@localhost day3]# ./file_op.py

[root@localhost day3]#

[root@localhost day3]#

[root@localhost day3]# cat yesterday2.txt

When I was[root@localhost day3]#
和seek配合,可以指定删除的范围
以下从第10个字符开始算。往后截取10个字符。 后面的截断。 其实就是保留了 20个字符
[root@localhost day3]# cat yesterday2.txt

When I was young

当我小时候

I'd listen to the radio

聆听收音机

Waitng for my favorite songs

等着我最喜欢的歌曲

When they played I'd sing along

当歌曲播放时我和着它轻轻吟唱

It made me smile

我脸上洋溢着幸福的微笑

[root@localhost day3]# cat file_op.py

#!/usr/bin/env python3

f = open ("yesterday2.txt",'a')

f.seek(10)

f.truncate(20)

[root@localhost day3]#

[root@localhost day3]# ./file_op.py

[root@localhost day3]#

[root@localhost day3]# cat yesterday2.txt                      #保留了20个字符

When I was young

当[root@localhost day3]#
读写 r+
可以用于打开文件,然后追加内容。
通过以下我们可以看到。他是写在最后一行的 。可以同时读和写。
[root@localhost day3]# cat yesterday2.txt

所有我喜爱万分的歌曲

Every shalala every wo'wo

每一个shalala每一个wo‘wo

still shines

仍然光芒四射

Every shing-a-ling-a-ling

每一个shing-a-ling

that they're starting to sing

每一个他们开始唱的

so fine

都如此悦耳

Wen they get to the part

当他们唱到他

[root@localhost day3]# cat file_op.py

#!/usr/bin/env python3

f = open ("yesterday2.txt",'r+')

print  ( f.readline() )

print  ( f.readline() )

print  ( f.readline() )

f.write("=========")

print  ( f.readline() )

[root@localhost day3]# ./file_op.py

所有我喜爱万分的歌曲

Every shalala every wo'wo

每一个shalala每一个wo‘wo

[root@localhost day3]# cat yesterday2.txt

所有我喜爱万分的歌曲

Every shalala every wo'wo

每一个shalala每一个wo‘wo

still shines

仍然光芒四射

Every shing-a-ling-a-ling

每一个shing-a-ling

that they're starting to sing

每一个他们开始唱的

so fine

都如此悦耳

Wen they get to the part

当他们唱到他

=========[root@localhost day3]#
写读 r+
貌似实际场景中用的不多。
他是先写再读,但是此处需注意。 他会将原有的文件先清空在重新开始写的 。然后才能读。
[root@master day3]# cat yesterday2.txt

seems the love I've known,

看起来我所知道的爱情

has always been the most destructive kind.

好像总是变成破坏性的那种

I guess that's why now I feel so old before my time.

我猜这就是为什么我感到如此苍老,比起我的真实年龄

Yesterday When I was young

往日当我还年轻时

The taste of life was sweet

生命的感受如此美好

[root@master day3]# cat file_op.py

#!/usr/bin/env  python3

f = open("yesterday2.txt","w+")

f.write("---------dao1-----------\n")

f.write("---------dao2-----------\n")

f.write("---------dao3-----------\n")

f.write("---------dao4-----------\n")

f.seek(0)                            #回到第一个字符,开始读,因为写的时候,其实已经在最后一个字符串了

print  (f.readline())

print  (f.readline())

f.close()

[root@master day3]# ./file_op.py

---------dao1-----------

---------dao2-----------

[root@master day3]#

[root@master day3]# cat yesterday2.txt

---------dao1-----------

---------dao2-----------

---------dao3-----------

---------dao4-----------
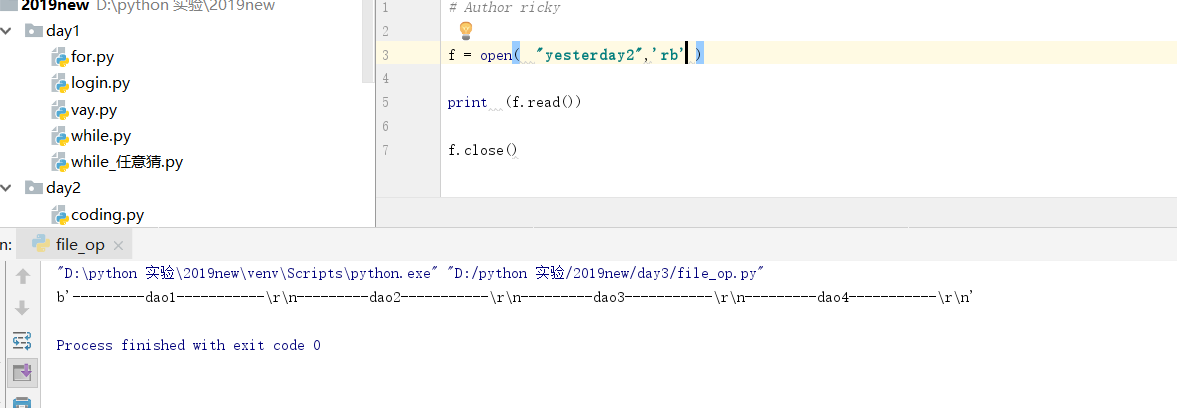
rb 读取2进制的文件
查看一下。可以看在用2进制的方式读取文件。 前面会有b开头(binary)
linux上处理
[root@master day3]# cat yesterday2.txt

---------dao1-----------

---------dao2-----------

---------dao3-----------

---------dao4-----------

[root@master day3]# cat file_op.py

#!/usr/bin/env  python3

f = open("yesterday2.txt","rb")

print  (f.read())

f.close()

[root@master day3]# ./file_op.py

b'---------dao1-----------\n---------dao2-----------\n---------dao3-----------\n---------dao4-----------\n'
windows上处理
需注意,因为之前windows上面有encoding编码的。 如果直接用2进制打开会报错。
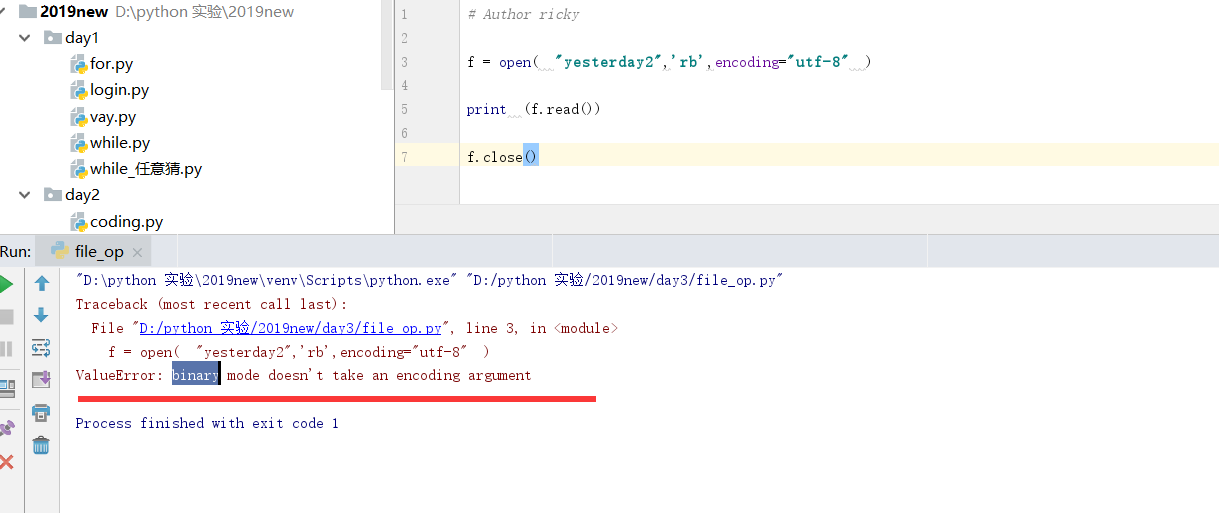
所以在windows上面需要用2进制的话,需要将encoding去掉,就可以了。
wb
2进制写。
[root@master day3]# cat file_op.py

#!/usr/bin/env  python3

f = open("yesterday2.txt","wb")

f.write( "hello binary".encode())            #需要将字符串转换成2进制

f.close()

[root@master day3]# ./file_op.py

[root@master day3]# cat yesterday2.txt

hello binary[root@master day3]#
修改文件中内容
要修改文件中的内容,其实只有2中方法。
1.打开文件,加载在内存中,进行修改,在保存在磁盘中, 就像 vim 这种的。
2. 读取老文件,进行修改,然后弄到新文件。
[root@localhost day3]# cat yesterday2.txt

When I was young

当我小时候

I'd listen to the radio

聆听收音机

Waitng for my favorite songs

等着我最喜欢的歌曲

[root@localhost day3]# cat file_op.py

#!/usr/bin/env python3

f = open ("yesterday2.txt",'r')

f_new = open ("yesterday2.new",'w')

for  line  in  f:

	if "I'd listen to the radio"  in line:

		line = line.replace("I'd listen to the radio","I'd  watch the television")              # 使用字符串替换, 替换需要修改的字符串

	f_new.write(line)

f.close()

f_new.close()

[root@localhost day3]# ./file_op.py

[root@localhost day3]# ls

file_op.py  yesterday2.new  yesterday2.txt  yesterday.txt

[root@localhost day3]# cat yesterday2.new

When I was young

当我小时候

I'd  watch the television

聆听收音机

Waitng for my favorite songs

等着我最喜欢的歌曲
for循环, 可以做如下理解。就是不管是不是判断到 字符串是否有进行替换, 都会写。
for  line  in  f:

	if "I'd listen to the radio"  in line:

		line = line.replace("I'd listen to the radio","I'd  watch the television")

	f_new.write(line)

其实等于

for line in f:

    if "I'd listen to the radio"  in line:

        line = line.replace("I'd listen to the radio","I'd  watch the television")

        f_new.write(line)

    else:

        f_new.write(line)
with 语句
我们常常会忘记关闭文件。 with可以帮助我们关闭文件
格式
with open( "yesterday2",'r',encoding="utf-8") as  f :

    for line  in f:

        print( line )
其实就是将写变量的形式 改了。 然后这个就不用为close 担心了。
f = open( "yesterday2",'r',encoding="utf-8")

改

with open( "yesterday2",'r',encoding="utf-8") as  f :
同时 可以打开多个
with open( "yesterday2",'r',encoding="utf-8") as  f , open( "yesterday3",'r',encoding="utf-8") as  g :

    for line  in f:

        print( line )
可以写的工整点
with open( "yesterday2",'r',encoding="utf-8") as  f , \

     open( "yesterday3",'r',encoding="utf-8") as  g :

    for line  in f:

        print( line
函数 和 函数式编程
面向对象
主要方式 是 类 ---》 class
面向过程
主要方式是 过程---》 def
函数式编程
主要方式 函数 ---》 def
格式
#  函数式编程

def func1():                                       # 定义函数

    '''testing 111 '''                             # 注释

    print ("in the func1")                         # 函数内容

    return 0                                       #  返回值

#  面向过程     和函数式相比就少了个 返回值。过程就像没有返回值的函数

def func2():

    '''testing  222'''

    print ("in the func2")
关于return 的 总结:
1.没有返回值。 返回 none
2.返回值=0, 返回object(对象)
3.返回值>0, 返回tuple(元组)
root@localhost day3]# ./func.py

in the func1

in the func2

in the func3

None

0

(0, 'aaa', ['aaa', 'bbb'], {'aaa': 'bbb'})

[root@localhost day3]# clear

[root@localhost day3]# lsc

-bash: lsc: command not found

[root@localhost day3]# clear

[root@localhost day3]# cat func.py

#!/usr/bin/env  python3

def func1():

    '''testing 111 '''

    print ("in the func1")

def  func2():

    ''' testing222'''

    print ("in the func2")

    return 0

def func3():

    '''testing333'''

    print ('in the func3')

    return 0 ,('aaa'), ['aaa','bbb'],{'aaa':'bbb'}

a = func1()

b = func2()

c = func3()

print (a)

print (b)

print (c)

[root@localhost day3]# ./func.py

in the func1

in the func2

in the func3

None

0

(0, 'aaa', ['aaa', 'bbb'], {'aaa': 'bbb'})

[root@localhost day3]#
函数赋值
位置参数
可以给函数赋值, 但是当运行函数的时候,一定要把值写进去。否则会报错
[root@localhost day3]# cat func.py

#!/usr/bin/env  python3

def func1(x,y):                    # 这里的x y 叫形参

    '''testing 111 '''

    print ( x )

    print ( y )

    return 0

func1  (1,2)                       # 这里的x y 叫实参,顺序于形参一一对应

[root@localhost day3]# ./func.py

1

2
关键字调用
也可以这么写
[root@localhost day3]# cat func.py

#!/usr/bin/env  python3

def func1(x,y):

    '''testing 111 '''

    print ( x )

    print ( y )

    return 0

func1  (y=2,x=1)                                 # 这个叫关键字调用

[root@localhost day3]# ./func.py

1

2
有可以2者混用
这边有个地方需要注意, 就是位置参数一定要写在关键字参数的前面, 否则会报错 。
[root@localhost day3]# cat func.py

#!/usr/bin/env  python3

def func1(x,y,z):

    '''testing 111 '''

    print ( x )

    print ( y )

    print ( z )

    return 0

func1  (2,z=1,y=6)

[root@localhost day3]# ./func.py

2

6

1
默认参数
就是形参的时候,直接就给赋值了。
特点:
1.调用函数的时候,默认参数非必须传递。 可用于,安装时候的默认安装
[root@localhost day3]# cat  func.py

#!/usr/bin/env  python3

def func1(x,y=2):

    '''testing 111 '''

    print ( x )

    print ( y )

    return 0

func1  (4)

[root@localhost day3]# ./func.py

4

2
参数组
当实参的数量确定不了的时候。 我们可以使用参数组。 这样就不会报错 了。
可以接受N个 位置参数。转换成元组的形式。
def func1(*args):

    '''testing 111 '''

    print (args)

func1(1,2,3,4,5,6)
字典形式传参
**kwagrs : 把N个关键字参数,转换成字典的方式。
[root@localhost day3]# cat func.py

#!/usr/bin/env  python3

def func1(**kwargs):                          #固定格式

    '''testing 111 '''

    print (kwargs)

func1  ( name = 'alex', age = '11' , sex = 'f' )

[root@localhost day3]# ./func.py

{'name': 'alex', 'age': '11', 'sex': 'f'}
也可以单独把 当个元素 取出来。
[root@localhost day3]# cat func.py

#!/usr/bin/env  python3

def func1(**kwargs):

    '''testing 111 '''

    print (kwargs)

    print (kwargs['name'])

    print (kwargs['age'])

    print (kwargs['sex'])

func1  ( name = 'alex', age = '11' , sex = 'f' )

[root@localhost day3]# ./func.py

{'name': 'alex', 'age': '11', 'sex': 'f'}

alex

11

f
也可以和 其他参数一起使用
[root@localhost day3]# cat func.py

#!/usr/bin/env  python3

def func1(name,age=18,**kwargs):     #和默认参数,位置参数一起使用

    '''testing 111 '''

    print (name)

    print (age)

    print (kwargs)

func1  ( 'AAAA', hobby = 'hahaha' , sex = 'f' )

[root@localhost day3]# ./func.py

AAAA

18

{'hobby': 'hahaha', 'sex': 'f'}        #将关键字参数变成了字典的形式
函数套 函数
[root@localhost day3]# cat func.py

#!/usr/bin/env  python3

def  logger (source):

   print ("from  %s" %source )

def func1(name,age=18,**kwargs):

    '''testing 111 '''

    print (name)

    print (age)

    print (kwargs)

    logger ("test4")                                      # 函数套函数

func1  ( 'AAAA', hobby = 'hahaha' , sex = 'f' )

[root@localhost day3]# ./func.py

AAAA

18

{'hobby': 'hahaha', 'sex': 'f'}

from  test4
局部变量
就是将一个变量封在函数中, 而不影响全局变量
在子程序中定义的变量称为局部变量 。在程序的一开始定义的变量称为全局变量。
全局变量的作用域是整个程序,局部变量的作用域是定义改变量的子程序。
当全局变量和局部变量同名的时候:
在定于局部变量的子程序内,局部变量起作用,其他地方全局变量起作用。
[root@localhost day3]# cat  func.py

#!/usr/bin/env  python3

def  change_name(name):

      print  ("before name",name)

      name  = "BBBB"                              #这函数就是这个这个变量的作用域,只在函数里面生效

      print  ("after name", name)

name = "aaaa"

print(name)

change_name(name)

print(name)

[root@localhost day3]# ./func.py

aaaa                                         #函数外

before name aaaa                             #函数内

after name BBBB                              #函数内

aaaa                                         #函数外
函数中定义全局变量
上面我们看到,函数中变量值能在函数中生效。 但是如果我们要强行在函数中定义全局变量,也能实现。
使用global
[root@localhost day3]# cat func.py

#!/usr/bin/env  python3

country =  "china"

def  change():

     global country

     country = "USA"

     print  (country)

print (country)

change()

print( country )

[root@localhost day3]# ./func.py

china

USA

USA
但是这里我们要注意一个问题。 如果我们要在函数中定义全局变量。 则在定义之前。我们不能在函数中调用这个变量 ,否则会报错 。如下 。
在定义global之前,就使用这个变量了。
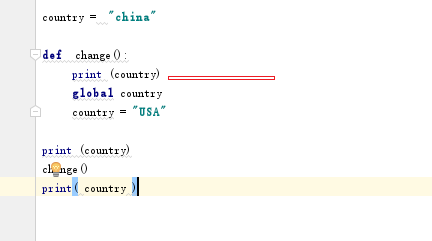
然后运行的时候回报错。
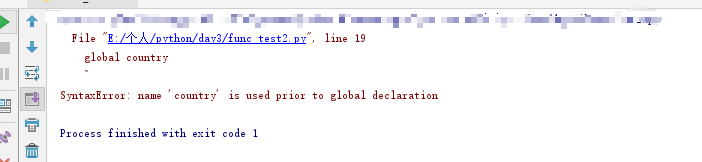
所以在函数中使用全局变量。 在定义前。不能使用。
局部变量中的,列表、字典等复杂变量可以全局生效。
[root@localhost day3]# cat func.py

#!/usr/bin/env  python3

name  = [ 'aaa','bbb','ccc']

def change_name():

    print (  "inside", name )

    name[0] = ('11111')

change_name()

print (name)

[root@localhost day3]# ./func.py

inside ['aaa', 'bbb', 'ccc']

['11111', 'bbb', 'ccc']
递归
就是自己调用自己
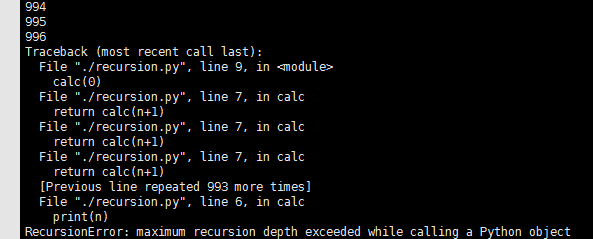
[root@localhost day3]# cat recursion.py

#!/usr/bin/env  python3

def calc (n):

    print(n)

    return calc(n+1)                                #返回的 调用自己的函数,是自己的函数+1

calc(0)

[root@localhost day3]# ./recursion.py

0

1

2
调用的函数 最多只有 999层。之后就会报错了
递归的特性:
1. 必须有一个明确的结束条件
2.每次进入更深一层递归时,问题的规模比上次递归的应有所较少。
3.递归的效率不高,递归的层次过多会导致栈溢出。
以下递归是,给他一个值。并且一直除以2,并且保持整数的情况下,要大于0,才执行。
[root@localhost day3]# cat recursion.py

#!/usr/bin/env  python3

def calc (n):

    print(n)

    if int(n) > 0:

        return  calc(int(n/2))

calc(10)

[root@localhost day3]# ./recursion.py

10

5

2

1

0
高阶函数(此处可以和day4的 装饰器 一起看 , 有助于理解 )
函数里面可以有参数。如果一个函数里面接受另一个函数作为参数,那这种函数就是高阶函数。
1. 把一个函数名当做实参传给另一个函数
2. 返回值中包含函数名
[root@localhost day3]# cat func.py

#!/usr/bin/env  python3

def add (a,b,f):

    return f(a) + f(b)

res = add(3,-6,abs)                                  #abs其实是内置函数(这样就是函数调函数), 是取绝对值的意思(就是都是正数)本来是(-6+3)应该等于-3. 但是都是绝对值的话就是(6+3)。那就是9,

#  此处需要注意,这边是传函数,不是传函数的执行结果,所有不能abs()这么写

print(res)

[root@localhost day3]# ./func.py

9
匿名函数
就是不用定义名字的函数、使用lambda函数
[root@localhost day4]# cat decorator1.py

#!/usr/bin/env  python3

calc = lambda x:x*3

print  ( calc (3))

[root@localhost day4]# ./decorator1.py

9
内置函数
python 有许多内置的函数。
参考:
https://www.runoob.com/python/python-built-in-functions.html
abs() : 取绝对值
abs(-45) :  45

abs(100.12) :  100.12

abs(119L) :  119
all() : 函数用于判断给定的可迭代参数 iterable 中的所有元素是否都为 TRUE,如果是返回 True,否则返回 False。 元素除了是 0、空、None、False 外都算 True。
>>> all(['a', 'b', 'c', 'd'])  # 列表list,元素都不为空或0

True

>>> all(['a', 'b', '', 'd'])   # 列表list,存在一个为空的元素

False

>>> all([0, 1,2, 3])          # 列表list,存在一个为0的元素

False

>>> all(('a', 'b', 'c', 'd'))  # 元组tuple,元素都不为空或0

True

>>> all(('a', 'b', '', 'd'))   # 元组tuple,存在一个为空的元素

False

>>> all((0, 1, 2, 3))          # 元组tuple,存在一个为0的元素

False

>>> all([])             # 空列表

True

>>> all(())             # 空元组

True
any() : 函数用于判断给定的可迭代参数 iterable 是否全部为 False,则返回 False,如果有一个为 True,则返回 True。只要有一个是True,就是True
>>>any(['a', 'b', 'c', 'd'])  # 列表list,元素都不为空或0

True

>>> any(['a', 'b', '', 'd'])   # 列表list,存在一个为空的元素

True

>>> any([0, '', False])        # 列表list,元素全为0,'',false

False

>>> any(('a', 'b', 'c', 'd'))  # 元组tuple,元素都不为空或0

True

>>> any(('a', 'b', '', 'd'))   # 元组tuple,存在一个为空的元素

True

>>> any((0, '', False))        # 元组tuple,元素全为0,'',false

False

>>> any([]) # 空列表

False

>>> any(()) # 空元组

False
bin() 把一个整数(int)十进制转2进制
>>> bin(1)

'0b1'

>>> bin(2)

'0b10'

>>> bin(4)

'0b100'

>>> bin(255)

'0b11111111'
bool() 函数用于将给定参数转换为布尔类型,如果没有参数,返回 False。就是将数据转为bool值。没有就是false
>>>bool()

False

>>> bool(0)

False

>>> bool(1)

True

>>> bool(2)

True

>>> issubclass(bool, int)  # bool 是 int 子类

True
bytearray() 方法返回一个新字节数组。这个数组里的元素是可变的,并且每个元素的值范围: 0 <= x < 256。
正常情况下,字节是不能修改的,使用 bytearray就能修改字节了。
[root@master day4]# cat  func.py

#!/usr/bin/env  python3

a =bytes("abcd",encoding="UTF-8")                          # 数据类型类型为字节

print (a.capitalize(),a)                                   # capitalize() 首字母大写。

b = bytearray("abcd",encoding="UTF-8")                     # 使用 bytearray()

print (b[0])                                               # 打印"abcd"的第一个数据,也就是"a"

b[0] = 70                                                  # 进行修改,不能字节输入数据内容,只能是ascII对应的数字  也就是 在 0--256的范围内

print (b)                                                  # 再次打印, 会发现原来的数据变化了。

[root@master day4]# ./func.py

b'Abcd' b'abcd'                                              # 第一次打印出来的a 是大写。 但是其实数据本生没有变化

97                                                           # 可以看到 打印出来的 其实是 "a" 这个字节ascII 的位置。

bytearray(b'2bcd')                                           # 可以看到 原来的a(ascII 97)  变成现在的2(ascII 70)
callable() 函数用于检查一个对象是否是可调用的。如果返回 True,object 仍然可能调用失败;但如果返回 False,调用对象 object 绝对不会成功。
像函数 这种 需要定义的 后面有()的, 里面可以传参的 。这种就是可调用的, 比如: 函数,类
>>>callable(0)                 # 数字不可调用

False

>>> callable("runoob")         # 字符串不可调用

False

>>> callable([1,2,30])         # 列表不可调用
False

>>> def add(a, b):

...     return a + b

...

>>> callable(add)             # 函数返回 True

True
chr() 用一个范围在 range(256)内的 将数字 转为ascII。 和 ord() 相对。
>>>print chr(0x30), chr(0x31), chr(0x61)   # 十六进制

0 1 a

>>> print chr(48), chr(49), chr(97)         # 十进制

0 1 a
compile() 函数将一个字符串编译为字节代码。
不知道干嘛用的 。 视频里说 import 只能导入本地的模块 。 用compile() 在某种情况下 可以相当于导入异地的模块。
>>>str = "for i in range(0,10): print(i)"

>>> c = compile(str,'','exec')   # 编译为字节代码对象

>>> c

<code object <module> at 0x10141e0b0, file "", line 1>

>>> exec(c)

0

1

2

3

4

5

6

7

8

9

>>> str = "3 * 4 + 5"

>>> a = compile(str,'','eval')

>>> eval(a)

17
dict() 函数用于创建一个字典。 功能其实和直接() 创建字典一样 。
>>>dict()                        # 创建空字典

{}

>>> dict(a='a', b='b', t='t')     # 传入关键字

{'a': 'a', 'b': 'b', 't': 't'}
dir() 函数不带参数时,返回当前范围内的变量、方法和定义的类型列表;带参数时,返回参数的属性、方法列表。
>>>dir()   #  获得当前模块的属性列表

['__builtins__', '__doc__', '__name__', '__package__', 'arr', 'myslice']

>>> dir([ ])    # 查看列表的方法

['__add__', '__class__', '__contains__', '__delattr__', '__delitem__', '__delslice__', '__doc__', '__eq__', '__format__', '__ge__', '__getattribute__', '__getitem__', '__getslice__', '__gt__', '__hash__', '__iadd__', '__imul__', '__init__', '__iter__', '__le__', '__len__', '__lt__', '__mul__', '__ne__', '__new__', '__reduce__', '__reduce_ex__', '__repr__', '__reversed__', '__rmul__', '__setattr__', '__setitem__', '__setslice__', '__sizeof__', '__str__', '__subclasshook__', 'append', 'count', 'extend', 'index', 'insert', 'pop', 'remove', 'reverse', 'sort']

>>>
python divmod() 函数把除数和余数运算结果结合起来,返回一个包含商和余数的元组(a // b, a % b)。
>>>divmod(7, 2)

(3, 1)

>>> divmod(8, 2)

(4, 0)

>>> divmod(1+2j,1+0.5j)

((1+0j), 1.5j)
enumerate() 函数用于将一个可遍历的数据对象(如列表、元组或字符串)组合为一个索引序列,同时列出数据和数据下标,一般用在 for 循环当中。
普通for循环
>>>i = 0

>>> seq = ['one', 'two', 'three']

>>> for element in seq:

...     print i, seq[i]

...     i +=1

...

0 one

1 two

2 three
用了 enumerate() 的循环
>>>seq = ['one', 'two', 'three']

>>> for i, element in enumerate(seq):

...     print i, element

...

0 one

1 two

2 three
eval() 函数用来执行一个字符串表达式,并返回表达式的值。
只能处理简单的数字这种。比如,运算。
>>>x = 7

>>> eval( '3 * x' )

21

>>> eval('pow(2,2)')

4

>>> eval('2 + 2')

4

>>> n=81

>>> eval("n + 4")

85
execfile() 函数可以用来执行一个文件。
假设文件 hello.py,内容如下:
print('runoob');
execfile 调用该文件
>>>execfile('hello.py')

runoob
filter() 函数用于过滤序列,过滤掉不符合条件的元素,返回由符合条件元素组成的新列表。
#!/usr/bin/python

# -*- coding: UTF-8 -*-

def is_odd(n):

    return n % 2 == 1     # 余数等于1. 就是不能整除。

newlist = filter(is_odd, [1, 2, 3, 4, 5, 6, 7, 8, 9, 10])             # 赋值的方式有点不一样,需要加,

print(newlist)
输出结果 :
[1, 3, 5, 7, 9]
frozenset() 返回一个冻结的集合,冻结后集合不能再添加或删除任何元素。
>>>a = frozenset(range(10))     # 生成一个新的不可变集合

>>> a

frozenset([0, 1, 2, 3, 4, 5, 6, 7, 8, 9])

>>> b = frozenset('runoob')

>>> b

frozenset(['b', 'r', 'u', 'o', 'n'])   # 创建不可变集合
globals() 函数会以字典类型返回当前位置的全部全局变量。
而且返回的值,是以字典的形式 。变量名是key,变量是value。
>>>a='runoob'

>>> print(globals())           # globals 函数返回一个全局变量的字典,包括所有导入的变量。

{'__builtins__': <module '__builtin__' (built-in)>, '__name__': '__main__', '__doc__': None, 'a': 'runoob', '__package__': None}
hash() 用于获取取一个对象(字符串或者数值等)的哈希值。, 就是生成一个对应的 hash值。
>>>hash('test')            # 字符串

2314058222102390712

>>> hash(1)                 # 数字

1

>>> hash(str([1,2,3]))      # 集合

1335416675971793195

>>> hash(str(sorted({'1':1}))) # 字典

7666464346782421378
help() 函数用于查看函数或模块用途的详细说明
>>>help('sys')             # 查看 sys 模块的帮助

……显示帮助信息……

>>>help('str')             # 查看 str 数据类型的帮助

……显示帮助信息……

>>>a = [1,2,3]

>>>help(a)                 # 查看列表 list 帮助信息

……显示帮助信息……

>>>help(a.append)          # 显示list的append方法的帮助

……显示帮助信息……
hex() 函数用于将10进制整数转换成16进制,以字符串形式表示。
>>>hex(255)

'0xff'

>>> hex(-42)

'-0x2a'

>>> hex(1L)

'0x1L'

>>> hex(12)

'0xc'

>>> type(hex(12))

<class 'str'>      # 字符串
id() 函数用于获取对象的内存地址。
>>>a = 'runoob'

>>> id(a)

4531887632

>>> b = 1

>>> id(b)

140588731085608
input() 函数接受一个标准输入数据,返回为 string 类型。
>>> a = input ("please input  you name:")

please input  you name:aaa

>>> print ( a )

aaa
isinstance() 函数来判断一个对象是否是一个已知的类型,类似 type()
>>>a = 2

>>> isinstance (a,int)

True

>>> isinstance (a,str)

False

>>> isinstance (a,(str,int,list))    # 是元组中的一个返回 True

True
isinstance() 与 type() 区别:
type() 不会认为子类是一种父类类型,不考虑继承关系。
isinstance() 会认为子类是一种父类类型,考虑继承关系。
如果要判断两个类型是否相同推荐使用 isinstance()。
class A:

    pass

class B(A):

    pass

isinstance(A(), A)    # returns True

type(A()) == A        # returns True

isinstance(B(), A)    # returns True

type(B()) == A        # returns False
locals() 函数会以字典类型返回当前位置的全部局部变量。和golbals 类似。 但是
globals() 只打印全局变量,不打印局部变量
locals() 只打印局部变量,不打印全局变量
[root@localhost day4]# cat func.py

#!/usr/bin/env  python3

def test():

	local_var = 333

	print (locals())

test()

print (globals())

print (globals().get('local_var'))

[root@localhost day4]# ./func.py

{'local_var': 333}                                 #  使用locals局部变量

{'__name__': '__main__', '__doc__': None, '__package__': None, '__loader__': <_frozen_importlib_external.SourceFileLoader object at 0x7fdb7af91828>, '__spec__': None, '__annotations__': {}, '__builtins__': <module 'builtins' (built-in)>, '__file__': './func.py', '__cached__': None, 'test': <function test at 0x7fdb7afc1e18>}

None                                               # 使用globals 其实是没有那个变量的
map() 会根据提供的函数对指定序列做映射。
第一个参数 function 以参数序列中的每一个元素调用 function 函数,返回包含每次 function 函数返回值的新列表。 生成的是列表。
>>>def square(x) :            # 计算平方数

...     return x ** 2

...

>>> map(square, [1,2,3,4,5])   # 计算列表各个元素的平方

[1, 4, 9, 16, 25]

>>> map(lambda x: x ** 2, [1, 2, 3, 4, 5])  # 使用 lambda 匿名函数

[1, 4, 9, 16, 25]

# 提供了两个列表,对相同位置的列表数据进行相加

>>> map(lambda x, y: x + y, [1, 3, 5, 7, 9], [2, 4, 6, 8, 10])

[3, 7, 11, 15, 19]
next() 返回迭代器的下一个项目
oct() 函数将一个整数转换成8进制字符串。
>>>oct(10)

'012'

>>> oct(20)

'024'

>>> oct(15)

'017'

>>>
open() 函数用于打开一个文件,创建一个 file 对象,相关的方法才可以调用它进行读写。
>>>f = open('test.txt')

>>> f.read()

'RUNOOB1\nRUNOOB2\n'
ord() 函数是 chr() 函数(对于8位的ASCII字符串)或 unichr() 函数(对于Unicode对象)的配对函数,它以一个字符(长度为1的字符串)作为参数,返回对应的 ASCII 数值。
>>>ord('a')

97

>>> ord('b')

98

>>> ord('c')

99
pow() 方法返回 xy(x的y次方) 的值。
>>> pow(3,6)                                    # 3的6次方

729

>>> pow(10,6)                                   # 10的6次方

1000000

>>> pow(2,6)                                    # 2的6次方

64
>>> pow(2,8)                                    # 2的8次方
256
repr() 函数将对象转化为供解释器读取的形式。
>>>s = 'RUNOOB'

>>> repr(s)

"'RUNOOB'"

>>> dict = {'runoob': 'runoob.com', 'google': 'google.com'};

>>> repr(dict)

"{'google': 'google.com', 'runoob': 'runoob.com'}"
reverse() 函数用于反向列表中元素。
[root@localhost day4]# cat func.py

#!/usr/bin/env  python3

aList = [123, 'xyz', 'zara', 'abc', 'xyz']

aList.reverse()

print  ( "List : ", aList)

[root@localhost day4]# ./func.py

List :  ['xyz', 'abc', 'zara', 'xyz', 123]
round() 方法返回浮点数x的四舍五入值。
>>> round(1.3342)

1

>>> round(1.3342,2)

1.33
slice() 函数实现切片对象,主要用在切片操作函数里的参数传递。就是切片的功能。
>>>myslice = slice(5)    # 设置截取5个元素的切片

>>> myslice

slice(None, 5, None)

>>> arr = range(10)

>>> arr

[0, 1, 2, 3, 4, 5, 6, 7, 8, 9]

>>> arr[myslice]         # 截取 5 个元素            其实相当于 arr[0:4]

[0, 1, 2, 3, 4]
sorted() 函数对所有可迭代的对象进行排序操作
[root@localhost day4]# cat func.py

#!/usr/bin/env  python3

a  =  [50,2,20,1,6,500]

b =sorted(a)                                                  # 排列列表

print (a)

print (b)

c = {6:2,8:0,1:4,-5:6,99:11,20:50}

d = sorted(c.items())                                         # 排列字典

print (c)

print (d)

[root@localhost day4]# ./func.py

[50, 2, 20, 1, 6, 500]

[1, 2, 6, 20, 50, 500]

{6: 2, 8: 0, 1: 4, -5: 6, 99: 11, 20: 50}

[(-5, 6), (1, 4), (6, 2), (8, 0), (20, 50), (99, 11)]
zip() 函数用于将可迭代的对象作为参数,将对象中对应的元素打包成一个个元组,然后返回由这些元组组成的列表。
其实就是把2个列表,结合起来一一对应
[root@localhost day4]# cat func.py

#!/usr/bin/env  python3

a = [1,2,3,4]

b = ['a','b','c','d']

for  i  in  zip(a,b):

    print (i)

[root@localhost day4]# ./func.py

(1, 'a')

(2, 'b')

(3, 'c')

(4, 'd')
__import__() 函数用于动态加载类和函数 。
import 能加载模块。
然后当你知道这个模块的字符串的名字是。就是要用_import_(),
最新的python里面感觉和导入模块类似。 和视屏里的有点差别。
跟着ALEX 学python day3集合 文件操作 函数和函数式编程 内置函数的更多相关文章
- 跟着ALEX 学python day4集合 装饰器 生成器 迭代器 json序列化
文档内容学习于 http://www.cnblogs.com/xiaozhiqi/ 装饰器 : 定义: 装饰器 本质是函数,功能是装饰其他函数,就是为其他函数添加附加功能. 原则: 1.不能修改被装 ...
- python成长之路第三篇(3)_内置函数及生成器迭代器
打个广告欢迎加入linux,python资源分享群群号:478616847 目录: 1.lambda表达式 2.map内置函数 3.filter内置函数 4.reduce内置函数 5.yield生成器 ...
- Python之路Python作用域、匿名函数、函数式编程、map函数、filter函数、reduce函数
Python之路Python作用域.匿名函数.函数式编程.map函数.filter函数.reduce函数 一.作用域 return 可以返回任意值例子 def test1(): print(" ...
- Python 4 函数的参数,内置函数,装饰器,生成器,迭代器,
一.函数的参数: 1.位置参数:调用函数时根据函数定义的参数位置来传递参数. 2.关键字参数:用于函数调用,通过“键-值”形式加以指定.可以让函数更加清晰.容易使用,同时也清除了参数的顺序需求. 3. ...
- Python之旅Day3 文件操作 函数(递归|匿名|嵌套|高阶)函数式编程 内置方法
知识回顾 常见五大数据类型分类小结:数字.字符串.列表.元组.字典 按存值个数区分:容器类型(列表.字典.元组) 标量原子(数字.字符串) 按是否可变区分:可变(列表.字典) 不可变(数字.字符串.元 ...
- Day3 - Python基础3 函数、递归、内置函数
Python之路,Day3 - Python基础3 本节内容 1. 函数基本语法及特性 2. 参数与局部变量 3. 返回值 嵌套函数 4.递归 5.匿名函数 6.函数式编程介绍 7.高阶函数 8. ...
- Python基础3 函数、递归、内置函数
本节内容 1. 函数基本语法及特性 2. 参数与局部变量 3. 返回值 嵌套函数 4.递归 5.匿名函数 6.函数式编程介绍 7.高阶函数 8.内置函数 温故知新 1. 集合 主要作用: 去重 关系测 ...
- Python之路【第四篇】: 函数、递归、内置函数
一. 背景提要 现在老板让你写一个监控程序,监控服务器的系统状况,当cpu\memory\disk等指标的使用量超过阀值时即发邮件报警,你掏空了所有的知识量,写出了以下代码 while True: i ...
- Python之函数、递归、内置函数
本节内容 1. 函数基本语法及特性 2. 参数与局部变量 3. 返回值 嵌套函数 4.递归 5.匿名函数 6.函数式编程介绍 7.高阶函数 8.内置函数 温故知新 1. 集合 主要作用: 去重 关系测 ...
随机推荐
- 201271050130-滕江南《面向对象程序设计(java)》第十一周学习总结
项目 内容 <面向对象程序设计(java)> https://www.cnblogs.com/nwnu-daizh/ 这个作业的要求在哪里 https://www.cnblogs.com/ ...
- 1【西北师大-2108Java】第一次作业成绩汇总
[西北师大-2108Java]第一次作业成绩汇总 经过本次作业的练习,了解了Java最基本的知识和Java的发展:了解了Java到底是一门怎样的语言,也知道了学习Java的乐趣,懂得了去选择Java开 ...
- day8_类的装饰器和反射
""" 类的装饰器: @property 当类的函数属性声明 @property后, 函数属性不需要加括号 即可调用 @staticmethod 当类的函数属性声明 @s ...
- layUI学习第一日:myeclipse中使用layUI
第一步:下载layUI,网址:https://www.layui.com/ 第二步:查看layUI解压后的内容,和官网解释各个文件夹的内容 第三部:在myeclipse中新建一个web project ...
- 小测试整理(含T1 T2)
这次测试规模较小,前两题也较水,但需要整理 T1(Jelly的男♂难题1): 从一个点出发,以四连通的方式扩散,可以走#,不能走o,走过的格子每单位时间会增加1点高度,问扩散完整间屋子需要的时间,以及 ...
- [CEOI2019]Cubeword(暴力)
没错,标签就是暴力. 首先发现棱上的所有词长度都相等,枚举长度 \(len\). 然后发现这些词中只有第一个字符和最后一个字符比较重要(只有这两个位置会与别的串衔接,中间的是啥无所谓). 令 \(cn ...
- vscode配置python环境-运行调试-windows环境
官方文件介绍 https://code.visualstudio.com/docs/languages/python 准备: vscode下载安装 python3版本下载(安装时可以选择添加环境变量, ...
- 使用Docker搭建HttpRunnerManager环境
建立一个HttpRunnerManager的环境需要Mysql,RabbitMQ服务,为简单部署,全部使用Docker 1. 在服务器建立Docker环境 2.建立Mysql容器 docker run ...
- weblogic 12c 安装与下载
转 一.WebLogic的介绍 WebLogic是美国bea公司出品的一个application server,确切的说是一个基于Javaee架构的中间件,纯java开发的,最新版本Web ...
- multer 基础教程(英文版)
Multer is a node.js middleware for handling multipart/form-data, which is primarily used for uploadi ...