
Shell~echo -e 颜色输出
echo -e 可以控制字体颜色和背景颜色输出
从一个例子开始:
# echo -e "\e[1;33;41m test content \e[0m"
输出效果:

. \e 转义起始符,定义一个转义序列, 可以使用 \033代替

. [ 表示开始定义颜色

. 1表示高亮,33表示字体颜色为黄色,45表示背景色为红色

. “test content” 属于文字内容

. m 转义终止符,表示颜色定义完毕

. 再次使用 \e[ ,表示再次开启颜色定义,0表示使用默认的颜色,m表示颜色定义结束,所以 \e[0m 的作用是恢复之前的配色方案
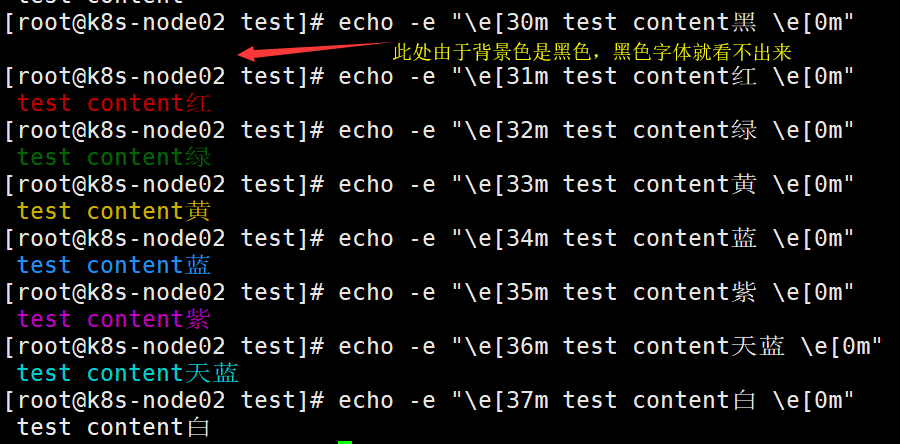
一、字体颜色
字体颜色:30——37
默认=0,黑色=30,红色=31,绿色=32,黄色=33,蓝色=34,紫色=35,天蓝色=36,白色=3
[root@k8s-node02 test]# echo -e "\e[30m test content黑 \e[0m"

 test content黑

[root@k8s-node02 test]# echo -e "\e[31m test content红 \e[0m"

 test content红

[root@k8s-node02 test]# echo -e "\e[32m test content绿 \e[0m"

 test content绿

[root@k8s-node02 test]# echo -e "\e[33m test content黄 \e[0m"

 test content黄

[root@k8s-node02 test]# echo -e "\e[34m test content蓝 \e[0m"

 test content蓝

[root@k8s-node02 test]# echo -e "\e[35m test content紫 \e[0m"

 test content紫

[root@k8s-node02 test]# echo -e "\e[36m test content天蓝 \e[0m"

 test content天蓝

[root@k8s-node02 test]# echo -e "\e[37m test content白 \e[0m"

 test content白
输出效果:
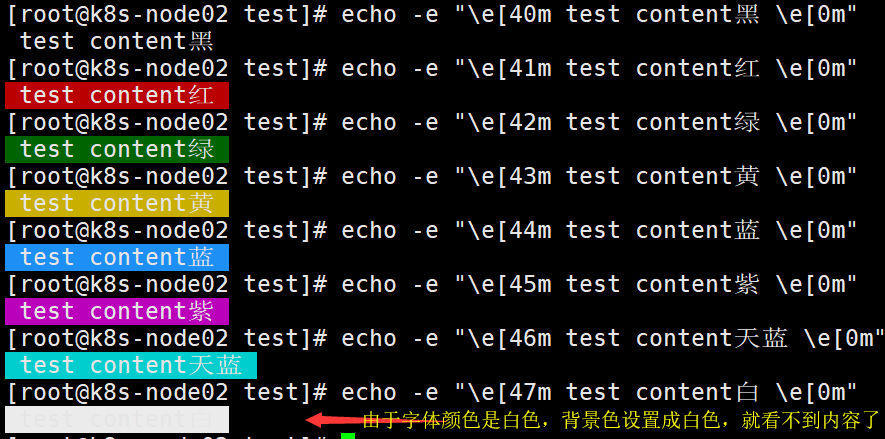
二、字背景颜色
字背景颜色:40——47
默认=0,黑色=40,红色=41,绿色=42,黄色=43,蓝色=44,紫色=45,天蓝色=46,白色=47
[root@k8s-node02 test]# echo -e "\e[40m test content黑 \e[0m"

 test content黑

[root@k8s-node02 test]# echo -e "\e[41m test content红 \e[0m"

 test content红

[root@k8s-node02 test]# echo -e "\e[42m test content绿 \e[0m"

 test content绿

[root@k8s-node02 test]# echo -e "\e[43m test content黄 \e[0m"

 test content黄

[root@k8s-node02 test]# echo -e "\e[44m test content蓝 \e[0m"

 test content蓝

[root@k8s-node02 test]# echo -e "\e[45m test content紫 \e[0m"

 test content紫

[root@k8s-node02 test]# echo -e "\e[46m test content天蓝 \e[0m"

 test content天蓝

[root@k8s-node02 test]# echo -e "\e[47m test content白 \e[0m"

 test content白
输出效果:
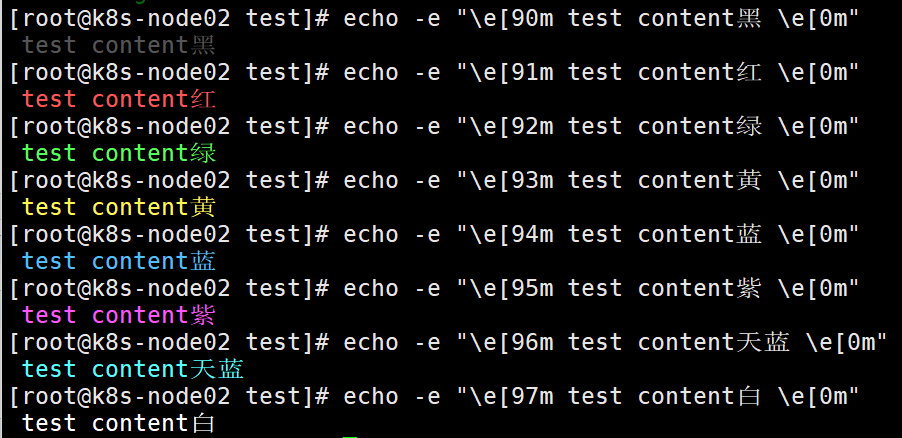
三、黑底彩色
黑底彩色:90——97
黑=90 深红=91 绿=92 黄色=93 蓝色=94 紫色=95 深绿=96 白色=97
[root@k8s-node02 test]# echo -e "\e[90m test content黑 \e[0m"

 test content黑

[root@k8s-node02 test]# echo -e "\e[91m test content红 \e[0m"

 test content红

[root@k8s-node02 test]# echo -e "\e[92m test content绿 \e[0m"

 test content绿

[root@k8s-node02 test]# echo -e "\e[93m test content黄 \e[0m"

 test content黄

[root@k8s-node02 test]# echo -e "\e[94m test content蓝 \e[0m"

 test content蓝

[root@k8s-node02 test]# echo -e "\e[95m test content紫 \e[0m"

 test content紫

[root@k8s-node02 test]# echo -e "\e[96m test content天蓝 \e[0m"

 test content天蓝

[root@k8s-node02 test]# echo -e "\e[97m test content白 \e[0m"

 test content白
输出结果:
四、字体控制选项:
\033[0m 关闭所有属性
\033[1m 设置高亮度
\033[4m 下划线
\033[5m 闪烁
\033[7m 反显,撞色显示,显示为白色黑底,或者显示为黑底白字
\033[8m 消影,字符颜色将会与背景颜色相同
\033[nA 光标上移n行
\033[nB 光标下移n行
\033[nC 光标右移n行
\033[nD 光标左移n行
\033[y;xH 设置光标位置
\033[2J 清屏
\033[K 清除从光标到行尾的内容
\033[s 保存光标位置
\033[u 恢复光标位置
\033[?25l 隐藏光标
\033[?25h 显示光标
五、实例演示
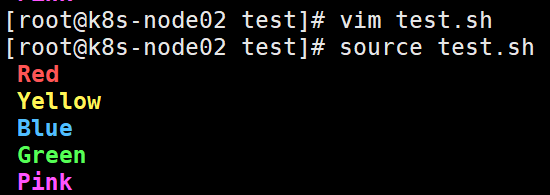
1.示例1:定义颜色变量
# vim color_test1.sh
#!/bin/bash

# 定义颜色变量,\、\e、\E是等价的,都是转义起始符

RED='\e[1;31m'  # 红

GREEN='\e[1;32m'  # 绿

YELLOW='\033[1;33m'  # 黄

BLUE='\E[1;34m'  # 蓝

PINK='\E[1;35m'  # 粉红

RES='\033[0m'  # 清除颜色

echo -e "${RED} Red ${RES}"

echo -e "${YELLOW} Yellow ${RES}"

echo -e "${BLUE} Blue ${RES}"

echo -e "${GREEN} Green ${RES}"

echo -e "${PINK} Pink ${RES}"
# source color_test1.sh
2.示例2:定义颜色动作
# vim color_test2.sh
#!/bin/bash

# 定义颜色动作

SETCOLOR_SUCCESS="echo -en \\E[1;32m"

SETCOLOR_FAILURE="echo -en \\E[1;31m"

SETCOLOR_WARNING="echo -en \\E[1;33m"

SETCOLOR_NORMAL="echo -en  \\E[0;39m"

# 使用时直接调用颜色动作,跟上相应的内容

$SETCOLOR_SUCCESS && echo test1

$SETCOLOR_FAILURE && echo test2

$SETCOLOR_WARNING && echo test3

$SETCOLOR_NORMAL  && echo test4
需要注意其中的一些细节:
(1)需要增加-n选项,这样引用时不会出现换行的问题。

(2)\\本质是\,在双引号中反斜线符号一定要写成\\。

(3)引用变量要放到其他语句前面,并使用&&连接。
# source color_test2.sh

六、tput命令
tput 命令会利用 terminfo 数据库中的信息,来控制和更改我们的终端,比如控制光标、更改文本属性、控制屏幕,以及为文本涂色。
其中,为文本涂色的方法是:
 tput setab:用于设置背景色

 tput setaf:用于设置前景色

 sgr0:表示颜色重置
颜色定义如下:

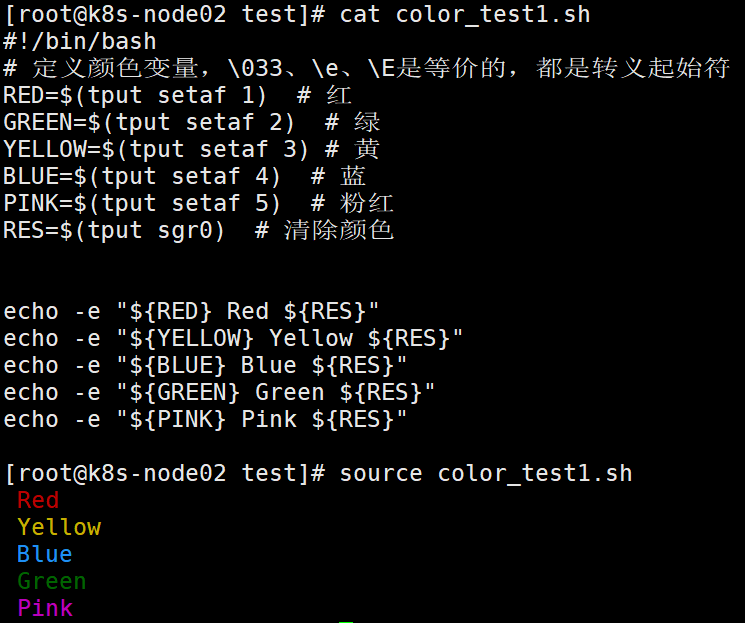
改写 实例演示中的 color_test1.sh
#!/bin/bash

# 定义颜色变量,\、\e、\E是等价的,都是转义起始符

RED=$(tput setaf )  # 红

GREEN=$(tput setaf )  # 绿

YELLOW=$(tput setaf ) # 黄

BLUE=$(tput setaf )  # 蓝

PINK=$(tput setaf )  # 粉红

RES=$(tput sgr0)  # 清除颜色

echo -e "${RED} Red ${RES}"

echo -e "${YELLOW} Yellow ${RES}"

echo -e "${BLUE} Blue ${RES}"

echo -e "${GREEN} Green ${RES}"

echo -e "${PINK} Pink ${RES}"
# source color_test1.sh
Shell~echo -e 颜色输出的更多相关文章
- shell实现带颜色输出的进度条
1.基础版 #!/bin/bash b='' ;$i<=;i+=)) do printf "执行进度 :[%-50s]%d%%\r" $b $i sleep 0.001 b= ...
- 【Shell】带颜色输出(白底x色)
echo -e "\033[31mHello World.\033[0m" 红色31m 绿色32m 黄色33m 蓝色34m 黑色30m 白色37m 紫色35m 深绿色36m
- 让shell脚本中的echo输出带颜色
转载自:http://www.linuxidc.com/Linux/2014-12/110463.htm 让echo输出带颜色的方法有两种 1.在shell脚本中定义颜色变量,使用echo -e调用变 ...
- shell脚本颜色输出(实例未编辑)
颜色输出通过echo 输出,需要加-e echo -e "\033[背景颜色;字体颜色\033[0m" 背景颜色 40 设置黑色背景 41 设置红色背景 42 设置绿色背景 43 ...
- Linux终端和win32控制台文本颜色输出
在使用putty.secureCRT.XShell等终端仿真器连接linux系统时,ls.vim等工具的输出都含有各种颜色,这些颜色的输出大大地增强了文本的可读性. 通常我们可以使用echo命令加-e ...
- shell 终端字符颜色
终端的字符颜色是用转义序列控制的,是文本模式下的系统显示功能,和具体的语言无关,shell,python,perl等均可以调用. 转义序列是以 ESC 开头,可以用 \033 完成相同的工作(ESC ...
- (转)shell脚本输出带颜色字体
shell脚本输出带颜色字体 原文:http://blog.csdn.net/andylauren/article/details/60873400 输出特效格式控制:\033[0m 关闭所有属性 ...
- jenkins调用shell脚本 输出带颜色字体
jenkins需要安装AnsiColor插件在构建环境项选择“color ansi console output” 安装插件AnsiColor shell 脚本相关颜色设置 echo -e " ...
- shell单引号中输出参数值
因为在shell的单引号中,所有的特殊字符和变量都会变成文本,那么如果需要在字符串中输出变量值怎么办呢? 这里记录以下两种方法: 使用双引号 shell> X='parameter' shell ...
随机推荐
- POC挖矿没有前途
最好的工作量证明是能力证明,能力不适合存储.望文生义,能力的本质意义是“能”和“力”(所有的词汇都按照望文生义理解,因为所有不能望文生义的词汇都是不良的已经被前人修正或将来被后人修正)能力是流动的,迁 ...
- NRF24L01双向无线通信
最近闲来无事,利用手头资源研究了一下基于nrf24L01的双向通信实验,整个系统如下图所示. 原理: nrf24L01本身是一种单向通信的无线模块,但是,当nrf24L01工作在增强型的 ShockB ...
- webservice因引用Oracle.DataAccess.dll导致发布前预编译不通过
这个问题最初是什么问题已经忘了,虽然就在几小时前/
- C#写日志工具类
代码: using System; using System.Collections.Generic; using System.IO; using System.Linq; using System ...
- LinuxShell——认识BATH这个Shell
LinuxShell——认识BATH这个Shell 摘要:本文主要了解了Linux系统中的Shell,以及什么是BATH. 什么是Shell Shell是一个命令行解释器,它为用户提供了一个向Linu ...
- 关于项目中js原型的使用
在一个项目中为了减少全局变量的使用及模块化的开发我们使用的构造函数加原型的开发模式 var App = function(){ //管理构造函数的属性 this.name = 'jack' } //页 ...
- iOS开发之--隐藏状态栏
1,全局隐藏 在Targets->General->勾选中Hide status bar .,如下图: 2.单个页面隐藏/展示状态栏 1).首先在info.plist里面View cont ...
- Fundebug后端Node.js插件更新至0.2.0,支持监控Express慢请求
摘要: 性能问题也是BUG,也需要监控. Fundebug后端Node.js异常监控服务 Fundebug是专业的应用异常监控平台,我们Node.js插件fundebug-nodejs可以提供全方位的 ...
- Jenkins的CI持续集成
Jenkins的CI持续集成 全局配置 系统管理->全局工具配置,配置Git,JDK和Maven 1)解压maven到当前目录 tar zxf apache-maven-3.5.4-bin.ta ...
- FusionSphere产品功能
华为Fusion产品 FusionSphere解决方案的三种场景 服务器虚拟化 NFVI:运营商基于openstack kvm协议的解决方案 云数据中心 FusionSphere服务器虚拟化解决方案 ...