AI金融:LSTM预测股票
第一部分:从RNN到LSTM
1、什么是RNN
RNN全称循环神经网络(Recurrent Neural Networks),是用来处理序列数据的。在传统的神经网络模型中,从输入层到隐含层再到输出层,层与层之间是全连接的,每层之间的节点是无连接的。但是这种普通的神经网络对于很多关于时间序列的问题却无能无力。例如,你要预测句子的下一个单词是什么,一般需要用到前面的单词,因为一个句子中前后单词并不是独立的。RNN之所以称为循环神经网路,即一个序列当前的输出与前面的输出也有关。具体的表现形式为网络会对前面时刻的信息进行记忆并应用于当前输出的计算中,即隐藏层之间的节点不再无连接而是有连接的,并且隐藏层的输入不仅包括输入层的输出还包括上一时刻隐藏层的输出,如下图所示:
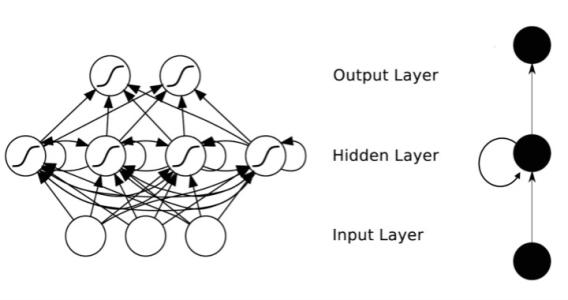
传统的神经网络中,数据从输入层输入,在隐藏层加工,从输出层输出。RNN不同的就是在隐藏层的加工方法不一样,后一个节点不仅受输入层输入的影响,还包受上一个节点的影响。
展开来就是这个样子:图中的xt−1,xt, xt+1代表不同时刻的输入,每个x都具有input layer的n维特征,依次进入循环神经网络以后,隐藏层输出st受到上一时刻st−1的隐藏层输出以及此刻输入层输入xt
的两方面影响。

缺点:RNN利用内部的记忆来处理任意时序的输入序列,并且在其处理单元之间既有内部的反馈连接又有前馈连接,这使得RNN可以更加容易处理不分段的文本等。但是由于RNN只能对部分序列进行记忆,所以在长序列上表现远不如短序列,造成了一旦序列过长便使得准确率下降的结果。
2、什么是LSTM
长短记忆神经网络——通常称作LSTM,是一种特殊的RNN,能够学习长的依赖关系。 他们由Hochreiter&Schmidhuber引入,并被许多人进行了改进和普及。他们在各种各样的问题上工作的非常好,现在被广泛使用。
LSTM是为了避免长依赖问题而精心设计的。 记住较长的历史信息实际上是他们的默认行为,而不是他们努力学习的东西。
所有循环神经网络都具有神经网络的重复模块链的形式。 在标准的RNN中,该重复模块将具有非常简单的结构,例如单个tanh层。

LSTM也拥有这种链状结构,但是重复模块则拥有不同的结构。与神经网络的简单的一层相比,LSTM拥有四层,这四层以特殊的方式进行交互。
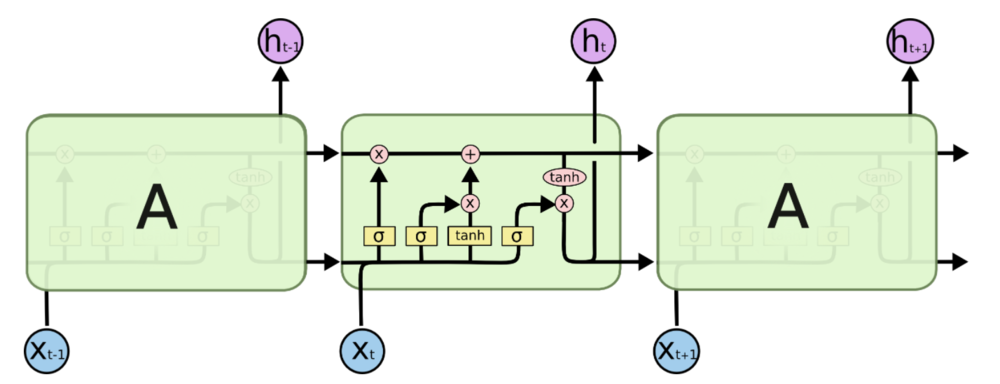
LSTM背后的核心理念
LSTM的关键是细胞状态,表示细胞状态的这条线水平的穿过图的顶部。
细胞的状态类似于输送带,细胞的状态在整个链上运行,只有一些小的线性操作作用其上,信息很容易保持不变的流过整个链。
门(Gate)是一种可选地让信息通过的方式。 它由一个Sigmoid神经网络层和一个点乘法运算组成。
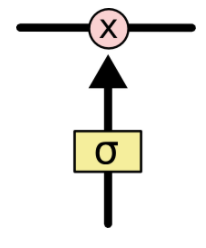
Sigmoid神经网络层输出0和1之间的数字,这个数字描述每个组件有多少信息可以通过, 0表示不通过任何信息,1表示全部通过
LSTM有三个门,用于保护和控制细胞的状态。
一步步的拆解LSTM
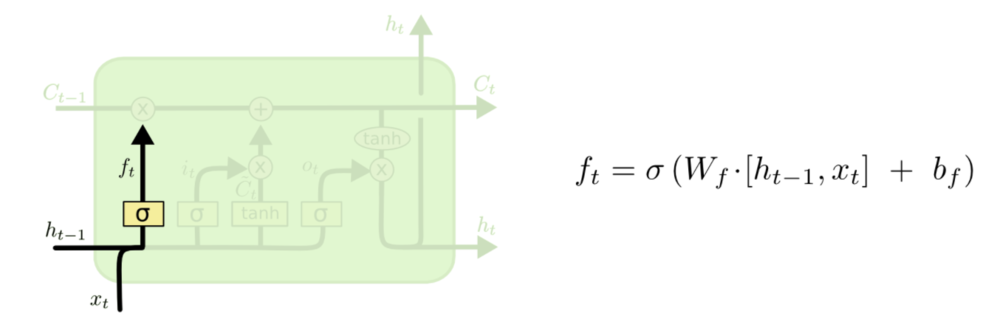
LSTM的第一步是决定我们要从细胞状态中丢弃什么信息。 该决定由被称为“忘记门”的Sigmoid层实现。它查看ht-1(前一个输出)和xt(当前输入),并为单元格状态Ct-1(上一个状态)中的每个数字输出0和1之间的数字。1代表完全保留,而0代表彻底删除。
让我们回到语言模型的例子,试图根据以前的语料来预测下一个单词。 在这样的问题中,细胞状态可能包括当前主题的性别,从而决定使用正确的代词。 当我们看到一个新主题时,我们想要忘记旧主题的性别。
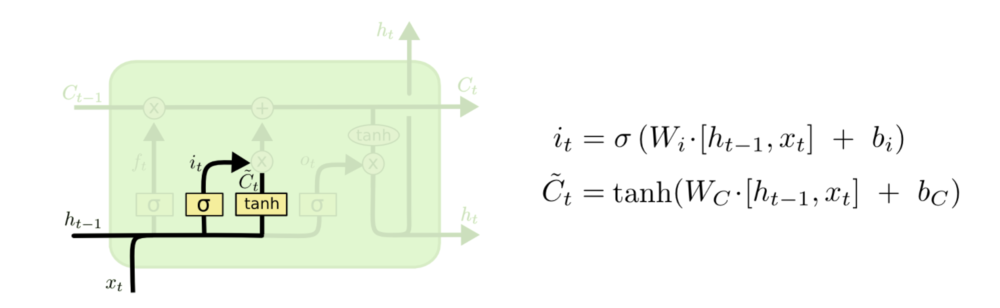
下一步是决定我们要在细胞状态中存储什么信息。 这部分分为两步。 首先,称为“输入门层”的Sigmoid层决定了我们将更新哪些值。 接下来一个tanh层创建候选向量Ct,该向量将会被加到细胞的状态中。 在下一步中,我们将结合这两个向量来创建更新值。
在我们的语言模型的例子中,我们希望将新主题的性别添加到单元格状态,以替换我们忘记的旧对象。
现在是时候去更新上一个状态值Ct−1了,将其更新为Ct。签名的步骤以及决定了应该做什么,我们只需实际执行即可。
我们将上一个状态值乘以ft,以此表达期待忘记的部分。之后我们将得到的值加上 it∗C̃ t。这个得到的是新的候选值, 按照我们决定更新每个状态值的多少来衡量.
在语言模型的例子中,对应着实际删除关于旧主题性别的信息,并添加新信息,正如在之前的步骤中描述的那样。

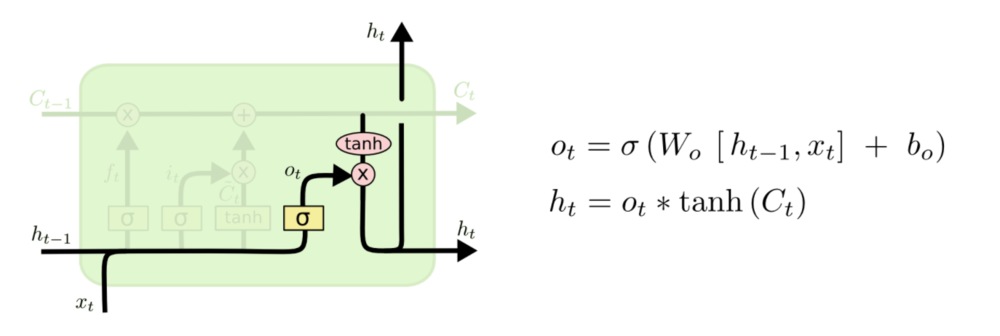
最后,我们需要决定我们要输出什么。 此输出将基于我们的细胞状态,但将是一个过滤版本。 首先,我们运行一个sigmoid层,它决定了我们要输出的细胞状态的哪些部分。 然后,我们将单元格状态通过tanh(将值规范化到-1和1之间),并将其乘以Sigmoid门的输出,至此我们只输出了我们决定的那些部分。
对于语言模型的例子,由于只看到一个主题,考虑到后面可能出现的词,它可能需要输出与动词相关的信息。 例如,它可能会输出主题是单数还是复数,以便我们知道动词应该如何组合在一起。
3、股票预测实战1
在对理论有理解的基础上,我们使用LSTM对股票进行预测。
环境配置如下:
- Python 3.5.x
- TensorFlow 1.10.0
- Numpy 1.15.0
- Keras 2.2.2
- Matplotlib 2.2.2
步骤一、导入数据:
import math
import numpy as np
import pandas as pd

class DataLoader():
    """A class for loading and transforming data for the lstm model"""

    def __init__(self, filename, split, cols):
        dataframe = pd.read_csv(filename)
        i_split = int(len(dataframe) * split)
        self.data_train = dataframe.get(cols).values[:i_split]
        self.data_test  = dataframe.get(cols).values[i_split:]
        self.len_train  = len(self.data_train)
        self.len_test   = len(self.data_test)
        self.len_train_windows = None

    def get_test_data(self, seq_len, normalise):
        '''
        Create x, y test data windows
        Warning: batch method, not generative, make sure you have enough memory to
        load data, otherwise reduce size of the training split.
        '''
        data_windows = []
        for i in range(self.len_test - seq_len):
            data_windows.append(self.data_test[i:i+seq_len])

        data_windows = np.array(data_windows).astype(float)
        data_windows = self.normalise_windows(data_windows, single_window=False) if normalise else data_windows

        x = data_windows[:, :-1]
        y = data_windows[:, -1, [0]]
        return x,y

    def get_train_data(self, seq_len, normalise):
        '''
        Create x, y train data windows
        Warning: batch method, not generative, make sure you have enough memory to
        load data, otherwise use generate_training_window() method.
        '''
        data_x = []
        data_y = []
        for i in range(self.len_train - seq_len):
            x, y = self._next_window(i, seq_len, normalise)
            data_x.append(x)
            data_y.append(y)
        return np.array(data_x), np.array(data_y)

    def generate_train_batch(self, seq_len, batch_size, normalise):
        '''Yield a generator of training data from filename on given list of cols split for train/test'''
        i = 0
        while i < (self.len_train - seq_len):
            x_batch = []
            y_batch = []
            for b in range(batch_size):
                if i >= (self.len_train - seq_len):
                    # stop-condition for a smaller final batch if data doesn't divide evenly
                    yield np.array(x_batch), np.array(y_batch)
                    i = 0
                x, y = self._next_window(i, seq_len, normalise)
                x_batch.append(x)
                y_batch.append(y)
                i += 1
            yield np.array(x_batch), np.array(y_batch)

    def _next_window(self, i, seq_len, normalise):
        '''Generates the next data window from the given index location i'''
        window = self.data_train[i:i+seq_len]
        window = self.normalise_windows(window, single_window=True)[0] if normalise else window
        x = window[:-1]
        y = window[-1, [0]]
        return x, y

    def normalise_windows(self, window_data, single_window=False):
        '''Normalise window with a base value of zero'''
        normalised_data = []
        window_data = [window_data] if single_window else window_data
        for window in window_data:
            normalised_window = []
            for col_i in range(window.shape[1]):
                normalised_col = [((float(p) / float(window[0, col_i])) - 1) for p in window[:, col_i]]
                normalised_window.append(normalised_col)
            normalised_window = np.array(normalised_window).T # reshape and transpose array back into original multidimensional format
            normalised_data.append(normalised_window)
        return np.array(normalised_data)
步骤二、定义模型
import os
import math
import numpy as np
import datetime as dt
from numpy import newaxis
from core.utils import Timer
from keras.layers import Dense, Activation, Dropout, LSTM
from keras.models import Sequential, load_model
from keras.callbacks import EarlyStopping, ModelCheckpoint

class Model():
   """A class for an building and inferencing an lstm model"""

   def __init__(self):
      self.model = Sequential()

   def load_model(self, filepath):
      print('[Model] Loading model from file %s' % filepath)
      self.model = load_model(filepath)

   def build_model(self, configs):
      timer = Timer()
      timer.start()

      for layer in configs['model']['layers']:
         neurons = layer['neurons'] if 'neurons' in layer else None
         dropout_rate = layer['rate'] if 'rate' in layer else None
         activation = layer['activation'] if 'activation' in layer else None
         return_seq = layer['return_seq'] if 'return_seq' in layer else None
         input_timesteps = layer['input_timesteps'] if 'input_timesteps' in layer else None
         input_dim = layer['input_dim'] if 'input_dim' in layer else None

         if layer['type'] == 'dense':
            self.model.add(Dense(neurons, activation=activation))
         if layer['type'] == 'lstm':
            self.model.add(LSTM(neurons, input_shape=(input_timesteps, input_dim), return_sequences=return_seq))
         if layer['type'] == 'dropout':
            self.model.add(Dropout(dropout_rate))

      self.model.compile(loss=configs['model']['loss'], optimizer=configs['model']['optimizer'])

      print('[Model] Model Compiled')
      timer.stop()

   def train(self, x, y, epochs, batch_size, save_dir):
      timer = Timer()
      timer.start()
      print('[Model] Training Started')
      print('[Model] %s epochs, %s batch size' % (epochs, batch_size))

      save_fname = os.path.join(save_dir, '%s-e%s.h5' % (dt.datetime.now().strftime('%d%m%Y-%H%M%S'), str(epochs)))
      callbacks = [
         EarlyStopping(monitor='val_loss', patience=2),
         ModelCheckpoint(filepath=save_fname, monitor='val_loss', save_best_only=True)
      ]
      self.model.fit(
         x,
         y,
         epochs=epochs,
         batch_size=batch_size,
         callbacks=callbacks
      )
      self.model.save(save_fname)

      print('[Model] Training Completed. Model saved as %s' % save_fname)
      timer.stop()

   def train_generator(self, data_gen, epochs, batch_size, steps_per_epoch, save_dir):
      timer = Timer()
      timer.start()
      print('[Model] Training Started')
      print('[Model] %s epochs, %s batch size, %s batches per epoch' % (epochs, batch_size, steps_per_epoch))

      save_fname = os.path.join(save_dir, '%s-e%s.h5' % (dt.datetime.now().strftime('%d%m%Y-%H%M%S'), str(epochs)))
      callbacks = [
         ModelCheckpoint(filepath=save_fname, monitor='loss', save_best_only=True)
      ]
      self.model.fit_generator(
         data_gen,
         steps_per_epoch=steps_per_epoch,
         epochs=epochs,
         callbacks=callbacks,
         workers=1
      )

      print('[Model] Training Completed. Model saved as %s' % save_fname)
      timer.stop()

   def predict_point_by_point(self, data):
      #Predict each timestep given the last sequence of true data, in effect only predicting 1 step ahead each time
      print('[Model] Predicting Point-by-Point...')
      predicted = self.model.predict(data)
      predicted = np.reshape(predicted, (predicted.size,))
      return predicted

   def predict_sequences_multiple(self, data, window_size, prediction_len):
      #Predict sequence of 50 steps before shifting prediction run forward by 50 steps
      print('[Model] Predicting Sequences Multiple...')
      prediction_seqs = []
      for i in range(int(len(data)/prediction_len)):
         curr_frame = data[i*prediction_len]
         predicted = []
         for j in range(prediction_len):
            predicted.append(self.model.predict(curr_frame[newaxis,:,:])[0,0])
            curr_frame = curr_frame[1:]
            curr_frame = np.insert(curr_frame, [window_size-2], predicted[-1], axis=0)
         prediction_seqs.append(predicted)
      return prediction_seqs

   def predict_sequence_full(self, data, window_size):
      #Shift the window by 1 new prediction each time, re-run predictions on new window
      print('[Model] Predicting Sequences Full...')
      curr_frame = data[0]
      predicted = []
      for i in range(len(data)):
         predicted.append(self.model.predict(curr_frame[newaxis,:,:])[0,0])
         curr_frame = curr_frame[1:]
         curr_frame = np.insert(curr_frame, [window_size-2], predicted[-1], axis=0)
      return predicted
步骤三、模型训练
import os
import json
import time
import math
import matplotlib.pyplot as plt
from core.data_processor import DataLoader
from core.model import Model

def plot_results(predicted_data, true_data):
    fig = plt.figure(facecolor='white')
    ax = fig.add_subplot(111)
    ax.plot(true_data, label='True Data')
    plt.plot(predicted_data, label='Prediction')
    plt.legend()
    plt.show()

def plot_results_multiple(predicted_data, true_data, prediction_len):
    fig = plt.figure(facecolor='white')
    ax = fig.add_subplot(111)
    ax.plot(true_data, label='True Data')
   # Pad the list of predictions to shift it in the graph to it's correct start
    for i, data in enumerate(predicted_data):
        padding = [None for p in range(i * prediction_len)]
        plt.plot(padding + data, label='Prediction')
        plt.legend()
    plt.show()

def main():
    configs = json.load(open('config.json', 'r'))
    if not os.path.exists(configs['model']['save_dir']): os.makedirs(configs['model']['save_dir'])

    data = DataLoader(
        os.path.join('data', configs['data']['filename']),
        configs['data']['train_test_split'],
        configs['data']['columns']
    )

    model = Model()
    model.build_model(configs)
    x, y = data.get_train_data(
        seq_len=configs['data']['sequence_length'],
        normalise=configs['data']['normalise']
    )

    '''
   # in-memory training
   model.train(
      x,
      y,
      epochs = configs['training']['epochs'],
      batch_size = configs['training']['batch_size'],
      save_dir = configs['model']['save_dir']
   )
   '''
    # out-of memory generative training
    steps_per_epoch = math.ceil((data.len_train - configs['data']['sequence_length']) / configs['training']['batch_size'])
    model.train_generator(
        data_gen=data.generate_train_batch(
            seq_len=configs['data']['sequence_length'],
            batch_size=configs['training']['batch_size'],
            normalise=configs['data']['normalise']
        ),
        epochs=configs['training']['epochs'],
        batch_size=configs['training']['batch_size'],
        steps_per_epoch=steps_per_epoch,
        save_dir=configs['model']['save_dir']
    )

    x_test, y_test = data.get_test_data(
        seq_len=configs['data']['sequence_length'],
        normalise=configs['data']['normalise']
    )

    predictions = model.predict_sequences_multiple(x_test, configs['data']['sequence_length'], configs['data']['sequence_length'])
    # predictions = model.predict_sequence_full(x_test, configs['data']['sequence_length'])
    # predictions = model.predict_point_by_point(x_test)

    plot_results_multiple(predictions, y_test, configs['data']['sequence_length'])
    # plot_results(predictions, y_test)

if __name__ == '__main__':
    main()
最终运行结果显示:

AI金融:LSTM预测股票的更多相关文章
- AI金融:利用LSTM预测股票每日最高价
第一部分:从RNN到LSTM 1.什么是RNN RNN全称循环神经网络(Recurrent Neural Networks),是用来处理序列数据的.在传统的神经网络模型中,从输入层到隐含层再到输出层, ...
- Tensorflow实例:利用LSTM预测股票每日最高价(一)
RNN与LSTM 这一部分主要涉及循环神经网络的理论,讲的可能会比较简略. 什么是RNN RNN全称循环神经网络(Recurrent Neural Networks),是用来处理序列数据的.在传统的神 ...
- 深度神经网络在量化交易里的应用 之二 -- 用深度网络(LSTM)预测5日收盘价格
距离上一篇文章,正好两个星期. 这边文章9月15日 16:30 开始写. 可能几个小时后就写完了.用一句粗俗的话说, "当你怀孕的时候,别人都知道你怀孕了, 但不知道你被日了多少回 ...
- 基于Spark Streaming预测股票走势的例子(一)
最近学习Spark Streaming,不知道是不是我搜索的姿势不对,总找不到具体的.完整的例子,一怒之下就决定自己写一个出来.下面以预测股票走势为例,总结了用Spark Streaming开发的具体 ...
- 通过机器学习的线性回归算法预测股票走势(用Python实现)
在本人的新书里,将通过股票案例讲述Python知识点,让大家在学习Python的同时还能掌握相关的股票知识,所谓一举两得.这里给出以线性回归算法预测股票的案例,以此讲述通过Python的sklearn ...
- 网络流量预测入门(三)之LSTM预测网络流量
目录 网络流量预测入门(三)之LSTM预测网络流量 数据集介绍 预测流程 数据集准备 SVR预测 LSTM 预测 优化点 网络流量预测入门(三)之LSTM预测网络流量 在上篇博客LSTM机器学习生成音 ...
- 基于 lstm 的股票收盘价预测 -- python
开始导入 MinMaxScaler 时会报错 “from . import _arpack ImportError: DLL load failed: 找不到指定的程序.” (把sklearn更新下) ...
- 如何预测股票分析--长短期记忆网络(LSTM)
在上一篇中,我们回顾了先知的方法,但是在这个案例中表现也不是特别突出,今天介绍的是著名的l s t m算法,在时间序列中解决了传统r n n算法梯度消失问题的的它这一次还会有令人杰出的表现吗? 长短期 ...
- Tensflow预测股票实例
import pandas as pd import numpy as np import matplotlib.pyplot as plt import tensorflow as tf #———— ...
随机推荐
- [RN] React Native 自定义导航栏随滚动渐变
React Native 自定义导航栏随滚动渐变 实现效果预览: 代码实现: 1.定义导航栏 NavPage.js import React, {Component} from 'react'; im ...
- 优先队列优化的 Huffman树 建立
如果用vector实现,在运行时遍历寻找最小的两个节点,时间复杂度为O(N^2) 但是我们可以用priority_queue优化,达到O(N logN)的时间复杂度 需要注意的是priority_qu ...
- Flask 中的 request 之 先知道有这么个东西
每个框架中都有处理请求的机制(request),但是每个框架的处理方式和机制是不同的 为了了解Flask的request中都有什么东西,首先我们要写一个前后端的交互 基于HTML + Flask 写一 ...
- 转载:cnn学习之卷积或者池化后输出的map的size计算
相信各位在学习cnn的时候,常常对于卷积或者池化后所得map的的大小具体是多少,不知道怎么算.尤其涉及到边界的时候. 首先需要了解对于一个输入的input_height*input_widtht的 ...
- python总结七
1.lpython是python语言的lisp前端,它类似于普通的lisp语言,他会被直接编译成字节码. 2.python中的变量只在哪里需要设置内部变量,在__init__函数中. 3.map()会 ...
- 搭建Hadoop+Python的大数据开发环境
实验环境 CentOS镜像为CentOS-7-x86_64-Everything-1804.iso 虚机配置 节点名称 IP地址 子网掩码 CPU/内存 磁盘 安装方式 master 192.168. ...
- 16 个超级实用的 Java 工具类
阅读本文大概需要 4 分钟. 出处:alterem juejin.im/post/5d4a25b351882505c105cc6e 在Java中,工具类定义了一组公共方法,这篇文章将介绍Java中使用 ...
- 【视频开发】伽马校正(gamma correction)学习笔记
我相信几乎所有做图像处理方面的人都听过伽马校正(Gamma Correction)这一个名词,但真正明白它是什么.为什么要有它.以及怎么用它的人其实不多.我也不例外. 最初我查过一些资料,但很多文章 ...
- maven 打包添加依赖
1.将依赖与自己的代码打入同一个jar包 只需在pom中添加如下plugin 在include 中添加需要的依赖,在exclude 中添加不需要的依赖 <groupId>org.apach ...
- 在博文顶部添加文章字数及阅读时间信息:阅读本文需要xx分钟
1.在博客园设置中,页首Html代码中添加js代码 2.js代码如下 <script type="text/javascript"> $("#cnblogs_ ...