
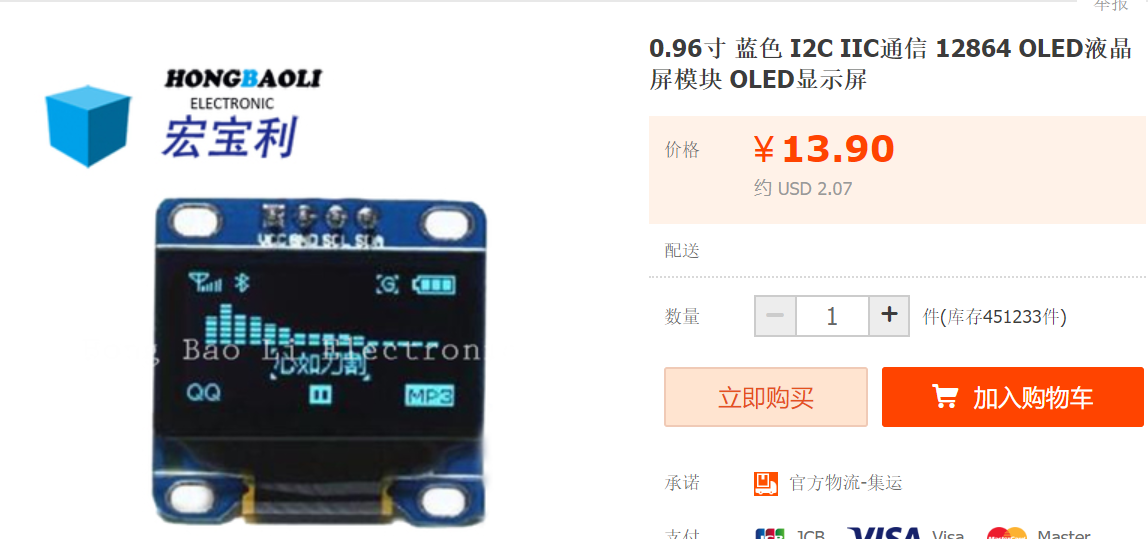
OLED液晶屏幕(1)OLED液晶屏幕ssd1306驱动芯片 arduino运行 ESP8266-07可以 12f不可以
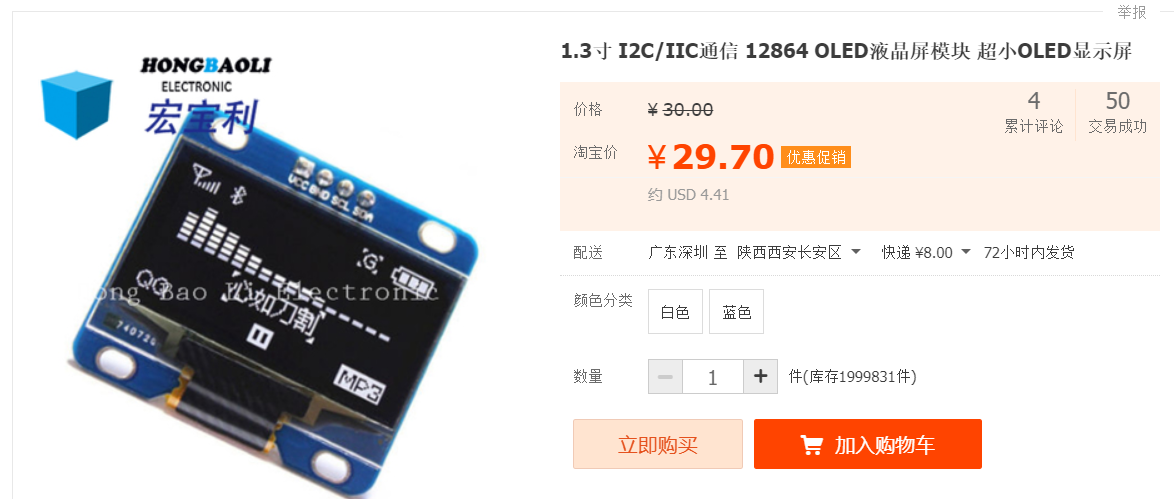
OLED屏幕有各种形状和尺寸,但目前有两种非常受欢迎的屏幕尺寸。
1)0.96“
2)1.3“
他们也有2种常见的颜色
1)蓝色
2)白色
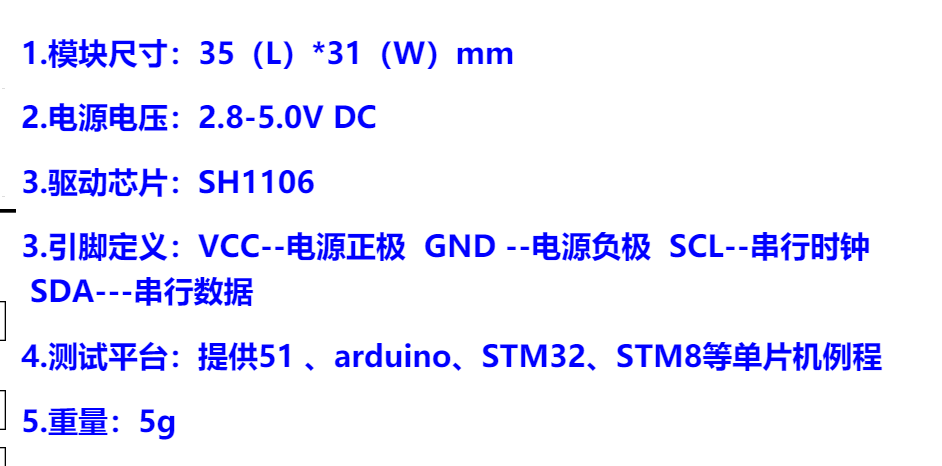
驱动OLED的芯片常用的有两种。这两种芯片有许多非常相似的设置命令(在大多数情况下相同),但用于显示信息的命令集是不同的,所以你不能只是改变屏幕 - 你需要更改程序/库来适合相应的芯片!
1)SH1106
2)SSD1306
https://item.taobao.com/item.htm?spm=a1z09.2.0.0.91172e8dcnKcE5&id=563407725788&_u=51qf7bf556f8

https://blog.csdn.net/ling3ye/article/details/53399305
https://startingelectronics.org/tutorials/arduino/modules/OLED-128x64-I2C-display/
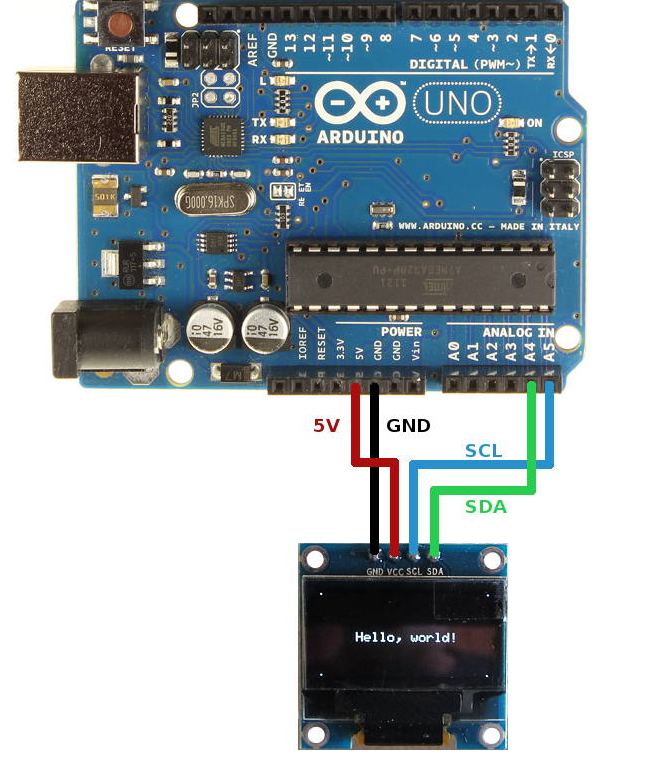
Arduino Uno OLED接线
下图显示了如何将Geekcreit 0.96英寸OLED I2C显示器连接到Arduino。用于将OLED显示器连接到Arduino Uno的引脚连接如下。
- OLED GND - Arduino GND
- OLED VCC - Arduino 5V
- OLED SCL - Arduino Uno A5
- OLED SDA - Arduino Uno A4
Arduino MEGA 2560 OLED接线
用于将Arduino MEGA 2560连接到OLED显示器的引脚连接如下。
- OLED GND - Arduino GND
- OLED VCC - Arduino 5V
- OLED SCL - Arduino MEGA 2560引脚21
- OLED SDA - Arduino MEGA 2560引脚20
ESP8266-07 连线方式
VCC-5v
GND-GND
SCL-D1
SDA-D2

esp8266-12f死活不显示
用于SSD1306和图形功能的ArduinoOLEDI²C库
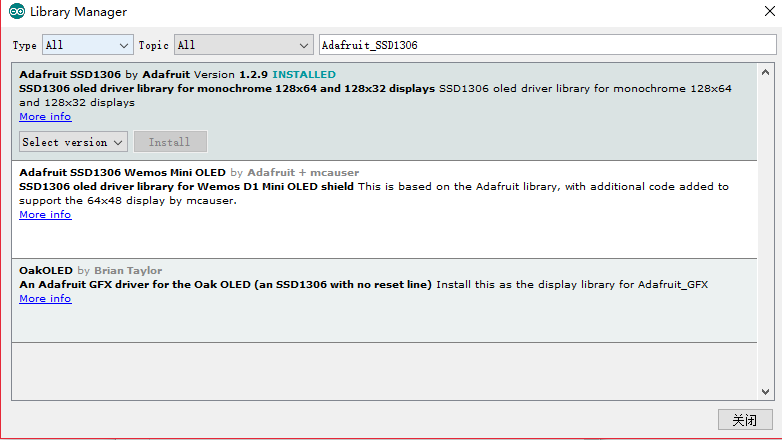
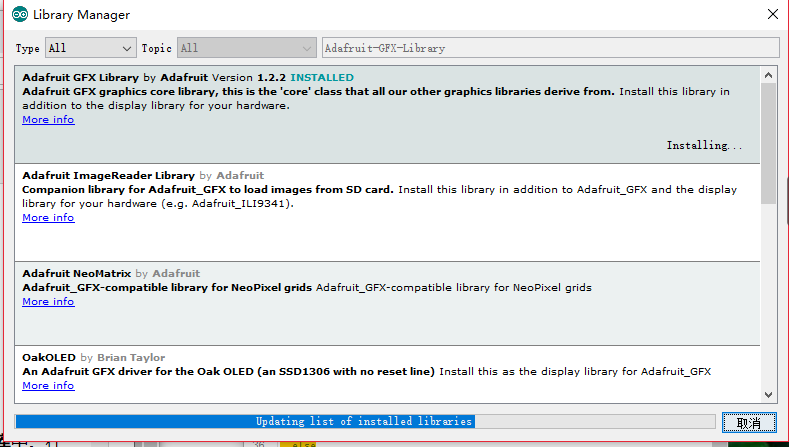
必须安装两个Arduino库才能开始使用显示器。SSD1306驱动程序库用于初始化显示并提供低级显示功能。GFX库提供用于显示文本,绘图线和圆圈等的图形功能。这两个库都可以从Adafruit获得。
安装SSD1306驱动程序库
1手动安装。下载Adafruit_SSD1306库,该库将保存到您的计算机中,名为Adafruit_SSD1306-master.zip。
将Adafruit_SSD1306-master文件夹从下载的压缩文件复制到Arduino 库文件夹中。此文件夹通常位于Windows系统上的Documents→Arduino→库中。在Linux上,它通常位于主文件夹 →Arduino→库中。
最后在Arduino库文件夹中,将Adafruit_SSD1306-master文件夹重命名为Adafruit_SSD1306。
2自动安装

安装GFX库
下载Adafruit_GFX库,该库保存在您的计算机中,名为Adafruit-GFX-Library-master.zip。
将Adafruit-GFX-Library-master文件夹从下载的压缩文件复制到Arduino库文件夹,如上面的SSD1306驱动程序所做。
在Arduino库文件夹中,将Adafruit-GFX-Library-master文件夹重命名为Adafruit_GFX。
使用
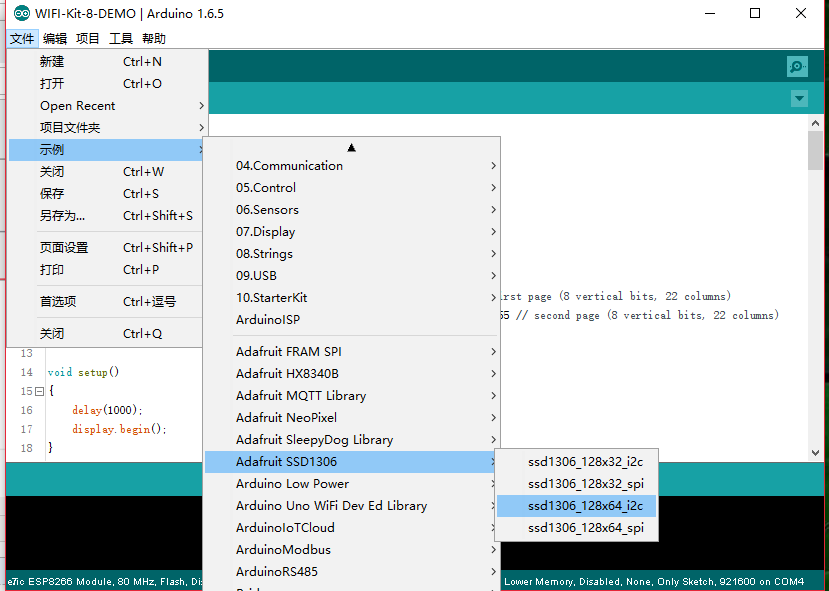
找到显示屏spi的地址,修改成 0x3C(源库代码打开可能是0x3D)

源代码修改
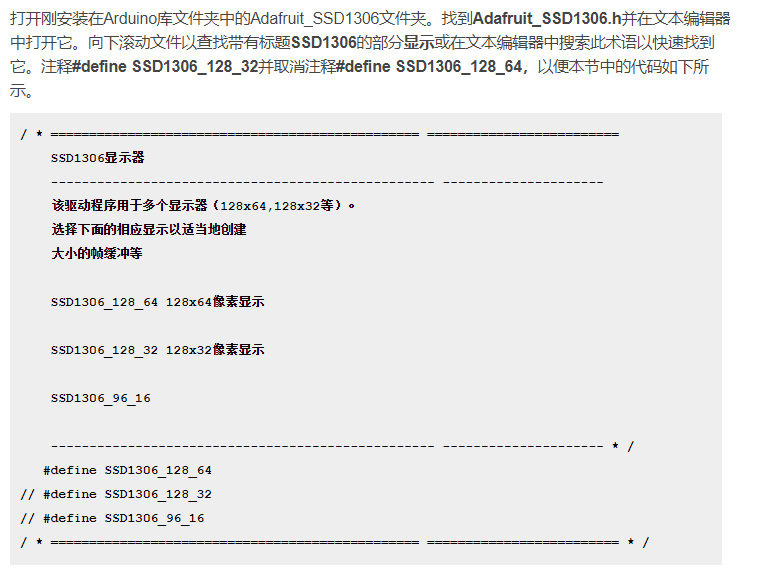
开启 128*64的注释(ESP8266-07使用的是这个正常工作)
关闭源代码 128*32的注释(arduino mega 2560使用的是这个正常工作)
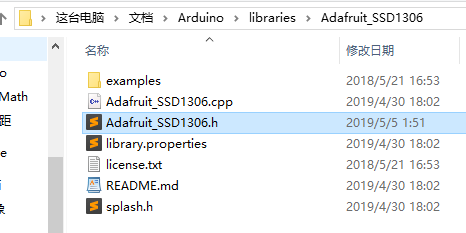
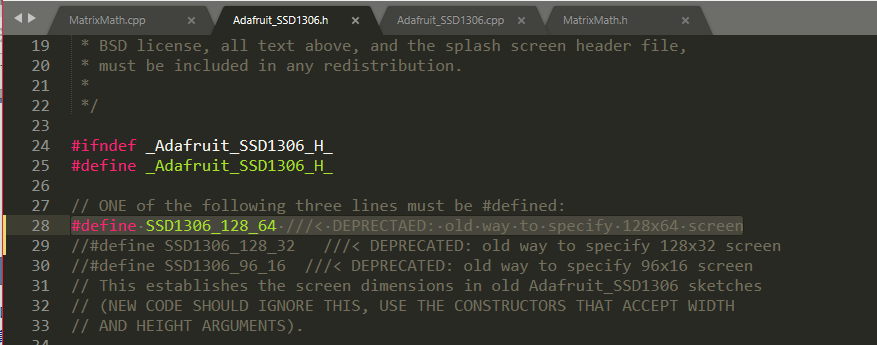
直接烧录
有报错
参看1
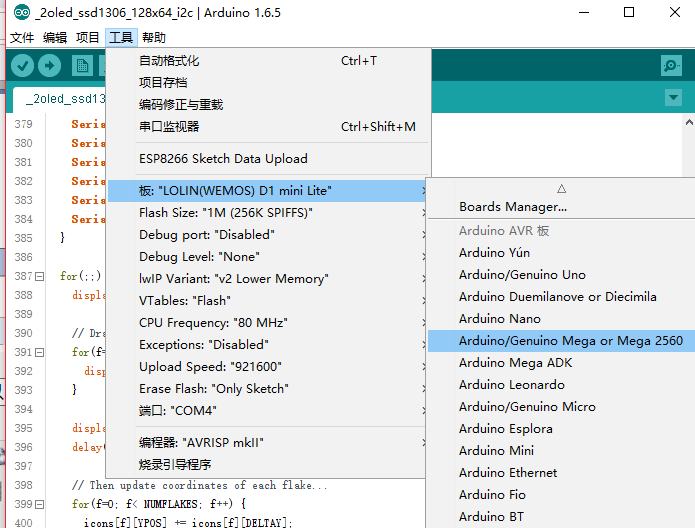
mega 2560板子型号选择
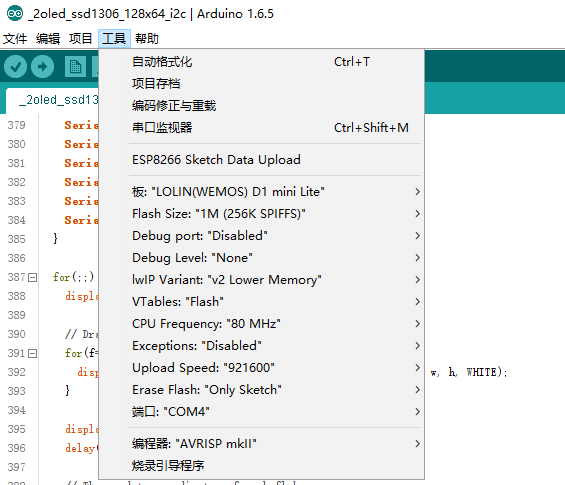
ESP8266-07板子型号选择
/**************************************************************************

 This is an example for our Monochrome OLEDs based on SSD1306 drivers

 Pick one up today in the adafruit shop!

 ------> http://www.adafruit.com/category/63_98

 This example is for a 128x32 pixel display using I2C to communicate

 3 pins are required to interface (two I2C and one reset).

 Adafruit invests time and resources providing this open

 source code, please support Adafruit and open-source

 hardware by purchasing products from Adafruit!

 Written by Limor Fried/Ladyada for Adafruit Industries,

 with contributions from the open source community.

 BSD license, check license.txt for more information

 All text above, and the splash screen below must be

 included in any redistribution.

 **************************************************************************/

#include <SPI.h>

#include <Wire.h>

#include <Adafruit_GFX.h>

#include <Adafruit_SSD1306.h>

#define SCREEN_WIDTH 128 // OLED display width, in pixels

#define SCREEN_HEIGHT 64 // OLED display height, in pixels

// Declaration for an SSD1306 display connected to I2C (SDA, SCL pins)

#define OLED_RESET    -1 //4  Reset pin # (or -1 if sharing Arduino reset pin)

Adafruit_SSD1306 display(SCREEN_WIDTH, SCREEN_HEIGHT, &Wire, OLED_RESET);

#define NUMFLAKES     10 // Number of snowflakes in the animation example

#define LOGO_HEIGHT   16

#define LOGO_WIDTH    16

static const unsigned char PROGMEM logo_bmp[] =

{ B00000000, B11000000,

  B00000001, B11000000,

  B00000001, B11000000,

  B00000011, B11100000,

  B11110011, B11100000,

  B11111110, B11111000,

  B01111110, B11111111,

  B00110011, B10011111,

  B00011111, B11111100,

  B00001101, B01110000,

  B00011011, B10100000,

  B00111111, B11100000,

  B00111111, B11110000,

  B01111100, B11110000,

  B01110000, B01110000,

  B00000000, B00110000 };

void setup() {

  Serial.begin(9600);

  // SSD1306_SWITCHCAPVCC = generate display voltage from 3.3V internally

  if(!display.begin(SSD1306_SWITCHCAPVCC, 0x3C)) { // Address 0x3D for 128x64

    Serial.println("SSD1306 allocation failed");

    for(;;); // Don't proceed, loop forever

  }

  Serial.println("success");

  // Show initial display buffer contents on the screen --

  // the library initializes this with an Adafruit splash screen.

  display.display();

  delay(2000); // Pause for 2 seconds

  // Clear the buffer

  display.clearDisplay();

  // Draw a single pixel in white

  display.drawPixel(10, 10, WHITE);

  // Show the display buffer on the screen. You MUST call display() after

  // drawing commands to make them visible on screen!

  display.display();

  delay(2000);

  // display.display() is NOT necessary after every single drawing command,

  // unless that's what you want...rather, you can batch up a bunch of

  // drawing operations and then update the screen all at once by calling

  // display.display(). These examples demonstrate both approaches...

  testdrawline();      // Draw many lines

  testdrawrect();      // Draw rectangles (outlines)

  testfillrect();      // Draw rectangles (filled)

  testdrawcircle();    // Draw circles (outlines)

  testfillcircle();    // Draw circles (filled)

  testdrawroundrect(); // Draw rounded rectangles (outlines)

  testfillroundrect(); // Draw rounded rectangles (filled)

  testdrawtriangle();  // Draw triangles (outlines)

  testfilltriangle();  // Draw triangles (filled)

  testdrawchar();      // Draw characters of the default font

  testdrawstyles();    // Draw 'stylized' characters

  testscrolltext();    // Draw scrolling text

  testdrawbitmap();    // Draw a small bitmap image

  // Invert and restore display, pausing in-between

  display.invertDisplay(true);

  delay(1000);

  display.invertDisplay(false);

  delay(1000);

  testanimate(logo_bmp, LOGO_WIDTH, LOGO_HEIGHT); // Animate bitmaps

}

void loop() {

}

void testdrawline() {

  int16_t i;

  display.clearDisplay(); // Clear display buffer

  for(i=0; i<display.width(); i+=4) {

    display.drawLine(0, 0, i, display.height()-1, WHITE);

    display.display(); // Update screen with each newly-drawn line

    delay(1);

  }

  for(i=0; i<display.height(); i+=4) {

    display.drawLine(0, 0, display.width()-1, i, WHITE);

    display.display();

    delay(1);

  }

  delay(250);

  display.clearDisplay();

  for(i=0; i<display.width(); i+=4) {

    display.drawLine(0, display.height()-1, i, 0, WHITE);

    display.display();

    delay(1);

  }

  for(i=display.height()-1; i>=0; i-=4) {

    display.drawLine(0, display.height()-1, display.width()-1, i, WHITE);

    display.display();

    delay(1);

  }

  delay(250);

  display.clearDisplay();

  for(i=display.width()-1; i>=0; i-=4) {

    display.drawLine(display.width()-1, display.height()-1, i, 0, WHITE);

    display.display();

    delay(1);

  }

  for(i=display.height()-1; i>=0; i-=4) {

    display.drawLine(display.width()-1, display.height()-1, 0, i, WHITE);

    display.display();

    delay(1);

  }

  delay(250);

  display.clearDisplay();

  for(i=0; i<display.height(); i+=4) {

    display.drawLine(display.width()-1, 0, 0, i, WHITE);

    display.display();

    delay(1);

  }

  for(i=0; i<display.width(); i+=4) {

    display.drawLine(display.width()-1, 0, i, display.height()-1, WHITE);

    display.display();

    delay(1);

  }

  delay(2000); // Pause for 2 seconds

}

void testdrawrect(void) {

  display.clearDisplay();

  for(int16_t i=0; i<display.height()/2; i+=2) {

    display.drawRect(i, i, display.width()-2*i, display.height()-2*i, WHITE);

    display.display(); // Update screen with each newly-drawn rectangle

    delay(1);

  }

  delay(2000);

}

void testfillrect(void) {

  display.clearDisplay();

  for(int16_t i=0; i<display.height()/2; i+=3) {

    // The INVERSE color is used so rectangles alternate white/black

    display.fillRect(i, i, display.width()-i*2, display.height()-i*2, INVERSE);

    display.display(); // Update screen with each newly-drawn rectangle

    delay(1);

  }

  delay(2000);

}

void testdrawcircle(void) {

  display.clearDisplay();

  for(int16_t i=0; i<max(display.width(),display.height())/2; i+=2) {

    display.drawCircle(display.width()/2, display.height()/2, i, WHITE);

    display.display();

    delay(1);

  }

  delay(2000);

}

void testfillcircle(void) {

  display.clearDisplay();

  for(int16_t i=max(display.width(),display.height())/2; i>0; i-=3) {

    // The INVERSE color is used so circles alternate white/black

    display.fillCircle(display.width() / 2, display.height() / 2, i, INVERSE);

    display.display(); // Update screen with each newly-drawn circle

    delay(1);

  }

  delay(2000);

}

void testdrawroundrect(void) {

  display.clearDisplay();

  for(int16_t i=0; i<display.height()/2-2; i+=2) {

    display.drawRoundRect(i, i, display.width()-2*i, display.height()-2*i,

      display.height()/4, WHITE);

    display.display();

    delay(1);

  }

  delay(2000);

}

void testfillroundrect(void) {

  display.clearDisplay();

  for(int16_t i=0; i<display.height()/2-2; i+=2) {

    // The INVERSE color is used so round-rects alternate white/black

    display.fillRoundRect(i, i, display.width()-2*i, display.height()-2*i,

      display.height()/4, INVERSE);

    display.display();

    delay(1);

  }

  delay(2000);

}

void testdrawtriangle(void) {

  display.clearDisplay();

  for(int16_t i=0; i<max(display.width(),display.height())/2; i+=5) {

    display.drawTriangle(

      display.width()/2  , display.height()/2-i,

      display.width()/2-i, display.height()/2+i,

      display.width()/2+i, display.height()/2+i, WHITE);

    display.display();

    delay(1);

  }

  delay(2000);

}

void testfilltriangle(void) {

  display.clearDisplay();

  for(int16_t i=max(display.width(),display.height())/2; i>0; i-=5) {

    // The INVERSE color is used so triangles alternate white/black

    display.fillTriangle(

      display.width()/2  , display.height()/2-i,

      display.width()/2-i, display.height()/2+i,

      display.width()/2+i, display.height()/2+i, INVERSE);

    display.display();

    delay(1);

  }

  delay(2000);

}

void testdrawchar(void) {

  display.clearDisplay();

  display.setTextSize(1);      // Normal 1:1 pixel scale

  display.setTextColor(WHITE); // Draw white text

  display.setCursor(0, 0);     // Start at top-left corner

  display.cp437(true);         // Use full 256 char 'Code Page 437' font

  // Not all the characters will fit on the display. This is normal.

  // Library will draw what it can and the rest will be clipped.

  for(int16_t i=0; i<256; i++) {

    if(i == '\n') display.write(' ');

    else          display.write(i);

  }

  display.display();

  delay(2000);

}

void testdrawstyles(void) {

  display.clearDisplay();

  display.setTextSize(1);             // Normal 1:1 pixel scale

  display.setTextColor(WHITE);        // Draw white text

  display.setCursor(0,0);             // Start at top-left corner

  display.println(F("Hello, world!"));

  display.setTextColor(BLACK, WHITE); // Draw 'inverse' text

  display.println(3.141592);

  display.setTextSize(2);             // Draw 2X-scale text

  display.setTextColor(WHITE);

  display.print(F("0x")); display.println(0xDEADBEEF, HEX);

  display.display();

  delay(2000);

}

void testscrolltext(void) {

  display.clearDisplay();

  display.setTextSize(2); // Draw 2X-scale text

  display.setTextColor(WHITE);

  display.setCursor(10, 0);

  display.println(F("scroll"));

  display.display();      // Show initial text

  delay(100);

  // Scroll in various directions, pausing in-between:

  display.startscrollright(0x00, 0x0F);

  delay(2000);

  display.stopscroll();

  delay(1000);

  display.startscrollleft(0x00, 0x0F);

  delay(2000);

  display.stopscroll();

  delay(1000);

  display.startscrolldiagright(0x00, 0x07);

  delay(2000);

  display.startscrolldiagleft(0x00, 0x07);

  delay(2000);

  display.stopscroll();

  delay(1000);

}

void testdrawbitmap(void) {

  display.clearDisplay();

  display.drawBitmap(

    (display.width()  - LOGO_WIDTH ) / 2,

    (display.height() - LOGO_HEIGHT) / 2,

    logo_bmp, LOGO_WIDTH, LOGO_HEIGHT, 1);

  display.display();

  delay(1000);

}

#define XPOS   0 // Indexes into the 'icons' array in function below

#define YPOS   1

#define DELTAY 2

void testanimate(const uint8_t *bitmap, uint8_t w, uint8_t h) {

  int8_t f, icons[NUMFLAKES][3];

  // Initialize 'snowflake' positions

  for(f=0; f< NUMFLAKES; f++) {

    icons[f][XPOS]   = random(1 - LOGO_WIDTH, display.width());

    icons[f][YPOS]   = -LOGO_HEIGHT;

    icons[f][DELTAY] = random(1, 6);

    Serial.print(F("x: "));

    Serial.print(icons[f][XPOS], DEC);

    Serial.print(F(" y: "));

    Serial.print(icons[f][YPOS], DEC);

    Serial.print(F(" dy: "));

    Serial.println(icons[f][DELTAY], DEC);

  }

  for(;;) { // Loop forever...

    display.clearDisplay(); // Clear the display buffer

    // Draw each snowflake:

    for(f=0; f< NUMFLAKES; f++) {

      display.drawBitmap(icons[f][XPOS], icons[f][YPOS], bitmap, w, h, WHITE);

    }

    display.display(); // Show the display buffer on the screen

    delay(200);        // Pause for 1/10 second

    // Then update coordinates of each flake...

    for(f=0; f< NUMFLAKES; f++) {

      icons[f][YPOS] += icons[f][DELTAY];

      // If snowflake is off the bottom of the screen...

      if (icons[f][YPOS] >= display.height()) {

        // Reinitialize to a random position, just off the top

        icons[f][XPOS]   = random(1 - LOGO_WIDTH, display.width());

        icons[f][YPOS]   = -LOGO_HEIGHT;

        icons[f][DELTAY] = random(1, 6);

      }

    }

  }

}
.com/item.htm?spm=a1z09.2.0.0.91172e8dcnKcE5&id=562158712128&_u=51qf7bf525e7

OLED液晶屏幕(1)OLED液晶屏幕ssd1306驱动芯片 arduino运行 ESP8266-07可以 12f不可以的更多相关文章
- Arduino 基于 ESP8266 配置WIFI模块
Arduino 基于 ESP8266 配置WIFI模块 使用ESP8266作为服务器,使用浏览器访问该服务器,从而控制LED灯 选择 [文件]->[示例]->[ESP8266WIFI]-& ...
- Arduino 配置 ESP8266环境
Arduino 配置 ESP8266环境 将 http://arduino.esp8266.com/stable/package_esp8266com_index.json 添加到 [附加开发板管理器 ...
- 0.96寸OLED显示屏驱动手册(SSD1306)
MCU IIC接口 IIC通信接口由从地址位SA0,IIC总线数据信号SDA(输出SDAout/D2和输入SDAin /D1)和IIC总线时钟信号SCL(D0).不管是数据线还是时钟线都需要连接上拉电 ...
- Arduino运行时突然[卡死在某一行/立即重启/串口输出乱码/程序执行不正常]的可能原因
1.这一行是分配内存,而内存不够了(Arduino uno只有2k) 2.内存本身已经只剩一点点了,于是就有莫名其妙的问题 3.没有调用Wire.begin().xx.setup()之类的操作!
- Arduino UNO +ESP8266采集数据上传到贝壳网
集成电路设计大赛赛程将至,我现在还是毫无头绪,然后又报了一个互联网+,比赛报了,东西就必须出来,时间很紧的情况下,所以选择了开源的arduino的进行完成.从开始接触Arduino到完成工程,前前后后 ...
- Arduino和ESP8266引脚图
Arduino的引脚图 https://www.geek-workshop.com/thread-11826-1-1.html ESP8266 https://item.taobao.com/item ...
- esp8266(3) Arduino通过ESP8266连接和获取网站源代码
http://www.plclive.com/a/tongxinjiekou/2016/0422/374.html 在上一篇8266的基础上,这一篇做个具体的连接网站的例子,供大家参考.上一篇基础篇请 ...
- arduino 配置 esp8266
在连接之前,先把程序下载到arduino中,很简单,就是定义了软口.如果中间要改动程序,要把rx和tx的连线去掉,不然下载程序可能失败. ; ; void setup() { pinMode(rx,I ...
- 【Arduino学习笔记07】模拟信号的输入与输出 analogRead() analogWrite() map() constrain()
模拟信号:Arduino中的模拟信号就是0v~5v的连续的电压值 数字信号:Arduino中的数字信号就是高电平(5V)或者低电平(0V),是两个离散的值 模拟信号->数字信号:ADC(模数转换 ...
随机推荐
- 超级简单POI导出Excel实战
在一般的生产管理系统都会将数据通过页面导出到Excel,这里以Java为例通过第三方开源poi进行对Excel的操作,具体操作如下 1.引入jar包依赖 这里我以maven的方式引入jar包,具体依赖 ...
- Django框架之第六篇(模型层)--单表查询和必知必会13条、单表查询之双下划线、Django ORM常用字段和参数、关系字段
单表查询 补充一个知识点:在models.py建表是 create_time = models.DateField() 关键字参数: 1.auto_now:每次操作数据,都会自动刷新当前操作的时间 2 ...
- 国内P2P网贷行业再次大清理,仅剩646家
最近有网贷行业头部网站流出消息,国内网贷行业再次迎来大洗牌 清扫之后网贷的平台数量仅剩646家,数量陡降 根据小编了解.自2007年国外网络借贷平台模式引入中国以来,由于国家一时没有做出相应规定个条例 ...
- SVN客户端教程
.SVN是一个自由/开源的版本控制系统,一组文件存放在中心版本库,记录每一次文件和目录的修改,Subversion允许把数据恢复到早期版本,或是检查数据修改的历史,Subversion可以通过网络访问 ...
- JVM 参数调优配置
在 tomcat 配置文件 tomcat/bin/catalina.sh 中 配置 JAVA_OPTS="-server -Xms2048m -Xmx2048m -Xss1024K -XX ...
- C# vb .net实现负片特效滤镜
在.net中,如何简单快捷地实现Photoshop滤镜组中的负片特效呢?答案是调用SharpImage!专业图像特效滤镜和合成类库.下面开始演示关键代码,您也可以在文末下载全部源码: 设置授权 第一步 ...
- k8s安装部署问题、解决方案汇总
角色 节点名 节点ip master n1 192.168.14.11 节点1 n2 192.168.14.12 节点2 n3 192.168.14.13 https://raw.githubuser ...
- [golang]使用gomail发邮件(在Go中发送电子邮件的最佳方式)
1 前言 定义邮箱服务器连接信息,如果是网易邮箱 pass填密码,qq邮箱填授权码(客户端专用密码). gomail包: go get gopkg.in/gomail.v2 更多功能可以参考 http ...
- Thymeleaf前后端分页查询
分页查询是一个很常见的功能,对于分页也有很多封装好的轮子供我们使用. 比如使用mybatis做后端分页可以用Pagehelper这个插件,如果使用SpringDataJPA更方便,直接就内置的分页查询 ...
- 对比分析HashMap、LinkedHashMap、TreeMap
HashMap的原理 :简单地说,HashMap 在底层将 key-value 当成一个整体进行处理,这个整体就是一个 Entry 对象.HashMap 底层采用一个 Entry[] 数组来保存所有的 ...