Centos7部署开源聊天软件rocket.chat
一、部署rocket.chat
1、看官方文档部署,很简单,一步一步跟着部署即可
注意:需要部署节点需要联网主要是yum方式
https://rocket.chat/docs/installation/manual-installation/centos/
2、这里贴一下步骤
Rocket.Chat in CentOS

This installation guide was tested in the following environment:

Rocket.Chat 1.0.

OS: CentOS 7.6

Mongodb 4.0.

NodeJS 8.11.4

Install necessary dependency packages
#---安装依赖包

Update package list and configure yum to install the official MongoDB packages with the following yum repository file:

#---配置repo源

sudo yum -y check-update

cat << EOF | sudo tee -a /etc/yum.repos.d/mongodb-org-4.0.repo

[mongodb-org-4.0]

name=MongoDB Repository

baseurl=https://repo.mongodb.org/yum/redhat/7/mongodb-org/4.0/x86_64/

gpgcheck=1

enabled=1

gpgkey=https://www.mongodb.org/static/pgp/server-4.0.asc

EOF

Configure Node.js to be installed via package manager:

#---配置node.js

sudo yum install -y curl && curl -sL https://rpm.nodesource.com/setup_8.x | sudo bash -

Install build tools, MongoDB, nodejs and graphicsmagick:

#---安装mongondb,nodejs,graphicsmagick

sudo yum install -y gcc-c++ make mongodb-org nodejs

sudo yum install -y epel-release && sudo yum install -y GraphicsMagick

Using npm install inherits and n, and the node version required by Rocket.Chat:

#---使用NPM安装 inherits,n,以及指定版本

sudo npm install -g inherits n && sudo n 8.11.4

Install Rocket.Chat

Download the latest Rocket.Chat version:

#---安装rocket.chat

curl -L https://releases.rocket.chat/latest/download -o /tmp/rocket.chat.tgz

tar -xzf /tmp/rocket.chat.tgz -C /tmp

Install (this guide uses /opt but feel free to choose a different directory):

#---这里使用得opt目录,也可以是其他目录

cd /tmp/bundle/programs/server && npm install

sudo mv /tmp/bundle /opt/Rocket.Chat

Configure the Rocket.Chat service

Add the rocketchat user, set the right permissions on the Rocket.Chat folder and create the Rocket.Chat service file:

#---配置rocket.chat服务,包括:添加rocketchat 用户,设置文佳佳权限创建服务文件

sudo useradd -M rocketchat && sudo usermod -L rocketchat

sudo chown -R rocketchat:rocketchat /opt/Rocket.Chat

cat << EOF |sudo tee -a /lib/systemd/system/rocketchat.service

[Unit]

Description=The Rocket.Chat server

After=network.target remote-fs.target nss-lookup.target nginx.target mongod.target

[Service]

ExecStart=/usr/local/bin/node /opt/Rocket.Chat/main.js

StandardOutput=syslog

StandardError=syslog

SyslogIdentifier=rocketchat

User=rocketchat

Environment=MONGO_URL=mongodb://localhost:27017/rocketchat?replicaSet=rs01 MONGO_OPLOG_URL=mongodb://localhost:27017/local?replicaSet=rs01 ROOT_URL=http://localhost:3000/ PORT=3000

[Install]

WantedBy=multi-user.target

EOF

Open the Rocket.Chat service file just created (/usr/lib/systemd/system/rocketchat.service) using sudo and your favourite text editor, and change the ROOT_URL environmental variable to reflect the URL you want to use for accessing the server (optionally change MONGO_URL, MONGO_OPLOG_URL and PORT):

#---打开服务文件,编辑改变ROOT_URL、MONGO_URL、MONGO_OPLOG_URL、PORT

MONGO_URL=mongodb://localhost:27017/rocketchat?replicaSet=rs01

MONGO_OPLOG_URL=mongodb://localhost:27017/local?replicaSet=rs01

ROOT_URL=http://your-host-name.com-as-accessed-from-internet:3000

PORT=

Setup storage engine and replication for MongoDB (mandatory for versions > ), and enable and start MongoDB and Rocket.Chat:

#---mongoDB设置存储引擎和replication,开机自启,启动数据库

sudo sed -i "s/^#  engine:/  engine: mmapv1/"  /etc/mongod.conf

sudo sed -i "s/^#replication:/replication:\n  replSetName: rs01/" /etc/mongod.conf

sudo systemctl enable mongod && sudo systemctl start mongod

mongo --eval "printjson(rs.initiate())"

sudo systemctl enable rocketchat && sudo systemctl start rocketchat

Optional configurations
#---可选配置

Configure firewall rule Configure a HTTP reverse proxy to access Rocket.Chat server [Configure mongo access control] [Configure production values for mongodb]

Configure your Rocket.Chat server

Open a web browser and access the configured ROOT_URL (http://your-host-name.com-as-accessed-from-internet:3000), follow the configuration steps to set an admin account and your organization and server info.

ZLIB version problem

Some users had experienced problems starting rocketchat server in CentOS because their zlib version is not compatible with rocket.chat.

If you find an error message similar to the following in the logs:

Exception in callback of async function: Error: /lib64/libz.so.: version `ZLIB_1.2.9' not found

Add this environmental variable in the Rocket.Chat service file (/usr/lib/systemd/system/rocketchat.service):

Environment=LD_PRELOAD=/opt/Rocket.Chat/programs/server/npm/node_modules/sharp/vendor/lib/libz.so

Github

Contribute to this page on GitHub
3、访问一下ip:3000端口
初始化,建立管理员账号,及选择这个应用场景等,这里就不截图了
二、简单管理rocket.chat
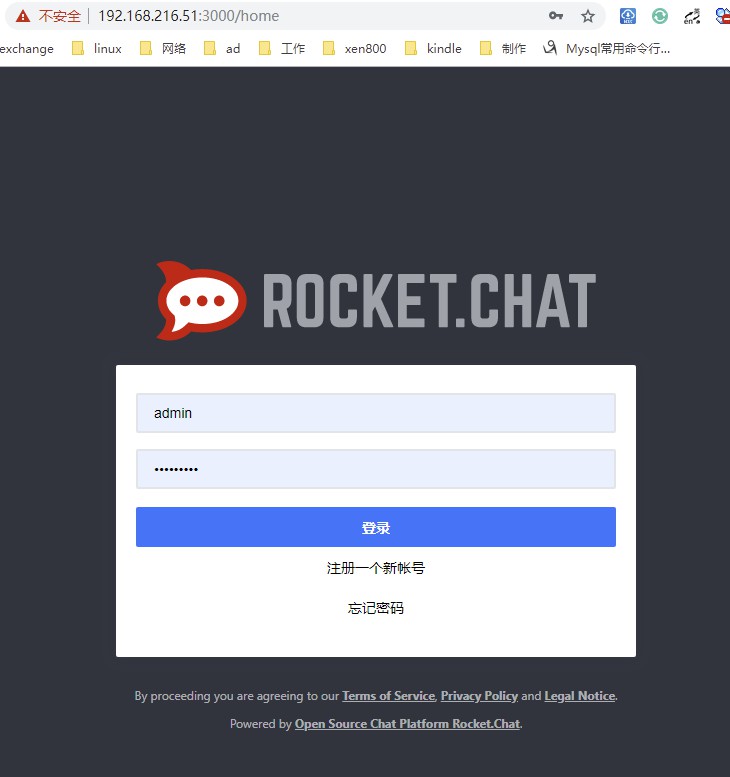
1、登陆界面,登陆
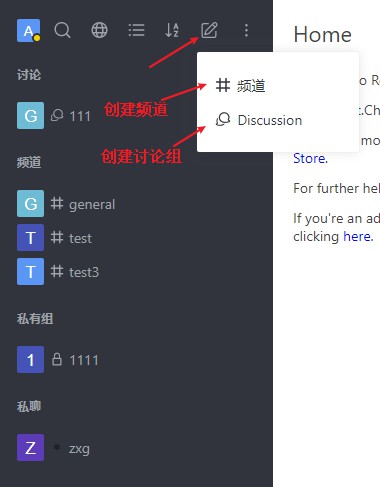
2、创建频道及讨论组
3、管理界面

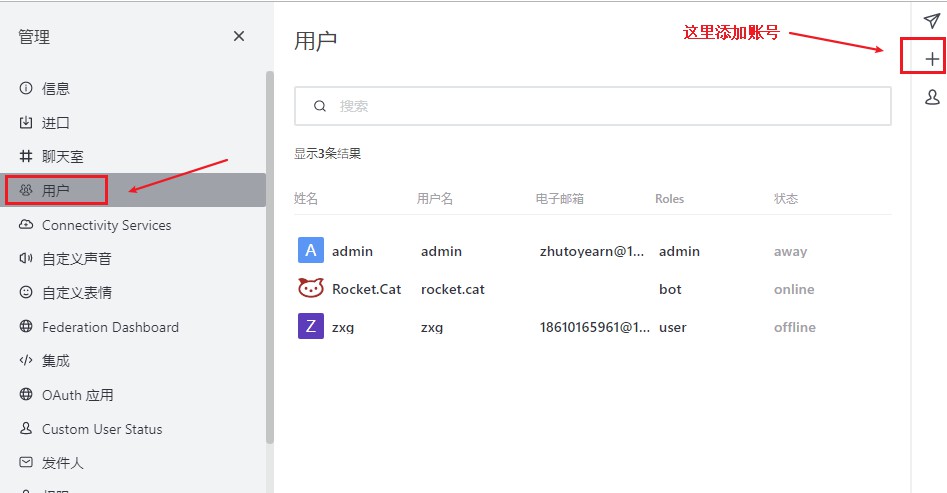
4、添加用户
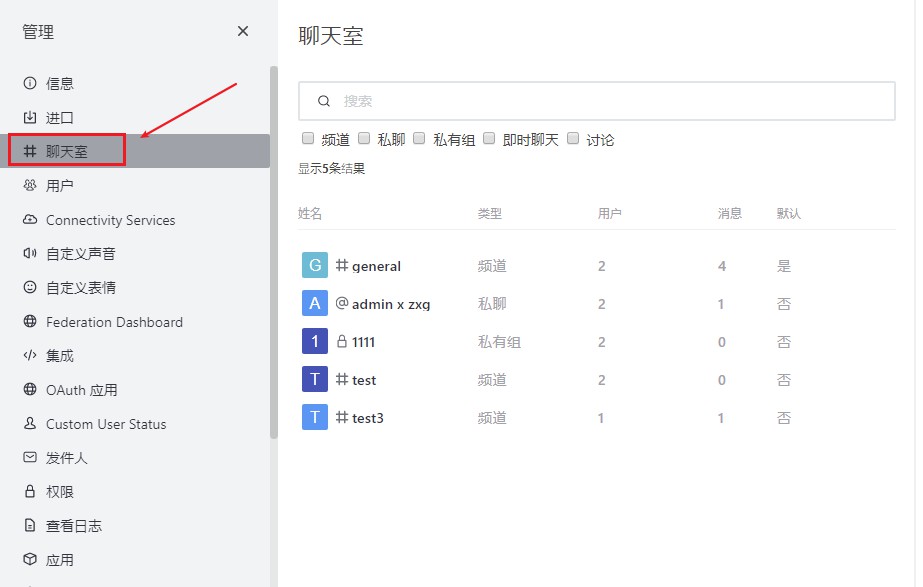
5、管理聊天室
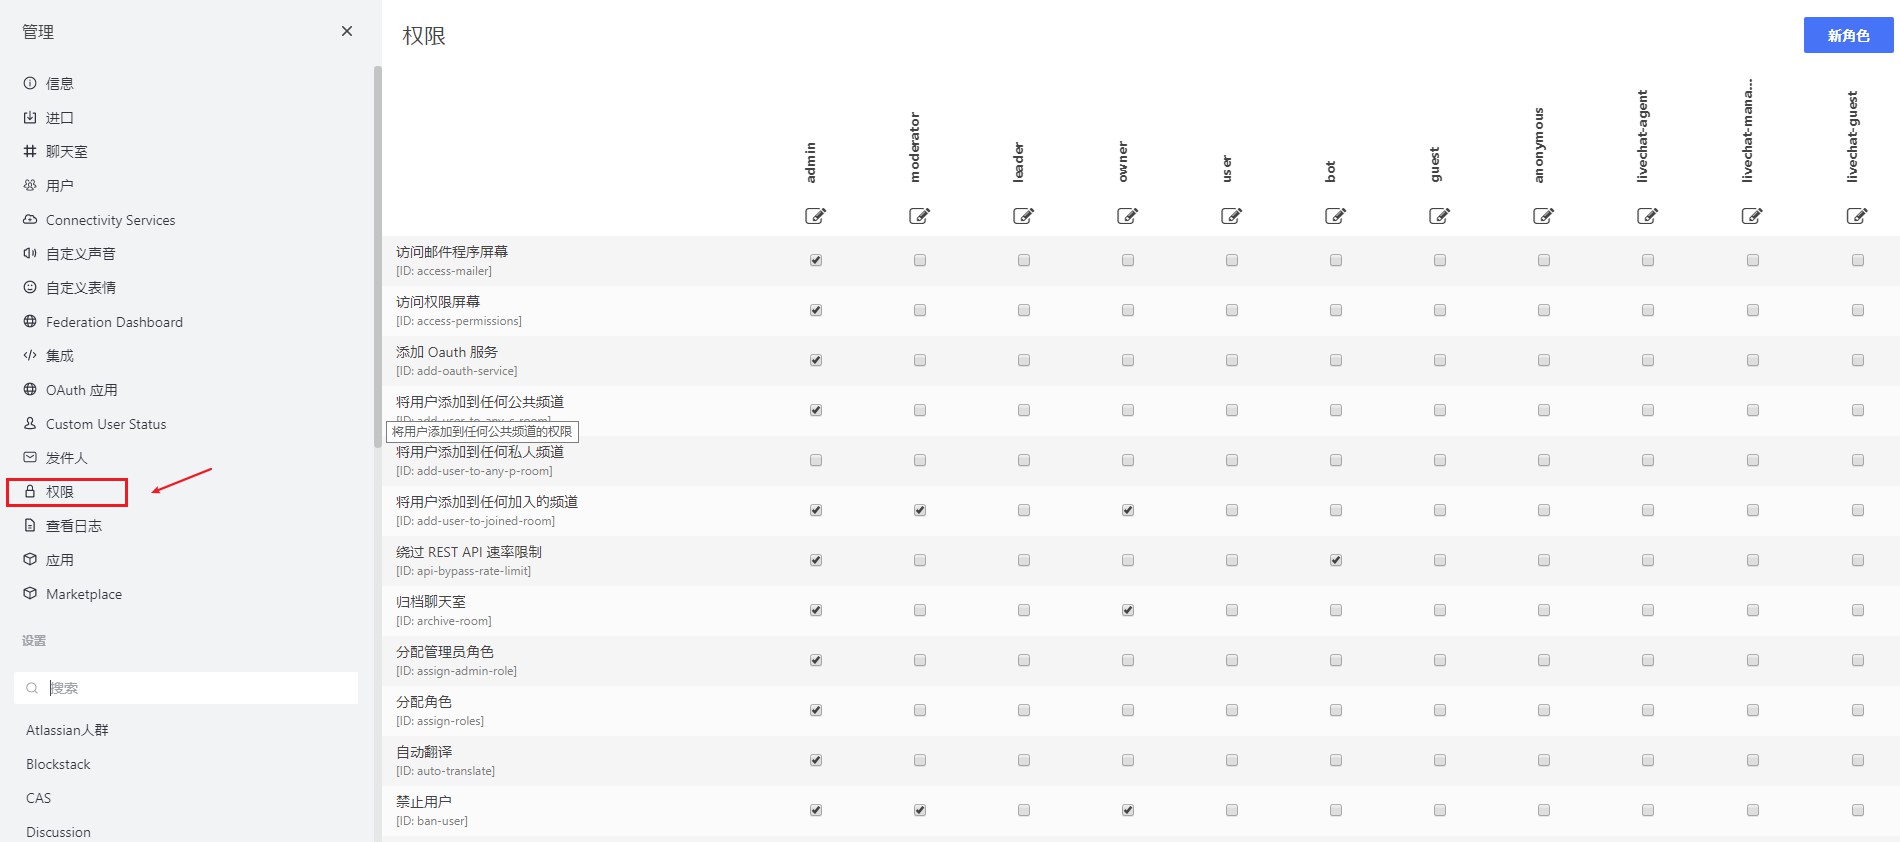
6、权限控制
转载请注明出处:https://www.cnblogs.com/zhangxingeng/p/11418803.html
Centos7部署开源聊天软件rocket.chat的更多相关文章
- RocketChat:开源聊天软件部署
1. 简介 RocketChat是一款优秀的开源聊天软件.支持各种平台,IOS.Android.Web.Mac.Windows以及Linux,安装部署简单,功能简单易用,目前部分功能还在完善当中,特别 ...
- Slack 开源替代品 Rocket.Chat(聊天,文件上传等等)
Rocket.Chat 是特性最丰富的 Slack 开源替代品之一. 主要功能:群组聊天,直接通信,私聊群,桌面通知,媒体嵌入,链接预览,文件上传,语音/视频 聊天,截图等等. Rocket.Chat ...
- Centos7 使用Docker安装rocket.chat聊天工具
镜像下载.域名解析.时间同步请点击阿里云开源镜像站 下载安装 Rocket.Chat 目前最新的版本为 4.0.1,可以通过手动或者容器的方式安装.这里我推荐使用容器,部署过程会方便不少. 如果要用容 ...
- Rocket.Chat 开源IM系统部署
Rocket.Chat 官方给出的文档也个人觉得太麻烦了,并且对ubuntu的支持程度远高于CentOS,自己就折腾写了个安装的笔记,如果是在公司内部或者是部门内部还是很有用处的,比较看中的功能有和g ...
- [svc]rocket.chat内网聊天服务器搭建(类似slack)
rocket.chat内网聊天服务 服务端有linux windows 树莓派等 支持客户端登陆- 官网 支持网页登陆 多人聊天图 还有手机客户端 部署rocket.chat 为了方便我使用docke ...
- puppet开源的软件自动化配置和部署工具——本质就是CS,服务端统一管理配置
1. 概述 puppet是一个开源的软件自动化配置和部署工具,它使用简单且功能强大,正得到了越来越多地关注,现在很多大型IT公司均在使用puppet对集群中的软件进行管理和部署,如google利用p ...
- Centos7如何安装开源办公软件Libreoffice
在Centos7安装了WPS,但是用了没两月就出问题,无法正常使用.(准确来说,安装的WPS一直都有各种问题存在,但是没有影响到主要功能也就将就着用,后来是直接输入不了文字) 既然是开源系统,自然而然 ...
- Mac 下安装运行Rocket.chat
最近花了一周的时间,复习了HTML.CSS.原生JS,并学习了Node.js.CoffeeScript.js.MongoDB,入了下门. 因为准备在Rocket.chat 上做二次开发,所以先下载和安 ...
- 开源server软件
Java缓存server jmemcached http://www.oschina.net/p/jmemcached jmemcached 是一个Java版的 memcached 缓存server, ...
随机推荐
- 2、kafka集群搭建
以三台为例,先安装一台,然后分发: 一.准备 1.下载 http://kafka.apache.org kafka_2.11-2.0.1.tgz 前面的数字2.11是scala的版本,2.0.1是ka ...
- vue-route开发注意事项
1.router-link to 动态赋值 router-link组件的to属性值有两种写法,字符串类型和对象类型 如果要动态传值,比如放到for循环中,传入for的index值,这时就必须使用对象形 ...
- 辨析Java方法参数中的值传递和引用传递
小方法大门道 小瓜瓜作为一个Java初学者,今天跟我说她想通过一个Java方法,将外部变量通过参数传递到方法中去,进行逻辑处理,方法执行完毕之后,再对修改过的变量进行判断处理,代码如下所示. publ ...
- 【转】使用fastboot命令刷机流程详解
一.Fastboot是什么? 1.1 首先介绍Recovery模式(卡刷) 在系统进行定制时,编译系统会编译出一份ZIP的压缩包,里面是一些系统分区镜像,提供给客户进行手动升级.恢复系统.需要提前将压 ...
- MySQL事务隔离级别(一)
本文实验的测试环境:Windows 10+cmd+MySQL5.6.36+InnoDB 一.事务的基本要素(ACID) 1.原子性(Atomicity):事务开始后所有操作,要么全部做完,要么全部不做 ...
- plsql查询数据库-中文显示问号问题
解决方法: 设置本地环境变量 :NLS_LANG=AMERICAN_AMERICA.ZHS16GBK https://blog.csdn.net/github_38358734/article/det ...
- 某表中字段值存在多个Gid逗号分开 取值拆分每个gid SQL多个逗号隔开的取值
存在值信息 表值函数实现: --实现split功能 的函数 拆分 逗号分开的多个值 ),)) )) as begin declare @i int set @SourceSql=rtrim(ltrim ...
- python初级(302) 3 easygui简单使用二
一.复习 1.easygui 信息提示对话框 2.easygui 是否对话框 二.easygui其它组件 1.选择对话框:choicebox(msg, title, choices) import e ...
- [LeetCode] 276. Paint Fence 粉刷篱笆
There is a fence with n posts, each post can be painted with one of the k colors. You have to paint ...
- 警方破获超大DDoS黑产案,20万个僵尸网络运营商被抓
中国警方已镇压并逮捕了一个犯罪集团,该集团经营着一个由200,000多个受感染网站构成的僵尸网络,这些网站被用来发起DDoS攻击. 这是中国当局针对兴旺的本地DDoS租用场景进行的首次重大镇压,最大的 ...