【SpringBoot】SpringBoot与SpringMVC自动配置(五)
本文介绍SpringBoot对Spring MVC自动配置,SpringBoot自动配置原理可以参考:【SpringBoot】SpringBoot配置与单元测试(二)
首先新建一个SpringBoot的web项目,参考:【SpringBoot】SpringBoot快速入门(一)
本例pom文件如下:
 <?xml version="1.0" encoding="UTF-8"?>

 <project xmlns="http://maven.apache.org/POM/4.0.0"

          xmlns:xsi="http://www.w3.org/2001/XMLSchema-instance"

          xsi:schemaLocation="http://maven.apache.org/POM/4.0.0 http://maven.apache.org/xsd/maven-4.0.0.xsd">

     <modelVersion>4.0.0</modelVersion>

     <groupId>com.test</groupId>

     <artifactId>test-springboot-web</artifactId>

     <version>1.0-SNAPSHOT</version>

     <parent>

         <groupId>org.springframework.boot</groupId>

         <artifactId>spring-boot-starter-parent</artifactId>

         <version>2.1.8.RELEASE</version>

     </parent>

     <properties>

         <project.build.sourceEncoding>UTF-8</project.build.sourceEncoding>

         <project.reporting.outputEncoding>UTF-8</project.reporting.outputEncoding>

         <java.version>1.8</java.version>

     </properties>

     <dependencies>

         <dependency>

             <groupId>org.springframework.boot</groupId>

             <artifactId>spring-boot-starter-web</artifactId>

         </dependency>

         <!--引入jquery-webjar-->

         <dependency>

             <groupId>org.webjars</groupId>

             <artifactId>jquery</artifactId>

             <version>3.3.1</version>

         </dependency>

         <dependency>

             <groupId>org.springframework.boot</groupId>

             <artifactId>spring-boot-starter-test</artifactId>

             <scope>test</scope>

         </dependency>

     </dependencies>

     <!-- SpringBoot打包插件,可以将代码打包成一个可执行的jar包 -->

     <build>

         <plugins>

             <plugin>

                 <groupId>org.springframework.boot</groupId>

                 <artifactId>spring-boot-maven-plugin</artifactId>

             </plugin>

         </plugins>

     </build>

 </project>
SpringMVC自动配置
自动配置在Spring的默认值之上添加了以下功能:
- 包含
ContentNegotiatingViewResolver和BeanNameViewResolver。 - 支持服务静态资源,包括对WebJars的支持。
- 自动注册
Converter,GenericConverter和Formatter豆类。 - 支持
HttpMessageConverters。 - 自动注册
MessageCodesResolver。 - 静态
index.html支持。 - 定制
Favicon支持。 - 自动使用
ConfigurableWebBindingInitializerbean。
如果想保留Spring Boot MVC功能,并且想要添加其他MVC配置(拦截器,格式化程序,视图控制器和其他功能),则可以编写一个配置类(@Configuration),并实现WebMvcConfigurer接口的类,但不能加 @EnableWebMvc。如果您希望提供,或的自定义实例RequestMappingHandlerMapping,则可以声明一个实例来提供此类组件。RequestMappingHandlerAdapter、ExceptionHandlerExceptionResolver、WebMvcRegistrationsAdapter
如果想完全控制Spring MVC,可以在配置类(@Configuration)添加上注释@EnableWebMvc。
添加MVC配置类
1、原理:
1)、WebMvcAutoConfiguration是SpringMVC的自动配置类
2)、在做其他自动配置时会导入;@Import(EnableWebMvcConfiguration.class)
3)、容器中所有的WebMvcConfigurer都会一起起作用;
4)、我们的配置类也会被调用;
2、编写一个配置类(@Configuration),实现WebMvcConfigurer接口;不能标注@EnableWebMvc;
这样既保留了所有的自动配置(WebMvcAutoConfiguration),也能用我们扩展的配置;
 // @EnableWebMvc // 全面接管SpringMVC,所有的WebMvc自动配置都失效,如静态资源的访问都失效

 @Configuration

 public class MyMvcConfig implements WebMvcConfigurer {

     @Override

     public void addViewControllers(ViewControllerRegistry registry) {

         // 浏览器访问 "/success2" 重定向到 "/success"

         registry.addRedirectViewController("/success2", "/success");

         // 浏览器访问 "/success2" 转发 "/success"

         registry.addViewController("/success3").setViewName("/success");

     }

 }
3、验证:效果SpringMVC的自动配置和我们的扩展配置都会起作用
重定向请求验证地址:http://localhost:8080/success
转发请求验证地址:http://localhost:8080/success
全面接管SpringMVC
1、原理
1)、查看源码WebMvcAutoConfiguration类,有条件注解,在没有WebMvcConfigurationSupport类的情况下才注入
@Configuration

@ConditionalOnWebApplication(type = Type.SERVLET)

@ConditionalOnClass({ Servlet.class, DispatcherServlet.class, WebMvcConfigurer.class })

// 条件判断:在没有WebMvcConfigurationSupport类的情况下才注入

@ConditionalOnMissingBean(WebMvcConfigurationSupport.class)

@AutoConfigureOrder(Ordered.HIGHEST_PRECEDENCE + 10)

@AutoConfigureAfter({ DispatcherServletAutoConfiguration.class, TaskExecutionAutoConfiguration.class,

        ValidationAutoConfiguration.class })

public class WebMvcAutoConfiguration {
2)、查看@EnableWebMvc注解源码,发现它导入DelegatingWebMvcConfiguration类
 @Retention(RetentionPolicy.RUNTIME)

 @Target(ElementType.TYPE)

 @Documented

 // 导入DelegatingWebMvcConfiguration类

 @Import(DelegatingWebMvcConfiguration.class)

 public @interface EnableWebMvc {

 }
DelegatingWebMvcConfiguration类继承了WebMvcConfigurationSupport类
 @Configuration

 public class DelegatingWebMvcConfiguration extends WebMvcConfigurationSupport {
3)、@EnableWebMvc将WebMvcConfigurationSupport组件导入进来,导入的WebMvcConfigurationSupport只是SpringMVC最基本的功能,WebMvcAutoConfiguration类又是在没有WebMvcConfigurationSupport组件情况下生效,所以@EnableWebMvc能使WebMvcAutoConfiguration失效,并全面接管SpringMVC
静态资源的映射规则
SpringBoot对静态文件映射都在类中WebMvcAutoConfiguration,自动配置好了,打开WebMvcAutoConfiguration类,并分析
1、规则:/webjars/**
规则:所有 /webjars/** ,都去 classpath:/META-INF/resources/webjars/ 找资源;
webjars:以jar包的方式引入静态资源; 官网地址:http://www.webjars.org/
 // 添加静态资源映射

 @Override

 public void addResourceHandlers(ResourceHandlerRegistry registry) {

     if (!this.resourceProperties.isAddMappings()) {

         logger.debug("Default resource handling disabled");

         return;

     }

     Duration cachePeriod = this.resourceProperties.getCache().getPeriod();

     CacheControl cacheControl = this.resourceProperties.getCache().getCachecontrol().toHttpCacheControl();

     if (!registry.hasMappingForPattern("/webjars/**")) {

         // 添加映射

         customizeResourceHandlerRegistration(registry.addResourceHandler("/webjars/**")

                 .addResourceLocations("classpath:/META-INF/resources/webjars/")

                 .setCachePeriod(getSeconds(cachePeriod)).setCacheControl(cacheControl));

     }

     String staticPathPattern = this.mvcProperties.getStaticPathPattern();

     if (!registry.hasMappingForPattern(staticPathPattern)) {

         customizeResourceHandlerRegistration(registry.addResourceHandler(staticPathPattern)

                 .addResourceLocations(getResourceLocations(this.resourceProperties.getStaticLocations()))

                 .setCachePeriod(getSeconds(cachePeriod)).setCacheControl(cacheControl));

     }

 }
测试:在pom文件中引入依赖
 <!--引入jquery-webjar-->

 <dependency>

     <groupId>org.webjars</groupId>

     <artifactId>jquery</artifactId>

     <version>3.3.1</version>

 </dependency>
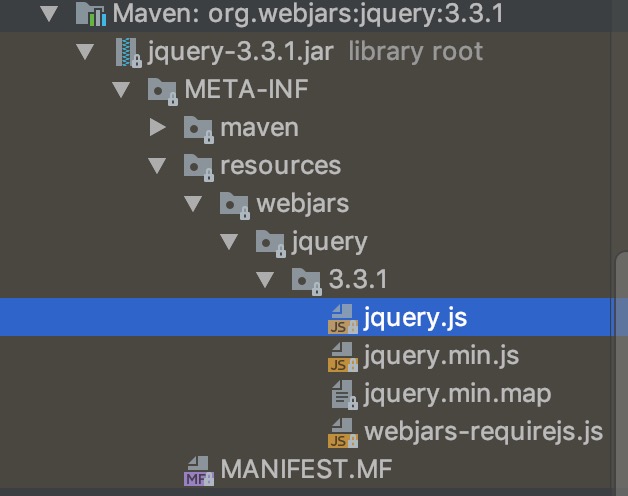
可以看到jar包中有jquery.js文件

验证:重启项目,浏览器上打开地址:http://localhost:8080/webjars/jquery/3.3.1/jquery.js,即可看到能获取到js文件
2、规则:/**
"/**" 访问当前项目的任何资源,都去(静态资源的文件夹)找映射,静态资源的文件夹如下:
 "classpath:/META-INF/resources/",

 "classpath:/resources/",

 "classpath:/static/",

 "classpath:/public/"
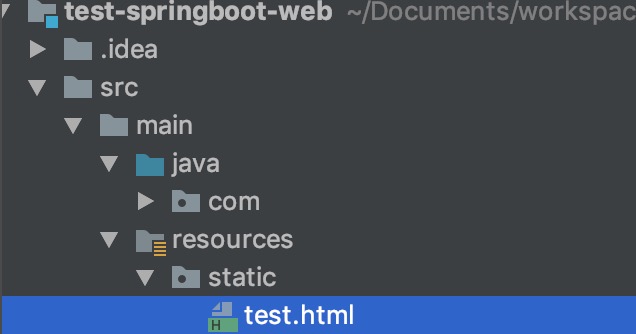
测试:在类路径中,创建static文件夹,在其中添加一个测试页面test.html

验证:重启项目,浏览器使用地址:http://localhost:8080/test.html,访问,即可看到test页面
3、规则:首页
首页映射规则代码在类中WebMvcAutoConfiguration,如下,也在静态文件夹(即规则2下的文件夹)下查找
 // 添加首页映射

 @Bean

 public WelcomePageHandlerMapping welcomePageHandlerMapping(ApplicationContext applicationContext) {

     WelcomePageHandlerMapping welcomePageHandlerMapping = new WelcomePageHandlerMapping(

             new TemplateAvailabilityProviders(applicationContext), applicationContext, getWelcomePage(),

             this.mvcProperties.getStaticPathPattern());

     welcomePageHandlerMapping.setInterceptors(getInterceptors());

     return welcomePageHandlerMapping;

 }
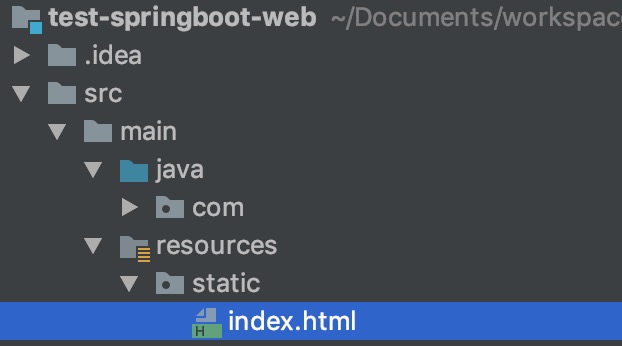
测试:在类路径中的static文件夹,在其中添加一个欢迎页面index.html

验证:重启项目,浏览器使用地址:http://localhost:8080,访问,即可看到欢迎页面
4、规则:**/favicon.ico
所有的 **/favicon.ico 都是在静态资源文件(即规则2下的文件夹)下找;
首页映射规则代码在类中WebMvcAutoConfiguration,如下
 // 配置站点的图标映射

 @Configuration

 @ConditionalOnProperty(value = "spring.mvc.favicon.enabled", matchIfMissing = true)

 public static class FaviconConfiguration implements ResourceLoaderAware {

     private final ResourceProperties resourceProperties;

     private ResourceLoader resourceLoader;

     public FaviconConfiguration(ResourceProperties resourceProperties) {

         this.resourceProperties = resourceProperties;

     }

     @Override

     public void setResourceLoader(ResourceLoader resourceLoader) {

         this.resourceLoader = resourceLoader;

     }

     @Bean

     public SimpleUrlHandlerMapping faviconHandlerMapping() {

         SimpleUrlHandlerMapping mapping = new SimpleUrlHandlerMapping();

         mapping.setOrder(Ordered.HIGHEST_PRECEDENCE + 1);

         mapping.setUrlMap(Collections.singletonMap("**/favicon.ico", faviconRequestHandler()));

         return mapping;

     }

     @Bean

     public ResourceHttpRequestHandler faviconRequestHandler() {

         ResourceHttpRequestHandler requestHandler = new ResourceHttpRequestHandler();

         requestHandler.setLocations(resolveFaviconLocations());

         return requestHandler;

     }

     private List<Resource> resolveFaviconLocations() {

         String[] staticLocations = getResourceLocations(this.resourceProperties.getStaticLocations());

         List<Resource> locations = new ArrayList<>(staticLocations.length + 1);

         Arrays.stream(staticLocations).map(this.resourceLoader::getResource).forEach(locations::add);

         locations.add(new ClassPathResource("/"));

         return Collections.unmodifiableList(locations);

     }

 }
测试:在类路径中的static文件夹,在其中添加一个favicon.ico图标
验证:重启项目,浏览器使用地址:http://localhost:8080,访问,即可看到浏览器标题上的站点图标已改变
【SpringBoot】SpringBoot与SpringMVC自动配置(五)的更多相关文章
- Springboot学习:SpringMVC自动配置
Spring MVC auto-configuration Spring Boot 自动配置好了SpringMVC 以下是SpringBoot对SpringMVC的默认配置:==(WebMvcAuto ...
- SpringBoot源码学习系列之SpringMVC自动配置
目录 1.ContentNegotiatingViewResolver 2.静态资源 3.自动注册 Converter, GenericConverter, and Formatter beans. ...
- SpringBoot:配置文件及自动配置原理
西部开源-秦疆老师:基于SpringBoot 2.1.6 的博客教程 秦老师交流Q群号: 664386224 未授权禁止转载!编辑不易 , 转发请注明出处!防君子不防小人,共勉! SpringBoot ...
- SpringBoot是如何实现自动配置的?--SpringBoot源码(四)
注:该源码分析对应SpringBoot版本为2.1.0.RELEASE 1 前言 本篇接 助力SpringBoot自动配置的条件注解ConditionalOnXXX分析--SpringBoot源码(三 ...
- SpringBoot Beans管理和自动配置
原 SpringBoot Beans管理和自动配置 火推 02 2017年12月20日 21:37:01 阅读数:220 SpringBoot Beans管理和自动配置 @SpringBootAppl ...
- SpringBoot自定义starter及自动配置
SpringBoot的核心就是自动配置,而支持自动配置的是一个个starter项目.除了官方已有的starter,用户自己也可以根据规则自定义自己的starter项目. 自定义starter条件 自动 ...
- 这一次搞懂SpringBoot核心原理(自动配置、事件驱动、Condition)
@ 目录 前言 正文 启动原理 事件驱动 自动配置原理 Condition注解原理 总结 前言 SpringBoot是Spring的包装,通过自动配置使得SpringBoot可以做到开箱即用,上手成本 ...
- SpringBoot扩展SpringMVC自动配置
SpringBoot中自动配置了 ViewResolver(视图解析器) ContentNegotiatingViewResolver(组合所有的视图解析器) 自动配置了静态资源文件夹.静态首页.fa ...
- SpringBoot日记——SpringMvc自动配置与扩展篇
为了让SpringBoot保持对SpringMVC的全面支持和扩展,而且还要维持SpringBoot不写xml配置的优势,我们需要添加一些简单的配置类即可实现: 通常我们使用的最多的注解是: @Bea ...
随机推荐
- 微服务框架---搭建 go-micro环境
1.安装micro 需要使用GO1.11以上版本 #linux 下 export GO111MODULE=on export GOPROXY=https://goproxy.io # windows下 ...
- zabbix--邮件告警报错“Support for SMTP authentication was not compiled in”
zabbix 邮件告警报错“Support for SMTP authentication was not compiled in” 邮件报警失败:Support for SMTP authentic ...
- 纯数据结构Java实现(8/11)(Trie)
欢迎访问我的自建博客: CH-YK Blog.
- python基础语法13 内置模块 subprocess,re模块,logging日志记录模块,防止导入模块时自动执行测试功能,包的理论
subprocess模块: - 可以通过python代码给操作系统终端发送命令, 并且可以返回结果. sub: 子 process: 进程 import subprocess while Tru ...
- LoadRunner【第一篇】下载、安装、破解、修改端口号
loadrunner11下载 loadrunner11大小有4g多,相对另外一款开源的性能测试工具jmeter来说,是非常笨重的了,可以关注公众号联系作则获取. loadrunner11安装(win7 ...
- wordpress站点更换域名了如何快速设置
有时我们的wordpress站点因为各种原因需要更换域名了,如何快速设置让网站直接用新域名而不受影响呢?比如旧域名是a.com,新域名为b.com,下面这段sql代码很有用 UPDATE wp_opt ...
- spark-shell操作hive
本文是在集群已经搭建好的基础上来说的,还没有搭建好集群的小伙伴还请自行百度! 启动spark-shell之前要先启动hive metastore 和 hiveservice2 hive --servi ...
- 超文本标记语言(Hyper Text Markup Language):构建网页的语言
超文本标记语言(Hyper Text Markup Language):构建网页的语言
- NSData、数据结构与数据转换
数据结构公式:Data_Structure=(D,R): 只要数据元素与数据(组织关系)能够保持:同一个数据(结构)可以在各种存贮形式间进行转换. 字节流或字符串是所有转化的中间节点(中转站).相当于 ...
- Codechef July Challenge 2019 Hit the Coconuts
假设现在有一堆数,我想要保证能取出一个,至少需要敲 (数的个数)*(这些数里的最小值)那么把这些数从大到小排序,$dp[i][j]$ 表示前 $i$ 个里面保证能取出 $j$ 个需要敲的次数.$dp[ ...
