
service worker 消息推送
https://developers.google.com/web/fundamentals/codelabs/push-notifications/?hl=en
首先下载源码:
git clone https://github.com/GoogleChrome/push-notifications.git设置如下选项方便开发:
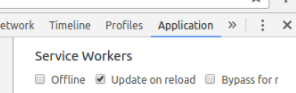
开始
注册之后记录sw实例:
  navigator.serviceWorker.register('sw.js')

  .then(function(swReg) {

    console.log('Service Worker is registered', swReg);

    swRegistration = swReg;

  })
生成key:
https://web-push-codelab.glitch.me/。生成了一个相互对应的public key 与 private key
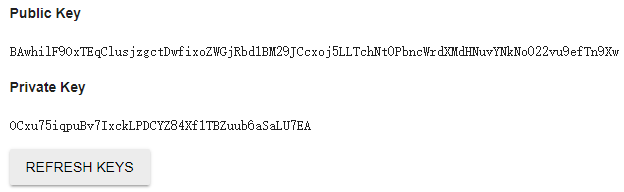
然后把public key记录到 applicationServerPublicKey变量上。
判断当前sw是否已经订阅过消息推送了:
  swRegistration.pushManager.getSubscription()

  .then(function(subscription) {

    isSubscribed = !(subscription === null);

    if (isSubscribed) {

      console.log('User IS subscribed.');

    } else {

      console.log('User is NOT subscribed.');

    }

  });
使用之前生成的public key来订阅消息推送:
const applicationServerKey = urlB64ToUint8Array(applicationServerPublicKey);

// subscribe 会给推送服务器发送一个网络请求

swRegistration.pushManager.subscribe({

    userVisibleOnly: true,  // 用于显示请求权限的界面,所以这个值基本必须为true,否则获取不到权限的话,当前promise会被reject

    applicationServerKey: applicationServerKey

}).then(function (subscription) {

    // 订阅成功。subscription 就是推送服务器返回的信息

    console.log('User is subscribed.');

    updateSubscriptionOnServer(subscription); // 在这个自定义函数中,我们应该把订阅信息发送给后端

    isSubscribed = true;

}).catch(function (err) {

    console.log('Failed to subscribe the user: ', err);

});

// 工具函数|

function urlB64ToUint8Array(base64String) {

    const padding = '='.repeat((4 - base64String.length % 4) % 4);

    const base64 = (base64String + padding)

        .replace(/\-/g, '+')

        .replace(/_/g, '/');

    const rawData = window.atob(base64);

    const outputArray = new Uint8Array(rawData.length);

    for (let i = 0; i < rawData.length; ++i) {

        outputArray[i] = rawData.charCodeAt(i);

    }

    return outputArray;

}
执行订阅的时候,界面上会有如下弹框来请求消息推送的显示权限:
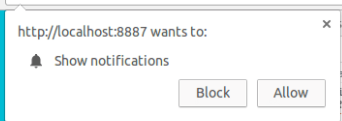
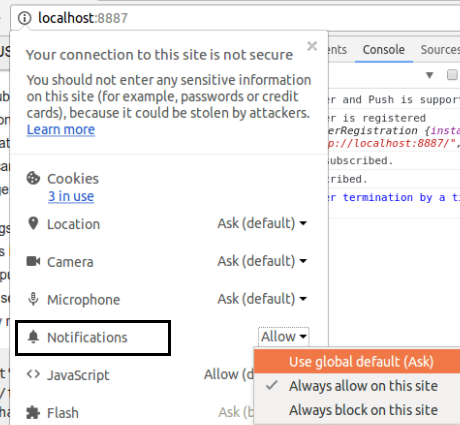
点击同意的话,则订阅成功。但如果用户点击了拒绝,则app没办法再次显示这个弹框而且没有消息推送,以下这个值会为true:
Notification.permission === 'denied'
手动点击这里(ask),可以撤销权限,使弹窗再次弹出来,方便开发测试:
处理消息推送
我们需要在sw中监听push事件,来接收服务器发来的消息推送:
self.addEventListener('push', function(event) {

    console.log('[Service Worker] Push Received.');

    console.log(`[Service Worker] Push had this data: "${event.data.text()}"`);

    const title = 'Push Codelab';

    const options = {

        body: 'Yay it works.',

        icon: 'images/icon.png',

        badge: 'images/badge.png'  //仅仅用在安卓

    };

    // showNotification 用于显示一个通知
   // waitUntil :使sw等待直至这个promise被处理,否则有可能这个promise没被处理,sw 就被浏览器终止了

    event.waitUntil(self.registration.showNotification(title, options));

});
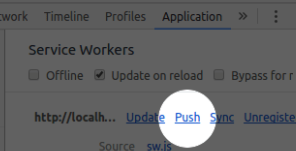
测试:在这里点击push:
屏幕左下角就会看到这个通知:
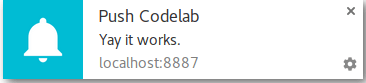
但是点击这个通知是没什么响应的,需要我们去注册一个点击事件:
self.addEventListener('notificationclick', function(event) {

    console.log('[Service Worker] Notification click Received.');

    event.notification.close();  // 关闭这个通知

    event.waitUntil(

        clients.openWindow('https://developers.google.com/web/')    // 打开一个标签

    );

});
发送消息推送
以上订阅成功后返回的subscription,将它 JSON.stringify(subscription) 后的字符串粘贴到 https://web-push-codelab.glitch.me/ 就可以发送用于测试的消息推送了(注意要用页面所在的key来订阅才可以)。
同理在实际应用中,我们后端也需要这个subscription信息来发送消息推送。步骤如下(使用 web-push):
创建firebase项目,里面的key为(用来作为GCM API key):

然后在https://web-push-codelab.glitch.me/ 中生成的public/private key为(其实也可以用webpush.generateVAPIDKeys来生成):
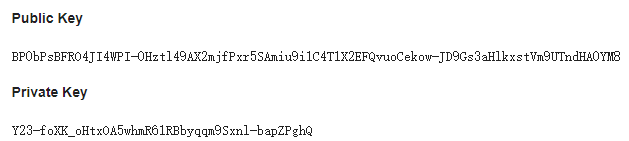
接着来订阅消息推送:
function urlB64ToUint8Array(base64String) {

    const padding = '='.repeat((4 - base64String.length % 4) % 4);

    const base64 = (base64String + padding)

        .replace(/\-/g, '+')

        .replace(/_/g, '/');

    const rawData = window.atob(base64);

    const outputArray = new Uint8Array(rawData.length);

    for (let i = 0; i < rawData.length; ++i) {

        outputArray[i] = rawData.charCodeAt(i);

    }

    return outputArray;

}

const applicationServerPublicKey = 'BP0bPsBFRO4JI4WPI-0Hztl49AX2mjfPxr5SAmiu9i1C4T1X2EFQvuoCekow-JD9Gs3aHlkxstVm9UTndHA0YM8';

function subscribeUser() {

  const applicationServerKey = urlB64ToUint8Array(applicationServerPublicKey);

  swRegistration.pushManager.subscribe({

    userVisibleOnly: true,

    applicationServerKey: applicationServerKey

  })

  .then(function(subscription) {

    console.log('User is subscribed.');

    updateSubscriptionOnServer(subscription);

    isSubscribed = true;

    updateBtn();

  })

  .catch(function(err) {

    console.log('Failed to subscribe the user: ', err);

    updateBtn();

  });

}
node服务器来发送消息推送:
const webpush = require('web-push');

// VAPID keys should only be generated only once.

// const vapidKeys = webpush.generateVAPIDKeys();

webpush.setGCMAPIKey('AIzaSyAPNqXa931TMPdEx5im92uDQmWQKfKFJNo');

webpush.setVapidDetails(

    'mailto:947133297@qq.com',

    "BP0bPsBFRO4JI4WPI-0Hztl49AX2mjfPxr5SAmiu9i1C4T1X2EFQvuoCekow-JD9Gs3aHlkxstVm9UTndHA0YM8",

    "Y23-foXK_oHtxOA5whmR61RBbyqqm9Sxnl-bapZPghQ"

);

// This is the same output of calling JSON.stringify on a PushSubscription

const pushSubscription = {

    endpoint: 'https://fcm.googleapis.com/fcm/send/fN0CygRBHVo:APA91bH4FB9bkE6RjD6v758TaNoHIx4IhUxdSm_bcFMPRRnyY4IcTlID9md6AwAdhUhqE7HzbL76WY6Wzak7MGmtrJ5InYAwYP31B-mc-TXRCnKQwUKxjIPe1Kv6-U_S672rG_8jVmpJ',

    keys: {

        auth: 'uOxqcnlXYQIyDucqXeWeeA==',

        p256dh: 'BFoO1hMB5kpWA4lPx2fKZGiyw3Qd-3n9afeE3jrJ62Bna66LsHQmCSIjo0Q9t2UF6MZdzyqe6cNkNbSGpNpmX6I='

    }

};

webpush.sendNotification(pushSubscription, 'Your Push Payload Text').then(()=>{

    console.log("发送完成")

}).catch((err)=>{

    console.log("被拒绝")

    console.log(err)

})
因为在中国被墙的原因,以上代码运行会报错:
被拒绝

{ Error: connect ETIMEDOUT 172.217.160.106:443

    at Object._errnoException (util.js:1024:11)

    at _exceptionWithHostPort (util.js:1046:20)

    at TCPConnectWrap.afterConnect [as oncomplete] (net.js:1182:14)

  code: 'ETIMEDOUT',

  errno: 'ETIMEDOUT',

  syscall: 'connect',

  address: '172.217.160.106',

  port: 443 }
查看issue之后,发现有人针对这个问题提交了一个PR,但是没有被应用,即master分支上还是存在这个问题。
取消订阅
swRegistration.pushManager.getSubscription()

.then(function(subscription) {

  if (subscription) {

    // TODO: Tell application server to delete subscription

    return subscription.unsubscribe();

  }

})

.catch(function(error) {

  console.log('Error unsubscribing', error);

})
并且要记得通知后端,不要往这个subscription推送消息了 。
service worker 消息推送的更多相关文章
- IOS - 消息推送原理和实现
一.消息推送原理: 在实现消息推送之前先提及几个于推送相关概念,如下图1-1: 1.Provider:就是为指定IOS设备应用程序提供Push的服务器,(如果IOS设备的应用程序是客户端的话,那么Pr ...
- iOS 消息推送原理及实现Demo
一.消息推送原理: 在实现消息推送之前先提及几个于推送相关概念,如下图1-1: 1.Provider:就是为指定IOS设备应用程序提供Push的服务器,(如果IOS设备的应用程序是客户端的话,那么Pr ...
- iOS 消息推送原理
一.消息推送原理: 在实现消息推送之前先提及几个于推送相关概念,如下图: 1. Provider:就是为指定IOS设备应用程序提供Push的服务器,(如果IOS设备的应用程序是客户端的话,那么Prov ...
- iOS 消息推送原理及实现总结
在实现消息推送之前先提及几个于推送相关概念,如下图:1. Provider:就是为指定IOS设备应用程序提供Push的服务器,(如果IOS设备的应用程序是客户端的话,那么Provider可以理解为服务 ...
- iOS 消息推送原理及实现总结 分类: ios技术 2015-03-01 09:22 70人阅读 评论(0) 收藏
在实现消息推送之前先提及几个于推送相关概念,如下图: 1. Provider:就是为指定IOS设备应用程序提供Push的服务器,(如果IOS设备的应用程序是客户端的话,那么Provider可以理解为服 ...
- iOS开发消息推送原理
转载自:http://www.cnblogs.com/cdts_change/p/3240893.html 一.消息推送原理: 在实现消息推送之前先提及几个于推送相关概念,如下图1-1: 1.Prov ...
- iOS消息推送原理
推送相关概念,如下图1-1: 1.Provider:就是为指定IOS设备应用程序提供Push的服务器,(如果IOS设备的应用程序是客户端的话,那么Provider可以理解为服务端[消息的发起者]): ...
- APNS消息推送实现
转自:http://blog.csdn.net/biaobiaoqi/article/details/8058503 一.消息推送原理: 在实现消息推送之前先提及几个于推送相关概念,如下图1-1: 1 ...
- iOS消息推送原理和实现总结
一.消息推送原理: 在实现消息推送之前先提及几个于推送相关概念,如下图:1. Provider:就是为指定IOS设备应用程序提供Push的服务器,(如果IOS设备的应用程序是客户端的话,那么Provi ...
随机推荐
- PAT甲级——1123 Is It a Complete AVL Tree (完全AVL树的判断)
嫌排版乱的话可以移步我的CSDN:https://blog.csdn.net/weixin_44385565/article/details/89390802 An AVL tree is a sel ...
- linux常用命令(ubuntu)
编辑: vi [path] vim [path] :q 退出 :wq 保存退出 查看进程 ps ps -aux | grep mem 查看全部含 “mem”的进程 ps –aux 查看全部 在系统启 ...
- php—cURL库基本用法总结
作用 用来连接客户端和服务器端,实从互联网上获取资源 常用接口 curl_init(): 初始化curl curl_close: 结束curl,释放资源 curl_setopt: 设置curl的属性 ...
- opencart 安装
1:安装 php5 apache2 mysql 2:下载opencart wget https://github.com/opencart/opencart/archive/master.zi ...
- cocos-js一些问题
1. setTexture和setSpriteFrame方法 修改精灵的里面的图片的时候如果是图片使用 var imgPath = "#" + this.imgName[idx] ...
- nodejs express session用法(含保存到redis)
普通用法: var express = require('express'); var session = require('express-session'); var app = express( ...
- asp.net mvc 使用uploadfiles 实现异步上传数据
lesg.cn 文章发布在: http://www.lesg.cn/netdaima/net/2017-990.html 在实际开发过程中, 为了提高用户的体验,在上传文件的时候通常会使用异步上传文 ...
- 開玩樹莓派(一):安裝Raspbian系統
目錄: 開玩樹莓派(一):安裝Raspbian系統 開玩樹莓派(二):配置IP,實現無顯示器局域網內Putty連接和RDP遠程 開玩樹莓派(三):Python編程 開玩樹莓派(四):GPIO控制和遠程 ...
- UVM之uvm_phase
UVM中的phase机制很有意思,它能让UVM启动之后,自动执行所有的流程.UVM 的user guide 中对uvm_phase的定义如下: This base class defines ever ...
- Android计算器布局
Android(安桌)计算器布局实现 ——解决整个屏幕方案 引言: 学完了android布局的几种方式,做了一个android计算器. 我在网上搜索了这方面的资料,发现了布局都 ...