(十三)SpringBoot 发送E-mail
一:添加mail依赖
<dependency>

   <groupId>org.springframework.boot</groupId>

   <artifactId>spring-boot-starter-mail</artifactId>

</dependency>
二:添加邮件配置
打开application.properties
#邮箱配置

spring.mail.protocol=smtp

#这里换成自己的邮箱类型   例如qq邮箱就写smtp.qq.com

spring.mail.host=smtp.126.com

spring.mail.port=25

spring.mail.smtpAuth=true

spring.mail.smtpStarttlsEnable=true

#这里换成自己的邮箱类型   例如qq邮箱就写smtp.qq.com

spring.mail.smtpSslTrust=smtp.126.com

#这里换成自己的邮箱账号

spring.mail.username=xxxxxx@126.com

#这里换成自己的邮箱密码或授权码   授权码获取可以百度

spring.mail.password=******
三:创建邮件实体类
package com.example.demo.model;

import java.util.Map;

public class Mail {

    /**

     * 发给多个人

     */

    private String[] to;

    /**

     * 抄送

     */

    private String[] cc;

    /**

     * 邮件标题

     */

    private String subject;

    /**

     * 邮件内容   简单文本 和附件邮件必填  其余的不需要

     */

    private String text;

    /**

     * 模板需要的数据   发送模板邮件必填

     */

    private Map<String,String> templateModel;

    /**

     * 选用哪个模板 发送模板邮件必填

     */

    private String templateName;

    public String[] getTo() {

        return to;

    }

    public void setTo(String[] to) {

        this.to = to;

    }

    public String getSubject() {

        return subject;

    }

    public void setSubject(String subject) {

        this.subject = subject;

    }

    public String getText() {

        return text;

    }

    public void setText(String text) {

        this.text = text;

    }

    public Map<String, String> getTemplateModel() {

        return templateModel;

    }

    public void setTemplateModel(Map<String, String> templateModel) {

        this.templateModel = templateModel;

    }

    public String getTemplateName() {

        return templateName;

    }

    public void setTemplateName(String templateName) {

        this.templateName = templateName;

    }

    public String[] getCc() {

        return cc;

    }

    public void setCc(String[] cc) {

        this.cc = cc;

    }

}
四:创建邮件常量类
创建core→constant→MailConstant
package com.example.demo.core.constant;

public class MailConstant {

    /**

     * 注册的模板名称

     */

    public static final String RETGISTEREMPLATE = "register";

    /**

     * 模板存放的路径

     */

    public static final String TEMPLATEPATH = "src/test/java/resources/template/mail";

}
五:创建邮件业务类
MailService
package com.example.demo.service;

import com.example.demo.model.Mail;

import javax.servlet.http.HttpServletRequest;

public interface MailService {

    /**

     * 发送简单邮件

     * @param mail

     */

    void sendSimpleMail(Mail mail);

    /**

     * 发送带附件的邮件

     * @param mail

     * @param request

     */

    void sendAttachmentsMail(Mail mail, HttpServletRequest request);

    /**

     * 发送静态资源  一张照片

     * @param mail

     * @throws Exception

     */

    void sendInlineMail(Mail mail) throws Exception;

    /**

     * 发送模板邮件

     * @param mail

     */

    void sendTemplateMail(Mail mail);

}
MailServiceImpl
package com.example.demo.service.impl;

import com.example.demo.core.constant.MailConstant;

import com.example.demo.core.utils.UploadActionUtil;

import com.example.demo.model.Mail;

import com.example.demo.service.MailService;

import freemarker.template.Template;

import freemarker.template.TemplateExceptionHandler;

import org.slf4j.Logger;

import org.slf4j.LoggerFactory;

import org.springframework.beans.factory.annotation.Qualifier;

import org.springframework.beans.factory.annotation.Value;

import org.springframework.core.io.FileSystemResource;

import org.springframework.mail.SimpleMailMessage;

import org.springframework.mail.javamail.JavaMailSender;

import org.springframework.mail.javamail.MimeMessageHelper;

import org.springframework.stereotype.Service;

import org.springframework.ui.freemarker.FreeMarkerTemplateUtils;

import org.springframework.web.servlet.view.freemarker.FreeMarkerConfigurer;

import javax.annotation.Resource;

import javax.mail.internet.MimeMessage;

import javax.servlet.http.HttpServletRequest;

import java.io.File;

import java.io.IOException;

import java.util.List;

@Service

public class MailServiceImpl implements MailService {

    private static final Logger logger = LoggerFactory.getLogger(MailServiceImpl.class);

    @Resource

    @Qualifier("javaMailSender")

    private JavaMailSender mailSender;

    @Value("${spring.mail.username}")

    private String from;

    @Resource

    private FreeMarkerConfigurer freeMarkerConfigurer;

    /**

     * 发送简单邮件

     */

    @Override

    public void sendSimpleMail(Mail mail){

        SimpleMailMessage message = new SimpleMailMessage();

        message.setFrom(from);

        message.setTo(mail.getTo());

        message.setSubject(mail.getSubject());

        message.setText(mail.getText());

        message.setCc(mail.getCc());

        mailSender.send(message);

    }

    /**

     * 发送附件

     *

     * @throws Exception

     */

    @Override

    public void sendAttachmentsMail(Mail mail,HttpServletRequest request){

        try{

            MimeMessage mimeMessage = mailSender.createMimeMessage();

            MimeMessageHelper helper = new MimeMessageHelper(mimeMessage, true);

            helper.setFrom(from);

            helper.setTo(mail.getTo());

            helper.setSubject(mail.getSubject());

            helper.setText(mail.getText());

            List<String> list = UploadActionUtil.uploadFile(request);

            for (int i = 1,length = list.size();i<=length;i++) {

                String fileName = list.get(i-1);

                String fileTyps = fileName.substring(fileName.lastIndexOf("."));

                FileSystemResource file = new FileSystemResource(new File(fileName));

                helper.addAttachment("附件-"+i+fileTyps, file);

            }

            mailSender.send(mimeMessage);

        }catch (Exception e){

            e.printStackTrace();

        }

    }

    /**

     * 发送静态资源  一张照片

     * @param mail

     * @throws Exception

     */

    @Override

    public void sendInlineMail(Mail mail){

        try{

            MimeMessage mimeMessage = mailSender.createMimeMessage();

            MimeMessageHelper helper = new MimeMessageHelper(mimeMessage, true);

            helper.setFrom(from);

            helper.setTo(mail.getTo());

            helper.setSubject(mail.getSubject());

            helper.setText("<html><body><img src=\"cid:chuchen\" ></body></html>", true);

            FileSystemResource file = new FileSystemResource(new File("C:\\Users\\Administrator\\Desktop\\设计图\\已完成\\微信图片_20180323135358.png"));

            // addInline函数中资源名称chuchen需要与正文中cid:chuchen对应起来

            helper.addInline("chuchen", file);

            mailSender.send(mimeMessage);

        }catch (Exception e){

            logger.error("发送邮件发生异常");

        }

    }

    /**

     * 发送模板邮件

     * @param mail

     */

    @Override

    public void sendTemplateMail(Mail mail){

        MimeMessage message = null;

        try {

            message = mailSender.createMimeMessage();

            MimeMessageHelper helper = new MimeMessageHelper(message, true);

            helper.setFrom(from);

            helper.setTo(mail.getTo());

            helper.setSubject(mail.getSubject());

            //读取 html 模板

            freemarker.template.Configuration cfg = getConfiguration();

            Template template = cfg.getTemplate(mail.getTemplateName()+".ftl");

            String html = FreeMarkerTemplateUtils.processTemplateIntoString(template, mail.getTemplateModel());

            helper.setText(html, true);

        } catch (Exception e) {

            e.printStackTrace();

        }

        mailSender.send(message);

    }

    private static freemarker.template.Configuration getConfiguration() throws IOException {

        freemarker.template.Configuration cfg = new freemarker.template.Configuration(freemarker.template.Configuration.VERSION_2_3_23);

        cfg.setDirectoryForTemplateLoading(new File(MailConstant.TEMPLATEPATH));

        cfg.setDefaultEncoding("UTF-8");

        cfg.setTemplateExceptionHandler(TemplateExceptionHandler.IGNORE_HANDLER);

        return cfg;

    }

}
六:创建ftl模板
这里我们创建一个注册的模板,其他模板大家可自行创建
在src/test/java/resources/template/mail目录下创建register.ftl
<html>

<head>

    <meta http-equiv="content-type" content="text/html;charset=utf8">

</head>

<body>

<div><span>尊敬的</span>${to}:</div>

<div>

    <span>欢迎您加入YUI,您的验证码为:

        <span style="color: red;">${identifyingCode}</span>

    </span>

</div>

<span style="margin-top: 100px">YUI科技</span>

</body>

</html>
七:创建MailController
package com.example.demo.controller;

import com.example.demo.core.constant.MailConstant;

import com.example.demo.core.ret.RetResponse;

import com.example.demo.core.ret.RetResult;

import com.example.demo.core.utils.ApplicationUtils;

import com.example.demo.model.Mail;

import com.example.demo.service.MailService;

import org.springframework.web.bind.annotation.PostMapping;

import org.springframework.web.bind.annotation.RequestMapping;

import org.springframework.web.bind.annotation.RestController;

import javax.annotation.Resource;

import javax.servlet.http.HttpServletRequest;

import java.util.HashMap;

import java.util.Map;

@RestController

@RequestMapping("/mail")

public class MailController {

    @Resource

    private MailService mailService;

    /**

     * 发送注册验证码

     * @param mail

     * @return 验证码

     * @throws Exception

     */

    @PostMapping("/sendTemplateMail")

    public RetResult<String> sendTemplateMail(Mail mail) throws Exception {

        String identifyingCode = ApplicationUtils.getNumStringRandom(6);

        mail.setSubject("欢迎注册初晨");

        mail.setTemplateName(MailConstant.RETGISTEREMPLATE);

        Map<String,String> map = new HashMap<>();

        map.put("identifyingCode",identifyingCode);

        map.put("to",mail.getTo()[0]);

        mail.setTemplateModel(map);

        mailService.sendTemplateMail(mail);

        return RetResponse.makeOKRsp(identifyingCode);

    }

    @PostMapping("/sendAttachmentsMail")

    public RetResult<String> sendAttachmentsMail(Mail mail,HttpServletRequest request) throws Exception {

        mail.setSubject("测试附件");

        mailService.sendAttachmentsMail(mail, request);

        return RetResponse.makeOKRsp();

    }

}
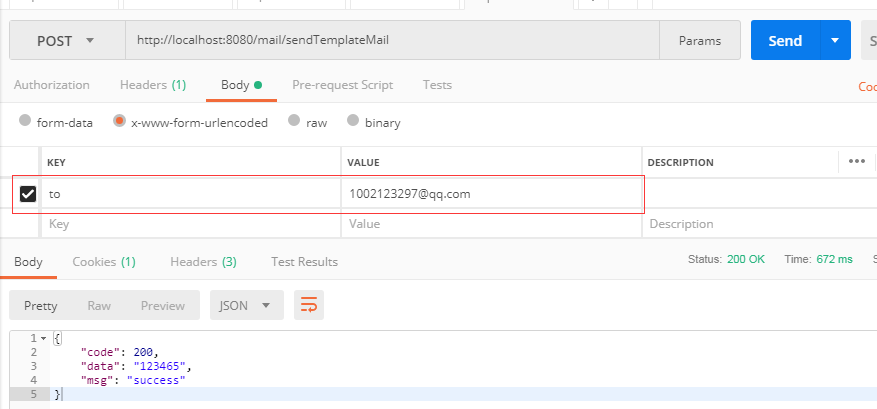
八:测试
输入localhost:8080/mail/sendTemplateMail
必填参数 to
(十三)SpringBoot 发送E-mail的更多相关文章
- 使用SpringBoot发送mail邮件
1.前言 发送邮件应该是网站的必备拓展功能之一,注册验证,忘记密码或者是给用户发送营销信息.正常我们会用JavaMail相关api来写发送邮件的相关代码,但现在springboot提供了一套更简易使用 ...
- SpringBoot 发送简单邮件
使用SpringBoot 发送简单邮件 1. 在pom.xml中导入依赖 <!--邮件依赖--> <dependency> <groupId>org.springf ...
- Java发送邮件 —— SpringBoot集成Java Mail
用途:此文仅供,自己今后的小程序通过邮件,批量通知用户. 简单记录了一些发送基本邮件的操作. 项目(SpringBoot版本为2.1.2.RELEASE): 核心依赖(其他相关依赖,在其使用的地方具体 ...
- [SpringBoot] - 发送带附件的邮件
<!--发送email依赖--> <dependency> <groupId>org.springframework.boot</groupId> &l ...
- qq邮箱发送,mail from address must be same as authorization user
由于邮箱发送的邮箱账号更换,所以重新测试.结果一直出错,要不就是请求超时,要不就是未授权. 用smtp 开始的时候,端口使用495,结果是请求超时. 后来改成25,结果是未授权. 再后来听人说,有一个 ...
- SpringBoot | 集成Java Mail
Spring Boot 对Java mail 集成提供了自动配置的支持,只需要配置依赖以及在application.properties 里配置邮件信息即可. 添加依赖: <dependency ...
- SpringBoot发送简单文本邮件
1.pom.xml添加 spring-boot-starter-mail 依赖 <dependency> <groupId>org.springframework.boot&l ...
- springboot发送email邮件
添加依赖 <dependency> <groupId>org.springframework.boot</groupId> <artifactId>sp ...
- springboot——发送put、delete请求
在springmvc中我们要发送put和delete请求,需要先配置一个过滤器HiddenHttpMethodFilter,而springboot中,已经帮我们自动配置了,所以我们可以不用配置这个过滤 ...
随机推荐
- accessor mothod mutator mothod 更改器方法 访问器方法 类的方法可以访问类的任何一个对象的私有域!
LocalDate.plusDate String.toUpperCase GregorianCalendar.add import java.time.*; public class Calenda ...
- Kotlin基本语法笔记2之类型检测及自动类型转换、循环
类型检测及自动类型转换 is运算符用于检测一个表达式是否为某类型的一个实例检测出为某类型后,检测后的分支中可以直接当作该类型使用,无需显示转换 fun getStringLength(obj: Any ...
- mysql 修改语法格式
1.修改字段注释格式 alter table {table} modify column {column} {type} comment '{comment}';
- Long转换为date
public static void main(String[] args) { Long time = System.currentTimeMillis(); System.out.println( ...
- java to Json or Json to JavaBean
今天练习,放这里,以后再补充 这里使用的jar包是 net.sf.json.JSONObject package yh.test.t1118; import net.sf.json.JSONArray ...
- UVA11149 Power of Matrix —— 矩阵倍增、矩阵快速幂
题目链接:https://vjudge.net/problem/UVA-11149 题意: 给出矩阵A,求出A^1 + A^2 …… + A^k . 题解: 1.可知:A^1 + A^2 …… + A ...
- javase练习题--每天写写
package com.javaTestDemo; import java.util.Scanner; public class JavaTest1 { public static void main ...
- COGS【345】共荣圈 && 【426】血帆海盗
题面 UPD:COGS 貌似进不去了,链接失效就删掉了. 如果你不小心看到了题目评论区,那你就会知道这是一道双倍经验题,另一题的链接见题目评论区…… 网络流+tarjan好题,但如果你真的的理解了网络 ...
- javascript之闭包,递归,深拷贝
闭包 理解:a函数执行后return出b函数且b函数可以访问a函数的数据 好处:子函数存储在复函数内部,子函数执行完不会被自动销毁 坏处:占用内存比较大 ex: function bibao(){ v ...
- ubuntu 常见问题解决
1.更新出现Could not get lock /var/lib/apt/lists/lock问题解决方法: 首先输入命令:sudo rm /var/lib/apt/lists/* -vf 执行完成 ...