(十三)SpringBoot 发送E-mail
一:添加mail依赖
<dependency>

   <groupId>org.springframework.boot</groupId>

   <artifactId>spring-boot-starter-mail</artifactId>

</dependency>
二:添加邮件配置
打开application.properties
#邮箱配置

spring.mail.protocol=smtp

#这里换成自己的邮箱类型   例如qq邮箱就写smtp.qq.com

spring.mail.host=smtp.126.com

spring.mail.port=25

spring.mail.smtpAuth=true

spring.mail.smtpStarttlsEnable=true

#这里换成自己的邮箱类型   例如qq邮箱就写smtp.qq.com

spring.mail.smtpSslTrust=smtp.126.com

#这里换成自己的邮箱账号

spring.mail.username=xxxxxx@126.com

#这里换成自己的邮箱密码或授权码   授权码获取可以百度

spring.mail.password=******
三:创建邮件实体类
package com.example.demo.model;

import java.util.Map;

public class Mail {

    /**

     * 发给多个人

     */

    private String[] to;

    /**

     * 抄送

     */

    private String[] cc;

    /**

     * 邮件标题

     */

    private String subject;

    /**

     * 邮件内容   简单文本 和附件邮件必填  其余的不需要

     */

    private String text;

    /**

     * 模板需要的数据   发送模板邮件必填

     */

    private Map<String,String> templateModel;

    /**

     * 选用哪个模板 发送模板邮件必填

     */

    private String templateName;

    public String[] getTo() {

        return to;

    }

    public void setTo(String[] to) {

        this.to = to;

    }

    public String getSubject() {

        return subject;

    }

    public void setSubject(String subject) {

        this.subject = subject;

    }

    public String getText() {

        return text;

    }

    public void setText(String text) {

        this.text = text;

    }

    public Map<String, String> getTemplateModel() {

        return templateModel;

    }

    public void setTemplateModel(Map<String, String> templateModel) {

        this.templateModel = templateModel;

    }

    public String getTemplateName() {

        return templateName;

    }

    public void setTemplateName(String templateName) {

        this.templateName = templateName;

    }

    public String[] getCc() {

        return cc;

    }

    public void setCc(String[] cc) {

        this.cc = cc;

    }

}
四:创建邮件常量类
创建core→constant→MailConstant
package com.example.demo.core.constant;

public class MailConstant {

    /**

     * 注册的模板名称

     */

    public static final String RETGISTEREMPLATE = "register";

    /**

     * 模板存放的路径

     */

    public static final String TEMPLATEPATH = "src/test/java/resources/template/mail";

}
五:创建邮件业务类
MailService
package com.example.demo.service;

import com.example.demo.model.Mail;

import javax.servlet.http.HttpServletRequest;

public interface MailService {

    /**

     * 发送简单邮件

     * @param mail

     */

    void sendSimpleMail(Mail mail);

    /**

     * 发送带附件的邮件

     * @param mail

     * @param request

     */

    void sendAttachmentsMail(Mail mail, HttpServletRequest request);

    /**

     * 发送静态资源  一张照片

     * @param mail

     * @throws Exception

     */

    void sendInlineMail(Mail mail) throws Exception;

    /**

     * 发送模板邮件

     * @param mail

     */

    void sendTemplateMail(Mail mail);

}
MailServiceImpl
package com.example.demo.service.impl;

import com.example.demo.core.constant.MailConstant;

import com.example.demo.core.utils.UploadActionUtil;

import com.example.demo.model.Mail;

import com.example.demo.service.MailService;

import freemarker.template.Template;

import freemarker.template.TemplateExceptionHandler;

import org.slf4j.Logger;

import org.slf4j.LoggerFactory;

import org.springframework.beans.factory.annotation.Qualifier;

import org.springframework.beans.factory.annotation.Value;

import org.springframework.core.io.FileSystemResource;

import org.springframework.mail.SimpleMailMessage;

import org.springframework.mail.javamail.JavaMailSender;

import org.springframework.mail.javamail.MimeMessageHelper;

import org.springframework.stereotype.Service;

import org.springframework.ui.freemarker.FreeMarkerTemplateUtils;

import org.springframework.web.servlet.view.freemarker.FreeMarkerConfigurer;

import javax.annotation.Resource;

import javax.mail.internet.MimeMessage;

import javax.servlet.http.HttpServletRequest;

import java.io.File;

import java.io.IOException;

import java.util.List;

@Service

public class MailServiceImpl implements MailService {

    private static final Logger logger = LoggerFactory.getLogger(MailServiceImpl.class);

    @Resource

    @Qualifier("javaMailSender")

    private JavaMailSender mailSender;

    @Value("${spring.mail.username}")

    private String from;

    @Resource

    private FreeMarkerConfigurer freeMarkerConfigurer;

    /**

     * 发送简单邮件

     */

    @Override

    public void sendSimpleMail(Mail mail){

        SimpleMailMessage message = new SimpleMailMessage();

        message.setFrom(from);

        message.setTo(mail.getTo());

        message.setSubject(mail.getSubject());

        message.setText(mail.getText());

        message.setCc(mail.getCc());

        mailSender.send(message);

    }

    /**

     * 发送附件

     *

     * @throws Exception

     */

    @Override

    public void sendAttachmentsMail(Mail mail,HttpServletRequest request){

        try{

            MimeMessage mimeMessage = mailSender.createMimeMessage();

            MimeMessageHelper helper = new MimeMessageHelper(mimeMessage, true);

            helper.setFrom(from);

            helper.setTo(mail.getTo());

            helper.setSubject(mail.getSubject());

            helper.setText(mail.getText());

            List<String> list = UploadActionUtil.uploadFile(request);

            for (int i = 1,length = list.size();i<=length;i++) {

                String fileName = list.get(i-1);

                String fileTyps = fileName.substring(fileName.lastIndexOf("."));

                FileSystemResource file = new FileSystemResource(new File(fileName));

                helper.addAttachment("附件-"+i+fileTyps, file);

            }

            mailSender.send(mimeMessage);

        }catch (Exception e){

            e.printStackTrace();

        }

    }

    /**

     * 发送静态资源  一张照片

     * @param mail

     * @throws Exception

     */

    @Override

    public void sendInlineMail(Mail mail){

        try{

            MimeMessage mimeMessage = mailSender.createMimeMessage();

            MimeMessageHelper helper = new MimeMessageHelper(mimeMessage, true);

            helper.setFrom(from);

            helper.setTo(mail.getTo());

            helper.setSubject(mail.getSubject());

            helper.setText("<html><body><img src=\"cid:chuchen\" ></body></html>", true);

            FileSystemResource file = new FileSystemResource(new File("C:\\Users\\Administrator\\Desktop\\设计图\\已完成\\微信图片_20180323135358.png"));

            // addInline函数中资源名称chuchen需要与正文中cid:chuchen对应起来

            helper.addInline("chuchen", file);

            mailSender.send(mimeMessage);

        }catch (Exception e){

            logger.error("发送邮件发生异常");

        }

    }

    /**

     * 发送模板邮件

     * @param mail

     */

    @Override

    public void sendTemplateMail(Mail mail){

        MimeMessage message = null;

        try {

            message = mailSender.createMimeMessage();

            MimeMessageHelper helper = new MimeMessageHelper(message, true);

            helper.setFrom(from);

            helper.setTo(mail.getTo());

            helper.setSubject(mail.getSubject());

            //读取 html 模板

            freemarker.template.Configuration cfg = getConfiguration();

            Template template = cfg.getTemplate(mail.getTemplateName()+".ftl");

            String html = FreeMarkerTemplateUtils.processTemplateIntoString(template, mail.getTemplateModel());

            helper.setText(html, true);

        } catch (Exception e) {

            e.printStackTrace();

        }

        mailSender.send(message);

    }

    private static freemarker.template.Configuration getConfiguration() throws IOException {

        freemarker.template.Configuration cfg = new freemarker.template.Configuration(freemarker.template.Configuration.VERSION_2_3_23);

        cfg.setDirectoryForTemplateLoading(new File(MailConstant.TEMPLATEPATH));

        cfg.setDefaultEncoding("UTF-8");

        cfg.setTemplateExceptionHandler(TemplateExceptionHandler.IGNORE_HANDLER);

        return cfg;

    }

}
六:创建ftl模板
这里我们创建一个注册的模板,其他模板大家可自行创建
在src/test/java/resources/template/mail目录下创建register.ftl
<html>

<head>

    <meta http-equiv="content-type" content="text/html;charset=utf8">

</head>

<body>

<div><span>尊敬的</span>${to}:</div>

<div>

    <span>欢迎您加入YUI,您的验证码为:

        <span style="color: red;">${identifyingCode}</span>

    </span>

</div>

<span style="margin-top: 100px">YUI科技</span>

</body>

</html>
七:创建MailController
package com.example.demo.controller;

import com.example.demo.core.constant.MailConstant;

import com.example.demo.core.ret.RetResponse;

import com.example.demo.core.ret.RetResult;

import com.example.demo.core.utils.ApplicationUtils;

import com.example.demo.model.Mail;

import com.example.demo.service.MailService;

import org.springframework.web.bind.annotation.PostMapping;

import org.springframework.web.bind.annotation.RequestMapping;

import org.springframework.web.bind.annotation.RestController;

import javax.annotation.Resource;

import javax.servlet.http.HttpServletRequest;

import java.util.HashMap;

import java.util.Map;

@RestController

@RequestMapping("/mail")

public class MailController {

    @Resource

    private MailService mailService;

    /**

     * 发送注册验证码

     * @param mail

     * @return 验证码

     * @throws Exception

     */

    @PostMapping("/sendTemplateMail")

    public RetResult<String> sendTemplateMail(Mail mail) throws Exception {

        String identifyingCode = ApplicationUtils.getNumStringRandom(6);

        mail.setSubject("欢迎注册初晨");

        mail.setTemplateName(MailConstant.RETGISTEREMPLATE);

        Map<String,String> map = new HashMap<>();

        map.put("identifyingCode",identifyingCode);

        map.put("to",mail.getTo()[0]);

        mail.setTemplateModel(map);

        mailService.sendTemplateMail(mail);

        return RetResponse.makeOKRsp(identifyingCode);

    }

    @PostMapping("/sendAttachmentsMail")

    public RetResult<String> sendAttachmentsMail(Mail mail,HttpServletRequest request) throws Exception {

        mail.setSubject("测试附件");

        mailService.sendAttachmentsMail(mail, request);

        return RetResponse.makeOKRsp();

    }

}
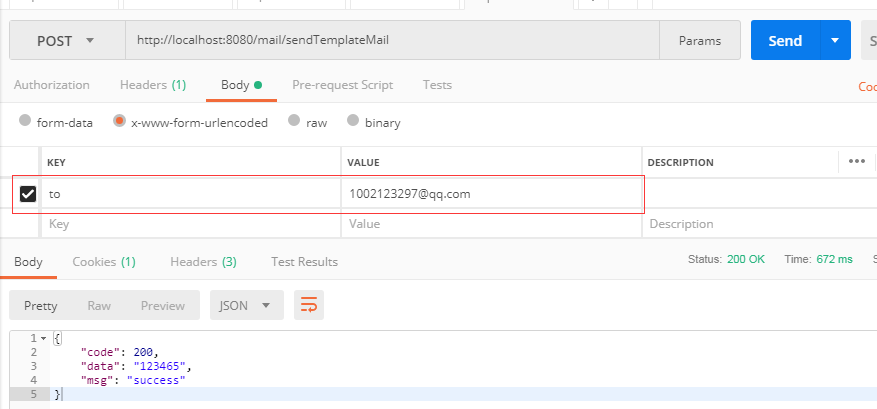
八:测试
输入localhost:8080/mail/sendTemplateMail
必填参数 to
(十三)SpringBoot 发送E-mail的更多相关文章
- 使用SpringBoot发送mail邮件
1.前言 发送邮件应该是网站的必备拓展功能之一,注册验证,忘记密码或者是给用户发送营销信息.正常我们会用JavaMail相关api来写发送邮件的相关代码,但现在springboot提供了一套更简易使用 ...
- SpringBoot 发送简单邮件
使用SpringBoot 发送简单邮件 1. 在pom.xml中导入依赖 <!--邮件依赖--> <dependency> <groupId>org.springf ...
- Java发送邮件 —— SpringBoot集成Java Mail
用途:此文仅供,自己今后的小程序通过邮件,批量通知用户. 简单记录了一些发送基本邮件的操作. 项目(SpringBoot版本为2.1.2.RELEASE): 核心依赖(其他相关依赖,在其使用的地方具体 ...
- [SpringBoot] - 发送带附件的邮件
<!--发送email依赖--> <dependency> <groupId>org.springframework.boot</groupId> &l ...
- qq邮箱发送,mail from address must be same as authorization user
由于邮箱发送的邮箱账号更换,所以重新测试.结果一直出错,要不就是请求超时,要不就是未授权. 用smtp 开始的时候,端口使用495,结果是请求超时. 后来改成25,结果是未授权. 再后来听人说,有一个 ...
- SpringBoot | 集成Java Mail
Spring Boot 对Java mail 集成提供了自动配置的支持,只需要配置依赖以及在application.properties 里配置邮件信息即可. 添加依赖: <dependency ...
- SpringBoot发送简单文本邮件
1.pom.xml添加 spring-boot-starter-mail 依赖 <dependency> <groupId>org.springframework.boot&l ...
- springboot发送email邮件
添加依赖 <dependency> <groupId>org.springframework.boot</groupId> <artifactId>sp ...
- springboot——发送put、delete请求
在springmvc中我们要发送put和delete请求,需要先配置一个过滤器HiddenHttpMethodFilter,而springboot中,已经帮我们自动配置了,所以我们可以不用配置这个过滤 ...
随机推荐
- TMS320C6478+MCP2515
调一个驱动,将看过的资料记录下来. 这个驱动写得比较直观:http://www.51hei.com/bbs/dpj-114085-1.html
- NSString和NSMutableNSString的基本用法
// // main.m // NSString /** NSString 1.NSString 是一个不可以变的字符串对象 2.NSMutableString是一个可变字符串. 下面代码为字符串的: ...
- POSTGRESQL主备部署模式
一.预期目的 主数据库(Primary pg ,假定主机名为A,后文不再赘述)和备用数据库(Standby pg,假定主机名为B,后文不再赘述)之间的数据能够相互备份. 主数据库发生故障时备用数据库可 ...
- iOS 设备获取唯一标识符汇总
在2013年3月21日苹果已经通知开发者,从2013年5月1日起,访问UIDID的应用将不再能通过审核,替代的方案是开发者应该使用“在iOS 6中介绍的Vendor或Advertising标示符”. ...
- Flask内置命令行工具—CLI
应用发现 flask命令在Flask库安装后可使用,使用前需要正确配置FLASK_APP环境变量以告知用户程序所在位置.不同平台设置方式有所不同. Unix Bash (Linux, Mac, etc ...
- HDU4850 Wow! Such String! —— 字符串构造
题目链接:http://acm.hdu.edu.cn/showproblem.php?pid=4850 代码如下: #include <iostream> #include <cst ...
- application 长用到的API
<%@ page language="java" contentType="text/html; charset=UTF-8" pageEncoding= ...
- [Tyvj Aug11] 黄金矿工
传送门 Description 黄金矿工是一个经典的小游戏,它可以锻炼人的反应能力.该游戏中,可以通过“挖矿”获得积分并不断升级.玩家可以在线玩flash版黄金矿工,也可以下载后玩单机版黄金矿工.目前 ...
- chan_ss7 呼出的时候指定使用某个CICs,或者CICs范围 的方法
Linkset one: 1-31 Incoming 33-58 Outgoing 58-63 Emergency Traffic Linkset two: 1-31 Incoming 33-58 ...
- Java并发之synchronized
Java多线程同步关键词是常用的多线程同步手段.它可以修饰静态类方法,实例方法,或代码块.修饰static静态方法时是对整个类加锁. 一.实现原理 在JVM中对象内存分三块区域,对象头.实例数据.对齐 ...