
LNMP平台的redis对接安装
LNMP平台的redis对接安装
一、安装LNMP的各个组件
略过,详见往期博客。
https://www.cnblogs.com/dingcong1201/p/15132258.html
或使用下列脚本
#!/bin/bash

systemctl stop firewalld

systemctl disable firewalld

setenforce 0

#--------nginx--------

#------安装依赖包

yum -y install pcre-devel zlib-devel gcc gcc-c++ make

#------创建运行用户

useradd -M -s /sbin/nologin nginx

#-----编译安装

cd /opt

tar zxvf nginx-1.12.0.tar.gz

cd nginx-1.12.0/

./configure --prefix=/usr/local/nginx --user=nginx --group=nginx --with-http_stub_status_module  #指定安装路径、用户、组、添加模块

make -j4 && make install

#----优化路径

ln -s /usr/local/nginx/sbin/nginx /usr/local/sbin/

#----添加 Nginx 系统服务

cat > /lib/systemd/system/nginx.service <<EOF

[Unit]

Description=nginx

After=network.target

[Service]

Type=forking

PIDFile=/usr/local/nginx/logs/nginx.pid

ExecStart=/usr/local/nginx/sbin/nginx

ExecReload=/bin/kill -s HUP $MAINPID

ExecStop=/bin/kill -s QUIT $MAINPID

PrivateTmp=true

[Install]

WantedBy=multi-user.target

EOF

chmod 754 /lib/systemd/system/nginx.service

systemctl start nginx.service

systemctl enable nginx.service

cd /opt

tar zxvf nginx-1.12.0.tar.gz

cd nginx-1.12.0/

./configure --prefix=/usr/local/nginx --user=nginx --group=nginx --with-http_stub_status_module  #指定安装路径、用户、组、添加模块

make -j2 && make install

#----优化路径

ln -s /usr/local/nginx/sbin/nginx /usr/local/sbin/

#----添加 Nginx 系统服务

cat > /lib/systemd/system/nginx.service <<EOF

[Unit]

Description=nginx

After=network.target

[Service]

Type=forking

PIDFile=/usr/local/nginx/logs/nginx.pid

ExecStart=/usr/local/nginx/sbin/nginx

ExecReload=/bin/kill -s HUP $MAINPID

ExecStop=/bin/kill -s QUIT $MAINPID

PrivateTmp=true

[Install]

WantedBy=multi-user.target

EOF

chmod 754 /lib/systemd/system/nginx.service

systemctl start nginx.service

systemctl enable nginx.service

#-------mysql-----

#-----安装依赖包

yum -y install gcc gcc-c++ ncurses ncurses-devel bison cmake

#----配置软件模块

cd /opt/

tar zxvf mysql-5.7.17.tar.gz

tar zxvf boost_1_59_0.tar.gz

mv boost_1_59_0 /usr/local/boost

cd /opt/mysql-5.7.17/

cmake \

-DCMAKE_INSTALL_PREFIX=/usr/local/mysql \

-DMYSQL_UNIX_ADDR=/usr/local/mysql/mysql.sock \

-DSYSCONFDIR=/etc \

-DSYSTEMD_PID_DIR=/usr/local/mysql \

-DDEFAULT_CHARSET=utf8  \

-DDEFAULT_COLLATION=utf8_general_ci \

-DWITH_EXTRA_CHARSETS=all \

-DWITH_INNOBASE_STORAGE_ENGINE=1 \

-DWITH_ARCHIVE_STORAGE_ENGINE=1 \

-DWITH_BLACKHOLE_STORAGE_ENGINE=1 \

-DWITH_PERFSCHEMA_STORAGE_ENGINE=1 \

-DMYSQL_DATADIR=/usr/local/mysql/data \

-DWITH_BOOST=/usr/local/boost \

-DWITH_SYSTEMD=1

#-----编译安装

make -j 4 && make install

#-----创建mysql用户

useradd -M -s /sbin/nologin  mysql

#-----修改mysql 配置文件

cat > /etc/my.cnf <<EOF

[client]

port = 3306

default-character-set=utf8

socket=/usr/local/mysql/mysql.sock

[mysql]

port = 3306

default-character-set=utf8

socket = /usr/local/mysql/mysql.sock

auto-rehash

[mysqld]

user = mysql

basedir=/usr/local/mysql

datadir=/usr/local/mysql/data

port = 3306

character-set-server=utf8

pid-file = /usr/local/mysql/mysqld.pid

socket=/usr/local/mysql/mysql.sock

bind-address = 0.0.0.0

skip-name-resolve

max_connections=2048

default-storage-engine=INNODB

max_allowed_packet=16M

server-id = 1

sql_mode=NO_ENGINE_SUBSTITUTION,STRICT_TRANS_TABLES,NO_AUTO_CREATE_USER,NO_AUTO_VALUE_ON_ZERO,NO_ZERO_IN_DATE,NO_ZERO_DATE,ERROR_FOR_DIVISION_BY_ZERO,PIPES_AS_CONCAT,ANSI_QUOTES

EOF

#-----更改mysql安装目录和配置文件的属主属组

chown -R mysql:mysql /usr/local/mysql/

chown mysql:mysql /etc/my.cnf

#-----设置路径环境变量

echo 'export PATH=/usr/local/mysql/bin:/usr/local/mysql/lib:$PATH' >> /etc/profile

source /etc/profile

#-----初始化数据库

cd /usr/local/mysql/bin/

./mysqld \

--initialize-insecure \

--user=mysql \

--basedir=/usr/local/mysql \

--datadir=/usr/local/mysql/data

#-----添加mysqld系统服务

cp /usr/local/mysql/usr/lib/systemd/system/mysqld.service /usr/lib/systemd/system/

systemctl daemon-reload

systemctl start mysqld.service

systemctl enable mysqld

#-----mysql相关配置更改

yum -y install expect

mima () {

passwd=$1

/usr/bin/expect <<-EOF

spawn mysqladmin -u root -p password $passwd

expect "Enter password:"

send "\r"

expect eof

EOF

}

mima "123456"

shouquan () {

/usr/bin/expect <<-EOF

spawn mysql -u root -p

expect "Enter password:" {send "123456\r"}

expect "mysql>" {send "grant all privileges on *.* to 'root'@'%' identified by '123456';\r"}

expect "mysql>" {send "quit\r"}

expect eof

EOF

}

shouquan

#------PHP-----

#-----安装环境依赖包

yum -y install gd \

libjpeg libjpeg-devel \

libpng libpng-devel \

freetype freetype-devel \

libxml2 libxml2-devel \

zlib zlib-devel \

curl curl-devel \

openssl openssl-devel

#-----编译安装

cd /opt

tar jxvf php-7.1.10.tar.bz2

cd php-7.1.10

./configure \

--prefix=/usr/local/php \

--with-mysql-sock=/usr/local/mysql/mysql.sock \

--with-mysqli \

--with-zlib \

--with-curl \

--with-gd \

--with-jpeg-dir \

--with-png-dir \

--with-freetype-dir \

--with-openssl \

--enable-fpm \

--enable-mbstring \

--enable-xml \

--enable-session \

--enable-ftp \

--enable-pdo \

--enable-tokenizer \

--enable-zip

make -j4 && make install

#-----路径优化

ln -s /usr/local/php/bin/* /usr/local/bin/

ln -s /usr/local/php/sbin/* /usr/local/sbin/

#-----调整PHP配置文件

#调整主配置文件

cp /opt/php-7.1.10/php.ini-development /usr/local/php/lib/php.ini

sed -i '1170c mysqli.default_socket = /usr/local/mysql/mysql.sock' /usr/local/php/lib/php.ini

sed -i '939c date.timezone = Asia/Shanghai' /usr/local/php/lib/php.ini

#调整进程服务配置文件

cd /usr/local/php/etc/

cp  php-fpm.conf.default php-fpm.conf

sed -i '17c pid = run/php-fpm.pid' /usr/local/php/etc/php-fpm.conf

#调整扩展配置文件

cd /usr/local/php/etc/php-fpm.d/

cp www.conf.default www.conf

#-----启动php-fpm

/usr/local/php/sbin/php-fpm -c /usr/local/php/lib/php.ini

#PHP-FPM(FastCGI Process Manager:FastCGI 进程管理器)是一个 PHPFastCGI 管理器, 由于Nginx服务器不能处理动态页面,需要由 Nginx 把动态请求交给 php-fpm 进程进行解析。

#-----添加php-fpm系统管理

cd /opt/php-7.1.10/sapi/fpm

cp php-fpm.service /usr/lib/systemd/system/php-fpm.service

systemctl restart php-fpm.service

#-----配置 Nginx 支持 PHP 解析

sed -i '65c location ~ \.php$ {' /usr/local/nginx/conf/nginx.conf

sed -i '66c root html;' /usr/local/nginx/conf/nginx.conf

sed -i '67c fastcgi_pass   127.0.0.1:9000;' /usr/local/nginx/conf/nginx.conf

sed -i '68c fastcgi_index  index.php;' /usr/local/nginx/conf/nginx.conf

sed -i '69c fastcgi_param  SCRIPT_FILENAME  /usr/local/nginx/html$fastcgi_script_name;' /usr/local/nginx/conf/nginx.conf

sed -i '70c include        fastcgi_params;' /usr/local/nginx/conf/nginx.conf

sed -i '71c }' /usr/local/nginx/conf/nginx.conf

systemctl restart nginx.service

#-----验证PHP 测试页

cat >/usr/local/nginx/html/index.php <<EOF

<?php

phpinfo();

?>

EOF
二、安装redis服务
略过,详见往期博客。
https://www.cnblogs.com/dingcong1201/p/15270205.html
三、安装redis扩展
下载包地址:
https://codeload.github.com/phpredis/phpredis/zip/develop
http://download.redis.io/releases/redis-4.0.2.tar.gz
[root@localhost ~]# cd /opt

[root@localhost opt]# rz -E

#传入下载好的安装包

rz waiting to receive.

[root@localhost opt]# tar -zxvf redis-4.0.2.tgz

[root@localhost opt]# cd redis-4.0.2/

[root@localhost redis-4.0.2]# phpize

Configuring for:

PHP Api Version:         20160303

Zend Module Api No:      20160303

Zend Extension Api No:   320160303

[root@localhost redis-4.0.2]# ./configure --with-php-config=/usr/local/php/bin/php-config --enable-redis

[root@localhost redis-4.0.2]# make -j 2 && make install

......

Installing shared extensions:     /usr/local/php/lib/php/extenson-zts-20160303/

[root@localhost redis-4.0.2]# ls /usr/local/php/lib/php/extensions/no-debug-non-zts-20160303/

opcache.a  opcache.so  redis.so
四、修改php配置文件
[root@localhost redis-4.0.2]# vim /usr/local/php/lib/php.ini

##736行,取消注释并修改,指定redis模块目录

extension_dir = "/usr/local/php/lib/php/extensions/no-deb     ug-non-zts-20160303/"

##738行,取消注释并修改,参数项名称为extension,指定redis模块名称

extension = "redis.so"

[root@localhost redis-4.0.2]# systemctl restart php-fpm.service

[root@localhost redis-4.0.2]# php -m | grep redis

redis
五、测试连接
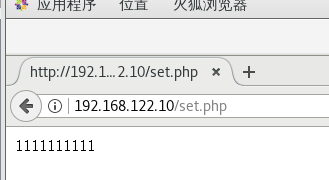
set
[root@localhost redis-4.0.2]# cd /usr/local/nginx/html/

[root@localhost html]# vim set.php

<?php

$redis = new redis();

$redis->connect('127.0.0.1', 6379);

$redis->set('test',"1111111111");

echo $redis->get('test');

?>

[root@localhost html]# curl http://192.168.122.10/set.php

1111111111[root@localhost html]#
get
[root@localhost html]# vim get.php

<?php

$redis = new redis();

$redis->connect('127.0.0.1', 6379);

$result = $redis->get('test');

var_dump($result);

?>

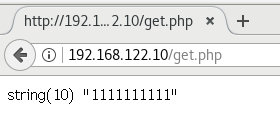
[root@localhost html]# curl http://192.168.122.10/get.php

string(10) "1111111111"
LNMP平台的redis对接安装的更多相关文章
- LNMP平台搭建---Nginx安装篇
在上一篇博文<LNMP平台搭建---Linux系统安装篇>中,我们安装了CentOS版本的Linux操作系统,现在,我们来安装一个Web服务器,大标题写着LNMP,其中的N就是Nginx, ...
- LNMP平台搭建---PHP安装篇
在前面三篇中,我们安装了Linux系统.Web服务器Nginx.MySQL数据库服务器,这篇就来将搭建动态网站的最后一步:PHP安装. Nginx服务器只能响应静态资源请求,对于动态资源请求就不行了, ...
- LNMP平台搭建---MySQL安装篇
在前两篇中,安装了一个基本的Web服务器,但是只能提供静态网页查看,要做成动态网站,就必须要数据库或其他编程语言支持了,这里先介绍MySQL数据库的安装. MySQL是一个开源的数据库,在互联网行业应 ...
- 基于C#的MongoDB数据库开发应用(4)--Redis的安装及使用
在前面介绍了三篇关于MongoDB数据库的开发使用文章,严格来讲这个不能归类于MongoDB数据库开发,不过Redis又有着和MongoDB数据库非常密切的关系,它们两者很接近,Redis主要是内存中 ...
- lnmp平台菜鸟入门级笔记
LNMP平台搭建 Mysql安装 MySQL安装 回复收藏 分享 1 下载MySQL数据库l到/usr/local/src/[root@xin tmp]# cd ...
- LNMP平台搭建---Linux系统安装篇
在互联网网站开发领域,有一个名词,大家一定不陌生,那就是LAMP,经典的Web服务器环境,由Linux+Apache+MySQL+PHP组成,,后来,一个名叫Nginx的Web服务器开源出来了,因其更 ...
- 源码搭建lnmp平台
lnmp平台是指利用linux操作系统,nginx服务器,mysql数据库和php语言搭建高性能web服务器,负载均衡器和邮件代理服务器. 原理图:‘
- redis&rabbitMQ安装
前言: 学习python已经有一段时间了,最近在学twisted(博客:twisted安装),redis,rabbitMQ感觉有点难度,所以还是写下博客整理下. 一.Redis的安装 redis是一种 ...
- lnmp或者lamp环境一键安装
参考网址:https://lnmp.org/install.html 下载并安装LNMP一键安装包: 您可以选择使用下载版(推荐美国及海外VPS或空间较小用户使用)或者完整版(推荐国内VPS使用,国内 ...
随机推荐
- hisql 高级功能数据检测将错误数据拦截在系统外 一
hisql github源码下载 git clone https://github.com/tansar/HiSql.git 在设计第二范式数据库时经常会把可能重复的数据单独做一种表关联,但是在写入表 ...
- Java时间格式化原来这么多玩法
时间过得真是快,现在已经是2022年了.作为开发来说,时间处理是非常繁琐的.从Java 8开始有了新的时间API.时间的处理更加优雅,不再需要借助三方类库,而且线程安全.今天来梳理一下新API的格式化 ...
- 初识python: xml 操作
导入模块: import xml.etree.ElementTree as ET 创建xml文件: new_xml = ET.Element("namelist") # 创建根节点 ...
- Pytest_用例分组(6)
用例分组 pytest进行分组测试的方法是使用装饰器 @pytest.mark.标记名称,被标记为相同名称的用例可以看做为同一个组. 分组用例的运行方式是在执行命令中追加 -m "标记名称& ...
- java 字符串 大小写转换 、去掉首末端空格 、根据索引切割字符 、判断是否含有某连续字符串
1. 字符串转大写: toUpperCase() 字符串转小写: toLowerCase() @Test public void tt(){ String d = "sdgGHJGjghGH ...
- react中使用antd按需加载(第一部)
什么是react按需加载?简单来说就是当我们引用antd的时候需要引入全局css样式,这会对性能造成一定的影响,那么使用按需加载以后就不需要引入css全局样式了,直接引入功能模块即可,既然需要设置按需 ...
- PPT2010制作翻牌动画
原文: https://www.toutiao.com/i6492653280676545037/ 新建一张空白幻灯片 选择"插入"选项卡,"插入"功能组,&q ...
- Android官方文档翻译 十八 4.2Pausing and Resuming an Activity
Pausing and Resuming an Activity 暂停和恢复一个activity This lesson teaches you to 这节课教给你 Pause Your Activi ...
- C\C++ IDE 比较以及调试
C\C++ IDE 比较以及调试 内容概要 这个作业属于哪个课程 2022面向对象程序设计 这个作业要求在哪里 2022面向对象程序设计寒假作业1 这个作业的目标 IDE 选择以及代码调试 作业正文 ...
- 为什么JavaWeb要分层
首先bai让我们坐着时光机回到n年前的web开发.那个时候最早du都是静态的html页面,zhi后来有了数据库,有了所谓dao的动态页面,然后程序猿在编码的时候,会把所有的代码都写在页面上,包括数据库 ...