【Python】批量给图片增加水印工具
背景
最近有一些图片需要增加水印,找了一圈也没看见比较好的工具,又不想用破解的PS,干脆自己做了一个GUI工具,有需要的同学自取
功能
- 支持水印预览
- 自定义水印文字内容
- 支持行楷和微软雅黑两种字体
- 支持自定义字号
- 支持自定义水印颜色
- 支持自定义水印间距
- 支持自定义水印透明度
- 支持自定义水印旋转角度
- 支持批量给图片增加水印
- 仅支持Windows平台(用到了windows上的字体)
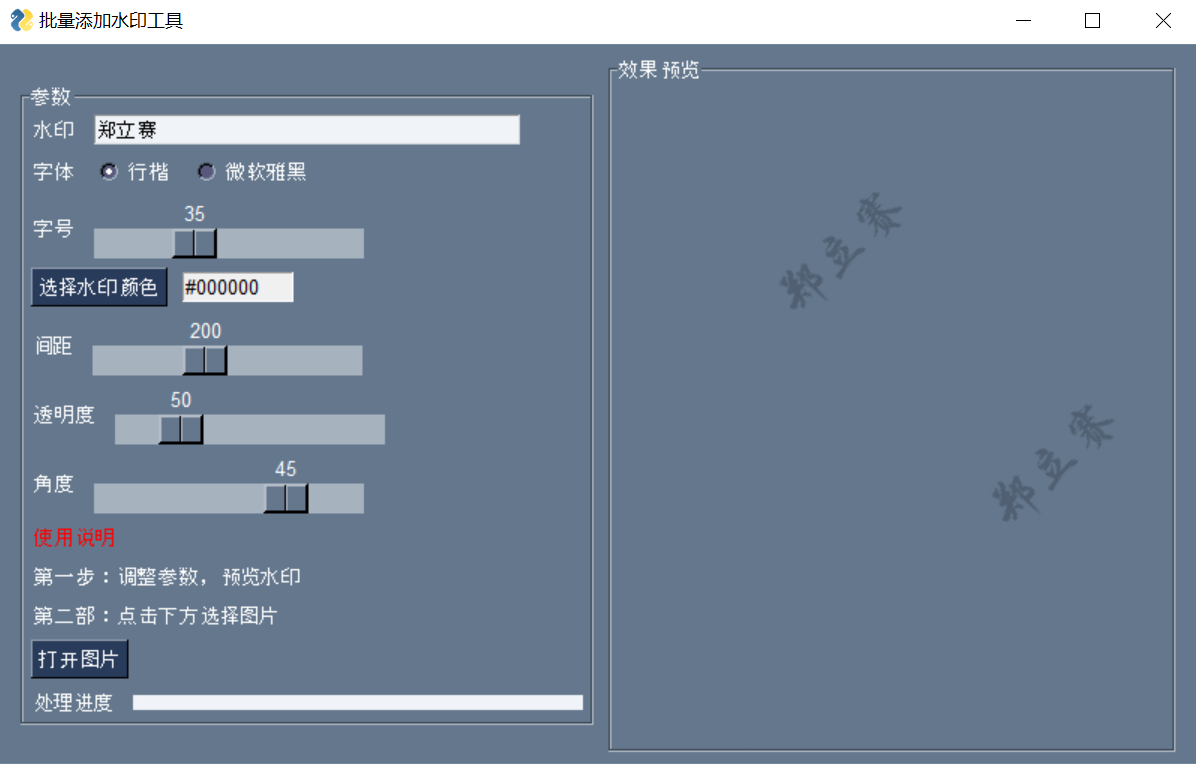
预览
使用方式
方法一:运行Python脚本。
电脑上需要安装python3运行环境
# 安装依赖包

pip install pillow pysimplegui

# 将下面的源码保存为: image_watermark_tool.py

python image_watermark_tool.py
方法二:直接下载exe文件,双击运行即可。
链接: https://pan.baidu.com/s/1veoNlDJOecq7bw0rQB-FYg
提取码: b9pe
exe程序由下面的源码打包而成
pyinstaller -F -w image_watermark_tool.py
源码
# author zhenglisai

from PIL import Image, ImageDraw, ImageFont

import PySimpleGUI as sg

import os

from io import BytesIO

import base64

import traceback

def add_watermark(image, msg, font, font_size, color, distance, transparency, angle):

    if font == "xingkai":

        font_name = "C:\\WINDOWS\\Fonts\\STXINGKA.TTF"

    else:

        font_name = "C:\\WINDOWS\\Fonts\\msyh.ttc"

    font = ImageFont.truetype(font_name, int(font_size))

    if color == "" or color == "None":

        r = 0

        g = 0

        b = 0

    else:

        color = color.replace("#", "0x")

        color = int(color, base=16) if isinstance(color, str) else color

        r = (color >> 16) & 0xff

        g = (color >> 8) & 0xff

        b = color & 0xff

    background = Image.new('RGBA', (image.size[0] * 3, image.size[1] * 3), (0, 0, 0, 0))

    background.paste(image, image.size)

    font_len = len(msg)

    rgba_image = background.convert('RGBA')

    text_overlay = Image.new('RGBA', rgba_image.size, (255, 255, 255, 0))

    image_draw = ImageDraw.Draw(text_overlay)

    for i in range(0, rgba_image.size[0], font_len * 40 + int(distance)):

        for j in range(0, rgba_image.size[1], int(distance)):

            image_draw.text((i, j), msg, font=font, fill=(r, g, b, int(transparency)))

    text_overlay = text_overlay.rotate(int(angle))

    image_result = Image.alpha_composite(rgba_image, text_overlay)

    image_result = image_result.crop((image.size[0], image.size[1], image.size[0] * 2, image.size[1] * 2))

    return image_result

frame = [

        [sg.Text("水印"), sg.InputText("郑立赛", key="text", enable_events=True)],

        [sg.Text("字体"), sg.Radio("行楷", "font", default=True, key="xingkai", enable_events=True), sg.Radio("微软雅黑", "font", key="yahei", enable_events=True)],

        [sg.Text("字号"), sg.Slider(range=(1, 100), default_value=36, key="font_size", orientation='horizontal', enable_events=True)],

        [sg.Button("选择水印颜色", button_type=sg.BUTTON_TYPE_COLOR_CHOOSER, target="color"),sg.InputText("#000000", enable_events=True, key="color", readonly=True, size=(10, 10))],

        [sg.Text("间距"), sg.Slider(range=(1, 500), default_value=200, key="distance", orientation='horizontal', enable_events=True)],

        [sg.Text("透明度"), sg.Slider(range=(0, 255), default_value=50, key="transparency", orientation='horizontal', enable_events=True)],

        [sg.Text("角度"), sg.Slider(range=(-90, 90), default_value=45, key="angle", orientation='horizontal', enable_events=True)],

        [sg.Text("使用说明", text_color="red")],

        [sg.Text("第一步:调整参数,预览水印")],

        [sg.Text("第二部:点击下方选择图片")],

        [sg.Button("打开图片", key="open_image")],

        [sg.Text("处理进度"), sg.ProgressBar(100, size=(30, 10), orientation="h", key="progress")]

    ]

frame_image = [

    [sg.Image(key="image"), sg.Sizer(640, 480)]

]

layout = [

    [sg.Frame(title="参数", layout=frame), sg.Frame(title="效果预览", layout=frame_image, element_justification="center")]

]

default_windows_size = (800, 480)

window = sg.Window("批量添加水印工具",

                   layout,

                   default_element_size=(40, 1),

                   grab_anywhere=True,

                   size=default_windows_size,

                   resizable=True,

                   finalize=True,

                   enable_close_attempted_event=True

                   )

while True:

    try:

        event, value = window.read()

        if event == sg.WIN_CLOSED:

            break

        if event == "open_image":

            image_path_list = sg.popup_get_file("选择图片",

                                           no_window=True,

                                           multiple_files=True

                                           )

            source_image_path = os.path.sep.join(image_path_list[0].split("/")[:-1])

            result_path = os.path.join(source_image_path, "watermark")

            if not os.path.exists(result_path):

                os.mkdir(result_path)

            image_count = len(image_path_list)

            text = value["text"]

            font_size = value["font_size"]

            distance = value["distance"]

            transparency = value["transparency"]

            angle = value["angle"]

            color = value["color"]

            progress_bar = window["progress"]

            count = 1

            total = len(image_path_list)

            for image_path in image_path_list:

                image_name = image_path.split("/")[-1].split(".")[0]

                image_source = Image.open(image_path)

                if value["yahei"]:

                    font = "yahei"

                else:

                    font = "xingkai"

                image_result = add_watermark(image_source, text, font, font_size, color, distance, transparency, angle)

                image_result_path = os.path.join(result_path, "%s.png" % image_name)

                image_result.save(image_result_path)

                buffered = BytesIO()

                image_result.save(buffered, format="PNG")

                data = base64.b64encode(buffered.getvalue())

                window["image"].update(data=data)

                progress_bar.UpdateBar(current_count=count, max=total)

                count += 1

            sg.popup_ok('%s张水印图片已保存在: %s' % (image_count, result_path))

        if event in ["angle", "transparency", "distance", "yahei", "xingkai", "font_size", "text", "color"]:

            image_demo = Image.new('RGBA', (640, 480), (0, 0, 0, 0))

            if value["yahei"]:

                font = "yahei"

            else:

                font = "xingkai"

            image_result = add_watermark(image_demo, value["text"], font, value["font_size"], value["color"], value["distance"], value["transparency"], value["angle"])

            buffered = BytesIO()

            image_result.save(buffered, format="PNG")

            data = base64.b64encode(buffered.getvalue())

            window["image"].update(data=data)

    except:

        sg.Print(traceback.format_exc())

window.close()
【Python】批量给图片增加水印工具的更多相关文章
- 如何用node.js批量给图片加水印
上一篇我们讲了如何用node.js给图片加水印,但是只是给某一张图片加,并没有涉及到批量处理.这一篇,我们学习如果批量进行图片加水印处理. 一.准备工作: 首先,你要阅读完这篇文章:http://ww ...
- C#图片增加水印
给图片增加水印 1.引用 using System.Drawing; 2.代码实现 string ImagePath = @"C:\Users\RAPOO\Pictures\Camera R ...
- Python批量修改图片格式和尺寸
Python批量修改图片格式和尺寸 备注: 1.导入了PIL库,是处理图片用的,很强大; 2.导入了的win32库,是判断隐藏文件用的,我们的项目需要删除隐藏文件,不需要的可以直接找到删除. 3.导入 ...
- Python实现给图片加水印功能
前言 最近忙得连轴转,很久没更新博客了,代码倒是没啥写,积累了好些东西,接下来一有时间就来更新吧~ 本文记录使用Python实现给图片添加水印的功能实现过程 先看效果 把公众号的封面作为素材 原图是这 ...
- Python 批量修改图片格式和尺寸
公司的一个项目要求把所有4096x4096的图片全部转化成2048x2048的图片,这种批量转换图片大小的软件网上很多,我的同事原来使用的美图看看的批量转换,但是稍微有点麻烦,每次还需要指定要转换的图 ...
- tinypng的python批量压缩图片功能
tinypng网站提供的图片压缩功能很不错,但是直接在网站上压缩有限制,大量压缩图片时比较麻烦,还好官方提供了很多脚本的自动化压缩接口.下面简单说下python批量压缩步骤. 1.申请api key ...
- python批量裁剪图片
"""用Pythonp批量裁剪图片""" from PIL import Imageimport matplotlib.pyplot as ...
- 【python】PIL 批量绘制图片矩形框工具
工具采用PIL:Python Imaging Library,图像处理标准库.PIL功能非常强大,但API却非常简单易用. 安装PIL 在Debian/Ubuntu Linux下直接通过apt安装 $ ...
- ps技术--批量给图片加水印
在日常的办公过程中,对于一些比较重要的文件的扫描件需要特殊处理,这时我们就需要给它们加上水印,保证它们的用途唯一,而这些扫描件很多,不可能一一给他们加水印,所以为提高工作效率,我们就可以使用一些小软件 ...
随机推荐
- Kubernetes Job Controller 原理和源码分析(一)
概述什么是 JobJob 入门示例Job 的 specPod Template并发问题其他属性 概述 Job 是主要的 Kubernetes 原生 Workload 资源之一,是在 Kubernete ...
- WEB前端工程师如何做职业规划?
对于一个WEB前端的职业规划,其实是有各种的答案,没有哪种答案是完全正确的,全凭自己的选择,只要是自己选定了,坚持去认真走,就好.在这里, 我只是 简要说一下自己对于这块儿内容的理解.有一个观点想要分 ...
- docker multi-stage 多阶段构建
多阶段构建 一.需求 二.普通构建 1.编写Dockerfile 2.构建镜像 三.多阶段(multi-stage)构建 1.编写Dockerfile 2.构建镜像 四.比较2个镜像的体积大小 我们在 ...
- Linux过来人帮你理清学习思路
很多同学接触linux不多,对linux平台的开发更是一无所知. 而现在的趋势越来越表明,作为一个优秀的软件开发人员,或计算机it行业从业人员,="" 掌握linux是一种很重要的 ...
- 21.6.29 test
\(NOI\) 模拟赛 \(T1\) 正解是个题解难以理解的数论,结果是组合数相加.暴力分拿满了,尝试打了 \(20*20\) 的表,最后大概打出了个三角形的表,并且帮我找到了一些性质.\(45\)p ...
- 从零开始的DIY智能家居 - 基于 ESP32 的智能浇水器
前言 上次 土壤湿度传感器 完成之后,就立下一个 flag 要搭建一个智慧浇水的智能场景,现在终于有时间填坑了!(o゚▽゚)o 智慧浇水场景的核心设备有三个: 检测土壤状态的:土壤湿度传感器 通过这个 ...
- Android 服务名称规则invalid service name 限制16字符以内
今天调试网络服务的时候为了区分,修改了原有服务名称,同时新增了两个服务. 系统运行的时候报错找不到对应的服务 init: no such service 'wpa_supplicant_common' ...
- [转]浅谈电路设计中应用DDR3处理缓存问题
本文转自:浅谈电路设计中应用DDR3处理缓存问题_若海人生的专栏-CSDN博客 DDR系列SDRAM存储芯片的高速率.高集成度和低成本使其理所当然成为存储芯片中的一霸.在PC和消费电子领域自是如此,它 ...
- Ubuntu 16.04 下 旋转显示器屏幕 竖屏显示
xrandr -o left $ xrandr -o left 向左旋转90度 $ xrandr -o right 向右旋转90度 $ xrandr -o inverted 上下翻转 $ xrandr ...
- 穿点最多的直线 牛客网 程序员面试金典 C++
穿点最多的直线 牛客网 程序员面试金典 C++ 题目描述 在二维平面上,有一些点,请找出经过点数最多的那条线. 给定一个点集vectorp和点集的大小n,没有两个点的横坐标相等的情况,请返回一个vec ...