Orchestrator+Proxysql 实现自动导换+应用透明读写分离
前面一篇博客我介绍了如何通过Orachestrator+脚本实现自动导换。
这一章,我来演示一下如何通过Orchestrator+Proxysql 实现自动导换+应用透明读写分离
总体架构
可选架构1
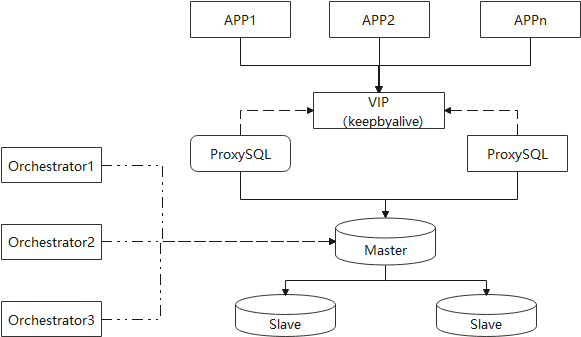
实际生产系统所用架构应该类似于上图:
1)应用APP,通过VIP连接ProxySQL
2)ProxySQL为了实现高可用,可部署2个。通过VIP管理,即同一时候只有一个ProxySQL是活动并接受外界请求。
当proxysql出现故障时,通过keepyalive实现导换,业务切换到另一个Porxysql。
3)MySQL Master和Slave组成高可用MySQL集群
4)Orchestrator集群负责监控MySQL服务器的导换
可选架构2

如上架构与架构1的区别是,每个应用连接自有的Proxysql。如应用/proxysql crash,则相应的proxysql+app整体不可用。
演示步骤
简化架构
为了演示简单一些,在这里我简化了很多组件。结构图如下

测试机器
如上,为了测试我用了5台虚拟机
host01 192.168.56.103
host02 192.168.56.104
host03 192.168.56.105
arch 192.168.56.130
proxysql 192.168.56.131
ProxySQL安装
ProxySQL安装点 这里.
MySQL复制拓扑图

MySQL创建用户权限
testuser*是作为proxysql读写操作的。
monitor用户是proxysql用来监控MySQL活动状态的。
create user testuser_w@'%' identified by 'Testpass1.';

grant insert,update,delete on *.* to 'testuser_w'@'%';

create user testuser_r@'%' identified by 'Testpass1.';

grant select on *.* to 'testuser_r'@'%';

create user testuser_rw@'%' identified by 'Testpass1.';

grant select,insert,update,delete on *.* to 'testuser_rw'@'%';

create user 'monitor'@'%' identified by 'monitor';

grant all privileges on *.* to 'monitor'@'%';
proxysql启动并插入规则
[root@proxysql-server proxysql]# service proxysql.service start
Redirecting to /bin/systemctl start proxysql.service.service
proxysql启动后,会开启两个端口。6032默认是用来管理,6033是默认用来连接mysql
[root@proxysql-server proxysql]# netstat -nlp|grep proxysql
tcp 0 0 0.0.0.0:6032 0.0.0.0:* LISTEN 17840/proxysql
tcp 0 0 0.0.0.0:6033 0.0.0.0:* LISTEN 17840/proxysql
登录proxysql管理端口配置数据
mysql -uadmin -padmin -h 127.0.0.1 -P 6032
插入如下配置。如下是指定600 hostgroup为只读,601端口为写入。(需要注意的是我这里的配置是master也做为读取结点)
其中scheduler的插入数据是做何用的,后面再讲述。
INSERT INTO mysql_servers (hostname,hostgroup_id,port,weight,max_replication_lag) VALUES ('192.168.56.103',601,3306,1000,60);

INSERT INTO mysql_servers (hostname,hostgroup_id,port,weight,max_replication_lag) VALUES ('192.168.56.104',601,3306,1000,60);

INSERT INTO mysql_servers (hostname,hostgroup_id,port,weight,max_replication_lag) VALUES ('192.168.56.105',601,3306,1000,60);

INSERT INTO mysql_servers (hostname,hostgroup_id,port,weight,max_replication_lag) VALUES ('192.168.56.103',600,3306,1000,0);

INSERT INTO mysql_replication_hostgroups(writer_hostgroup,reader_hostgroup) values(600,601);

LOAD MYSQL SERVERS TO RUNTIME; SAVE MYSQL SERVERS TO DISK;

insert into mysql_query_rules (username,destination_hostgroup,active) values('testuser_w',600,1);

insert into mysql_query_rules (username,destination_hostgroup,active) values('testuser_r',601,1);

insert into mysql_query_rules (username,destination_hostgroup,active,retries,match_digest) values('testuser_rw',601,1,3,'^SELECT');

LOAD MYSQL QUERY RULES TO RUNTIME;SAVE MYSQL QUERY RULES TO DISK;

insert into mysql_users (username,password,active,default_hostgroup,transaction_persistent) values ('testuser_w','Testpass1.',1,600,1);

insert into mysql_users (username,password,active,default_hostgroup,transaction_persistent) values ('testuser_r','Testpass1.',1,601,1);

insert into mysql_users (username,password,active,default_hostgroup,transaction_persistent) values ('testuser_rw','Testpass1.',1,600,1);

LOAD MYSQL USERS TO RUNTIME;SAVE MYSQL USERS TO DISK;

INSERT  INTO scheduler (id,interval_ms,filename,arg1) values (10,2000,"/var/lib/proxysql/server_monitor.pl","-u=admin -p=admin -h=127.0.0.1 -G=601 -P=6032 --debug=0  --log=/var/lib/proxysql/server_check");

LOAD SCHEDULER TO RUNTIME;SAVE SCHEDULER TO DISK;
插入成功后,查看服务器状态
如下可以看到,所以的服务器的状态都显示为ONLINE。
mysql> select * from mysql_servers;

+--------------+----------------+------+-----------+--------+--------+-------------+-----------------+---------------------+---------+----------------+---------+

| hostgroup_id | hostname       | port | gtid_port | status | weight | compression | max_connections | max_replication_lag | use_ssl | max_latency_ms | comment |

+--------------+----------------+------+-----------+--------+--------+-------------+-----------------+---------------------+---------+----------------+---------+

| 601          | 192.168.56.104 | 3306 | 0         | ONLINE | 1000   | 0           | 1000            | 60                  | 0       | 0              |         |

| 601          | 192.168.56.105 | 3306 | 0         | ONLINE | 1000   | 0           | 1000            | 60                  | 0       | 0              |         |

| 600          | 192.168.56.103 | 3306 | 0         | ONLINE | 1000   | 0           | 1000            | 60                  | 0       | 0              |         |

| 601          | 192.168.56.103 | 3306 | 0         | ONLINE | 1000   | 0           | 1000            | 60                  | 0       | 0              |         |

+--------------+----------------+------+-----------+--------+--------+-------------+-----------------+---------------------+---------+----------------+---------+
停止host01,查看导换后的变化
通过service mysqld stop,或是启动firewall,shutdwon mysql都可以。
host01无法连接后,mysql的拓扑结构变成了如下

查看proxysql状态数据的变化
如下,可以看到104的hostgroup变成了600(写入端口),host01(192.168.56.103)的状态变为了SHUNNED
mysql> select * from mysql_servers;

+--------------+----------------+------+-----------+--------+--------+-------------+-----------------+---------------------+---------+----------------+---------+

| hostgroup_id | hostname       | port | gtid_port | status | weight | compression | max_connections | max_replication_lag | use_ssl | max_latency_ms | comment |

+--------------+----------------+------+-----------+--------+--------+-------------+-----------------+---------------------+---------+----------------+---------+

| 601          | 192.168.56.103 | 3306 | 0         | ONLINE | 1000   | 0           | 1000            | 60                  | 0       | 0              |         |

| 601          | 192.168.56.105 | 3306 | 0         | ONLINE | 1000   | 0           | 1000            | 60                  | 0       | 0              |         |

| 600          | 192.168.56.104 | 3306 | 0         | ONLINE | 1000   | 0           | 1000            | 60                  | 0       | 0              |         |

| 601          | 192.168.56.104 | 3306 | 0         | ONLINE | 1000   | 0           | 1000            | 60                  | 0       | 0              |         |

+--------------+----------------+------+-----------+--------+--------+-------------+-----------------+---------------------+---------+----------------+---------+

mysql> select * from stats_mysql_connection_pool where hostgroup between 600 and 601 order by hostgroup,srv_host desc;

+-----------+----------------+----------+---------+----------+----------+--------+---------+-------------+---------+-------------------+-----------------+-----------------+------------+

| hostgroup | srv_host       | srv_port | status  | ConnUsed | ConnFree | ConnOK | ConnERR | MaxConnUsed | Queries | Queries_GTID_sync | Bytes_data_sent | Bytes_data_recv | Latency_us |

+-----------+----------------+----------+---------+----------+----------+--------+---------+-------------+---------+-------------------+-----------------+-----------------+------------+

| 600       | 192.168.56.104 | 3306     | ONLINE  | 0        | 1        | 1      | 242     | 1           | 18      | 0                 | 306             | 198             | 1282       |

| 601       | 192.168.56.105 | 3306     | ONLINE  | 0        | 1        | 1      | 0       | 1           | 127     | 0                 | 2159            | 1397            | 550        |

| 601       | 192.168.56.104 | 3306     | ONLINE  | 0        | 1        | 1      | 0       | 1           | 207     | 0                 | 3519            | 2277            | 1282       |

| 601       | 192.168.56.103 | 3306     | SHUNNED | 0        | 0        | 0      | 28      | 1           | 0       | 0                 | 0               | 0               | 389        |

+-----------+----------------+----------+---------+----------+----------+--------+---------+-------------+---------+-------------------+-----------------+-----------------+------------+

4 rows in set (0.01 sec)
通过mysql客户端,测试当前行为
如下,写一个简单的循环语句,测试mysql的行为。如下,可以发现写入操作都只会发送到新的host02机器。
只读操作,会发送到host02和host03机器。host01已经从读取列表内排除。
[root@proxysql-server proxysql]# while true; do mysql -u testuser_w -pTestpass1. -h 127.0.0.1 -P 6033 -e "select @@hostname"; sleep  1; done

mysql: [Warning] Using a password on the command line interface can be insecure.

+------------+

| @@hostname |

+------------+

| host02     |

+------------+

mysql: [Warning] Using a password on the command line interface can be insecure.

+------------+

| @@hostname |

+------------+

| host02     |

+------------+

^C

[root@proxysql-server proxysql]# while true; do mysql -u testuser_r -pTestpass1. -h 127.0.0.1 -P 6033 -e "select @@hostname"; sleep  1; done

mysql: [Warning] Using a password on the command line interface can be insecure.

+------------+

| @@hostname |

+------------+

| host03     |

+------------+

mysql: [Warning] Using a password on the command line interface can be insecure.

+------------+

| @@hostname |

+------------+

| host02     |

+------------+
当host01重新启动后,会发生什么?
细心的读者,可能会发生,mysql_servers列表内,并没有排除host01。那如果host01启动后,会发生什么呢?
结果就是只读操作会继续发送到host01机器。
因为实际上host01机器在导换后,并不属于复制集群了。
如果只读操作继续发送到host01,肯定会读到旧的数据。造成应用出现问题。
那我们如何避免出现此问题呢?方法就是通过上面的脚本来把host01排除出复制集群。
后续的修复需要DBA来干预,如加入复制集群,等复制同步完成后,再开放host01可以作为读结点。
增加一个定时任务
脚本做如下检查
- read_only=ON – mysql服务器是否为 read-only (Slave,read-only为ON)
- repl_lag is NULL – Master,这个参数值应该为NULL (如果seconds_behind_master没有定义, ProxySQL 会报告repl_lag 为 NULL)
如果 read_only=ON, 这意味者,这台服务器当前不是master。但如果repl_lag=NULL, 这就意味得服务器没有开启复制,而且很有可能以前是master. 所以,就必须把它从Hostgroup内移除.
INSERT  INTO scheduler (id,interval_ms,filename,arg1) values (10,2000,"/var/lib/proxysql/server_monitor.pl","-u=admin -p=admin -h=127.0.0.1 -G=601 -P=6032 --debug=0  --log=/var/lib/proxysql/server_check");

LOAD SCHEDULER TO RUNTIME;SAVE SCHEDULER TO DISK;
检查mysql服务器状态
当host01重新启动后。
如下,可以看到host01(192.168.56.103)的状态是在线,但是hostgroup修改成为了9601(server_monitor.pl脚本实现就是通过修改 New hostgroup=9000+ old hostgroup)。如此一来,发往601只读hostgroup里,就排除了host01。
mysql> select * from mysql_servers;

+--------------+----------------+------+-----------+--------+--------+-------------+-----------------+---------------------+---------+----------------+---------+

| hostgroup_id | hostname       | port | gtid_port | status | weight | compression | max_connections | max_replication_lag | use_ssl | max_latency_ms | comment |

+--------------+----------------+------+-----------+--------+--------+-------------+-----------------+---------------------+---------+----------------+---------+

| 9601         | 192.168.56.103 | 3306 | 0         | ONLINE | 1000   | 0           | 1000            | 60                  | 0       | 0              |         |

| 600          | 192.168.56.104 | 3306 | 0         | ONLINE | 1000   | 0           | 1000            | 60                  | 0       | 0              |         |

| 601          | 192.168.56.105 | 3306 | 0         | ONLINE | 1000   | 0           | 1000            | 60                  | 0       | 0              |         |

| 601          | 192.168.56.104 | 3306 | 0         | ONLINE | 1000   | 0           | 1000            | 60                  | 0       | 0              |         |

+--------------+----------------+------+-----------+--------+--------+-------------+-----------------+---------------------+---------+----------------+---------+

4 rows in set (0.00 sec)
server_monitor.pl完整脚本
#!/usr/bin/perl

# This tool is "fat-packed": most of its dependent modules are embedded

# in this file.

package remove_old_master;

use Time::HiRes qw(gettimeofday);

use strict;

use DBI;

use Getopt::Long;

use Pod::Usage;

use Data::Dumper;

$Getopt::Long::ignorecase = 0;

my $Param = {};

my $user = "admin";

my $pass = "admin";

my $help = '';

my $host = 'localhot' ;

my $debug = 0 ;

my %hostgroups;

my %processState;

my %processCommand;

my @HGIds;

######################################################################

#Local functions

######################################################################

sub URLDecode {

my $theURL = $_[0];

$theURL =~ tr/+/ /;

$theURL =~ s/%([a-fA-F0-9]{2,2})/chr(hex($1))/eg;

$theURL =~ s/<!--(.|\n)*-->//g;

return $theURL;

}

sub URLEncode {

my $theURL = $_[0];

$theURL =~ s/([\W])/"%" . uc(sprintf("%2.2x",ord($1)))/eg;

return $theURL;

}

# return a proxy object

sub get_proxy($$$$){

my $dns = shift;

my $user = shift;

my $pass = shift;

my $debug = shift;

my $proxynode = ProxySqlNode->new();

$proxynode->dns($dns);

$proxynode->user($user);

$proxynode->password($pass);

$proxynode->debug($debug);

return $proxynode;

}

sub main{

# ============================================================================

#+++++ INITIALIZATION

# ============================================================================

if($#ARGV < 3){

#given a ProxySQL scheduler

#limitation we will pass the whole set of params as one

# and will split after

@ARGV = split('\ ',$ARGV[0]);

}

$Param->{user} = '';

$Param->{log} = undef ;

$Param->{password} = '';

$Param->{host} = '';

$Param->{port} = '127.0.0.1';

$Param->{debug} = 0;

$Param->{processlist} = 0;

$Param->{OS} = $^O;

$Param->{main_segment} = 0;

$Param->{retry_up} = 0;

$Param->{retry_down} = 0;

$Param->{print_execution} = 0;

$Param->{development} = 0;

$Param->{hgid} = 0;

my $run_pid_dir = "/tmp" ;

#if (

GetOptions(

'user|u:s' => \$Param->{user},

'password|p:s' => \$Param->{password},

'host|h:s' => \$host,

'port|P:i' => \$Param->{port},

'debug|d:i' => \$Param->{debug},

'log:s' => \$Param->{log},

'main_segment|S:s'=> \$Param->{main_segment},

'retry_up:i' => \$Param->{retry_up},

'retry_down:i' => \$Param->{retry_down},

'execution_time:i' => \$Param->{print_execution},

'development:i' => \$Param->{development},

'active_failover' => \$Param->{active_failover},

'hgid|G:i' => \$Param->{hgid},

'help|?' => \$Param->{help}

) or pod2usage(2);

pod2usage(-verbose => 2) if $Param->{help};

die print Utils->print_log(1,"Option --hgid not specified.\n") unless defined($Param->{hgid});

die print Utils->print_log(1,"Option --host not specified.\n") unless defined $Param->{host};

die print Utils->print_log(1,"Option --user not specified.\n") unless defined $Param->{user};

die print Utils->print_log(1,"Option --port not specified.\n") unless defined $Param->{port};

die "Option --log not specified. We need a place to log what is going on, don't we?\n" unless defined $Param->{log};

print Utils->print_log(2,"Option --log not specified. We need a place to log what is going on, don't we?\n") unless defined $Param->{log};

if($Param->{debug}){

Utils::debugEnv();

}

$Param->{host} = URLDecode($host);

my $dsn = "DBI:mysql:host=$Param->{host};port=$Param->{port}";

if(defined $Param->{user}){

$user = "$Param->{user}";

}

if(defined $Param->{password}){

$pass = "$Param->{password}";

}

my $hg =$Param->{hgid};

$hg =~ s/[\:,\,]/_/g;

my $base_path = "${run_pid_dir}/proxysql_galera_check_${hg}.pid";

#============================================================================

# Execution

#============================================================================

if(defined $Param->{log}){

open(FH, '>>', $Param->{log}."_".$hg.".log") or die Utils->print_log(1,"cannot open file");

#select FH;

}

if($Param->{development} < 1){

if(!-e $base_path){

`echo "$$ : $hg" > $base_path`

}

else{

print Utils->print_log(1,"Another process is running using the same HostGroup and settings,\n Or orphan pid file. check in $base_path");

exit 1;

}

}

# for test only purpose comment for prod

#my $xx =1;

#my $y =0;

#$xx=20000000 if($Param->{development} > 0);

#while($y < $xx){

#++$y ;

my $start = gettimeofday();

if($Param->{debug} >= 1){

print Utils->print_log(3,"START EXECUTION\n");

}

my $proxy_sql_node = get_proxy($dsn, $user, $pass ,$Param->{debug}) ;

$proxy_sql_node->retry_down($Param->{retry_down});

$proxy_sql_node->move_node($proxy_sql_node,$Param->{hgid});

$proxy_sql_node->connect();

my $end = gettimeofday();

print Utils->print_log(3,"END EXECUTION Total Time:".($end - $start) * 1000 ."\n\n") if $Param->{print_execution} >0;

$proxy_sql_node->disconnect();

#debug braket

sleep 2 if($Param->{development} > 0);

}

if(defined $Param->{log}){

close FH; # in the end

}

`rm -f $base_path`;

exit(0);

}

# ############################################################################

# Run the program.

# ############################################################################

exit main(@ARGV);

{

package ProxySqlNode;

sub new {

my $class = shift;

my $SQL_get_monitor = "select variable_name name,variable_value value from global_variables where variable_name in( 'mysql-monitor_username','mysql-monitor_password','mysql-monitor_read_only_timeout' ) order by 1";

my $SQL_get_hostgroups = "select distinct hostgroup_id hg_isd from mysql_servers order by 1;";

my $SQL_get_rep_hg = "select writer_hostgroup,reader_hostgroup from mysql_replication_hostgroups order by 1;";

# Variable section for looping values

#Generalize object for now I have conceptualize as:

# Proxy (generic container)

# Proxy->{DNS} conenction reference

# Proxy->{PID} processes pid (angel and real)

# Proxy->{hostgroups}

# Proxy->{user} This is the user name

# Proxy->{password}

# Proxy->{port} node status (OPEN 0,Primary 1,Joiner 2,Joined 3,Synced 4,Donor 5)

my $self = {

_dns => undef,

_pid => undef,

_user => undef,

_password => undef,

_port => undef,

_hgid => undef,

_monitor_user => undef,

_monitor_password => undef,

_SQL_get_monitor => $SQL_get_monitor,

_SQL_get_hg=> $SQL_get_hostgroups,

_SQL_get_replication_hg=> $SQL_get_rep_hg,

_dbh_proxy => undef,

_check_timeout => 100, #timeout in ms

_retry_down => 0, # number of retry on a node before declaring it as failed.

};

bless $self, $class;

return $self;

}

sub retry_down{

my ( $self, $in ) = @_;

$self->{_retry_down} = $in if defined($in);

return $self->{_retry_down};

}

sub debug{

my ( $self, $debug ) = @_;

$self->{_debug} = $debug if defined($debug);

return $self->{_debug};

}

sub dns {

my ( $self, $dns ) = @_;

$self->{_dns} = $dns if defined($dns);

return $self->{_dns};

}

sub dbh_proxy{

my ( $self, $dbh_proxy ) = @_;

$self->{_dbh_proxy} = $dbh_proxy if defined($dbh_proxy);

return $self->{_dbh_proxy};

}

sub pid {

my ( $self, $pid ) = @_;

$self->{_pid} = $pid if defined($pid);

return $self->{_pid};

}

sub user{

my ( $self, $user ) = @_;

$self->{_user} = $user if defined($user);

return $self->{_user};

}

sub password {

my ( $self, $password ) = @_;

$self->{_password} = $password if defined($password);

return $self->{_password};

}

sub monitor_user{

my ( $self, $monitor_user ) = @_;

$self->{_monitor_user} = $monitor_user if defined($monitor_user);

return $self->{_monitor_user};

}

sub monitor_password {

my ( $self, $monitor_password ) = @_;

$self->{_monitor_password} = $monitor_password if defined($monitor_password);

return $self->{_monitor_password};

}

sub port {

my ( $self, $port ) = @_;

$self->{_port} = $port if defined($port);

return $self->{_port};

}

sub hgid {

my ( $self, $hgid ) = @_;

$self->{_hgid} = $hgid if defined($hgid);

print Dumper($hgid);

return $self->{_hgid};

}

sub check_timeout{

my ( $self, $check_timeout ) = @_;

$self->{_check_timeout} = $check_timeout if defined($check_timeout);

return $self->{_check_timeout};

}

sub move_node{

my ( $self,$proxynode,$hgid ) = @_;

my $dbh = Utils::get_connection($self->{_dns}, $self->{_user}, $self->{_password},' ');

$self->{_dbh_proxy} = $dbh;

my $SQL_get_old_master= "SELECT ro.hostname,

 ro.port,

 ms.hostgroup_id

 FROM (select *, max(time_start_us) from monitor.mysql_server_read_only_log group by hostname,port) as ro

 LEFT JOIN (select *,max(time_start_us) from monitor.mysql_server_replication_lag_log group by hostname,port ) as lag ON ro.hostname=lag.hostname

 AND ro.port=lag.port

 LEFT JOIN mysql_servers ms ON ro.hostname=ms.hostname

 AND ro.port=ms.port,

 mysql_replication_hostgroups hg

 WHERE read_only=1

 AND repl_lag IS NULL

 AND ms.hostgroup_id='$hgid'

 AND ms.hostgroup_id = hg.reader_hostgroup

 AND ms.status='ONLINE'

 GROUP BY ro.hostname,

 ro.port;";

my $sth = $dbh->prepare($SQL_get_old_master);

my $ref;

$sth->execute();

while ($ref = $sth->fetchrow_arrayref()) {

print "@$ref[0] @$ref[1]\n";

if (@$ref[0] ne '') {

move_node_down_hg_change($proxynode,@$ref[0],@$ref[1],$Param->{hgid});

}

}

}

#Connect method connect an populate the cluster returns the Galera cluster

sub connect{

my ( $self, $port ) = @_;

my $dbh = Utils::get_connection($self->{_dns}, $self->{_user}, $self->{_password},' ');

$self->{_dbh_proxy} = $dbh;

# get monitor user/pw

my $cmd = $self->{_SQL_get_monitor};

my $sth = $dbh->prepare($cmd);

$sth->execute();

while (my $ref = $sth->fetchrow_hashref()) {

if($ref->{'name'} eq 'mysql-monitor_password' ){$self->{_monitor_password} = $ref->{'value'};}

if($ref->{'name'} eq 'mysql-monitor_username' ) {$self->{_monitor_user} = $ref->{'value'};}

if($ref->{'name'} eq 'mysql-monitor_read_only_timeout' ) {$self->{_check_timeout} = $ref->{'value'};}

}

if($self->debug >=1){print Utils->print_log(3," Connecting to ProxySQL " . $self->{_dns}. "\n" ); }

}

sub disconnect{

my ( $self, $port ) = @_;

$self->{_dbh_proxy}->disconnect;

}

#move a node to a maintenance HG ((9000 + HG id))

sub move_node_down_hg_change{

my ($proxynode, $host,$port,$hgid) = @_;

if($hgid > 9000) {return 1;}

my $node_sql_command = "SET GLOBAL READ_ONLY=1;";

my $proxy_sql_command =" UPDATE mysql_servers SET hostgroup_id=".(9000 + $hgid)." WHERE hostgroup_id=$hgid AND hostname='$host' AND port='$port'";

print "$proxy_sql_command\n";

$proxynode->{_dbh_proxy}->do($proxy_sql_command) or die "Couldn't execute statement: " . $proxynode->{_dbh_proxy}->errstr;

$proxynode->{_dbh_proxy}->do("LOAD MYSQL SERVERS TO RUNTIME") or die "Couldn't execute statement: " . $proxynode->{_dbh_proxy}->errstr;

print Utils->print_log(2," Move node:"

." SQL:" .$proxy_sql_command

."\n" );

}

}

{

package ProxySqlHG;

sub new {

my $class = shift;

my $self = {

_id => undef, #

_type => undef, # available types: w writer; r reader ; mw maintance writer; mr maintenance reader

_size => 0,

};

bless $self, $class;

return $self;

}

sub id {

my ( $self, $id ) = @_;

$self->{_id} = $id if defined($id);

return $self->{_id};

}

sub type {

my ( $self, $type ) = @_;

$self->{_type} = $type if defined($type);

return $self->{_type};

}

sub size {

my ( $self, $size ) = @_;

$self->{_size} = $size if defined($size);

return $self->{_size};

}

}

{

package Utils;

use Time::HiRes qw(gettimeofday);

#============================================================================

## get_connection -- return a valid database connection handle (or die)

## $dsn -- a perl DSN, e.g. "DBI:mysql:host=ltsdbwm1;port=3311"

## $user -- a valid username, e.g. "check"

## $pass -- a matching password, e.g. "g33k!"

sub get_connection($$$$) {

my $dsn = shift;

my $user = shift;

my $pass = shift;

my $SPACER = shift;

my $dbh = DBI->connect($dsn, $user, $pass);

if (!defined($dbh)) {

print Utils->get_current_time ."[ERROR] Cannot connect to $dsn as $user\n";

# die();

return undef;

}

return $dbh;

}

#Prrint time from invocation with milliseconds

sub get_current_time{

use POSIX qw(strftime);

my $t = gettimeofday();

my $date = strftime "%Y/%m/%d %H:%M:%S", localtime $t;

$date .= sprintf ".%03d", ($t-int($t))*1000; # without rounding

return $date;

}

#prit all environmnt variables

sub debugEnv{

my $key = keys %ENV;

foreach $key (sort(keys %ENV)) {

print $key, '=', $ENV{$key}, "\n";

}

}

#Print a log entry

sub print_log($$){

my $log_level = $_[1];

my $text = $_[2];

my $log_text = "[ - ] ";

SWITCH: {

if ($log_level == 1) { $log_text= "[ERROR] "; last SWITCH; }

if ($log_level == 2) { $log_text= "[WARN] "; last SWITCH; }

if ($log_level == 3) { $log_text= "[INFO] "; last SWITCH; }

if ($log_level == 4) { $log_text= "[DEBUG] "; last SWITCH; }

}

return Utils::get_current_time.":".$log_text.$text;

}

#trim a string

sub trim {

my $s = shift;

$s =~ s/^\s+|\s+$//g;

return $s

};

}

# ############################################################################

# Documentation

# #################

=pod

=head1 NAME

server_monitor.pl

=head1 OPTIONS

    server_monitor.pl -u=admin -p=admin -h=192.168.1.50 -G=601 -P=3310 --debug=0 --log <full_path_to_file> --help

    sample [options] [file ...]

    Options:

      -u|user user to connect to the proxy

      -p|password Password for the proxy

      -h|host Proxy host

      -G Hostgroup ID with role definition.

      --retry_down The number of loop/test the check has to do before moving a node Down (default 0)

      --debug

      --log Full path to the log file ie (/var/log/proxysql/galera_check_) the check will add the identifier for the specific HG.

      -help help message

=head1 DESCRIPTION

Server monitor is a script to remove the server from the HostGroup which are not part of the replicaset anymore.

The script monitors the read_only flag and the repl_lag. If read_only=1 and repl_lag is NULL it removes the server from the HostGroup.

Why we need this?

Example: If we promote a new master and the old master won't be the a slave of the ne master, the ProxySQL will thought that server now is part of the

read hostgroup and going to send reads. But the old master does not part of the replicaset anymore. ProxySQL should not send any traffic.

=head1 Configure in ProxySQL

INSERT INTO scheduler (id,interval_ms,filename,arg1) values (10,2000,"/var/lib/proxysql/server_monitor.pl","-u=admin -p=admin -h=192.168.1.50 -G=601 -P=3310 --retry_down=2 --debug=0 --log=/var/lib/proxysql/server_check");

LOAD SCHEDULER TO RUNTIME;SAVE SCHEDULER TO DISK;

update scheduler set arg1="-u=admin -p=admin -h=192.168.1.50 -G=601 -P=3310 --debug=1 --log=/var/lib/proxysql/server_check" where id =10;

LOAD SCHEDULER TO RUNTIME;SAVE SCHEDULER TO DISK;

delete from scheduler where id=10;

LOAD SCHEDULER TO RUNTIME;SAVE SCHEDULER TO DISK;

=cut
注意事项
因为proxysql通过read_only变量来进行消息的转发控制,所以我们启动服务器的时候,一定要以read_only方式进行启动(即便是master)。如此就能避免很多类似多点同时写入的问题。
参考资料
https://www.percona.com/blog/2016/11/09/orchestrator-and-proxysql/
Orchestrator+Proxysql 实现自动导换+应用透明读写分离的更多相关文章
- MySQL Orchestrator自动导换+VIP切换
目录 Orchestrator总体结构... 测试环境信息... Orchestrator详细配置... SSH免密配置... /etc/hosts配置... visudo配置... /e ...
- SpringMVC+ Mybatis 配置多数据源 + 自动数据源切换 + 实现数据库读写分离
现在大型的电子商务系统,在数据库层面大都采用读写分离技术,就是一个Master数据库,多个Slave数据库.Master库负责数据更新和实时数据查询,Slave库当然负责非实时数据查询.因为在实际的应 ...
- MySQL ProxySQL读写分离使用初探
目的 在美团点评DBProxy读写分离使用说明文章中已经说明了使用目的,本文介绍ProxySQL的使用方法以及和DBProxy的性能差异.具体的介绍可以看官网的相关说明,并且这个中间件也是percon ...
- MySQL ProxySQL读写分离实践
目的 在上一篇文章MySQL ProxySQL读写分离使用初探里初步介绍了ProxySQL的使用,本文继续介绍它的一些特点和DBProxy的性能差异.深入一些去了解ProxySQL,通过测试来说明Pr ...
- ProxySQL+MGR实现读写分离和主节点故障无感知切换 - 完整操作记录
前面的文章介绍了ProxySQL用法,这里说下ProxySQL中间件针对Mysql组复制模式实现读写分离以及主节点故障时能够自动切换到新的主节点,而应用对此过程无感知的功能.Mysql组复制(MGR) ...
- ProxySQL读写分离
我们首先看一下自己的环境: MHA已经搭建: master: slave: slave: MHA manager在172.16.16.34,配置文件如下: [root@localhost bin]# ...
- Eclipse Oxygen 解决 自动导包的问题
换成了 Eclipse 的Oxygen 版本 , 发现之前好用的自动导包功能不能用了 (Ctrl+Shift+O) 再 网上看资料 上面说 将 In Windows 替换为Editing Java ...
- Android studio之更改快捷键及自动导包
更改AS中的代码提示快捷键,AS做的也挺智能的,在Keymap中可以选择使用eclipse的快捷键设置,但是虽然设置了,对有些快捷键还是不能使用,那么就需要我们手动去修改了. 在代码提示AS默认的快捷 ...
- Android Studio设置自动导包
Android Studio设置自动导包. 步骤: (1)找到File->Settings (2)找到Editor->General->Auto Import (3)依照上图勾选几个 ...
随机推荐
- python学习笔记02-简单游戏
一拖又过去快一个月了,哭聊.. 惰性千万不要有.. 今天简单接触一下条件语句 一个简单的文字游戏 1 print('----第一个文字游戏----') 2 temp = input('猜一下现在心里想 ...
- Spring Cloud专题之三:Hystrix
在微服务架构中,我们将系统拆分成很多个服务单元,各单位的应用间通过服务注册与订阅的方式相互依赖.由于每个单元都在不同的进程中运行,依赖通过远程调用的方式执行,这样就有可能因为网络原因或是依赖服务自身问 ...
- 20 批量ping主机
#!/bin/bash IP_LIST="`cat /root/ip.txt`" ip_dir="/root/ip_dir" [ ! -d ${ip_dir} ...
- SQL 清除数据库日志
exec sp_detach_db 'MCS4WLSQM','true' --运行上一个命令. --改名LOG文件后再关闭上一行代码,然后再运行下一行代码 exec sp_attach_single_ ...
- yoyogo v1.7.4 发布,支持 grpc v1.3.8 & etcd 3.5.0
YoyoGo (Go语言框架)一个简单.轻量.快速.基于依赖注入的微服务框架( web .grpc ),支持Nacos/Consoul/Etcd/Eureka/k8s /Apollo等 . https ...
- centos 8 gitlab 重置管理员的密码
登录gitlab安装服务器 由于 root 账户用的很少,所以我们容易忘记它的密码,但不代表它不重要,类似 linux 的 root 账户:一旦我们忘记了 root 账号的密码,我们需要知道重置的方法 ...
- AcWing 106. 动态中位数
依次读入一个整数序列,每当已经读入的整数个数为奇数时,输出已读入的整数构成的序列的中位数. #include<bits/stdc++.h> using namespace std; pri ...
- 从零玩转人脸识别之RGB人脸活体检测
从零玩转RGB人脸活体检测 前言 本期教程人脸识别第三方平台为虹软科技,本文章讲解的是人脸识别RGB活体追踪技术,免费的功能很多可以自行搭配,希望在你看完本章课程有所收获. ArcFace 离线SDK ...
- SpringBoot | 1.4 数据库事务处理
前言 前面讲解了Sring的AOP,可以知道它是用来抽取公共代码,增强方法的.而在JDBC操作数据库进行数据处理时,有很多重复的公共代码:事务的提交与回滚跟AOP的约定流程很相似.因此,Spring数 ...
- 消息队列——kafka
原文:再过半小时,你就能明白kafka的工作原理了 会出现什么情况呢? 1.为了这个女朋友,我请假回去拿(老板不批). 2.小哥一直在你楼下等(小哥还有其他的快递要送). 3.周末再送(显然等不及). ...