ReentrantLock之Condition源码解读
1.背景
阅读该源码的前提是,已经阅读了reentrantLock的源码!
2.await源码解读
condition代码理解的核心,其实就是理解到:
线程节点如何从sync双向链表队列到指定的条件队列中,
然后又如何从条件队列中到sync双向链表队列的
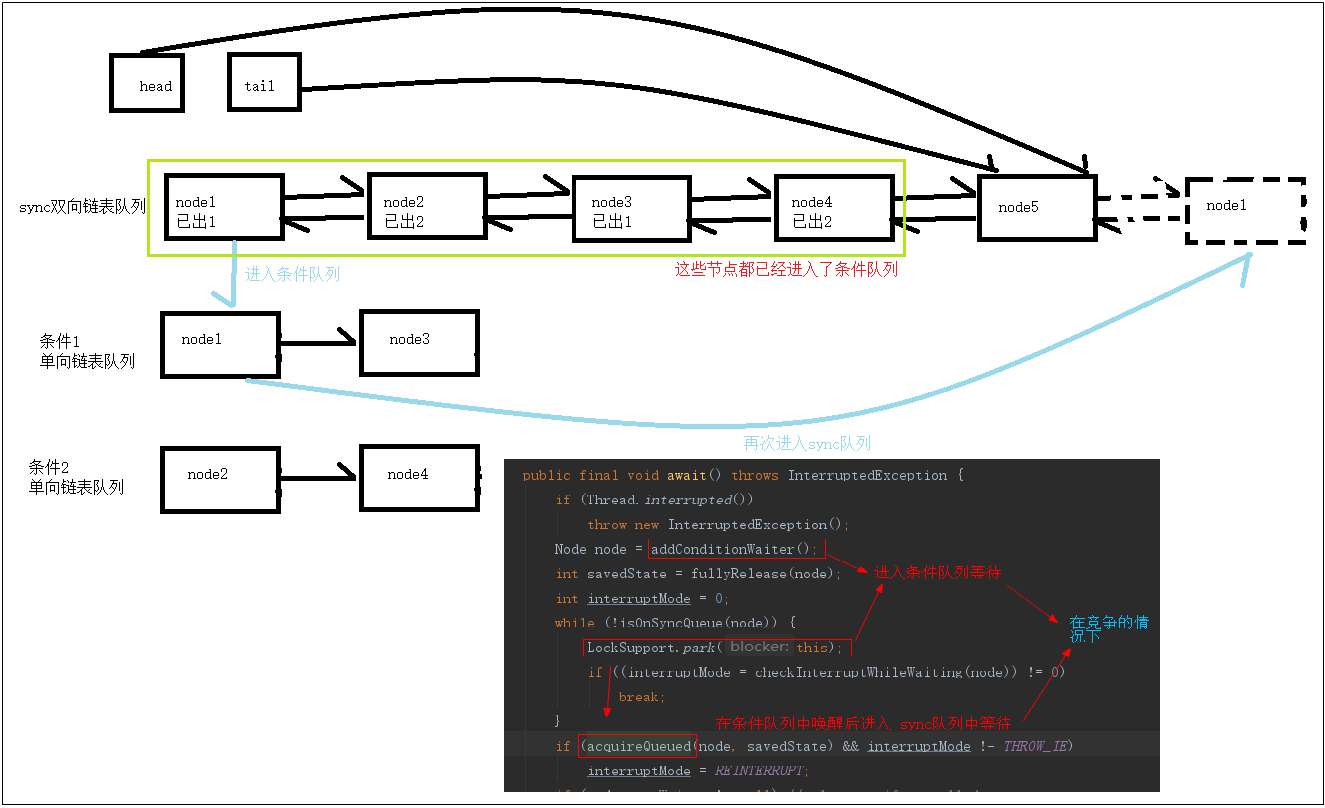
一定要先把下面的2个图理解到,再去看源码和断点调试就很容易理解了
核心逻辑图:
核心代码逻辑图:
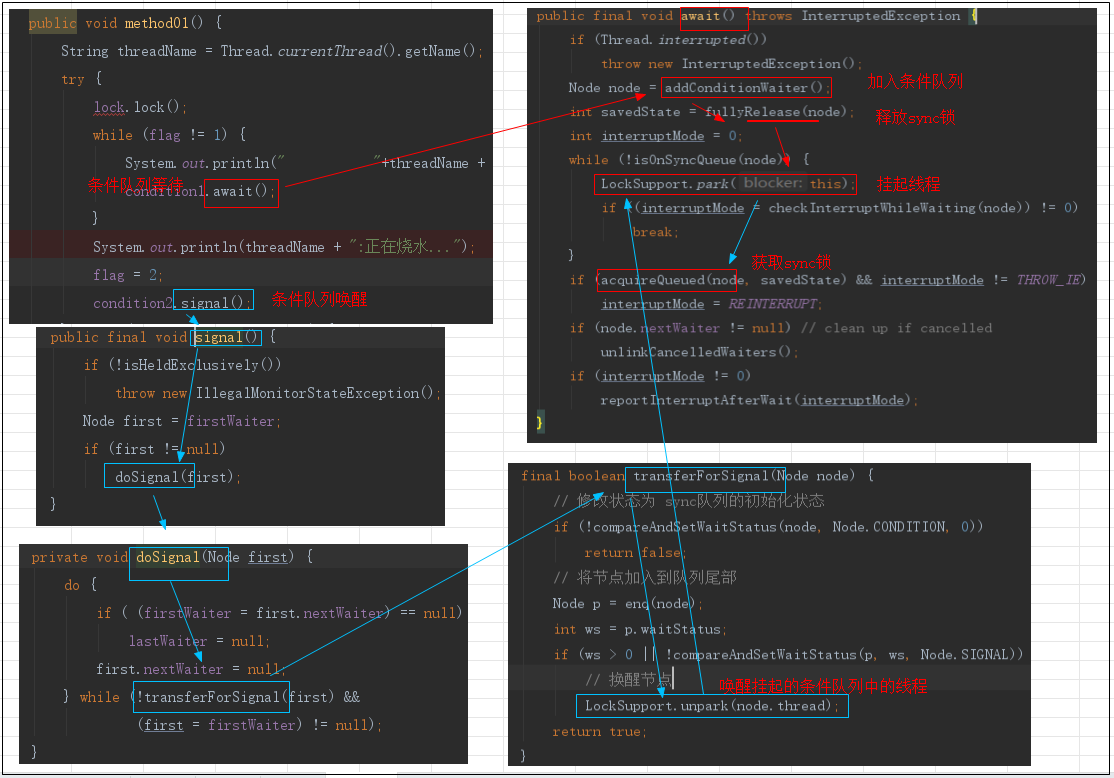
2.1.await方法详解
代码解读:
  /**

     * 进入条件等待

     */

    public final void await() throws InterruptedException {

        // 是否有中断标记

        if (Thread.interrupted())

            throw new InterruptedException();

        // 将线程加入到条件等待队列

        Node node = addConditionWaiter();

       /* fullyRelease(node) 释放锁并唤醒后继节点

         这里要结合ReentrantLock来理解,执行到这里说明是获取到了锁的,

         这里就是要释放ReentrantLock锁,然后进入到条件队列中等待*/

        int savedState = fullyRelease(node);

        // interruptMode =0表示没有中断, interruptMode =1表示退出时重新中断 ,interruptMode=-1表示退出时抛异常

        int interruptMode = 0;

        while (!isOnSyncQueue(node)) {

            // 在条件队列中等待

            LockSupport.park(this);

            // checkInterruptWhileWaiting(node)返回0,表示没有中断

            if ((interruptMode = checkInterruptWhileWaiting(node)) != 0)

                break;

        }

        // acquireQueued(node, savedState) 从sync队列中重新获取锁,并处理中断标记

        if (acquireQueued(node, savedState) && interruptMode != THROW_IE)

            interruptMode = REINTERRUPT;

        // node结点不是最后一个结点,清除条件队列中无效的节点

        if (node.nextWaiter != null) // clean up if cancelled

            unlinkCancelledWaiters();

        // 重新处理中断,具体中断方式取决于 interruptMode 的值,

        // interruptMode =1表示退出时重新中断 ,interruptMode=-1表示退出时抛异常int interruptMode = 0;

        if (interruptMode != 0)

            reportInterruptAfterWait(interruptMode);

    }
2.2.addConditionWaiter方法详解
代码解读:
  /**

     * 添加新的节点到条件队列

     * 这里的条件队列是 单链表,不是双链表

     * CONDITION = -2 表示是条件队列

     */

    private Node addConditionWaiter() {

        Node t = lastWaiter;

        // t.waitStatus != Node.CONDITION ?? 这个条件的作用

        if (t != null && t.waitStatus != Node.CONDITION) {

            // 去掉取消节点

            unlinkCancelledWaiters();

            // 将取消的节点,去掉后,尾节点可能会变

            t = lastWaiter;

        }

        Node node = new Node(Thread.currentThread(), Node.CONDITION);

        if (t == null)

            // 第一次进入条件队列

            firstWaiter = node;

        else

            // 将当前节点放在尾节点之后

            t.nextWaiter = node;

        // 设置新的尾节点

        lastWaiter = node;

        // 返回当前节点

        return node;

    }
2.3.fullyRelease方法详解
代码解读:
 /**

     * 释放锁,并唤醒后继节点

     *

     * @param node

     * @return

     */

    final int fullyRelease(Node node) {

        boolean failed = true;

        try {

            // 获取当前资源状态

            int savedState = getState();

            // release(savedState) 释放锁并唤醒后继节点

            if (release(savedState)) {

                failed = false;

                return savedState;

            } else {

                throw new IllegalMonitorStateException();

            }

        } finally {

            // 释放锁失败节点取消

            if (failed)

                node.waitStatus = Node.CANCELLED;

        }

    }
2.4.isOnSyncQueue方法详解
代码解读:
 /**

     * 判定节点是否在sync队列中

     *

     * @param node

     * @return

     */

    final boolean isOnSyncQueue(Node node) {

        // 如果节点标记位是CONDITION = -2的状态 或者 没有前继节点,说明节点不在队列中

        if (node.waitStatus == Node.CONDITION || node.prev == null)

            return false;

        // 如果下一个节点不为空说明节点在队列里面

        if (node.next != null) // If has successor, it must be on queue

            return true;

        // 遍历sync队列,查看节点是否在队列里面

        return findNodeFromTail(node);

    }
2.5.findNodeFromTail方法详解
代码解读:
   /**

     * 遍历节点,查看传入的节点是否在队列里面,在里面返回true

     *

     * @param node

     * @return

     */

    private boolean findNodeFromTail(Node node) {

        Node t = tail;

        for (; ; ) {

            if (t == node)

                return true;

            if (t == null)

                return false;

            // 从后往前遍历,还记得之前我们在讲ReentrantLock的源码时说过为什么要从后往前遍历么?

            t = t.prev;

        }

    }
2.6.checkInterruptWhileWaiting方法详解
代码解读:
 /**

     * // 该模式意味着在退出等待时重新中断

     * private static final int REINTERRUPT = 1;

     * // 该模式意味着在退出等待时抛出InterruptedException

     * private static final int THROW_IE = -1;

     *

     * @param node

     * @return

     */

    private int checkInterruptWhileWaiting(Node node) {

        // 当前线程没有被中断直接返回0

        // 当前线程已经被中断了的话

        return Thread.interrupted() ?

                // 取消时重新入队列成功,标记为退出时抛出异常

                // 取消时重新入队列失败,标记位退出时重新中断

                (transferAfterCancelledWait(node) ? THROW_IE : REINTERRUPT) :

                0;

    }
2.7.transferAfterCancelledWait方法详解
代码解读:
 /**

     * 条件等待队列中的节点如果已经被取消,将节点添加到sync队列的尾部

     *

     * @param node

     * @return 节点添加到尾部成功返回true, 否则返回false

     */

    final boolean transferAfterCancelledWait(Node node) {

        // 初始化节点

        if (compareAndSetWaitStatus(node, Node.CONDITION, 0)) {

            // 将节点添加到尾部

            enq(node);

            // 添加到队列成功返回true

            return true;

        }

        // 判断节点是否在Sync队列里面

        while (!isOnSyncQueue(node))

            // 不在队列里面则等待,直到线程执行完成

            Thread.yield();

        // 添加失败,返回false

        return false;

    }
2.8.unlinkCancelledWaiters方法详解
代码解读:
 /**

     * 作用:删除单项向链表中已经取消的节点,即状态不等于2的节点

     * 这是典型单向链表删除节点的逻辑,如果对这个段代码不是很理解,

     * 可以查看之前的数据结果部分

     */

    private void unlinkCancelledWaiters() {

        Node t = firstWaiter;

        Node trail = null;

        while (t != null) {

            Node next = t.nextWaiter;

            if (t.waitStatus != Node.CONDITION) {

                // 断开连接,帮助GC回收

                t.nextWaiter = null;

                if (trail == null)

                    // 重新定义头结点

                    firstWaiter = next;

                else

                    trail.nextWaiter = next;

                if (next == null)

                    // 最后的有效尾节点

                    lastWaiter = trail;

            } else {

                trail = t;

            }

            // 指针后移

            t = next;

        }

    }
2.9.reportInterruptAfterWait方法详解
代码解读:
 /**

     * 中断的具体处理方式

     * interruptMode =1表示退出时重新中断 ,interruptMode=-1表示退出时抛异常

     *

     * @param interruptMode

     * @throws InterruptedException

     */

    private void reportInterruptAfterWait(int interruptMode)

            throws InterruptedException {

        if (interruptMode == THROW_IE)

            // 抛出异常的处理方式

            throw new InterruptedException();

        else if (interruptMode == REINTERRUPT)

            // 自我中断的处理方式

            selfInterrupt();

    }
2.10.selfInterrupt方法详解
代码解读:
 /**

     * 当前线程执行中断处理

     */

    static void selfInterrupt() {

        Thread.currentThread().interrupt();

    }
3.signal源码解读
3.1.signal源码解读
代码:
    /**

     * 唤醒条件队列中的节点

     */

    public final void signal() {

        // 检查当前线程是否是拥有锁的线程

        if (!isHeldExclusively())

            throw new IllegalMonitorStateException();

        Node first = firstWaiter;

        if (first != null)

            // 执行唤醒方法

            doSignal(first);

    }
3.2.isHeldExclusively源码解读
代码:
    /**

     * 判定当前线程是否是拥有锁的线程

     * @return

     */

    protected final boolean isHeldExclusively() {

        return getExclusiveOwnerThread() == Thread.currentThread();

    }
3.3.doSignal源码解读
代码:
    /**

     * 执行唤醒条件队列中的节点

     * @param first

     */

    private void doSignal(Node first) {

        do {

            // 这个if的判定就是检查条件队列中是否还有节点,如果没有了,就将lastWaiter设置为null

            if ( (firstWaiter = first.nextWaiter) == null)

                lastWaiter = null;

            // 第一个节点出队列后,断开引用

            first.nextWaiter = null;

        } while (!transferForSignal(first) && (first = firstWaiter) != null);

    }
3.4.transferForSignal源码解读
 /**

     * 唤醒条件队列中的节点--> 到 sync对列中去

     * @param node

     * @return

     */

    final boolean transferForSignal(Node node) {

        // 修改状态为 sync队列的初始化状态

        if (!compareAndSetWaitStatus(node, Node.CONDITION, 0))

            return false;

        // 将节点加入到队列尾部

        Node p = enq(node);

        int ws = p.waitStatus;

        if (ws > 0 || !compareAndSetWaitStatus(p, ws, Node.SIGNAL))

            // 换醒节点

            LockSupport.unpark(node.thread);

        return true;

    }
4.测试
不论你是否理解了源码,都建议大家多使用断点调试查看
节点是如何进入队列,
如何出队列,
如何挂起线程,
如何唤醒线程的.....
测试代码


package com.my.aqs.condition;

import java.util.concurrent.locks.Condition;

import java.util.concurrent.locks.Lock;

import java.util.concurrent.locks.ReentrantLock;

public class ConditionTest {

    // 功能标记位

    private int flag = 1;

    // 创建非公平锁

    private Lock lock = new ReentrantLock(false);

    // 条件锁1-烧水

    private Condition condition1 = lock.newCondition();

    // 条件锁2-泡茶

    private Condition condition2 = lock.newCondition();

    // 条件锁3-喝茶

    private Condition condition3 = lock.newCondition();

    /**

     * 功能:烧水

     */

    public void method01() {

        String threadName = Thread.currentThread().getName();

        try {

            lock.lock();

            while (flag != 1) {

                System.out.println("           "+threadName + ",需要,挂起当前线程,进入条件等待队列,因为当前不是烧水标记1,而是:" + flag);

                condition1.await();

            }

            System.out.println(threadName + ":正在烧水...");

           // System.out.println(threadName + ":烧水完成,唤醒泡茶线程");

            flag = 2;

            condition2.signal();

        } catch (InterruptedException e) {

            e.printStackTrace();

        } finally {

            lock.unlock();

        }

    }

    /**

     * 功能:泡茶

     */

    public void method02() {

        String threadName = Thread.currentThread().getName();

        try {

            lock.lock();

            while (flag != 2) {

                System.out.println("           "+threadName + ",需要,挂起当前线程,进入条件等待队列,因为当前不是泡茶标记2,而是:" + flag);

                condition2.await();

            }

            System.out.println(threadName + ":正在泡茶...");

           // System.out.println(threadName + ":泡茶完成,唤醒喝茶线程");

            flag = 3;

            condition3.signal();

        } catch (InterruptedException e) {

            e.printStackTrace();

        } finally {

            lock.unlock();

        }

    }

    /**

     * 功能:喝茶

     */

    public void method03() {

        String threadName = Thread.currentThread().getName();

        try {

            lock.lock();

            while (flag != 3) {

                System.out.println("           "+threadName + ",需要,挂起当前线程,进入条件等待队列,因为当前不是喝茶标记3,而是:" + flag);

                condition3.await();

            }

            System.out.println(threadName + ":正在喝茶...");

           // System.out.println(threadName + ":喝茶完成,唤醒烧水线程");

            flag = 1;

            condition1.signal();

        } catch (InterruptedException e) {

            e.printStackTrace();

        } finally {

            lock.unlock();

        }

    }

    /**

     * 睡眠时间是为了让线程按照这个顺序进入队列等待 喝茶->泡茶->烧水

     * @param args

     */

    public static void main(String[] args) {

        ConditionTest conditionTest = new ConditionTest();

        for (int i = 1; i <= 2; i++) {

            // 烧水

            new Thread(() -> {

                try {

                    Thread.sleep(5*1000L);

                } catch (InterruptedException e) {

                    e.printStackTrace();

                }

                conditionTest.method01();

            }, "烧水-线程 " + i).start();

            // 泡茶

            new Thread(() -> {

                try {

                    Thread.sleep(5*100L);

                } catch (InterruptedException e) {

                    e.printStackTrace();

                }

                conditionTest.method02();

            }, "泡茶-线程 " + i).start();

            // 喝茶

            new Thread(() -> {

                try {

                    Thread.sleep(100L);

                } catch (InterruptedException e) {

                    e.printStackTrace();

                }

                conditionTest.method03();

            }, "喝茶-线程 " + i).start();

        }

    }

}
断点调试图:

测试结果:
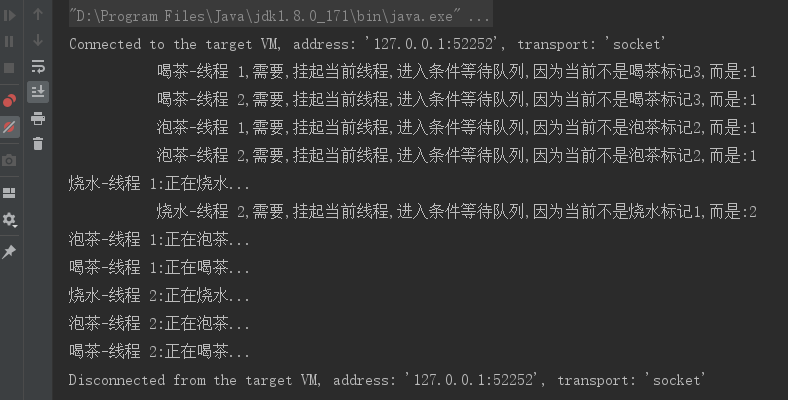
完美
ReentrantLock之Condition源码解读的更多相关文章
- ReentrantLock和condition源码浅析(二)
转载请注明出处... 接着上一篇的ReentrantLock和condition源码浅析(一),这篇围绕着condition 一.condition的介绍 在这里为了作对比,引入Object类的两个方 ...
- ReentrantLock和condition源码浅析(一)
转载请注明出处..... 一.介绍 大家都知道,在java中如果要对一段代码做线程安全操作,都用到了锁,当然锁的实现很多,用的比较多的是sysnchronize和reentrantLock,前者是ja ...
- AbstractQueuedSynchronizer源码解读--续篇之Condition
1. 背景 在之前的AbstractQueuedSynchronizer源码解读中,介绍了AQS的基本概念.互斥锁.共享锁.AQS对同步队列状态流转管理.线程阻塞与唤醒等内容.其中并不涉及Condit ...
- AbstractQueuedSynchronizer源码解读
1. 背景 AQS(java.util.concurrent.locks.AbstractQueuedSynchronizer)是Doug Lea大师创作的用来构建锁或者其他同步组件(信号量.事件等) ...
- CyclicBarrier源码解读
1. 简介 JUC中的CyclicBarrier提供了一种多线程间的同步机制,可以让多个线程在barrier等待其它线程到达barrier.正如其名CyclicBarrier含义就是可以循环使用的屏障 ...
- ScheduledThreadPoolExecutor源码解读
1. 背景 在之前的博文--ThreadPoolExecutor源码解读已经对ThreadPoolExecutor的实现原理与源码进行了分析.ScheduledExecutorService也是我们在 ...
- JDK容器类List,Set,Queue源码解读
List,Set,Queue都是继承Collection接口的单列集合接口.List常用的实现主要有ArrayList,LinkedList,List中的数据是有序可重复的.Set常用的实现主要是Ha ...
- AbstractQueuedSynchronizer 源码解读(转载)
转载文章,拜读了一下原文感觉很不错,转载一下,侵删 链接地址:http://objcoding.com/2019/05/05/aqs-exclusive-lock/ Java并发之AQS源码分析(一) ...
- SDWebImage源码解读之SDWebImageDownloaderOperation
第七篇 前言 本篇文章主要讲解下载操作的相关知识,SDWebImageDownloaderOperation的主要任务是把一张图片从服务器下载到内存中.下载数据并不难,如何对下载这一系列的任务进行设计 ...
- AFNetworking 3.0 源码解读(三)之 AFURLRequestSerialization
这篇就讲到了跟请求相关的类了 关于AFNetworking 3.0 源码解读 的文章篇幅都会很长,因为不仅仅要把代码进行详细的的解释,还会大概讲解和代码相关的知识点. 上半篇: URI编码的知识 关于 ...
随机推荐
- org.springframework.beans.BeanUtils.copyProperties对象赋值的常见问题
org.springframework.beans.BeanUtils.copyProperties对象赋值的常见问题 //codepublic static void copyProperties( ...
- Java8统计金额demo
Java8统计金额demo package com.example.core.mydemo.java8; public class GoodsPriceDTO { private String goo ...
- Timing!!!
End or Beginning "毕业",一个令人无限憧憬的具象化名词.适逢高考结束,又有一批人将奔赴更远的地方,离开他们生活了十八年的城市,在这之中亦然有着曾经的我们.但大家把 ...
- apache开源 国内镜像地址
https://mirrors.tuna.tsinghua.edu.cn/apache/kylin/apache-kylin-3.1.1/
- 制作Jdk镜像
本文介绍用Dockerfile的方式构建Jdk镜像,请保证安装了Docker环境. 首先创建/opt/jdk目录,后续步骤都在该目录下进行操作. 准备好Jdk安装文件,放到/opt/jdk目录下. 编 ...
- Nuxt 3组件开发与管理
title: Nuxt 3组件开发与管理 date: 2024/6/20 updated: 2024/6/20 author: cmdragon excerpt: 摘要:本文深入探讨了Nuxt 3的组 ...
- Java面试知识点(六)hashmap深度理解
1.hashmap 的数据结构 要知道 hashmap 是什么,首先要搞清楚它的数据结构,在 java 编程语言中,最基本的结构就是两种,一个是数组,另外一个是模拟指针(引用),所有的数据结构都可以用 ...
- python重拾第九天-进程、线程、协程
本节内容 操作系统发展史介绍 进程.与线程区别 python GIL全局解释器锁 线程 语法 join 线程锁之Lock\Rlock\信号量 将线程变为守护进程 Event事件 queue队列 生产者 ...
- .NET中使用RabbitMQ延时队列和死信队列
RabbitMQ延时队列和死信队列 延时队列和死信队列 延时队列是RabbitMQ中的一种特殊队列,它可以在消息到达队列后延迟一段时间再被消费. 延时队列的实现原理是通过使用消息的过期时间和死信队列来 ...
- js脚本化css
脚本化CSS 我们刚讲过如何获取和设置行内样式的值,但是我们开发不会所有样式都写在行内,同时js没法获取内嵌样式表和外部样式表中的值. 事实上DOM提供了可靠的API,得到计算后的样式. 1. 获取计 ...