Spring 的依赖注入
Spring 的依赖注入
@
每博一文案
"在千千万万个选择里",我永远选择去做哪些我认为值得的事,我可能干得很漂亮,也可能搞得一塌糊涂。

但没关系,重要的是我为之努力过。”我们很难做好每件事,让人生不留下任何遗憾,尽力而为就好“享受

生活的过程,接受结果。”人生是用来体验的,不是用来演绎完美的,我慢慢能接受自己身上哪些灰暗的部分,原谅自己

的迟钝和平庸,允许自己出错,允许自己偶尔断电,带着缺憾拼命绽放,这是与自己达成和解的唯一方式。”

尽力就好,允许所有的事与愿违。和不适合你的过去说再见,哪些伤痛的不堪的,霉烂的过去绝口不提。

太阳的起落在告诉我们,永远会有崭新的一天。

“真正有价值的事情,都不是轻松舒服就能完成的”。那些晨间的寂静,不眠的星光,清醒的克制,

孤军奋战的坚持,暗暗许下的承诺,才是我热爱自己的时刻。"人生就是一步一步地打怪升级,坚持

下去,你所执着的努力一定会有所收获",

                                       ——————《网友的评论》
1. 依赖注入
依赖注入实现了控制反转的思想:
- Spring通过依赖注入的方式来完成Bean(类/对象)的管理。
- Bean的管理:Bean对象的创建,以及Bean对象中属性的赋值(或者叫做Bean对象之间的关联的维护)。
依赖注入:
- 依赖指的是对象和对象 之间的关联关系。
- 注入指的是一种数据传递行为,通过注入行为来让对象和对象产生关系。
依赖注入常见的实现方式包括两种:
- 第一种:set注入
- 第二种: 构造注入
**准备工作:通过 maven 导入对应 spring6 的相关jar **
<?xml version="1.0" encoding="UTF-8"?>

<project xmlns="http://maven.apache.org/POM/4.0.0"

         xmlns:xsi="http://www.w3.org/2001/XMLSchema-instance"

         xsi:schemaLocation="http://maven.apache.org/POM/4.0.0 http://maven.apache.org/xsd/maven-4.0.0.xsd">

    <modelVersion>4.0.0</modelVersion>

    <groupId>org.example</groupId>

    <artifactId>spring6-003-dependency-injection-blog</artifactId>

    <version>1.0-SNAPSHOT</version>

    <!--    将项目的打包方式为 jar Java项目的方式-->

    <packaging>jar</packaging>

    <properties>

        <maven.compiler.source>17</maven.compiler.source>

        <maven.compiler.target>17</maven.compiler.target>

    </properties>

    <!--    导入相关的依赖仓库-->

    <dependencies>

        <!--        spring6 框架-->

        <!--spring contest 仓库-->

        <!-- https://mvnrepository.com/artifact/org.springframework/spring-context -->

        <dependency>

            <groupId>org.springframework</groupId>

            <artifactId>spring-context</artifactId>

            <version>6.0.3</version>

        </dependency>

        <!-- junit4 -->

        <dependency>

            <groupId>junit</groupId>

            <artifactId>junit</artifactId>

            <version>4.13.2</version>

            <scope>test</scope>

        </dependency>

        <dependency>

            <groupId>org.apache.logging.log4j</groupId>

            <artifactId>log4j-core</artifactId>

            <version>2.19.0</version>

        </dependency>

        <dependency>

            <groupId>org.apache.logging.log4j</groupId>

            <artifactId>log4j-slf4j2-impl</artifactId>

            <version>2.19.0</version>

        </dependency>

    </dependencies>

</project>
1.1 构造注入
所谓的构造注入:核心就是:调用了对应的构造方法,进行一个类/对象的属性赋值。
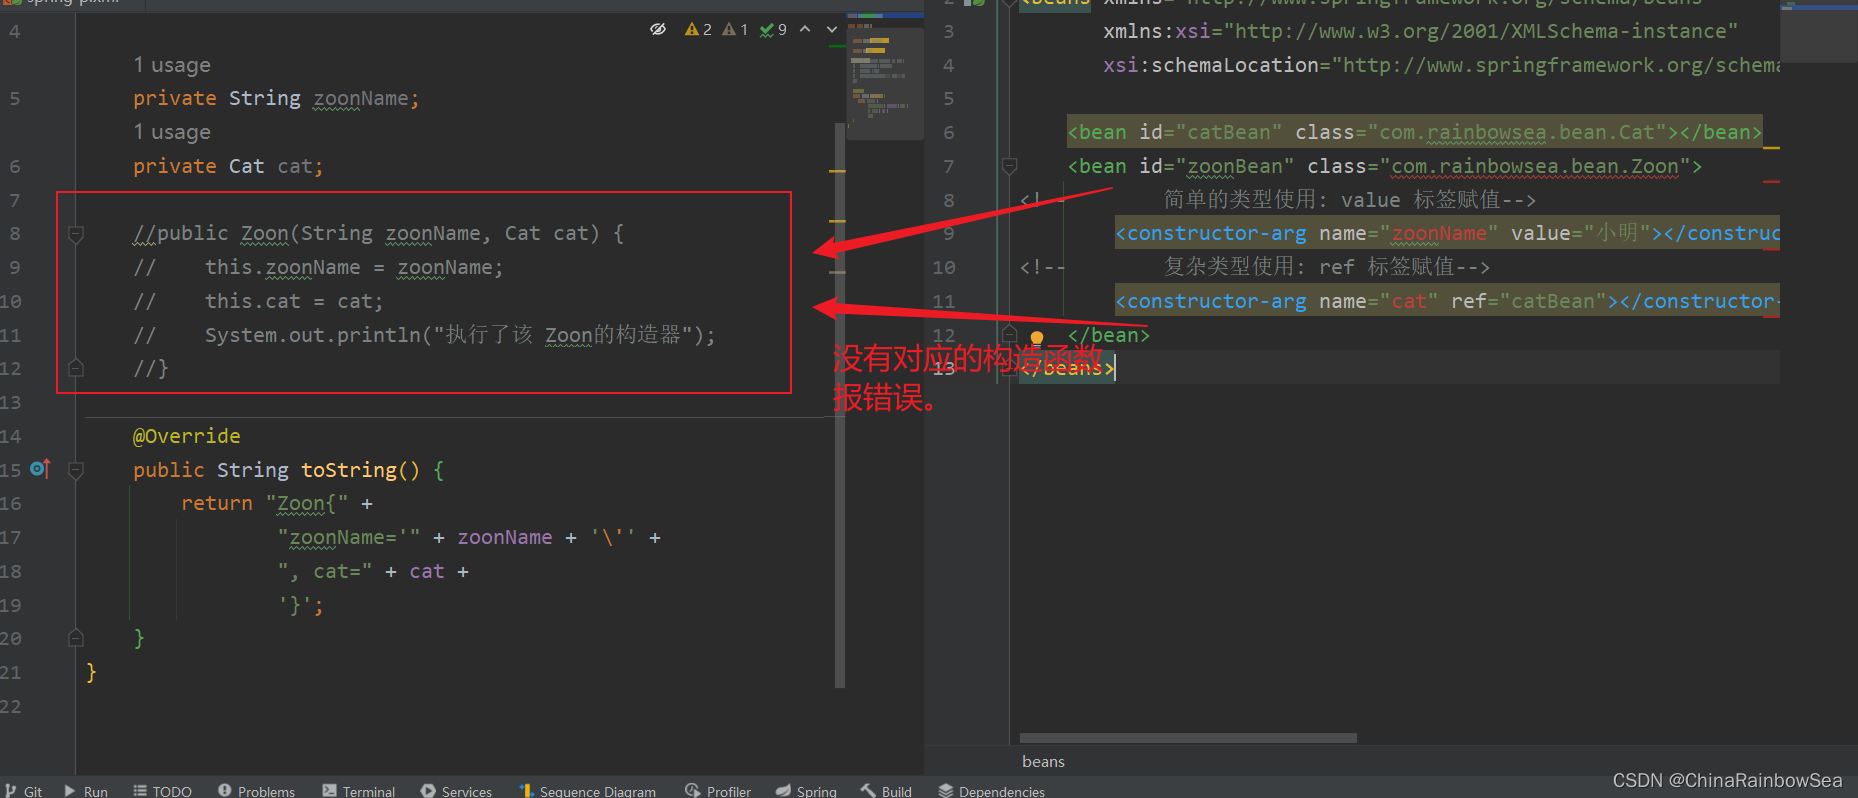
既然要调用构造方法,进行一个属性的赋值的话,那么我们的对应属性的赋值的,构造方法必须存在才行。
构造注入:是在对象创建的时刻进行注入的。
重点:构造注入的使用的标签是:
<constructor-arg></constructor-arg>
1.1.1 通过参数名进行构造注入
格式:
    <bean id="" class="">

<!--        简单的类型使用: value 标签赋值-->

        <constructor-arg name="" value=""></constructor-arg>

<!--        复杂类型使用: ref 标签赋值-->

        <constructor-arg name="" ref=""></constructor-arg>

    </bean>
package com.rainbowsea.bean;

public class Cat {

    private String name;

    @Override

    public String toString() {

        return "Cat{" +

                "name='" + name + '\'' +

                '}';

    }

}
package com.rainbowsea.bean;
public class Zoon {
private String zoonName;
private Cat cat;
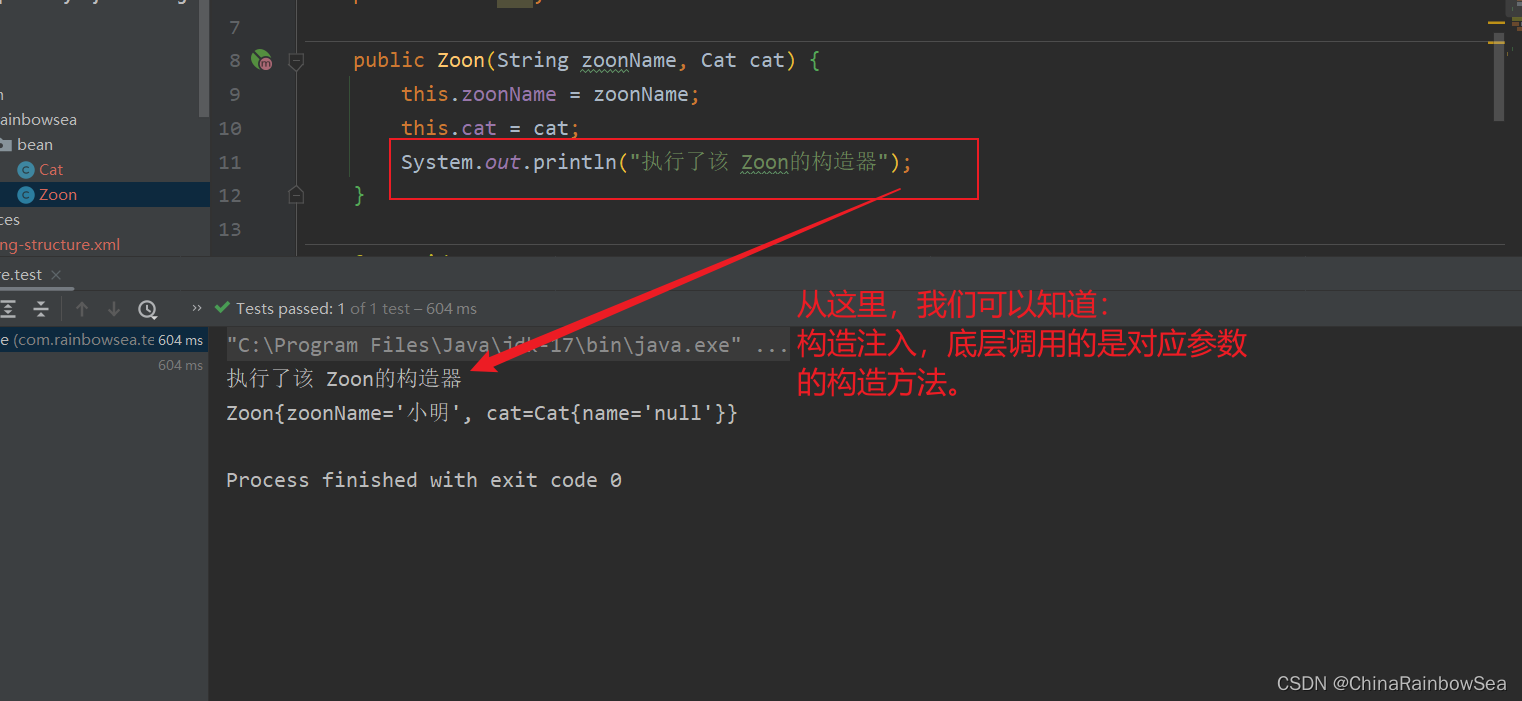
public Zoon(String zoonName, Cat cat) {
this.zoonName = zoonName;
this.cat = cat;
System.out.println("执行了该 Zoon的构造器");
}
@Override
public String toString() {
return "Zoon{" +
"zoonName='" + zoonName + '\'' +
", cat=" + cat +
'}';
}
}
spring.xml
<?xml version="1.0" encoding="UTF-8"?>

<beans xmlns="http://www.springframework.org/schema/beans"

       xmlns:xsi="http://www.w3.org/2001/XMLSchema-instance"

       xsi:schemaLocation="http://www.springframework.org/schema/beans http://www.springframework.org/schema/beans/spring-beans.xsd">

    <bean id="catBean" class="com.rainbowsea.bean.Cat"></bean>

    <bean id="zoonBean" class="com.rainbowsea.bean.Zoon">

<!--        简单的类型使用: value 标签赋值-->

        <constructor-arg name="zoonName" value="小明"></constructor-arg>

<!--        复杂类型使用: ref 标签赋值-->

        <constructor-arg name="cat" ref="catBean"></constructor-arg>

    </bean>

</beans>
运行测试:
package com.rainbowsea.test;

import com.rainbowsea.bean.Zoon;

import org.junit.Test;

import org.springframework.context.ApplicationContext;

import org.springframework.context.support.ClassPathXmlApplicationContext;

public class SpringStructure {

    @Test

    public void test() {

        // 获取到对应的 spring6当中的xml的,容器对象

        // 面向接口编程,左边为接口,

        ApplicationContext applicationContext = new ClassPathXmlApplicationContext("spring-structure.xml");

        // 通过 id 获取到对应的类/class

        Zoon zoonBean = applicationContext.getBean("zoonBean", Zoon.class);

        System.out.println(zoonBean);

    }

}
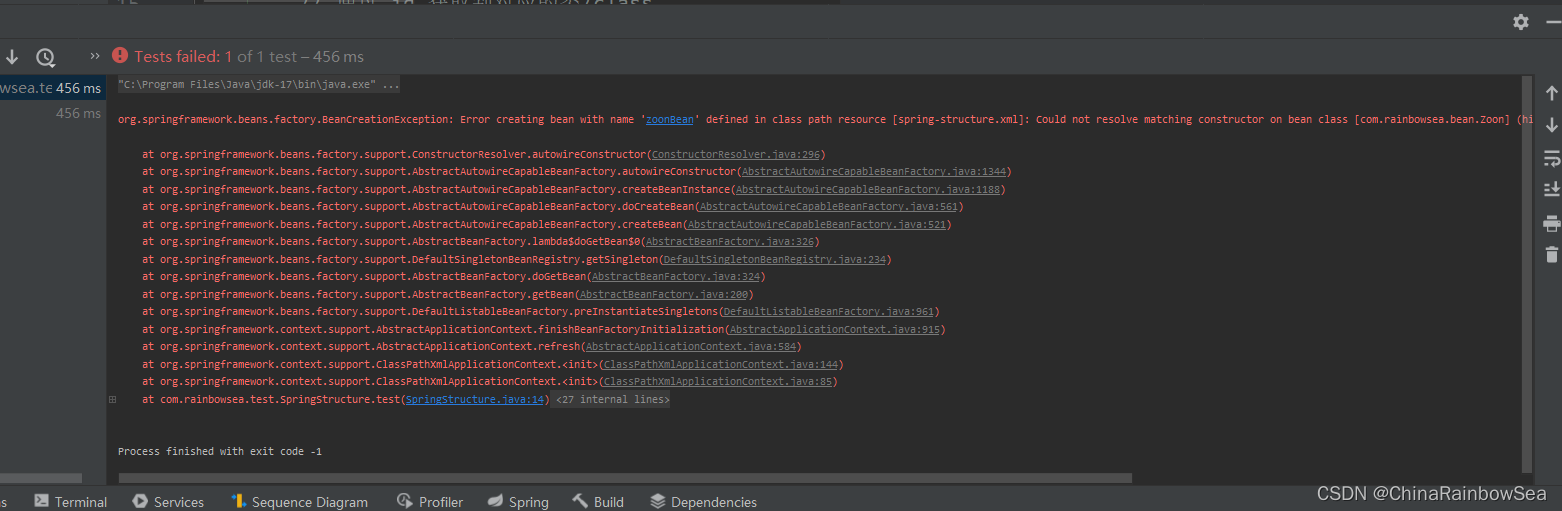
测试如果,我们将构造方法删除了,就不行了,报如下错误:
1.1.2 通过参数的下标,进行构造注入
格式:
<?xml version="1.0" encoding="UTF-8"?>

<beans xmlns="http://www.springframework.org/schema/beans"

       xmlns:xsi="http://www.w3.org/2001/XMLSchema-instance"

       xsi:schemaLocation="http://www.springframework.org/schema/beans http://www.springframework.org/schema/beans/spring-beans.xsd">

<!--     index 下标注入: 注意:第一个参数是从 0 开始的,简单的类型使用: value 标签赋值-->

        <constructor-arg index="0" value=""></constructor-arg>

<!--        复杂类型使用: ref 标签赋值-->

        <constructor-arg index="1" ref=""></constructor-arg>

    </bean>

</beans>
<?xml version="1.0" encoding="UTF-8"?>

<beans xmlns="http://www.springframework.org/schema/beans"

       xmlns:xsi="http://www.w3.org/2001/XMLSchema-instance"

       xsi:schemaLocation="http://www.springframework.org/schema/beans http://www.springframework.org/schema/beans/spring-beans.xsd">

    <bean id="catBean" class="com.rainbowsea.bean.Cat"></bean>

    <bean id="zoonBean" class="com.rainbowsea.bean.Zoon">

<!--         index 下标注入: 注意:第一个参数是从 0 开始的,简单的类型使用: value 标签赋值-->

        <constructor-arg index="0" value="小明"></constructor-arg>

<!--        复杂类型使用: ref 标签赋值-->

        <constructor-arg index="1" ref="catBean"></constructor-arg>

    </bean>

</beans>
运行测试:

1.1.3 不指定参数下标,不指定参数名字,通过自动装配的方式
格式:但是这种方式不建议:因为可读性十分的差。
<?xml version="1.0" encoding="UTF-8"?>

<beans xmlns="http://www.springframework.org/schema/beans"

       xmlns:xsi="http://www.w3.org/2001/XMLSchema-instance"

       xsi:schemaLocation="http://www.springframework.org/schema/beans http://www.springframework.org/schema/beans/spring-beans.xsd">

    <bean id="catBean" class="com.rainbowsea.bean.Cat"></bean>

    <bean id="zoonBean" class="com.rainbowsea.bean.Zoon">

<!--      简单的类型使用: value 标签赋值-->

        <constructor-arg value="xxx"></constructor-arg>

<!--        复杂类型使用: ref 标签赋值-->

        <constructor-arg ref="xxx"></constructor-arg>

    </bean>

</beans>
<?xml version="1.0" encoding="UTF-8"?>

<beans xmlns="http://www.springframework.org/schema/beans"

       xmlns:xsi="http://www.w3.org/2001/XMLSchema-instance"

       xsi:schemaLocation="http://www.springframework.org/schema/beans http://www.springframework.org/schema/beans/spring-beans.xsd">

    <bean id="catBean" class="com.rainbowsea.bean.Cat"></bean>

    <bean id="zoonBean" class="com.rainbowsea.bean.Zoon">

<!--      简单的类型使用: value 标签赋值-->

        <constructor-arg value="小明"></constructor-arg>

<!--        复杂类型使用: ref 标签赋值-->

        <constructor-arg ref="catBean"></constructor-arg>

    </bean>

</beans>
运行测试:
1.2 set 注入
set 注入顾名思义:是基于 set () 方法实现的,底层通过反射机制调用属性对应的 set() 方法然后给属性赋值。这种方式 要求属性必须对外提供 set() 方法。
package com.rainbowsea.bean;

public class Cat {

    private String name;

    public String getName() {

        return name;

    }

    @Override

    public String toString() {

        return "Cat{" +

                "name='" + name + '\'' +

                '}';

    }

}
package com.rainbowsea.bean;
public class Zoon {
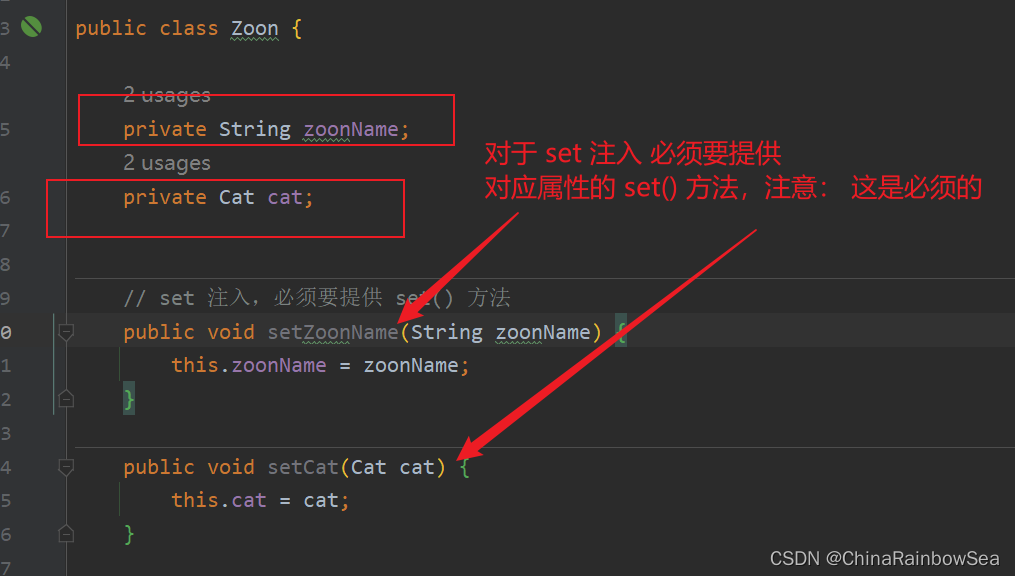
private String zoonName;
private Cat cat;
// set 注入,必须要提供 set() 方法
public void setZoonName(String zoonName) {
this.zoonName = zoonName;
}
public void setCat(Cat cat) {
this.cat = cat;
}
@Override
public String toString() {
return "Zoon{" +
"zoonName='" + zoonName + '\'' +
", cat=" + cat +
'}';
}
}
set注入的格式如下:
<?xml version="1.0" encoding="UTF-8"?>

<beans xmlns="http://www.springframework.org/schema/beans"

       xmlns:xsi="http://www.w3.org/2001/XMLSchema-instance"

       xsi:schemaLocation="http://www.springframework.org/schema/beans http://www.springframework.org/schema/beans/spring-beans.xsd">

    <bean id="xxx" class="xxx">

<!--        set 注入使用: <property></property> 标签:

        同样的: value 为简单类型的赋值-->

        <property name="xxx" value=""></property>

        <!--

        同样的: ref 为复杂类型的赋值-->

        <!--    name 属性怎么指定值,set 方法的方法名: ,然后把剩下的单词字母变小写,写到这里-->

<!--        ref 翻译为引用,英语单词: references ,ref 后面指定的是 bean 的id-->

<!--        id 是唯一的不可以重复的出现的 ref 和 value 是一样的。-->

        <property name="xxx" ref="xxx"></property>

    </bean>

</beans>
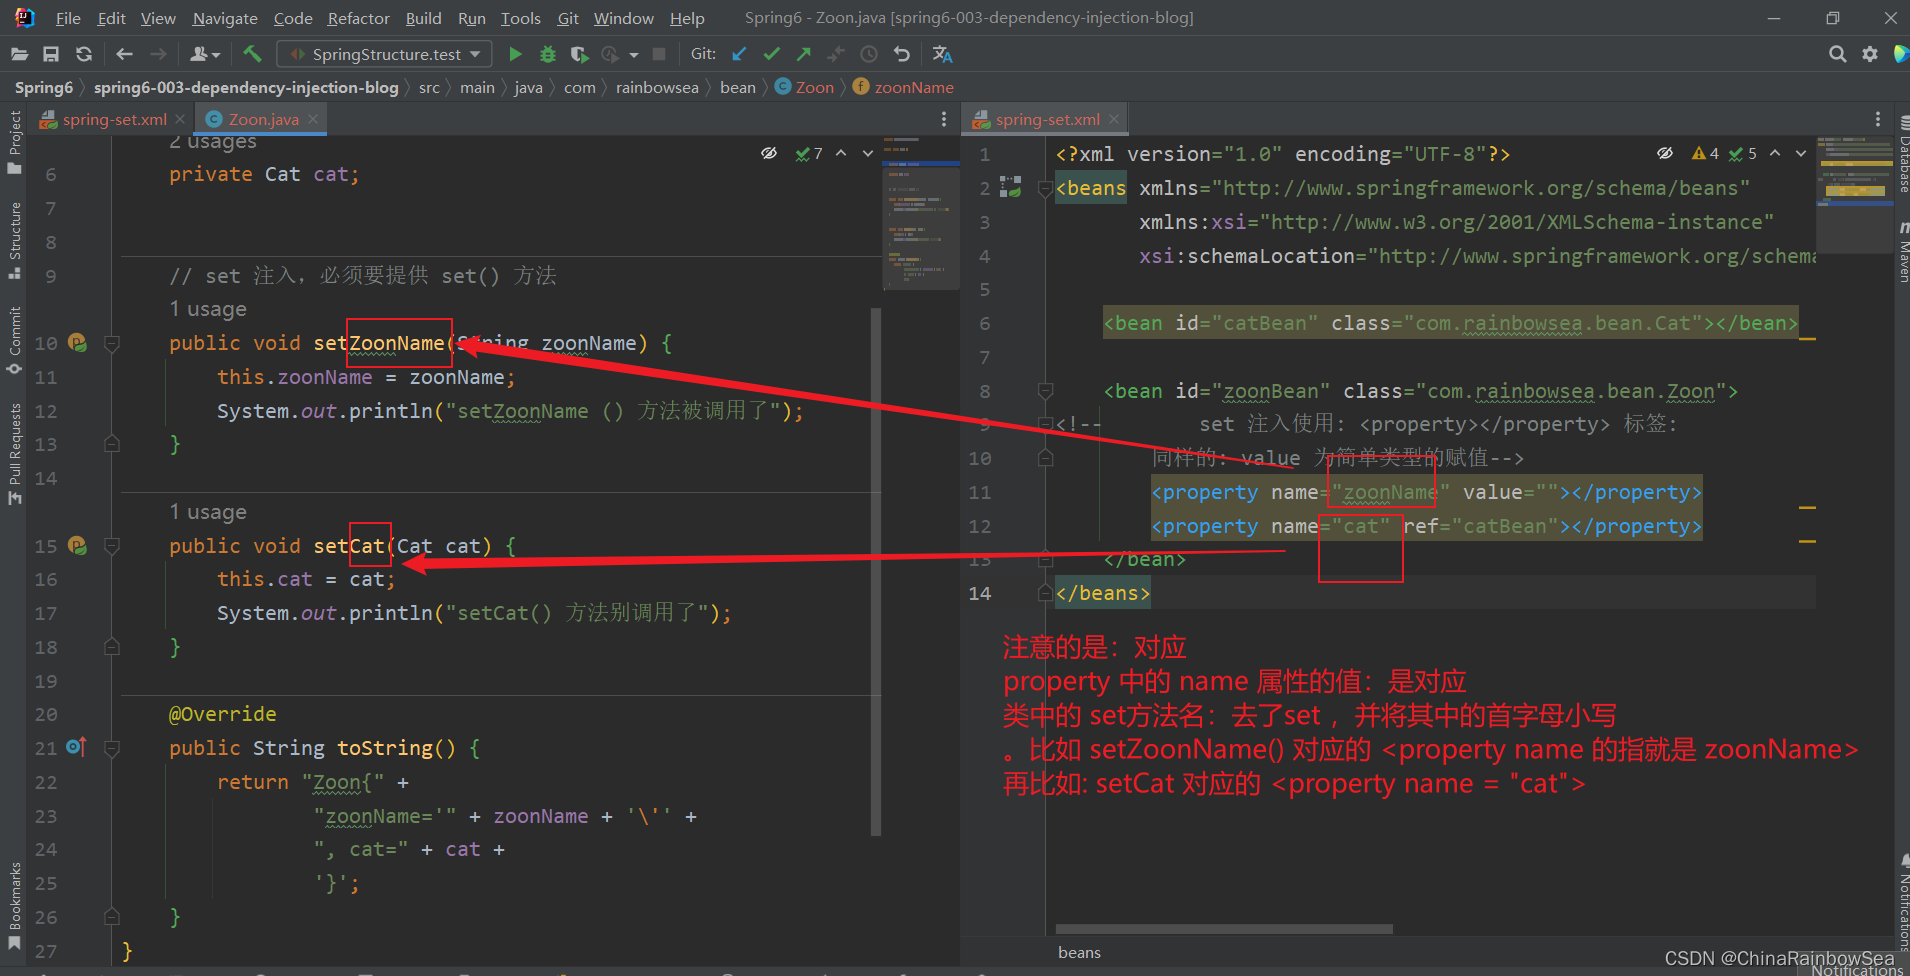
需要注意的是:
- 其中的
<property name="xxx"></property>中的 name 必须是 对应类当中的 set() 方法。去了,set,其次是 首字母小写 。这是不可以乱写的。 - Eg:
说明property标签的name是:setUserDao()方法名演变得到的。演变的规律是:

● setUsername() 演变为 username

● setPassword() 演变为 password

● setUserDao() 演变为 userDao

● setUserService() 演变为 userService
- 具体的如下图所示:
运行测试:
package com.rainbowsea.test;

import com.rainbowsea.bean.Zoon;

import org.junit.Test;

import org.springframework.context.ApplicationContext;

import org.springframework.context.support.ClassPathXmlApplicationContext;

public class SpringStructure {

    @Test

    public void test() {

        // 获取到对应的 spring6当中的xml的,容器对象

        // 面向接口编程,左边为接口,

        ApplicationContext applicationContext = new ClassPathXmlApplicationContext("spring-set.xml");

        // 通过 id 获取到对应的类/class

        Zoon zoonBean = applicationContext.getBean("zoonBean", Zoon.class);

        System.out.println(zoonBean);

    }

}
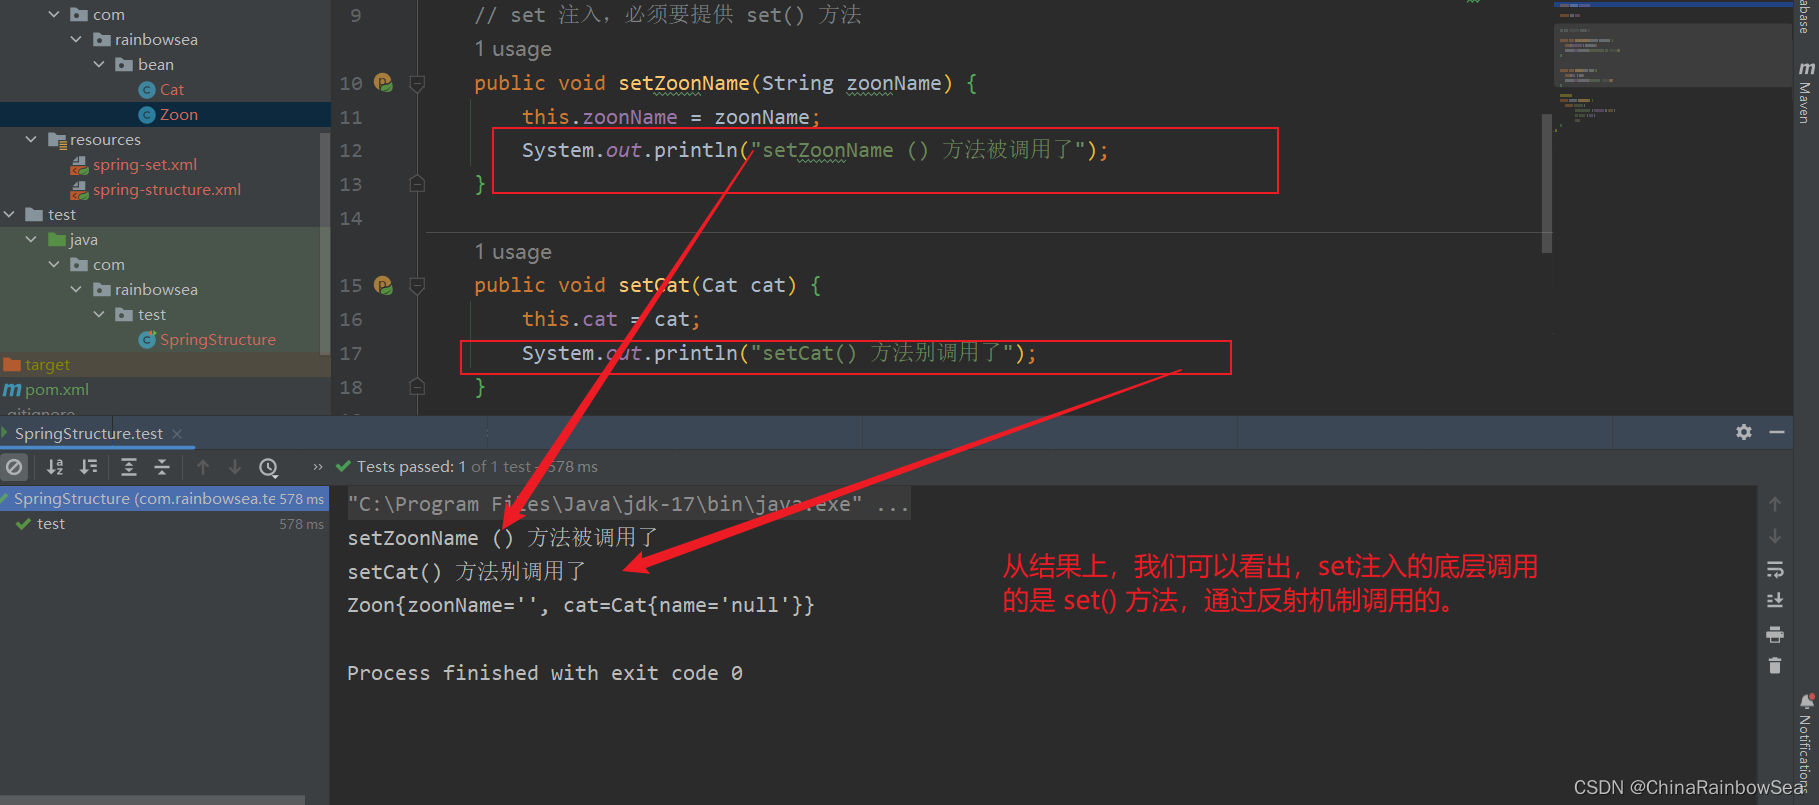
测试:我们如果把: 对应的 set 方法注释掉了,运行测试一下。
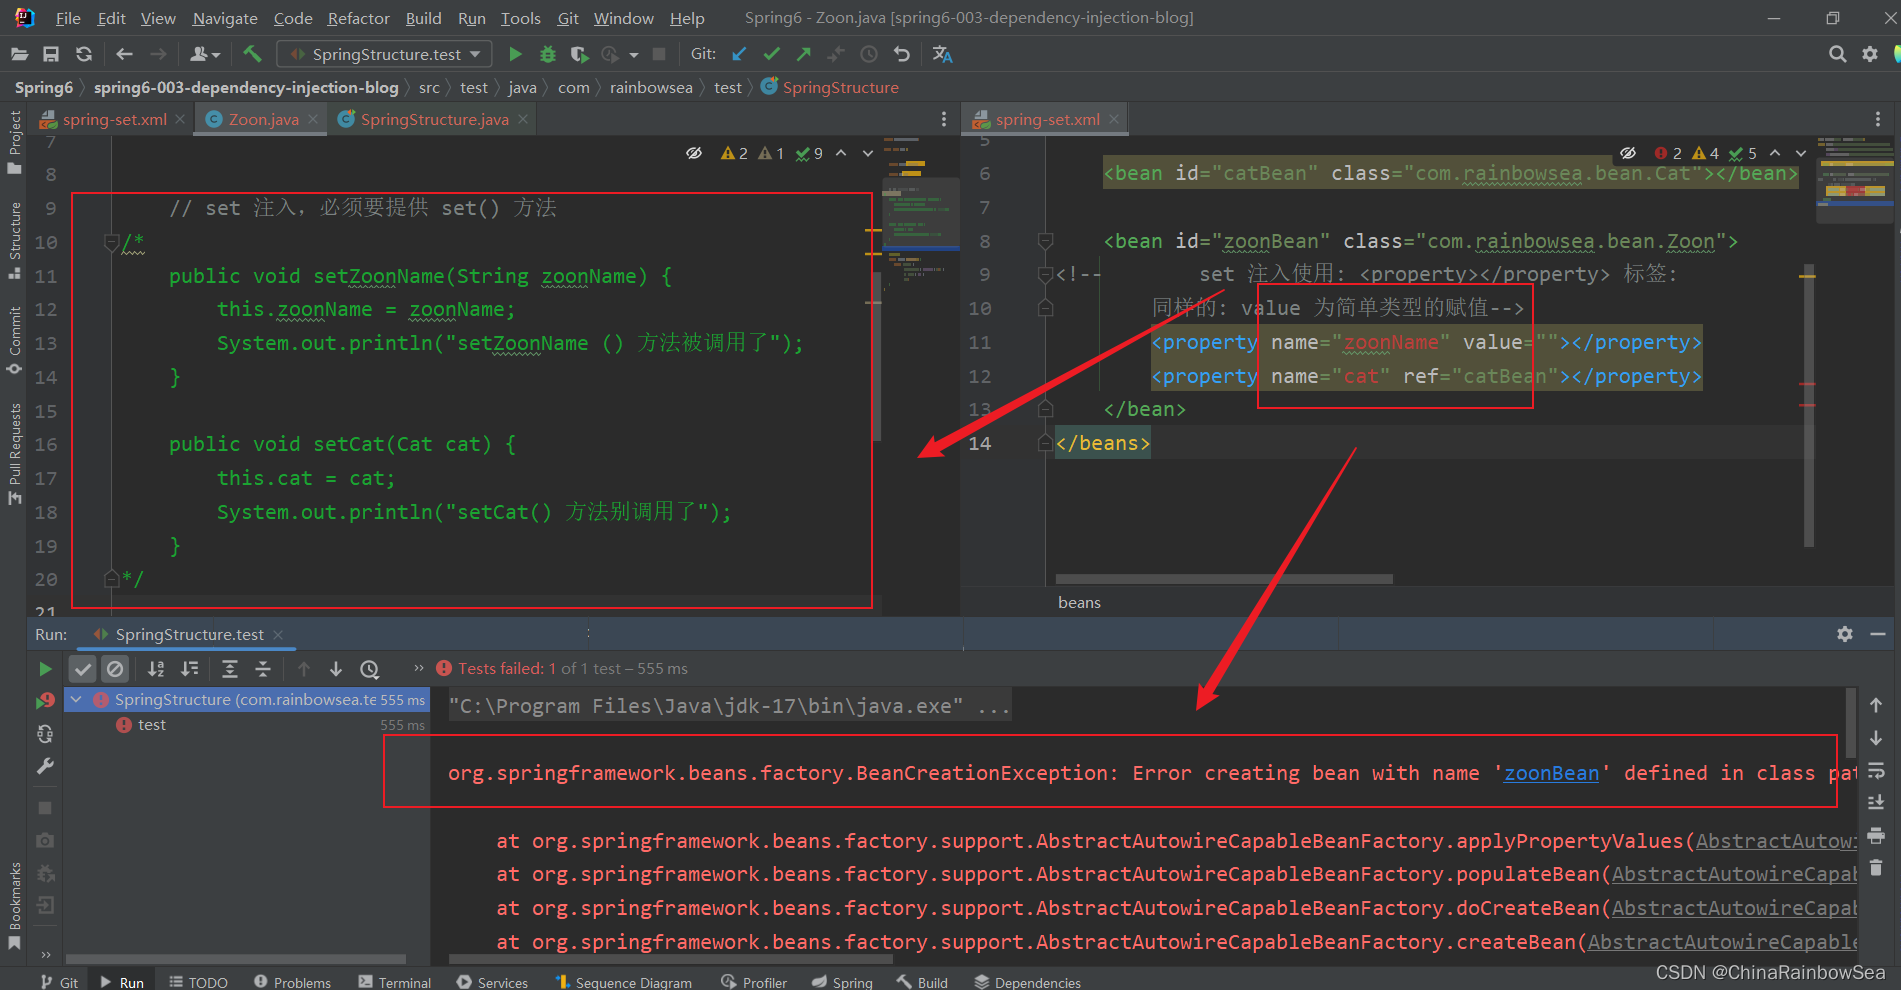
从结果上,我们可以看出:set 方法是必须 存在的。
set 注入的简单总结:
- 实现原理:
通过property标签获取到属性名:userDao:
通过性名推断出set方法名:setUserDao
通过反射机制调用setUserDao()方法给属性赋值
property标签的 name是属性名。
property标签的ref是要注入的bean对象的id。(通过ref属性来完成bean的装配,这是bean最简单的一种装配方式。装配指的是:创建系统组件之间关联的动作)
set注入的核心实现原理:通过反射机制调用set方法来给属性赋值,让两个对象之间产生关系。
2. set注入的各种方式详解
实际上在实际的开发过程中,我们使用的更多的是 set()方法的注入 。
2.1 set 注入外部Bean
外部Bean的特点: bean定义到外面,在property标签中使用ref 属性或是 value 属性进行注入。通常这种方式是常用。
格式如下:
<?xml version="1.0" encoding="UTF-8"?>

<beans xmlns="http://www.springframework.org/schema/beans"

       xmlns:xsi="http://www.w3.org/2001/XMLSchema-instance"

       xsi:schemaLocation="http://www.springframework.org/schema/beans http://www.springframework.org/schema/beans/spring-beans.xsd">

    <bean id="catBean" class="com.rainbowsea.bean.Cat"></bean>

    <bean id="zoonBean" class="com.rainbowsea.bean.Zoon">

<!--如下:方式是 外部 bean 的注入的方式-->

        <property name="zoonName" value=""></property>

        <property name="cat" ref="catBean"></property>

    </bean>

</beans>

上面:我们测试用的 set 注入的方式:用的都是这种外部 Bean 的方式。
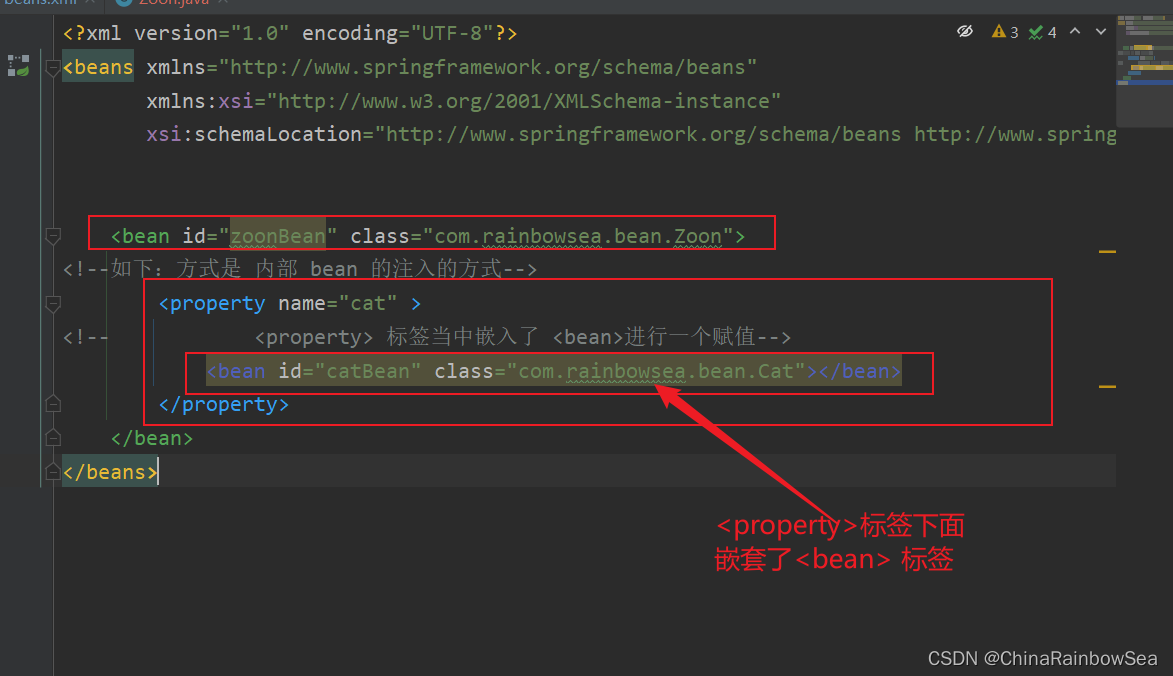
2.2 set 注入内部Bean
内部Bean的方式:在bean标签中嵌套bean标签:
具体格式如下:
<?xml version="1.0" encoding="UTF-8"?>

<beans xmlns="http://www.springframework.org/schema/beans"

       xmlns:xsi="http://www.w3.org/2001/XMLSchema-instance"

       xsi:schemaLocation="http://www.springframework.org/schema/beans http://www.springframework.org/schema/beans/spring-beans.xsd">

    <bean id="zoonBean" class="com.rainbowsea.bean.Zoon">

<!--如下:方式是 内部 bean 的注入的方式-->

        <property name="cat" >

<!--            <property> 标签当中嵌入了 <bean>进行一个赋值-->

            <bean id="catBean" class="com.rainbowsea.bean.Cat">

            </bean>

        </property>

    </bean>

</beans>
运行测试:

2.3 set 注入类型
2.3.1 set 注入简单类型
package com.rainbowsea.bean;

public class Cat {

    private int age;

    private String name;

    // set注入:底层反射调用 set 方法

    public void setAge(int age) {

        this.age = age;

    }

    public void setName(String name) {

        this.name = name;

    }

    @Override

    public String toString() {

        return "Cat{" +

                "age=" + age +

                ", name='" + name + '\'' +

                '}';

    }

}
格式:
在set 注入当中:简单类型的注使用 value 标签属性,进行一个属性的赋值操作
需要特别注意:如果给简单类型赋值,使用value属性或value标签。而不是ref。
<?xml version="1.0" encoding="UTF-8"?>
<beans xmlns="http://www.springframework.org/schema/beans"
xmlns:xsi="http://www.w3.org/2001/XMLSchema-instance"
xsi:schemaLocation="http://www.springframework.org/schema/beans http://www.springframework.org/schema/beans/spring-beans.xsd">
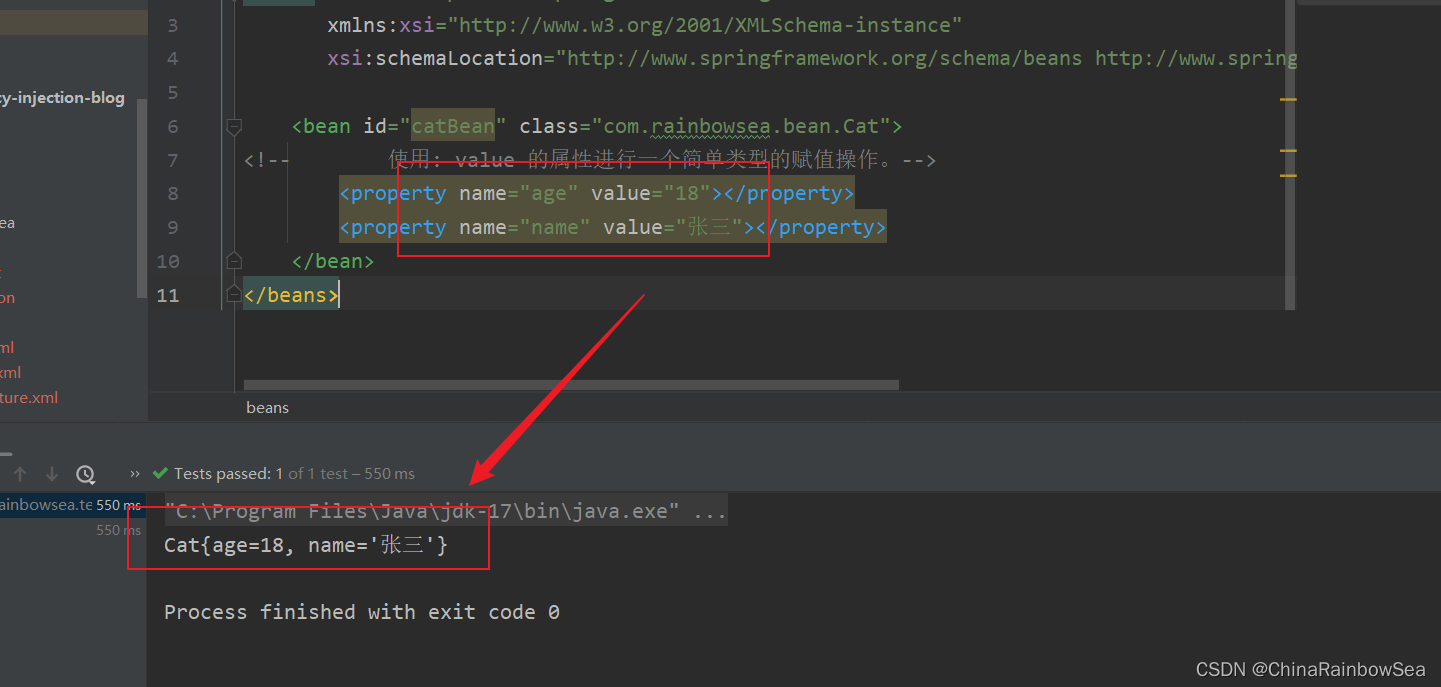
<bean id="catBean" class="com.rainbowsea.bean.Cat">
<!-- 使用: value 的属性进行一个简单类型的赋值操作。-->
<property name="age" value="18"></property>
<property name="name" value="张三"></property>
</bean>
</beans>
运行测试:
package com.rainbowsea.test;

import com.rainbowsea.bean.Cat;

import com.rainbowsea.bean.Zoon;

import org.junit.Test;

import org.springframework.context.ApplicationContext;

import org.springframework.context.support.ClassPathXmlApplicationContext;

public class SpringStructure {

    @Test

    public void test() {

        // 获取到对应的 spring6当中的xml的,容器对象

        // 面向接口编程,左边为接口,

        ApplicationContext applicationContext = new ClassPathXmlApplicationContext("spring-sets.xml");

        // 通过 id 获取到对应的类/class

        Cat catBean = applicationContext.getBean("catBean", Cat.class);

        System.out.println(catBean);

    }

}
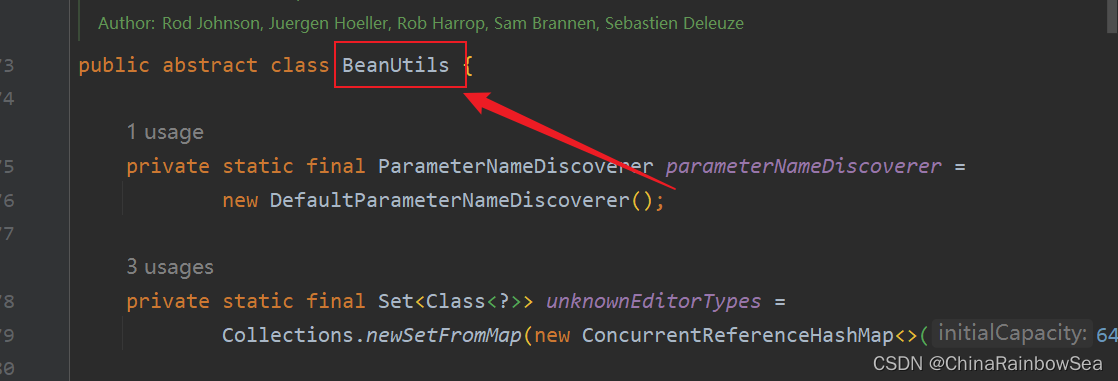
既然我们知道了:简单类型如何使用 set 注入了,那么我们就需要知道哪些是 简单类型了 ?
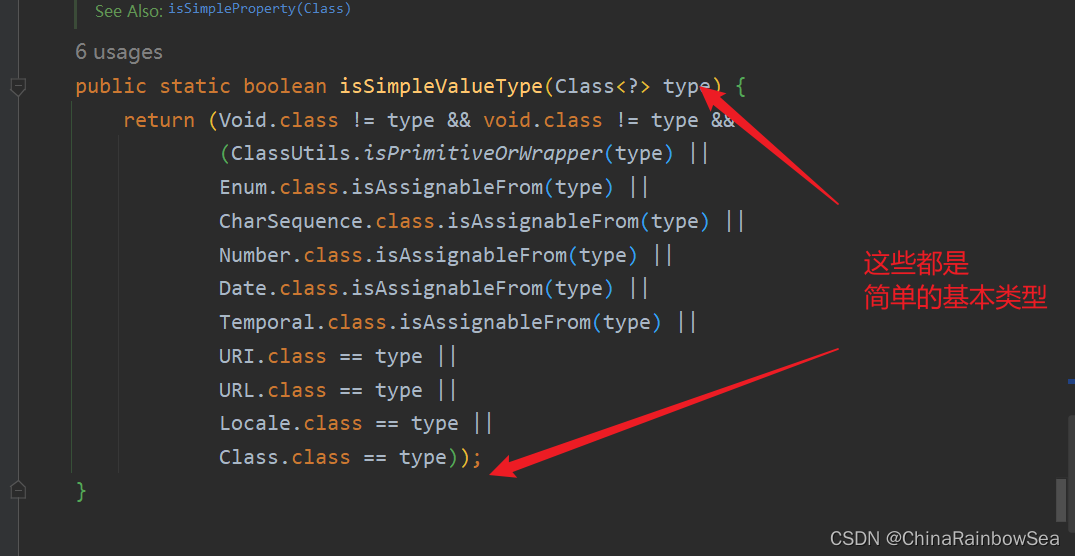
简单类型包括哪些呢?可以通过Spring的源码来分析一下:BeanUtils类
	/**

	 * Check if the given type represents a "simple" value type: a primitive or

	 * primitive wrapper, an enum, a String or other CharSequence, a Number, a

	 * Date, a Temporal, a URI, a URL, a Locale, or a Class.

	 * <p>{@code Void} and {@code void} are not considered simple value types.

	 * @param type the type to check

	 * @return whether the given type represents a "simple" value type

	 * @see #isSimpleProperty(Class)

	 */

	public static boolean isSimpleValueType(Class<?> type) {

		return (Void.class != type && void.class != type &&

				(ClassUtils.isPrimitiveOrWrapper(type) ||

				Enum.class.isAssignableFrom(type) ||

				CharSequence.class.isAssignableFrom(type) ||

				Number.class.isAssignableFrom(type) ||

				Date.class.isAssignableFrom(type) ||

				Temporal.class.isAssignableFrom(type) ||

				URI.class == type ||

				URL.class == type ||

				Locale.class == type ||

				Class.class == type));

	}
通过源码分析得知,简单类型包括:
- 基本数据类型
- 基本数据类型对应的包装类
- String或其他的CharSequence子类
- Number子类
- Date子类
- Enum子类
- URI
- URL
- Temporal子类
- Locale
- Class
- 另外还包括以上简单值类型对应的数组类型。
测试验证:
package com.rainbowsea.bean;

/**

 * 枚举类

 */

public enum Season {

    SPRING,SUMMER,AUTUMN,WINTER

}
package com.rainbowsea.bean;

public class SimpleValueType {

    // 下面的都是简单的类型

    private int age;

    private Integer age2;

    private boolean flag;

    private Boolean flag2;

    private char c;

    private Character c2;

    private Season season;  // 枚举

    private String username;

    private Class clazz;

    // set 注入必须要:设置 set() 方法

    public void setAge(int age) {

        this.age = age;

    }

    public void setAge2(Integer age2) {

        this.age2 = age2;

    }

    public void setFlag(boolean flag) {

        this.flag = flag;

    }

    public void setFlag2(Boolean flag2) {

        this.flag2 = flag2;

    }

    public void setC(char c) {

        this.c = c;

    }

    public void setC2(Character c2) {

        this.c2 = c2;

    }

    public void setSeason(Season season) {

        this.season = season;

    }

    public void setUsername(String username) {

        this.username = username;

    }

    public void setClazz(Class clazz) {

        this.clazz = clazz;

    }

    @Override

    public String toString() {

        return "SimpleValueType{" +

                "age=" + age +

                ", age2=" + age2 +

                ", flag=" + flag +

                ", flag2=" + flag2 +

                ", c=" + c +

                ", c2=" + c2 +

                ", season=" + season +

                ", username='" + username + '\'' +

                ", clazz=" + clazz +

                '}';

    }

}
<?xml version="1.0" encoding="UTF-8"?>

<beans xmlns="http://www.springframework.org/schema/beans"

       xmlns:xsi="http://www.w3.org/2001/XMLSchema-instance"

       xsi:schemaLocation="http://www.springframework.org/schema/beans http://www.springframework.org/schema/beans/spring-beans.xsd">

    <bean  id="svt" class="com.rainbowsea.bean.SimpleValueType">

        <!--        下面这种方式是外部的注入-->

        <property name="age" value="20"></property>

        <property name="age2" value="20"></property>

        <property name="username" value="zhangsan"></property>

        <property name="season" value="SPRING"></property>

        <property name="flag" value="false"></property>

        <property name="flag2" value="true"></property>

        <property name="c" value="男"></property>

        <!--        如果简单类型使用的是 ref 是会报错的, ref 注入的是 bean 类的信息-->

        <property name="c2" value="女"></property>

        <property name="clazz" value="java.lang.String"></property>

    </bean>

</beans>
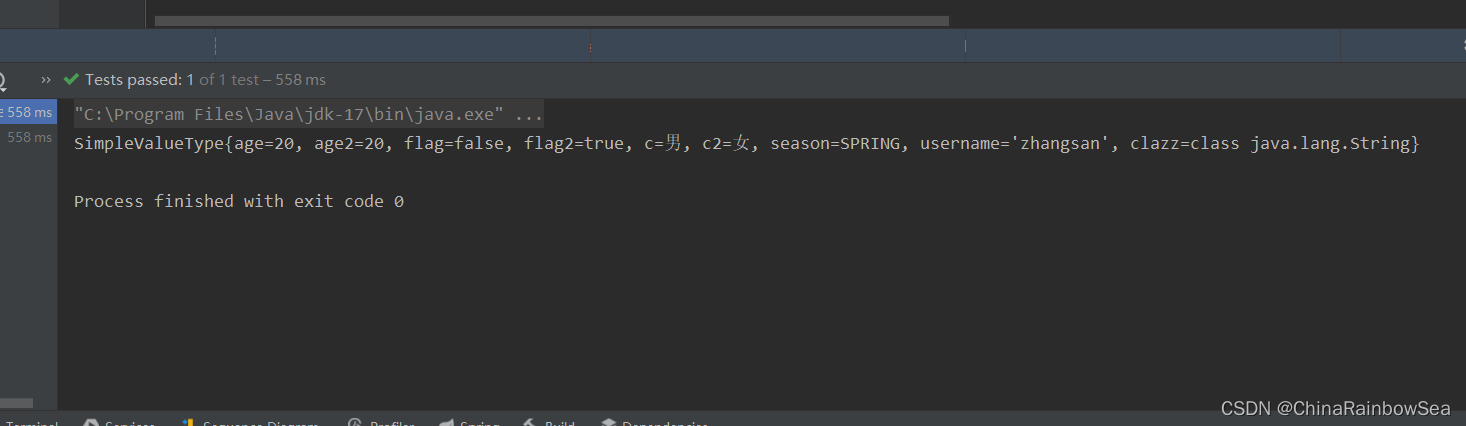
运行测试:
package com.rainbowsea.test;

import com.rainbowsea.bean.SimpleValueType;

import org.junit.Test;

import org.springframework.context.ApplicationContext;

import org.springframework.context.support.ClassPathXmlApplicationContext;

public class SpringStructure {

    @Test

    public void test() {

        // 获取到对应的 spring6当中的xml的,容器对象

        // 面向接口编程,左边为接口,

        ApplicationContext applicationContext = new ClassPathXmlApplicationContext("spring-sets.xml");

        // 通过 id 获取到对应的类/class

        SimpleValueType svt = applicationContext.getBean("svt", SimpleValueType.class);

        System.out.println(svt);

    }

}
注意了: 特殊的日期时间进行一个特殊的赋值:
从上面的 BeanUtils 我们可以知道的的是 Date ,它是被Spring定义为了一个简单类型,来进行处理的。
但是,我们进行一个如下的测试:
package com.rainbowsea.bean;

import java.util.Date;

public class TestDate {

    private Date date;

    public void setDate(Date date) {

        this.date = date;

    }

    @Override

    public String toString() {

        return "TestDate{" +

                "date=" + date +

                '}';

    }

}
<?xml version="1.0" encoding="UTF-8"?>

<beans xmlns="http://www.springframework.org/schema/beans"

       xmlns:xsi="http://www.w3.org/2001/XMLSchema-instance"

       xsi:schemaLocation="http://www.springframework.org/schema/beans http://www.springframework.org/schema/beans/spring-beans.xsd">

    <bean id="testDateBean" class="com.rainbowsea.bean.TestDate">

        <property name="date" value="2023 -05-6"></property>

    </bean>

</beans>
package com.rainbowsea.test;

import com.rainbowsea.bean.SimpleValueType;

import com.rainbowsea.bean.TestDate;

import org.junit.Test;

import org.springframework.context.ApplicationContext;

import org.springframework.context.support.ClassPathXmlApplicationContext;

public class SpringStructure {

    @Test

    public void test() {

        // 获取到对应的 spring6当中的xml的,容器对象

        // 面向接口编程,左边为接口,

        ApplicationContext applicationContext = new ClassPathXmlApplicationContext("spring-sets.xml");

        // 通过 id 获取到对应的类/class

        TestDate testDate = applicationContext.getBean("date", TestDate.class);

        System.out.println(testDate);

    }

}
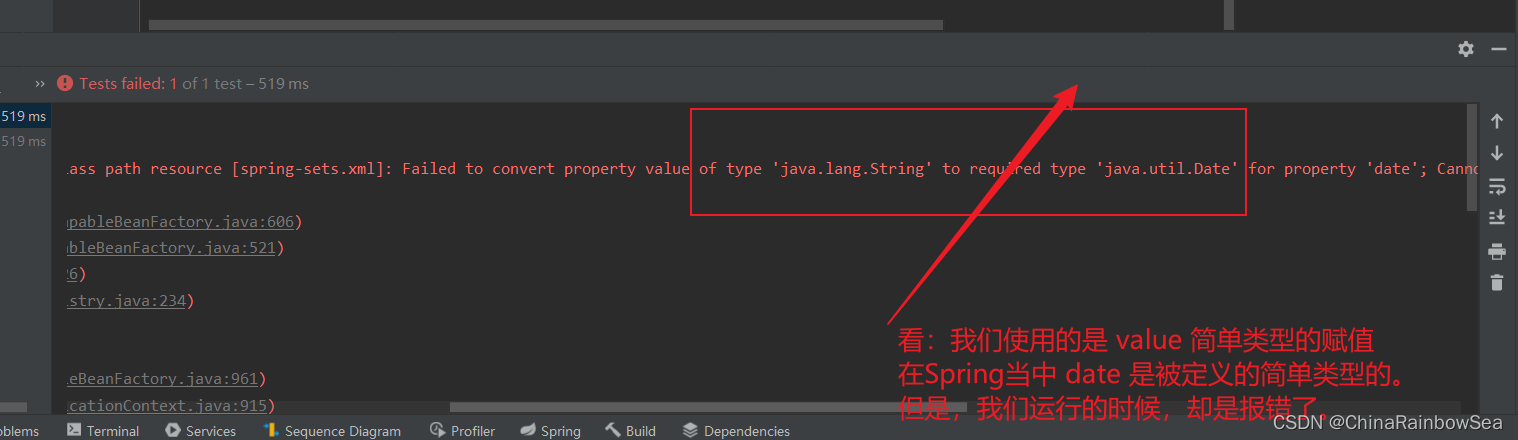
报错的原因是:
从报错的信息上,我们可以看到:
[
说:
'java.lang.String' to required type 'java.util.Date'说 这个 2023 -05-6 这个字符串,无法转换成 java.util.Date 类型。<property name="date" value="2023 -05-6"></property>如果你硬要把Date 当作简单类型的话,使用 value 赋值的话,这个日期字符串格式有要求的。所有的要求就是: new Date toString 打印显示的格式形式:Fri Jun 30 11:27:41 CST 2023。但是,我们在实际开发中,我们一般不会把 Date 当做简单类型,虽然是简单类型,但是我们一般采用的是ref 的Date 类型的属性赋值。
- 如果把Date当做简单类型的话,日期字符串格式不能随便写。格式必须符合Date的toString()方法格式。显然这就比较鸡肋了。如果我们提供一个这样的日期字符串:2010-10-11,在这里是无法赋值给Date类型的属性的。
- spring6之后,当注入的是URL,那么这个url字符串是会进行有效性检测的。如果是一个存在的url,那就没问题。如果不存在则报错。

测试使用: 我们要求的格式: Fri Jun 30 11:27:41 CST 2023 进行一个 Date 的测试
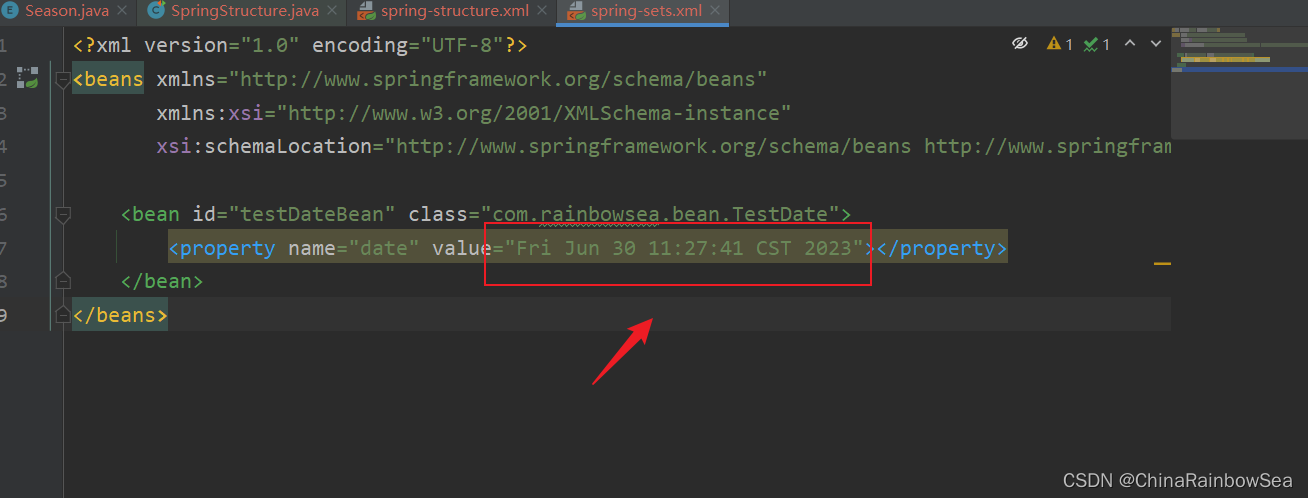
<?xml version="1.0" encoding="UTF-8"?>

<beans xmlns="http://www.springframework.org/schema/beans"

       xmlns:xsi="http://www.w3.org/2001/XMLSchema-instance"

       xsi:schemaLocation="http://www.springframework.org/schema/beans http://www.springframework.org/schema/beans/spring-beans.xsd">

    <bean id="testDateBean" class="com.rainbowsea.bean.TestDate">

        <property name="date" value="Fri Jun 30 11:27:41 CST 2023"></property>

    </bean>

</beans>
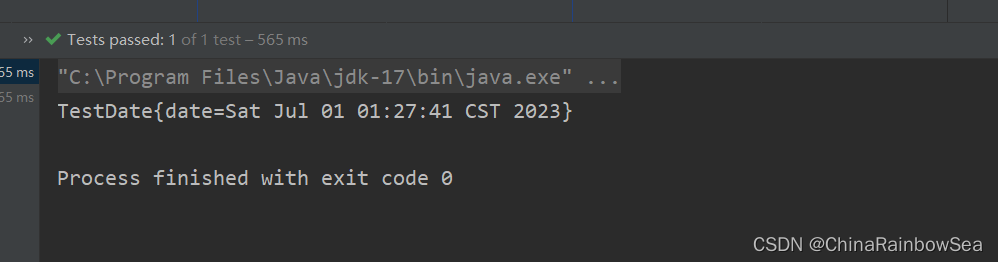
测试:
package com.rainbowsea.test;

import com.rainbowsea.bean.SimpleValueType;

import com.rainbowsea.bean.TestDate;

import org.junit.Test;

import org.springframework.context.ApplicationContext;

import org.springframework.context.support.ClassPathXmlApplicationContext;

public class SpringStructure {

    @Test

    public void test() {

        // 获取到对应的 spring6当中的xml的,容器对象

        // 面向接口编程,左边为接口,

        ApplicationContext applicationContext = new ClassPathXmlApplicationContext("spring-sets.xml");

        // 通过 id 获取到对应的类/class

        TestDate testDate = applicationContext.getBean("testDateBean", TestDate.class);

        System.out.println(testDate);

    }

}
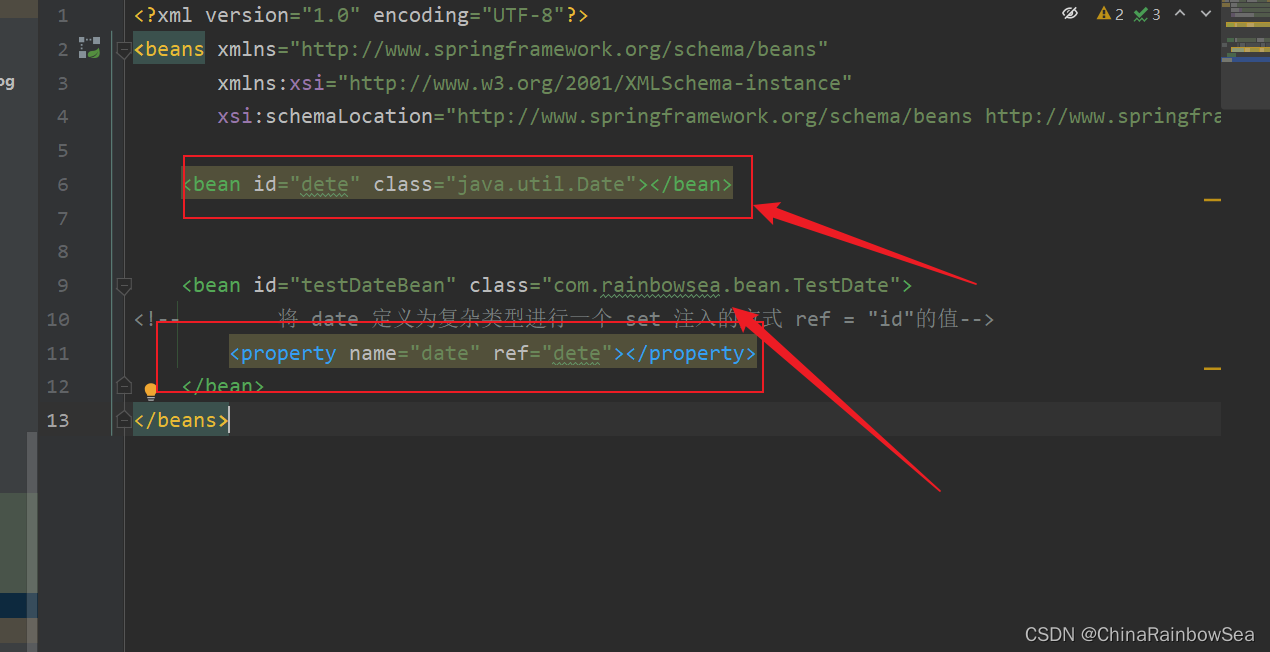
测试将 Date 当作为复杂类型进行一个set 注入的方式:测试
<?xml version="1.0" encoding="UTF-8"?>

<beans xmlns="http://www.springframework.org/schema/beans"

       xmlns:xsi="http://www.w3.org/2001/XMLSchema-instance"

       xsi:schemaLocation="http://www.springframework.org/schema/beans http://www.springframework.org/schema/beans/spring-beans.xsd">

    <bean id="dete" class="java.util.Date"></bean>

    <bean id="testDateBean" class="com.rainbowsea.bean.TestDate">

<!--        将 date 定义为复杂类型进行一个 set 注入的方式 ref = "id"的值-->

        <property name="date" ref="dete"></property>

    </bean>

</beans>
package com.rainbowsea.test;

import com.rainbowsea.bean.SimpleValueType;

import com.rainbowsea.bean.TestDate;

import org.junit.Test;

import org.springframework.context.ApplicationContext;

import org.springframework.context.support.ClassPathXmlApplicationContext;

public class SpringStructure {

    @Test

    public void test() {

        // 获取到对应的 spring6当中的xml的,容器对象

        // 面向接口编程,左边为接口,

        ApplicationContext applicationContext = new ClassPathXmlApplicationContext("spring-sets.xml");

        // 通过 id 获取到对应的类/class

        TestDate testDate = applicationContext.getBean("testDateBean", TestDate.class);

        System.out.println(testDate);

    }

}

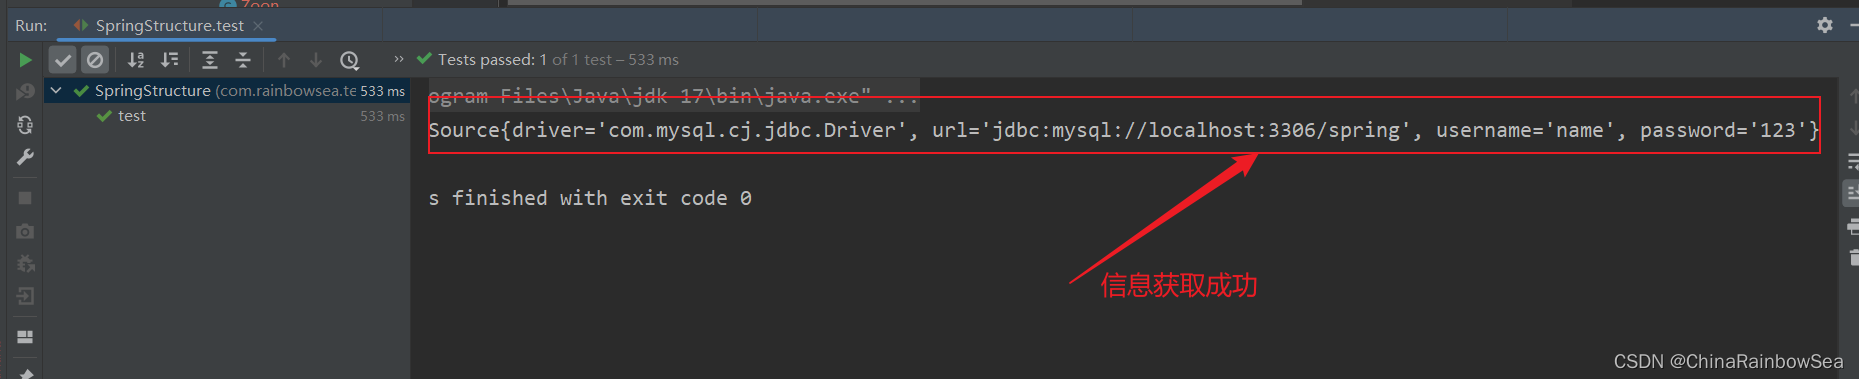
经典案例:给数据源的属性注入值:
假设我们现在要自己手写一个数据源,我们都知道所有的数据源都要实现javax.sql.DataSource接口,并且数据源中应该有连接数据库的信息,例如:driver、url、username、password等。
package com.rainbowsea.bean;

import javax.sql.DataSource;

import java.io.PrintWriter;

import java.sql.Connection;

import java.sql.SQLException;

import java.sql.SQLFeatureNotSupportedException;

import java.util.logging.Logger;

public class MyDataSource implements DataSource {

    private String driver;

    private String url;

    private String username;

    private String password;

    // set 注入必须提供 set () 方法

    public void setDriver(String driver) {

        this.driver = driver;

    }

    public void setUrl(String url) {

        this.url = url;

    }

    public void setUsername(String username) {

        this.username = username;

    }

    public void setPassword(String password) {

        this.password = password;

    }

    @Override

    public Connection getConnection() throws SQLException {

        return null;

    }

    @Override

    public Connection getConnection(String username, String password) throws SQLException {

        return null;

    }

    @Override

    public PrintWriter getLogWriter() throws SQLException {

        return null;

    }

    @Override

    public void setLogWriter(PrintWriter out) throws SQLException {

    }

    @Override

    public void setLoginTimeout(int seconds) throws SQLException {

    }

    @Override

    public int getLoginTimeout() throws SQLException {

        return 0;

    }

    @Override

    public Logger getParentLogger() throws SQLFeatureNotSupportedException {

        return null;

    }

    @Override

    public <T> T unwrap(Class<T> iface) throws SQLException {

        return null;

    }

    @Override

    public boolean isWrapperFor(Class<?> iface) throws SQLException {

        return false;

    }

    @Override

    public String toString() {

        return "MyDataSource{" +

                "driver='" + driver + '\'' +

                ", url='" + url + '\'' +

                ", username='" + username + '\'' +

                ", password='" + password + '\'' +

                '}';

    }

}
<?xml version="1.0" encoding="UTF-8"?>

<beans xmlns="http://www.springframework.org/schema/beans"

       xmlns:xsi="http://www.w3.org/2001/XMLSchema-instance"

       xsi:schemaLocation="http://www.springframework.org/schema/beans http://www.springframework.org/schema/beans/spring-beans.xsd">

    <bean id="data" class="com.rainbowsea.bean.MyDataSource">

        <property name="driver" value="com.mysql.cj.jdbc.Driver"></property>

        <property name="url" value="jdbc:mysql://localhost:3306/spring"></property>

        <property name="username" value="name"></property>

        <property name="password" value="123"></property>

    </bean>

</beans>
运行测试:
package com.rainbowsea.test;

import com.rainbowsea.bean.MyDataSource;

import org.junit.Test;

import org.springframework.context.ApplicationContext;

import org.springframework.context.support.ClassPathXmlApplicationContext;

public class SpringStructure {

    @Test

    public void test() {

        // 获取到对应的 spring6当中的xml的,容器对象

        // 面向接口编程,左边为接口,

        ApplicationContext applicationContext = new ClassPathXmlApplicationContext("spring-sets.xml");

        // 通过 id 获取到对应的类/class

        MyDataSource data = applicationContext.getBean("data", MyDataSource.class);

        System.out.println(data);

    }

}
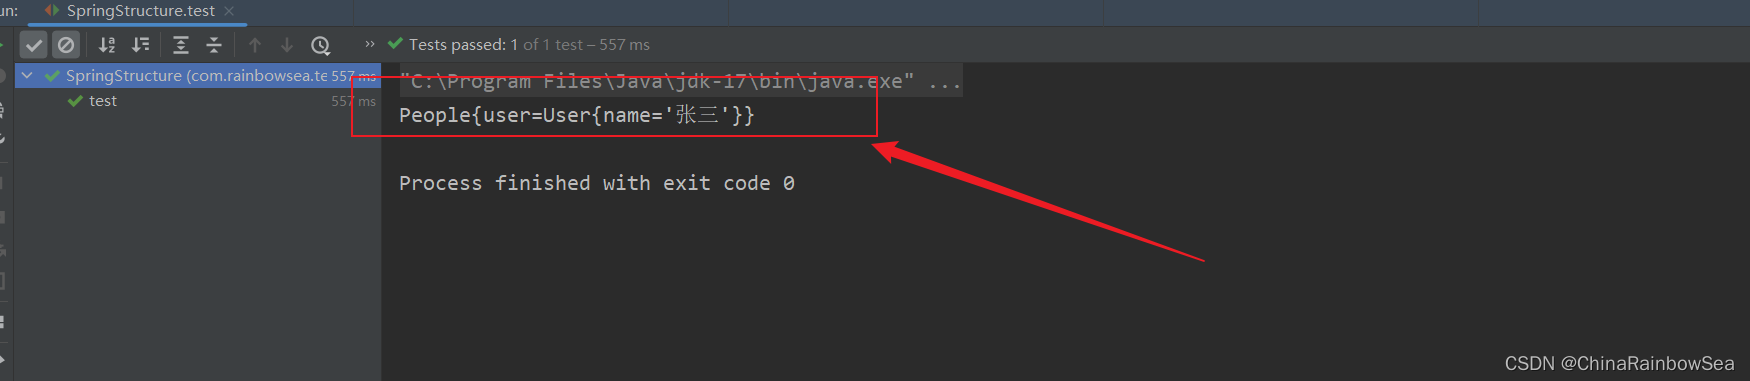
2.3.2 set 复杂类型注入的方式
格式:
<?xml version="1.0" encoding="UTF-8"?>

<beans xmlns="http://www.springframework.org/schema/beans"

       xmlns:xsi="http://www.w3.org/2001/XMLSchema-instance"

       xsi:schemaLocation="http://www.springframework.org/schema/beans http://www.springframework.org/schema/beans/spring-beans.xsd">

    <bean id="userBean" class="com.rainbowsea.bean.User">

        <property name="name" value="张三"></property>

    </bean>

    <bean id="peopleBean" class="com.rainbowsea.bean.People">

<!--         ref 表示的是复杂类型,其中的值表示的是: 对应的复杂类型的id 值。-->

        <property name="user" ref="userBean"></property>

    </bean>

</beans>
package com.rainbowsea.bean;

public class User {

    private String name;

    public void setName(String name) {

        this.name = name;

    }

    @Override

    public String toString() {

        return "User{" +

                "name='" + name + '\'' +

                '}';

    }

}
package com.rainbowsea.bean;

public class People {

    private User user;

    private String name;

    public void setUser(User user) {

        this.user = user;

    }

    @Override

    public String toString() {

        return "People{" +

                "user=" + user +

                '}';

    }

}
<?xml version="1.0" encoding="UTF-8"?>

<beans xmlns="http://www.springframework.org/schema/beans"

       xmlns:xsi="http://www.w3.org/2001/XMLSchema-instance"

       xsi:schemaLocation="http://www.springframework.org/schema/beans http://www.springframework.org/schema/beans/spring-beans.xsd">

    <bean id="userBean" class="com.rainbowsea.bean.User">

        <property name="name" value="张三"></property>

    </bean>

    <bean id="peopleBean" class="com.rainbowsea.bean.People">

<!--         ref 表示的是复杂类型,其中的值表示的是: 对应的复杂类型的id 值。-->

        <property name="user" ref="userBean"></property>

    </bean>

</beans>
运行测试:
package com.rainbowsea.test;

import com.rainbowsea.bean.MyDataSource;

import com.rainbowsea.bean.People;

import org.junit.Test;

import org.springframework.context.ApplicationContext;

import org.springframework.context.support.ClassPathXmlApplicationContext;

public class SpringStructure {

    @Test

    public void test() {

        // 获取到对应的 spring6当中的xml的,容器对象

        // 面向接口编程,左边为接口,

        ApplicationContext applicationContext = new ClassPathXmlApplicationContext("spring-sets.xml");

        // 通过 id 获取到对应的类/class

        People peopleBean = applicationContext.getBean("peopleBean", People.class);

        System.out.println(peopleBean);

    }

}
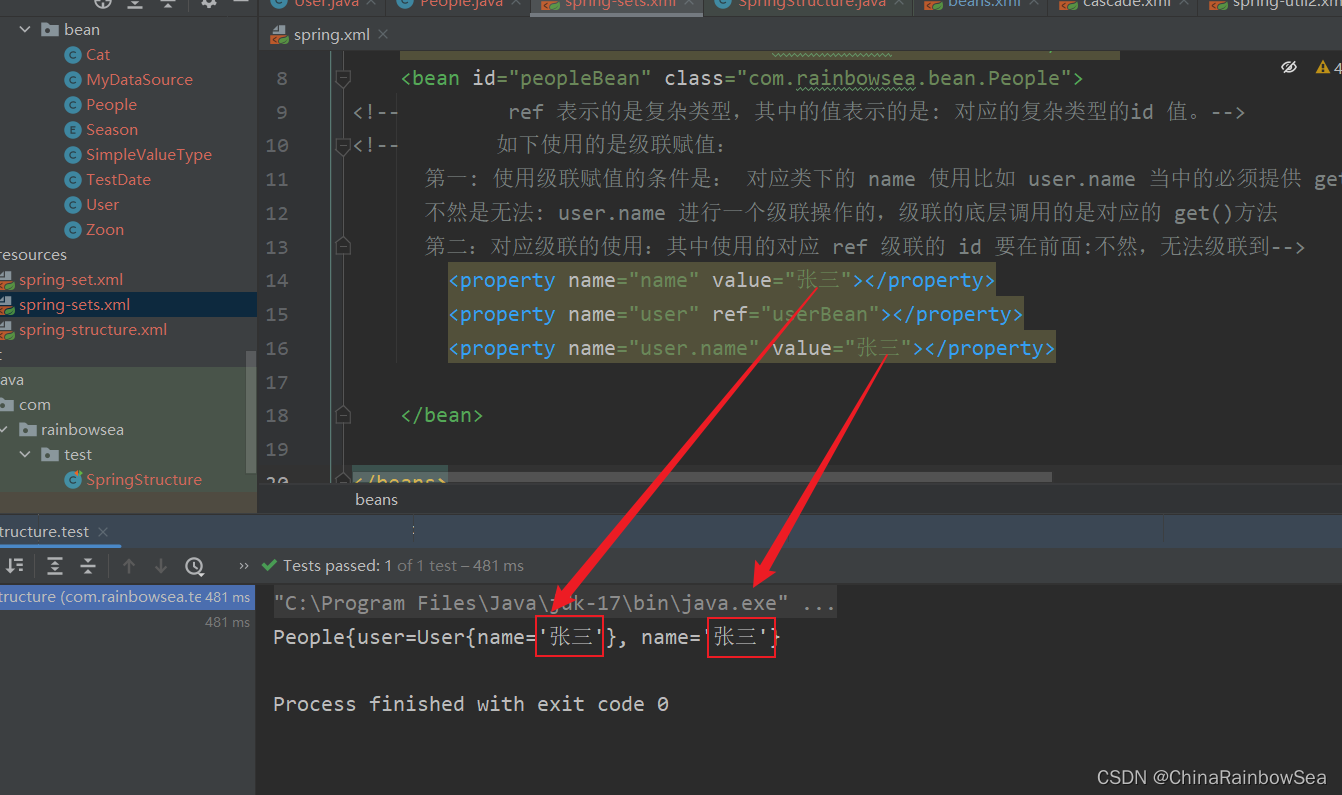
2.4 级联属性赋值
级联的要求:
- 对应级联的类下的属性的赋值,必须提供 get() 方法,因为级联的底层调用的就是 get() 方法。不然无法级联到。
- 注意:级联的上下放置的顺序,级联当中的使用的 id ,必须在级联之前先定义处理出来,不然同样无法级联到。
package com.rainbowsea.bean;

public class User {

    private String name;

    public void setName(String name) {

        this.name = name;

    }

    @Override

    public String toString() {

        return "User{" +

                "name='" + name + '\'' +

                '}';

    }

}
package com.rainbowsea.bean;

public class People {

    private User user;

    private String name;

    public void setUser(User user) {

        this.user = user;

    }

    public void setName(String name) {

        this.name = name;

    }

    // 使用级联的话,必须提供其中的 get() 方法进行一个获取

    // 级联的底层调用的就是 get()方法。

    public User getUser() {

        return user;

    }

    @Override

    public String toString() {

        return "People{" +

                "user=" + user +

                ", name='" + name + '\'' +

                '}';

    }

}
<?xml version="1.0" encoding="UTF-8"?>

<beans xmlns="http://www.springframework.org/schema/beans"

       xmlns:xsi="http://www.w3.org/2001/XMLSchema-instance"

       xsi:schemaLocation="http://www.springframework.org/schema/beans http://www.springframework.org/schema/beans/spring-beans.xsd">

    <bean id="userBean" class="com.rainbowsea.bean.User"></bean>

    <bean id="peopleBean" class="com.rainbowsea.bean.People">

<!--         ref 表示的是复杂类型,其中的值表示的是: 对应的复杂类型的id 值。-->

<!--        如下使用的是级联赋值:

      第一: 使用级联赋值的条件是: 对应类下的 name 使用比如 user.name 当中的必须提供 get() 方法。

      不然是无法: user.name 进行一个级联操作的,级联的底层调用的是对应的 get()方法

      第二:对应级联的使用:其中使用的对应 ref 级联的 id 要在前面:不然,无法级联到-->

        <property name="name" value="张三"></property>

        <property name="user" ref="userBean"></property>

        <property name="user.name" value="张三"></property>

    </bean>

</beans>
运行测试:
package com.rainbowsea.test;

import com.rainbowsea.bean.MyDataSource;

import com.rainbowsea.bean.People;

import org.junit.Test;

import org.springframework.context.ApplicationContext;

import org.springframework.context.support.ClassPathXmlApplicationContext;

public class SpringStructure {

    @Test

    public void test() {

        // 获取到对应的 spring6当中的xml的,容器对象

        // 面向接口编程,左边为接口,

        ApplicationContext applicationContext = new ClassPathXmlApplicationContext("spring-sets.xml");

        // 通过 id 获取到对应的类/class

        People peopleBean = applicationContext.getBean("peopleBean", People.class);

        System.out.println(peopleBean);

    }

}
级联用的比较少,所以大家了解一下就好了。
2.5 set 注入数组类型
关于set 数组类型的注入的方式:
格式:
<?xml version="1.0" encoding="UTF-8"?>

<beans xmlns="http://www.springframework.org/schema/beans"

       xmlns:xsi="http://www.w3.org/2001/XMLSchema-instance"

       xsi:schemaLocation="http://www.springframework.org/schema/beans http://www.springframework.org/schema/beans/spring-beans.xsd">

    <bean id="userBean" class="com.rainbowsea.bean.User"></bean>

    <bean id="peopleBean" class="com.rainbowsea.bean.People">

        <property name="name">

<!--            数组的赋值使用: array 标签-->

            <array>

                <value></value>

                <value></value>

                <value></value>

            </array>

        </property>

    </bean>

</beans>
2.5.1 当数组中的元素是简单类型
package com.rainbowsea.bean;

import java.util.Arrays;

public class People {

    private String[] name;

    public void setName(String[] name) {

        this.name = name;

    }

    @Override

    public String toString() {

        return "People{" +

                "name=" + Arrays.toString(name) +

                '}';

    }

}
<?xml version="1.0" encoding="UTF-8"?>

<beans xmlns="http://www.springframework.org/schema/beans"

       xmlns:xsi="http://www.w3.org/2001/XMLSchema-instance"

       xsi:schemaLocation="http://www.springframework.org/schema/beans http://www.springframework.org/schema/beans/spring-beans.xsd">

    <bean id="userBean" class="com.rainbowsea.bean.User"></bean>

    <bean id="peopleBean" class="com.rainbowsea.bean.People">

        <property name="name">

<!--            数组的赋值使用: array 标签-->

            <array>

<!--                简单类型使用: value-->

                <value>张三</value>

                <value>李四</value>

                <value>王五</value>

            </array>

        </property>

    </bean>

</beans>
运行测试:
<?xml version="1.0" encoding="UTF-8"?>

<beans xmlns="http://www.springframework.org/schema/beans"

       xmlns:xsi="http://www.w3.org/2001/XMLSchema-instance"

       xsi:schemaLocation="http://www.springframework.org/schema/beans http://www.springframework.org/schema/beans/spring-beans.xsd">

    <bean id="peopleBean" class="com.rainbowsea.bean.People">

        <property name="name">

<!--            数组的赋值使用: array 标签-->

            <array>

<!--                简单类型使用: value-->

                <value>张三</value>

                <value>李四</value>

                <value>王五</value>

            </array>

        </property>

    </bean>

</beans>

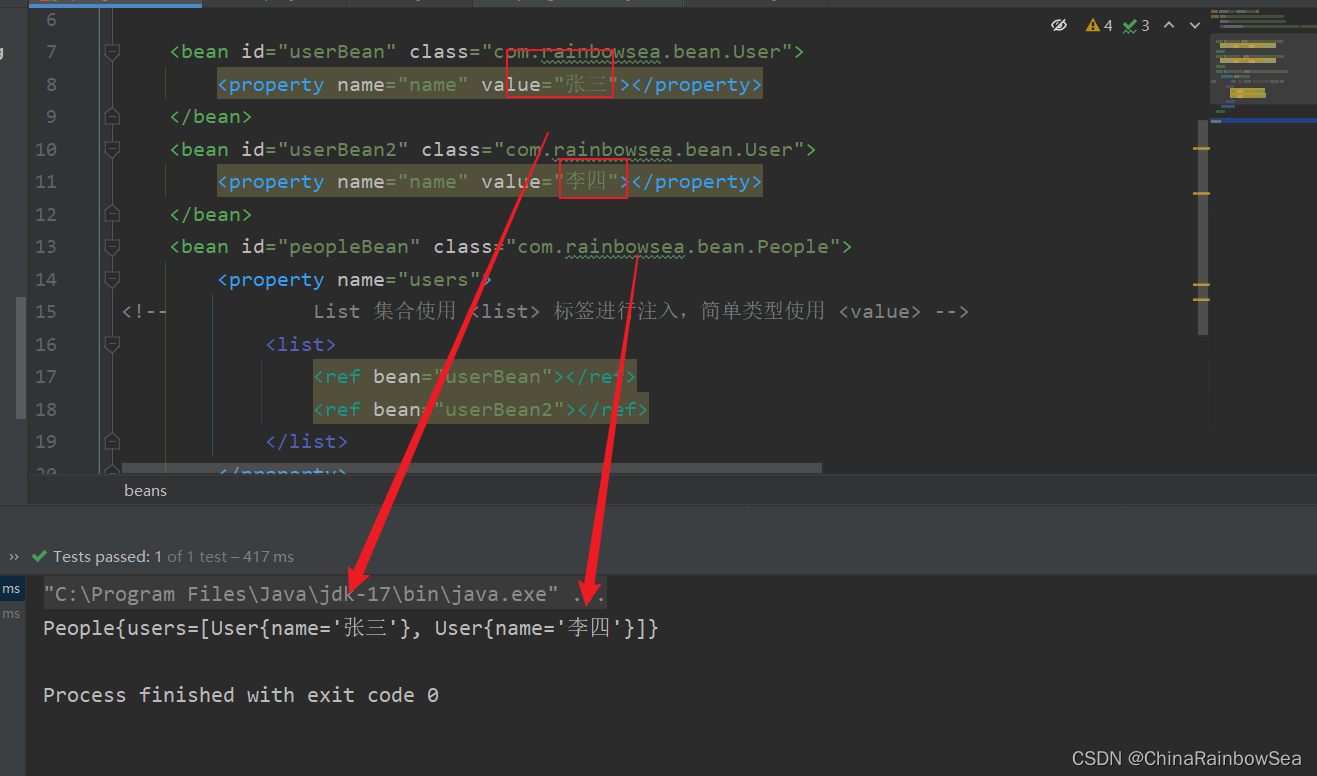
2.5.2 当数组中的元素是复杂类型
格式:
<?xml version="1.0" encoding="UTF-8"?>

<beans xmlns="http://www.springframework.org/schema/beans"

       xmlns:xsi="http://www.w3.org/2001/XMLSchema-instance"

       xsi:schemaLocation="http://www.springframework.org/schema/beans http://www.springframework.org/schema/beans/spring-beans.xsd">

    <bean id="xxx1" class="com.rainbowsea.bean.User">

        <property name="name" value="张三"></property>

    </bean>

    <bean id="xxx2" class="com.rainbowsea.bean.User">

        <property name="name" value="李四"></property>

    </bean>

    <bean id="peopleBean" class="com.rainbowsea.bean.People">

        <property name="users">

<!--            数组的赋值使用: array 标签-->

            <array>

<!--                复杂型使用: ref bean 是对应的id-->

                <ref bean="xxx1"></ref>

                <ref bean="xxx2"></ref>

            </array>

        </property>

    </bean>

</beans>
**举例: **
package com.rainbowsea.bean;

public class User {

    private String name;

    public void setName(String name) {

        this.name = name;

    }

    @Override

    public String toString() {

        return "User{" +

                "name='" + name + '\'' +

                '}';

    }

}
package com.rainbowsea.bean;

import java.util.Arrays;

public class People {

    private User[] users;

    public void setUsers(User[] users) {

        this.users = users;

    }

    @Override

    public String toString() {

        return "People{" +

                "users=" + Arrays.toString(users) +

                '}';

    }

}
<?xml version="1.0" encoding="UTF-8"?>

<beans xmlns="http://www.springframework.org/schema/beans"

       xmlns:xsi="http://www.w3.org/2001/XMLSchema-instance"

       xsi:schemaLocation="http://www.springframework.org/schema/beans http://www.springframework.org/schema/beans/spring-beans.xsd">

    <bean id="userBean" class="com.rainbowsea.bean.User">

        <property name="name" value="张三"></property>

    </bean>

    <bean id="userBean2" class="com.rainbowsea.bean.User">

        <property name="name" value="李四"></property>

    </bean>

    <bean id="peopleBean" class="com.rainbowsea.bean.People">

        <property name="users">

<!--            数组的赋值使用: array 标签-->

            <array>

<!--                复杂类型使用: ref-->

                <ref bean="userBean"></ref>

                <ref bean="userBean2"></ref>

            </array>

        </property>

    </bean>

</beans>
运行测试:
package com.rainbowsea.test;

import com.rainbowsea.bean.MyDataSource;

import com.rainbowsea.bean.People;

import org.junit.Test;

import org.springframework.context.ApplicationContext;

import org.springframework.context.support.ClassPathXmlApplicationContext;

public class SpringStructure {

    @Test

    public void test() {

        // 获取到对应的 spring6当中的xml的,容器对象

        // 面向接口编程,左边为接口,

        ApplicationContext applicationContext = new ClassPathXmlApplicationContext("spring-sets.xml");

        // 通过 id 获取到对应的类/class

        People peopleBean = applicationContext.getBean("peopleBean", People.class);

        System.out.println(peopleBean);

    }

}

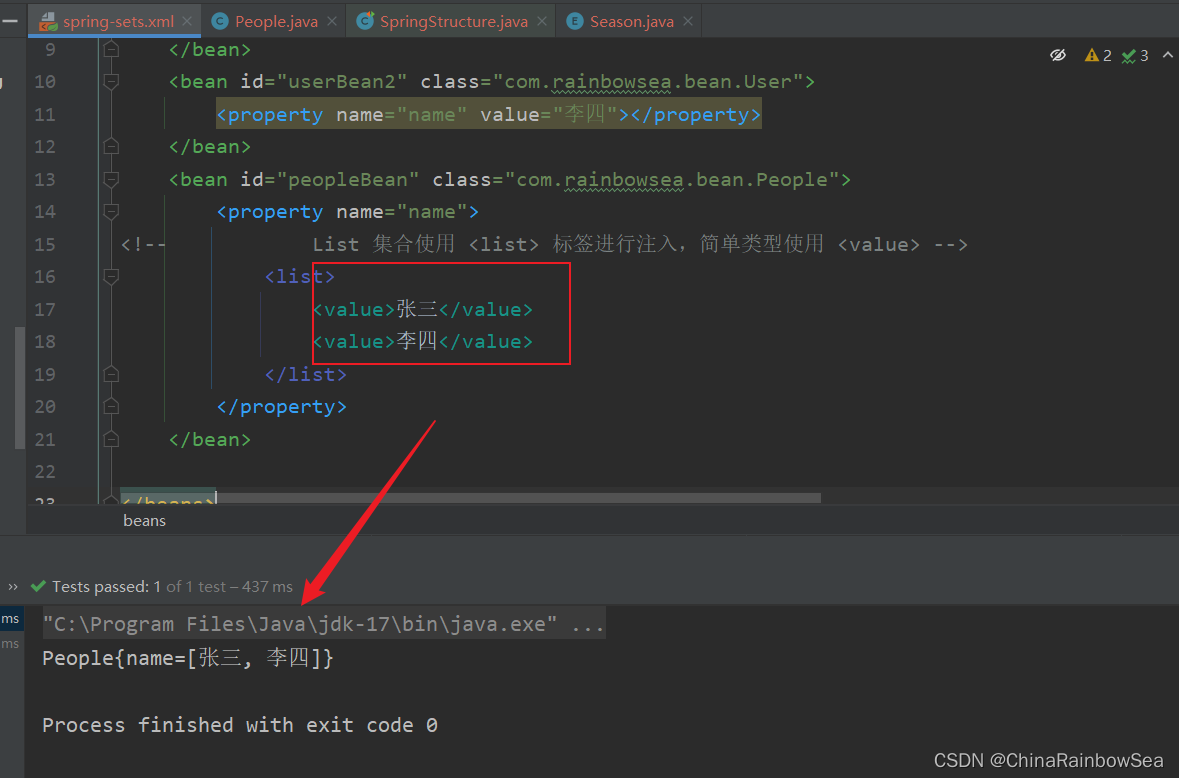
2.6 set注入List集合类型
List集合:有序可重复
2.6.1 set 注入 List集合简单类型
<?xml version="1.0" encoding="UTF-8"?>

<beans xmlns="http://www.springframework.org/schema/beans"

       xmlns:xsi="http://www.w3.org/2001/XMLSchema-instance"

       xsi:schemaLocation="http://www.springframework.org/schema/beans http://www.springframework.org/schema/beans/spring-beans.xsd">

    <bean id="peopleBean" class="com.rainbowsea.bean.People">

        <property name="name">

<!--            List 集合使用 <list> 标签进行注入,简单类型使用 <value> -->

            <list>

                <value>张三</value>

                <value>李四</value>

            </list>

        </property>

    </bean>

</beans>
package com.rainbowsea.bean;

import java.util.List;

public class People {

 private List<String> name;

    public void setName(List<String> name) {

        this.name = name;

    }

    @Override

    public String toString() {

        return "People{" +

                "name=" + name +

                '}';

    }

}
运行测试:
package com.rainbowsea.test;

import com.rainbowsea.bean.MyDataSource;

import com.rainbowsea.bean.People;

import org.junit.Test;

import org.springframework.context.ApplicationContext;

import org.springframework.context.support.ClassPathXmlApplicationContext;

public class SpringStructure {

    @Test

    public void test() {

        // 获取到对应的 spring6当中的xml的,容器对象

        // 面向接口编程,左边为接口,

        ApplicationContext applicationContext = new ClassPathXmlApplicationContext("spring-sets.xml");

        // 通过 id 获取到对应的类/class

        People peopleBean = applicationContext.getBean("peopleBean", People.class);

        System.out.println(peopleBean);

    }

}
2.6.2 set 注入List集合复杂类型
<?xml version="1.0" encoding="UTF-8"?>

<beans xmlns="http://www.springframework.org/schema/beans"

       xmlns:xsi="http://www.w3.org/2001/XMLSchema-instance"

       xsi:schemaLocation="http://www.springframework.org/schema/beans http://www.springframework.org/schema/beans/spring-beans.xsd">

    <bean id="userBean" class="com.rainbowsea.bean.User">

        <property name="name" value="张三"></property>

    </bean>

    <bean id="userBean2" class="com.rainbowsea.bean.User">

        <property name="name" value="李四"></property>

    </bean>

    <bean id="peopleBean" class="com.rainbowsea.bean.People">

        <property name="users">

<!--            List 集合使用 <list> 标签进行注入,简单类型使用 <ref> bean=对应的Id -->

            <list>

                <ref bean="userBean"></ref>

                <ref bean="userBean2"></ref>

            </list>

        </property>

    </bean>

</beans>
package com.rainbowsea.bean;

public class User {

    private String name;

    public void setName(String name) {

        this.name = name;

    }

    @Override

    public String toString() {

        return "User{" +

                "name='" + name + '\'' +

                '}';

    }

}
package com.rainbowsea.bean;

import java.util.List;

public class People {

 private List<User> users;

    public void setUsers(List<User> users) {

        this.users = users;

    }

    @Override

    public String toString() {

        return "People{" +

                "users=" + users +

                '}';

    }

}
运行测试:
package com.rainbowsea.test;

import com.rainbowsea.bean.MyDataSource;

import com.rainbowsea.bean.People;

import org.junit.Test;

import org.springframework.context.ApplicationContext;

import org.springframework.context.support.ClassPathXmlApplicationContext;

public class SpringStructure {

    @Test

    public void test() {

        // 获取到对应的 spring6当中的xml的,容器对象

        // 面向接口编程,左边为接口,

        ApplicationContext applicationContext = new ClassPathXmlApplicationContext("spring-sets.xml");

        // 通过 id 获取到对应的类/class

        People peopleBean = applicationContext.getBean("peopleBean", People.class);

        System.out.println(peopleBean);

    }

}
注意:注入List集合的时候使用list标签,如果List集合中是简单类型使用value标签,反之使用ref标签。
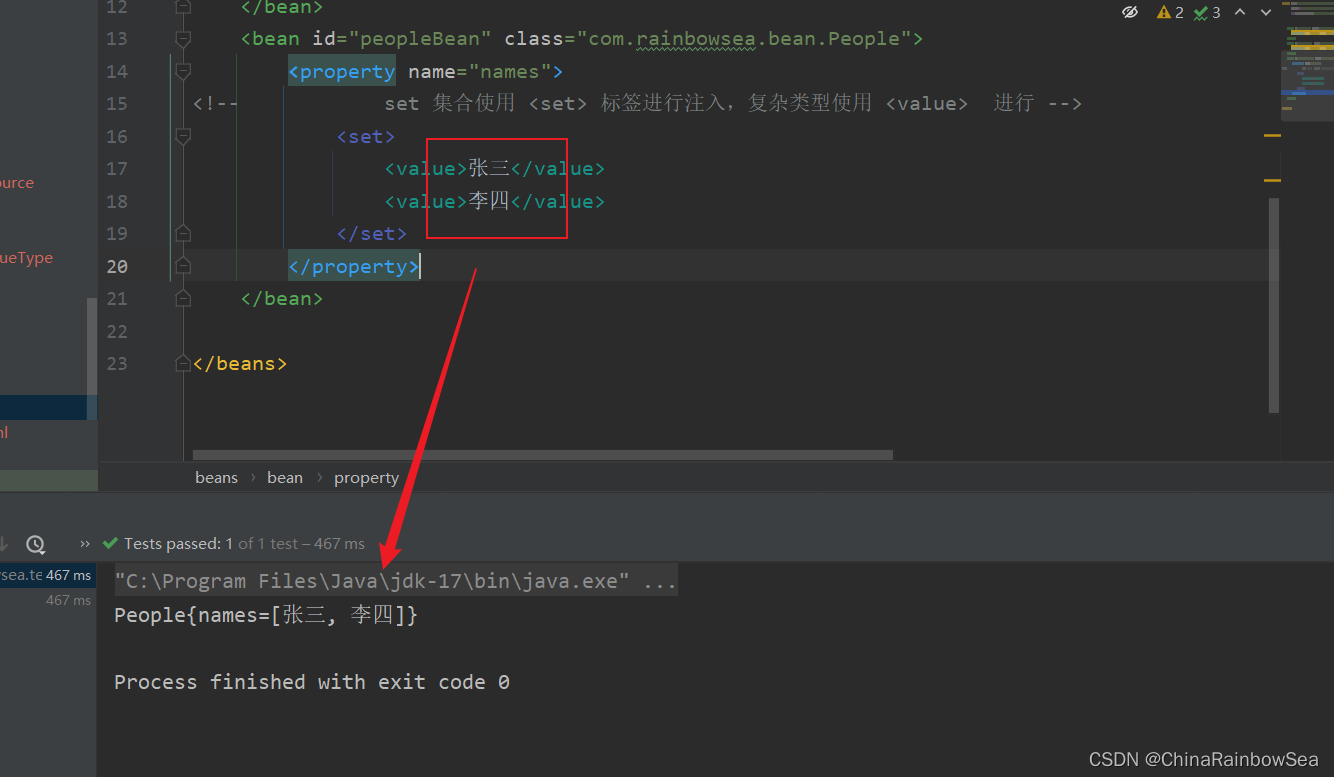
2.7 set注入Set集合类型
Set集合:无序不可重复
2.7.1 set 注入 Set集合简单类型
<?xml version="1.0" encoding="UTF-8"?>

<beans xmlns="http://www.springframework.org/schema/beans"

       xmlns:xsi="http://www.w3.org/2001/XMLSchema-instance"

       xsi:schemaLocation="http://www.springframework.org/schema/beans http://www.springframework.org/schema/beans/spring-beans.xsd">

    <bean id="peopleBean" class="com.rainbowsea.bean.People">

        <property name="names">

<!--            set 集合使用 <set> 标签进行注入,复杂类型使用 <value>  进行 -->

            <set>

                <value>张三</value>

                <value>李四</value>

            </set>

        </property>

    </bean>

</beans>
package com.rainbowsea.bean;

import java.util.Set;

public class People {

 private Set<String> names;

    public void setNames(Set<String> names) {

        this.names = names;

    }

    @Override

    public String toString() {

        return "People{" +

                "names=" + names +

                '}';

    }

}
package com.rainbowsea.test;

import com.rainbowsea.bean.MyDataSource;

import com.rainbowsea.bean.People;

import org.junit.Test;

import org.springframework.context.ApplicationContext;

import org.springframework.context.support.ClassPathXmlApplicationContext;

public class SpringStructure {

    @Test

    public void test() {

        // 获取到对应的 spring6当中的xml的,容器对象

        // 面向接口编程,左边为接口,

        ApplicationContext applicationContext = new ClassPathXmlApplicationContext("spring-sets.xml");

        // 通过 id 获取到对应的类/class

        People peopleBean = applicationContext.getBean("peopleBean", People.class);

        System.out.println(peopleBean);

    }

}
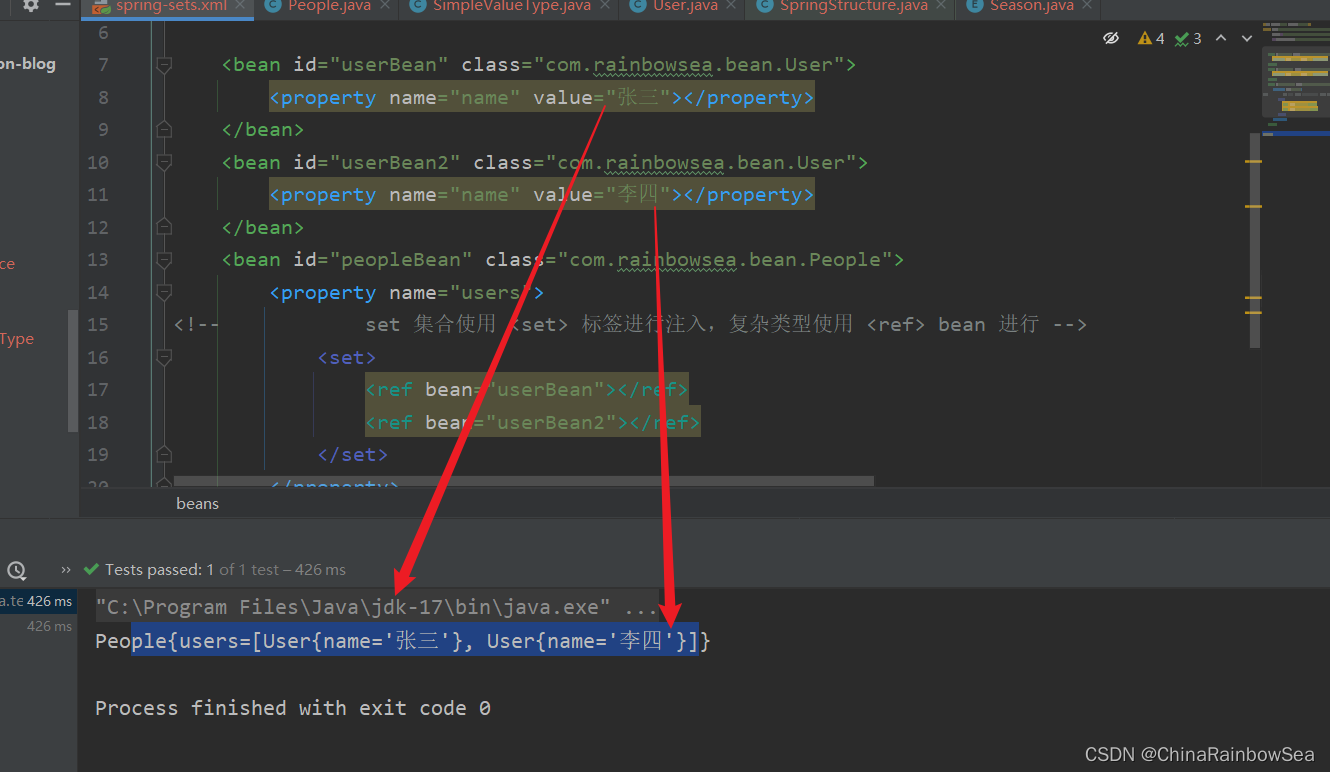
2.7.2 set 注入Set集合复杂类型
<?xml version="1.0" encoding="UTF-8"?>

<beans xmlns="http://www.springframework.org/schema/beans"

       xmlns:xsi="http://www.w3.org/2001/XMLSchema-instance"

       xsi:schemaLocation="http://www.springframework.org/schema/beans http://www.springframework.org/schema/beans/spring-beans.xsd">

    <bean id="userBean" class="com.rainbowsea.bean.User">

        <property name="name" value="张三"></property>

    </bean>

    <bean id="userBean2" class="com.rainbowsea.bean.User">

        <property name="name" value="李四"></property>

    </bean>

    <bean id="peopleBean" class="com.rainbowsea.bean.People">

        <property name="users">

<!--            set 集合使用 <set> 标签进行注入,复杂类型使用 <ref> bean 进行 -->

            <set>

                <ref bean="userBean"></ref>

                <ref bean="userBean2"></ref>

            </set>

        </property>

    </bean>

</beans>
package com.rainbowsea.bean;

public class User {

    private String name;

    public void setName(String name) {

        this.name = name;

    }

    @Override

    public String toString() {

        return "User{" +

                "name='" + name + '\'' +

                '}';

    }

}
package com.rainbowsea.bean;

import java.util.Set;

public class People {

 private Set<User> users;

    public void setUsers(Set<User> users) {

        this.users = users;

    }

    @Override

    public String toString() {

        return "People{" +

                "users=" + users +

                '}';

    }

}
运行测试:
package com.rainbowsea.test;

import com.rainbowsea.bean.MyDataSource;

import com.rainbowsea.bean.People;

import org.junit.Test;

import org.springframework.context.ApplicationContext;

import org.springframework.context.support.ClassPathXmlApplicationContext;

public class SpringStructure {

    @Test

    public void test() {

        // 获取到对应的 spring6当中的xml的,容器对象

        // 面向接口编程,左边为接口,

        ApplicationContext applicationContext = new ClassPathXmlApplicationContext("spring-sets.xml");

        // 通过 id 获取到对应的类/class

        People peopleBean = applicationContext.getBean("peopleBean", People.class);

        System.out.println(peopleBean);

    }

}
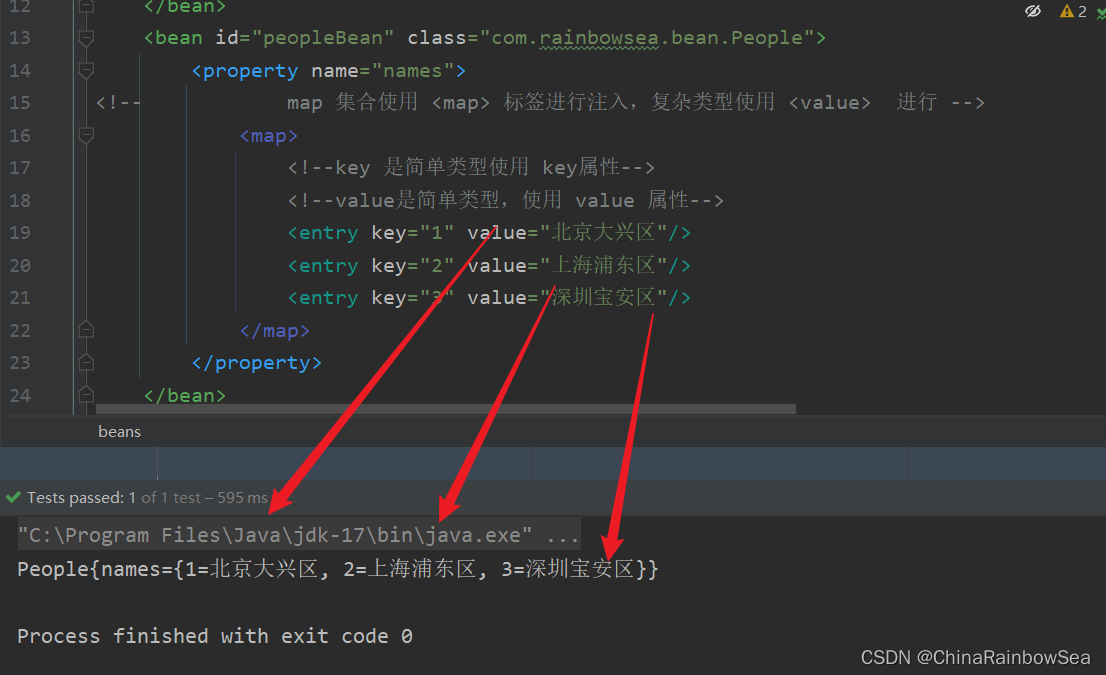
2.8 set注入Map集合
2.8.1 set 注入的Map集合简单类型
要点:
- 使用标签
- 如果key是简单类型,使用 key 属性,反之使用 key-ref 属性。
- 如果value是简单类型,使用 value 属性,反之使用 value-ref 属性。
<?xml version="1.0" encoding="UTF-8"?>

<beans xmlns="http://www.springframework.org/schema/beans"

       xmlns:xsi="http://www.w3.org/2001/XMLSchema-instance"

       xsi:schemaLocation="http://www.springframework.org/schema/beans http://www.springframework.org/schema/beans/spring-beans.xsd">

    <bean id="peopleBean" class="com.rainbowsea.bean.People">

        <property name="names">

<!--            map 集合使用 <map> 标签进行注入,复杂类型使用 <value>  进行 -->

            <map>

                <!--key 是简单类型使用 key属性-->

                <!--value是简单类型,使用 value 属性-->

                <entry key="1" value="北京大兴区"/>

                <entry key="2" value="上海浦东区"/>

                <entry key="3" value="深圳宝安区"/>

            </map>

        </property>

    </bean>

</beans>
package com.rainbowsea.bean;

import java.util.Map;

public class People {

 private Map<Integer,String> names;

    public void setNames(Map<Integer, String> names) {

        this.names = names;

    }

    @Override

    public String toString() {

        return "People{" +

                "names=" + names +

                '}';

    }

}
运行测试:
package com.rainbowsea.test;

import com.rainbowsea.bean.People;

import org.junit.Test;

import org.springframework.context.ApplicationContext;

import org.springframework.context.support.ClassPathXmlApplicationContext;

public class SpringStructure {

    @Test

    public void test() {

        // 获取到对应的 spring6当中的xml的,容器对象

        // 面向接口编程,左边为接口,

        ApplicationContext applicationContext = new ClassPathXmlApplicationContext("spring-sets.xml");

        // 通过 id 获取到对应的类/class

        People peopleBean = applicationContext.getBean("peopleBean", People.class);

        System.out.println(peopleBean);

    }

}
2.8.2 set 注入的Map集合的复杂类型
<?xml version="1.0" encoding="UTF-8"?>

<beans xmlns="http://www.springframework.org/schema/beans"

       xmlns:xsi="http://www.w3.org/2001/XMLSchema-instance"

       xsi:schemaLocation="http://www.springframework.org/schema/beans http://www.springframework.org/schema/beans/spring-beans.xsd">

    <bean id="userBean" class="com.rainbowsea.bean.User">

        <property name="name" value="张三"></property>

    </bean>

    <bean id="userBean2" class="com.rainbowsea.bean.User">

        <property name="name" value="李四"></property>

    </bean>

    <bean id="peopleBean" class="com.rainbowsea.bean.People">

        <property name="user">

<!--            map 集合使用 <map> 标签进行注入,复杂类型使用 <value>  进行 -->

            <map>

                <!--key 不是简单类型使用 key-ref 属性-->

                <!--value不是简单类型,使用 value-ref 属性-->

                <entry key="1" value-ref="userBean"></entry>

                <entry key="2" value-ref="userBean2"></entry>

            </map>

        </property>

    </bean>

</beans>
package com.rainbowsea.bean;

public class User {

    private String name;

    public void setName(String name) {

        this.name = name;

    }

    @Override

    public String toString() {

        return "User{" +

                "name='" + name + '\'' +

                '}';

    }

}
package com.rainbowsea.bean;

import java.util.Map;

public class People {

 private Map<Integer,User> user;

 // set 注入,必须要有 set 方法

    public void setUser(Map<Integer, User> user) {

        this.user = user;

    }

    @Override

    public String toString() {

        return "People{" +

                "user=" + user +

                '}';

    }

}
运行测试:
package com.rainbowsea.test;

import com.rainbowsea.bean.People;

import org.junit.Test;

import org.springframework.context.ApplicationContext;

import org.springframework.context.support.ClassPathXmlApplicationContext;

public class SpringStructure {

    @Test

    public void test() {

        // 获取到对应的 spring6当中的xml的,容器对象

        // 面向接口编程,左边为接口,

        ApplicationContext applicationContext = new ClassPathXmlApplicationContext("spring-sets.xml");

        // 通过 id 获取到对应的类/class

        People peopleBean = applicationContext.getBean("peopleBean", People.class);

        System.out.println(peopleBean);

    }

}

2.9 set注入Properties 特殊的 Map 集合
java.util.Properties继承java.util.Hashtable,所以Properties也是一个Map集合。
但是虽然 Properties 是一个 Map 集合,但是在 Spring当中,是无法使用 标签进行一个 set 注入的。
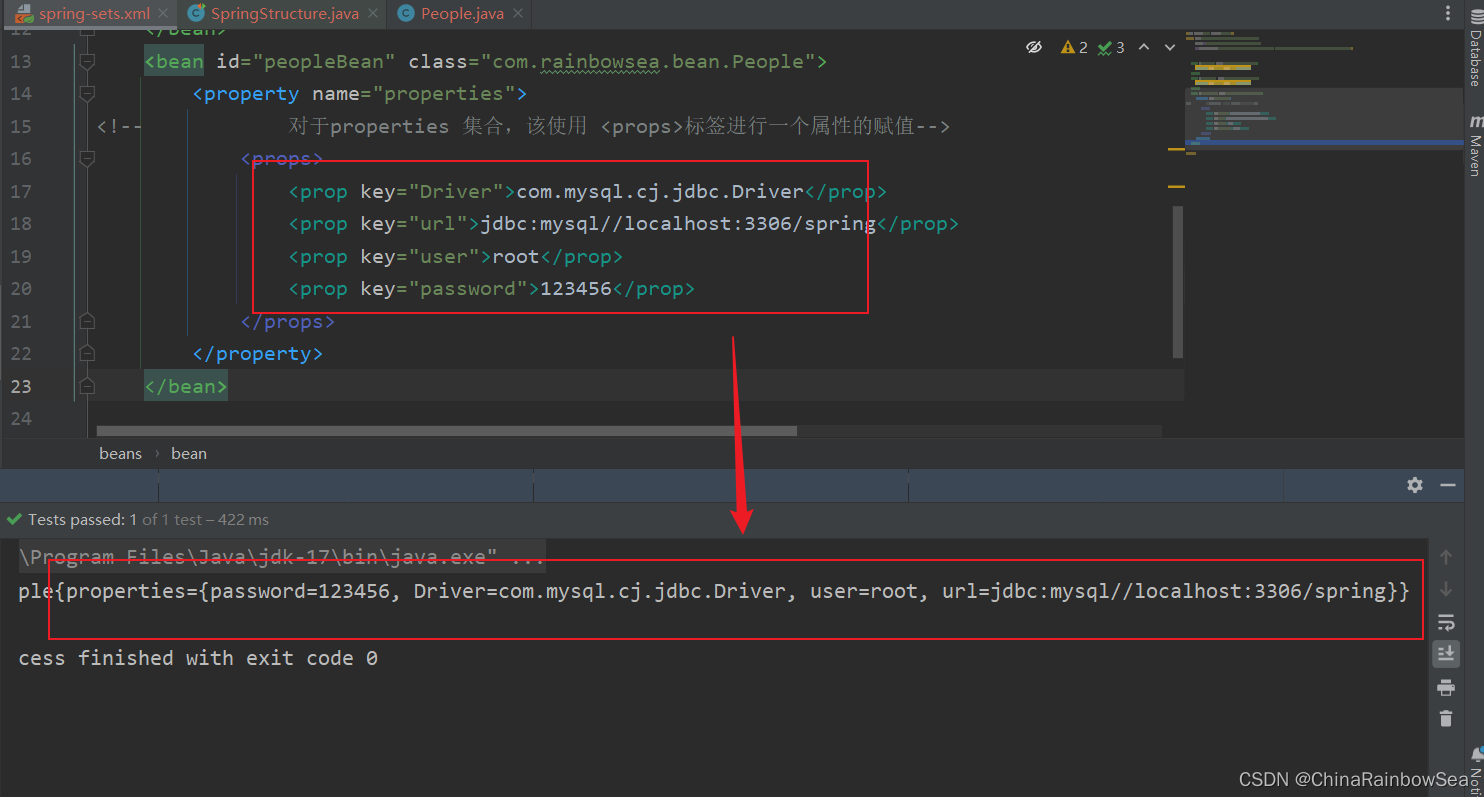
对于 properties 集合类型的,set 注入使用的是 p标签
<?xml version="1.0" encoding="UTF-8"?>

<beans xmlns="http://www.springframework.org/schema/beans"

       xmlns:xsi="http://www.w3.org/2001/XMLSchema-instance"

       xsi:schemaLocation="http://www.springframework.org/schema/beans http://www.springframework.org/schema/beans/spring-beans.xsd">

    <bean id="peopleBean" class="com.rainbowsea.bean.People">

        <property name="properties">

<!--            对于properties 集合,该使用 <props>标签进行一个属性的赋值-->

            <props>

                <prop key="Driver">com.mysql.cj.jdbc.Driver</prop>

                <prop key="url">jdbc:mysql//localhost:3306/spring</prop>

                <prop key="user">root</prop>

                <prop key="password">123456</prop>

            </props>

        </property>

    </bean>

</beans>
package com.rainbowsea.bean;

import java.util.Properties;

public class People {

    private Properties properties;

    // set 注入必须提供 set 方法

    public void setProperties(Properties properties) {

        this.properties = properties;

    }

    @Override

    public String toString() {

        return "People{" +

                "properties=" + properties +

                '}';

    }

}
运行测试:
package com.rainbowsea.test;

import com.rainbowsea.bean.People;

import org.junit.Test;

import org.springframework.context.ApplicationContext;

import org.springframework.context.support.ClassPathXmlApplicationContext;

public class SpringStructure {

    @Test

    public void test() {

        // 获取到对应的 spring6当中的xml的,容器对象

        // 面向接口编程,左边为接口,

        ApplicationContext applicationContext = new ClassPathXmlApplicationContext("spring-sets.xml");

        // 通过 id 获取到对应的类/class

        People peopleBean = applicationContext.getBean("peopleBean", People.class);

        System.out.println(peopleBean);

    }

}
2.10 set 注入 null 和空字符串的方式
2.10.1 set 注入 null 值的方式
当我们想要对一个属性为一个 null 值的时候,我们应该怎么做呢?
有如下两种方式:
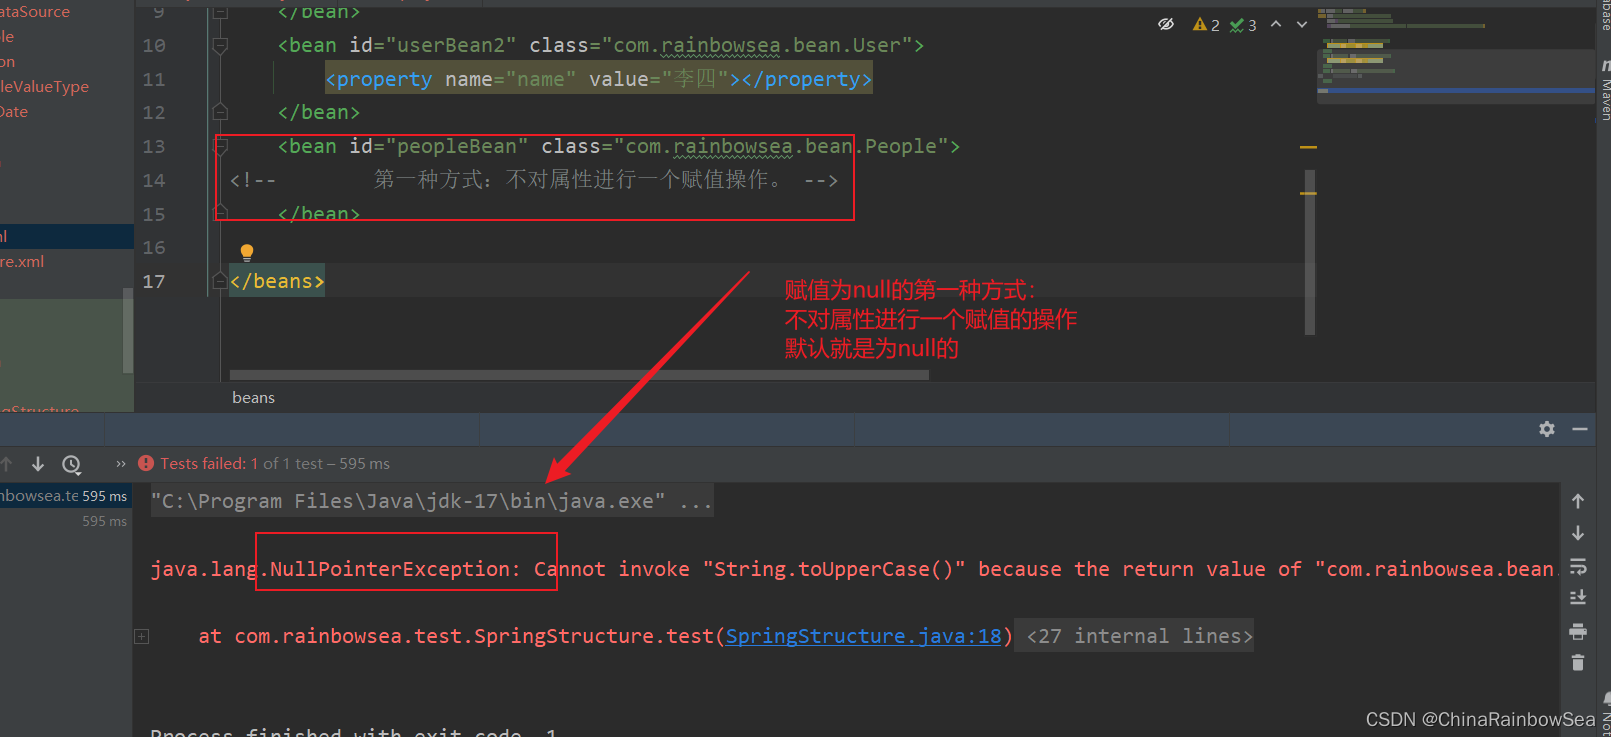
第一种方式:方式不给属性注入,属性的默认值就是为 null 的
测试:
<?xml version="1.0" encoding="UTF-8"?>

<beans xmlns="http://www.springframework.org/schema/beans"

       xmlns:xsi="http://www.w3.org/2001/XMLSchema-instance"

       xsi:schemaLocation="http://www.springframework.org/schema/beans http://www.springframework.org/schema/beans/spring-beans.xsd">

    <bean id="peopleBean" class="com.rainbowsea.bean.People">

<!--        第一种方式:不对属性进行一个赋值操作。 -->

    </bean>

</beans>
package com.rainbowsea.bean;

import java.util.Properties;

public class People {

    private String name;

    // set 注入必须提供 set 方法

    public void setName(String name) {

        this.name = name;

    }

    // 提供一个get 方法用于测试,是否为null的

    public String getName() {

        return name;

    }

    @Override

    public String toString() {

        return "People{" +

                "name='" + name + '\'' +

                '}';

    }

}
运行测试
package com.rainbowsea.test;

import com.rainbowsea.bean.People;

import org.junit.Test;

import org.springframework.context.ApplicationContext;

import org.springframework.context.support.ClassPathXmlApplicationContext;

public class SpringStructure {

    @Test

    public void test() {

        // 获取到对应的 spring6当中的xml的,容器对象

        // 面向接口编程,左边为接口,

        ApplicationContext applicationContext = new ClassPathXmlApplicationContext("spring-sets.xml");

        // 通过 id 获取到对应的类/class

        People peopleBean = applicationContext.getBean("peopleBean", People.class);

        // 将小写字母转换为大写字母,如果name为空报 null 异常测试:

        System.out.println(peopleBean.getName().toUpperCase());

    }

}
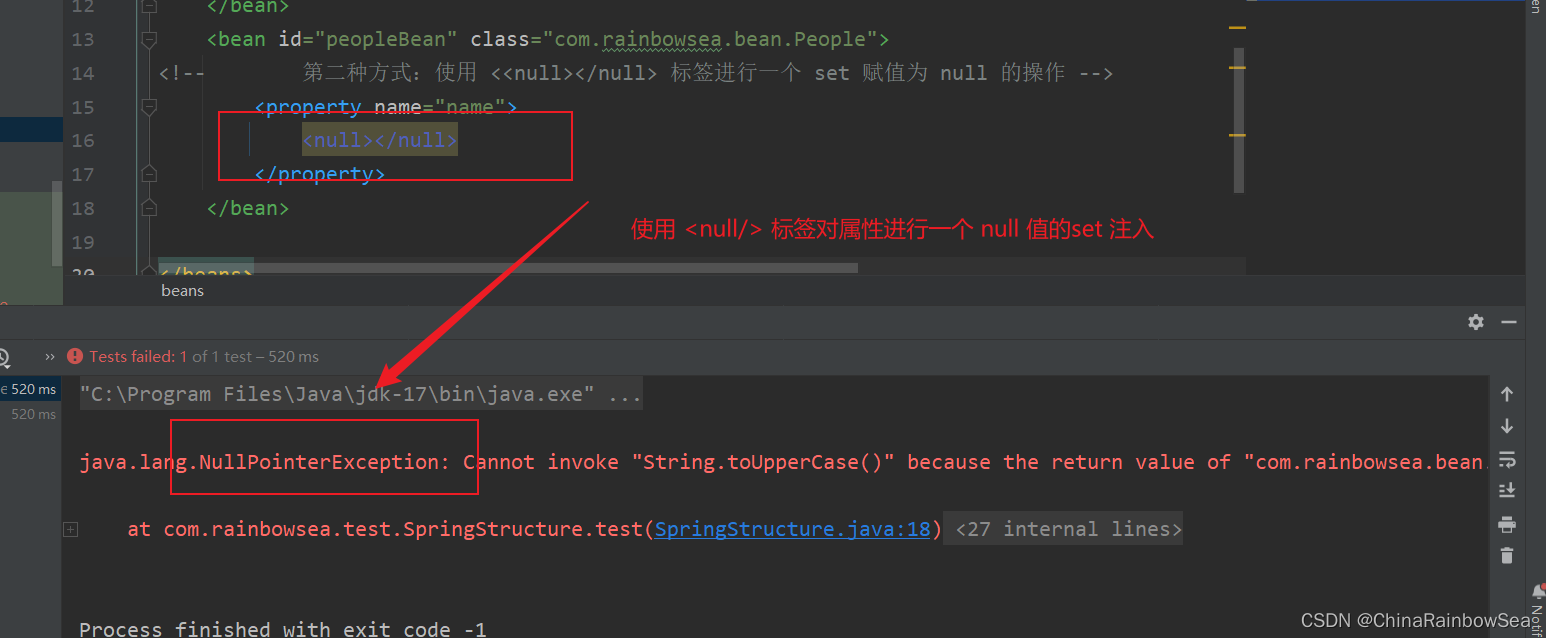
方式二:使用 <null></null> 的标签进行一个属性 set 注入赋值为 null 的操作
<?xml version="1.0" encoding="UTF-8"?>

<beans xmlns="http://www.springframework.org/schema/beans"

       xmlns:xsi="http://www.w3.org/2001/XMLSchema-instance"

       xsi:schemaLocation="http://www.springframework.org/schema/beans http://www.springframework.org/schema/beans/spring-beans.xsd">

    <bean id="peopleBean" class="com.rainbowsea.bean.People">

<!--        第二种方式:使用 <<null></null> 标签进行一个 set 赋值为 null 的操作 -->

        <property name="name">

            <null></null>

        </property>

    </bean>

</beans>
运行测试:
package com.rainbowsea.test;

import com.rainbowsea.bean.People;

import org.junit.Test;

import org.springframework.context.ApplicationContext;

import org.springframework.context.support.ClassPathXmlApplicationContext;

public class SpringStructure {

    @Test

    public void test() {

        // 获取到对应的 spring6当中的xml的,容器对象

        // 面向接口编程,左边为接口,

        ApplicationContext applicationContext = new ClassPathXmlApplicationContext("spring-sets.xml");

        // 通过 id 获取到对应的类/class

        People peopleBean = applicationContext.getBean("peopleBean", People.class);

        // 将小写字母转换为大写字母,如果name为空报 null 异常测试:

        System.out.println(peopleBean.getName().toUpperCase());

    }

}
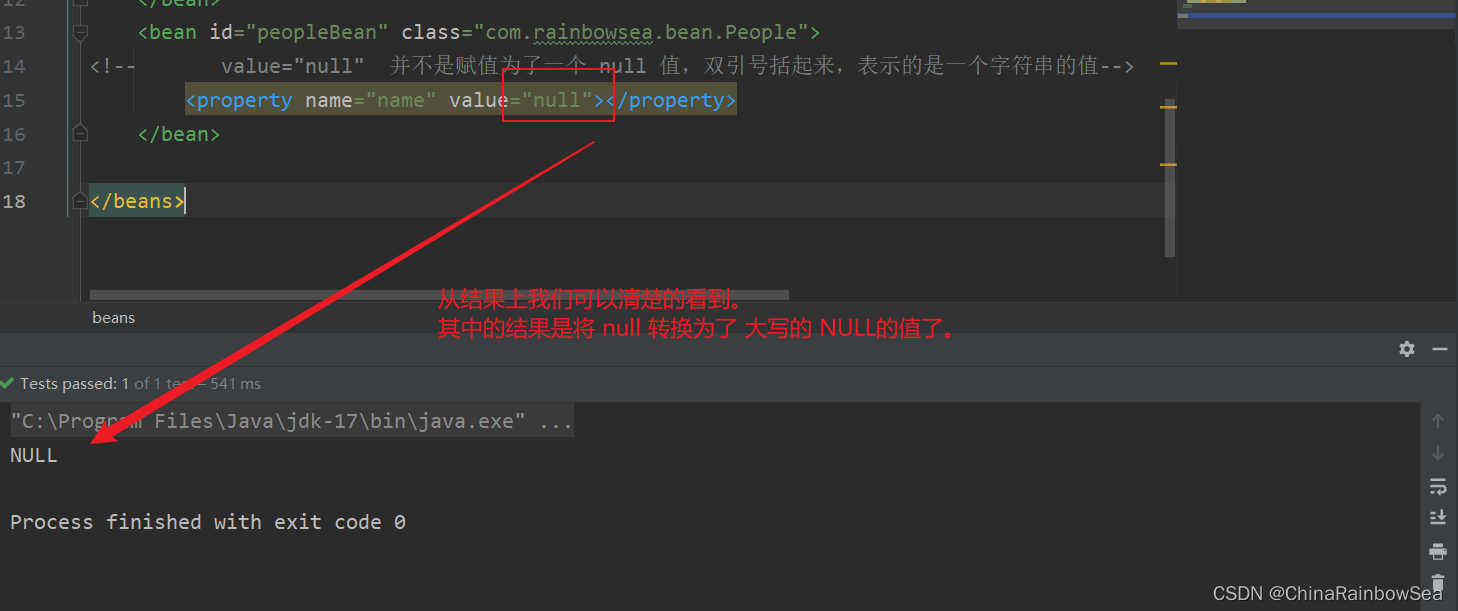
注意点:就是如果我们将 value = null ,set 注入的话,并不是将 value 的属性值,赋值为了null,而是赋值为了一个 null 的字符串而已。
<?xml version="1.0" encoding="UTF-8"?>

<beans xmlns="http://www.springframework.org/schema/beans"

       xmlns:xsi="http://www.w3.org/2001/XMLSchema-instance"

       xsi:schemaLocation="http://www.springframework.org/schema/beans http://www.springframework.org/schema/beans/spring-beans.xsd">

    <bean id="peopleBean" class="com.rainbowsea.bean.People">

<!--       value="null"  并不是赋值为了一个 null 值,双引号括起来,表示的是一个字符串的值-->

        <property name="name" value="null"></property>

    </bean>

</beans>
2.10.2 set 注入空字符串值的方式
同样的,如果我们想要将一个属性的值,赋值为 空字符串 该怎么做呢?
**方式一:我们可以 value="" 的方式进行一个空字符串的赋值 **
package com.rainbowsea.bean;

public class People {

    private String name;

    // set 注入必须提供 set 方法

    public void setName(String name) {

        this.name = name;

    }

    @Override

    public String toString() {

        return "People{" +

                "name='" + name + '\'' +

                '}';

    }

}
<?xml version="1.0" encoding="UTF-8"?>

<beans xmlns="http://www.springframework.org/schema/beans"

       xmlns:xsi="http://www.w3.org/2001/XMLSchema-instance"

       xsi:schemaLocation="http://www.springframework.org/schema/beans http://www.springframework.org/schema/beans/spring-beans.xsd">

    <bean id="peopleBean" class="com.rainbowsea.bean.People">

<!--      value="" 就是将值赋值为一个空字符串-->

        <property name="name" value=""></property>

    </bean>

</beans>

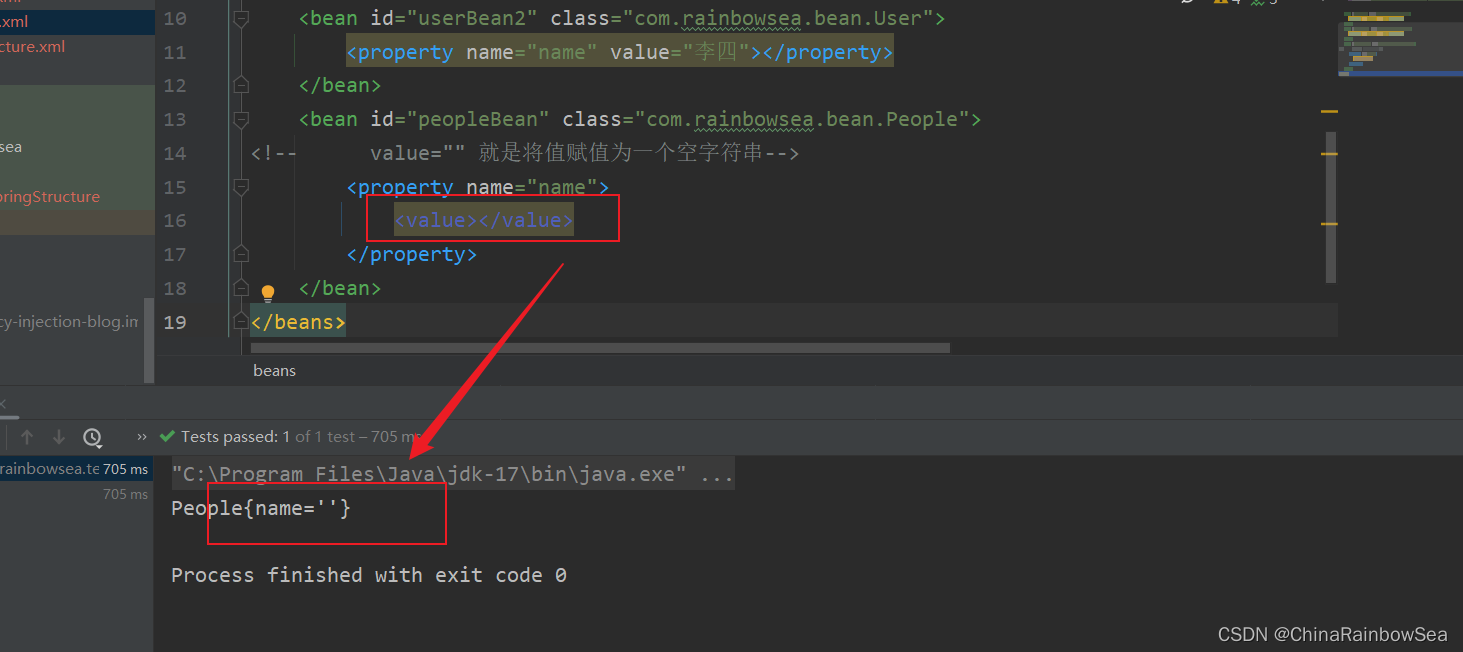
方式二: 使 <value/> 进行一个空字符串的 set 注入
<?xml version="1.0" encoding="UTF-8"?>

<beans xmlns="http://www.springframework.org/schema/beans"

       xmlns:xsi="http://www.w3.org/2001/XMLSchema-instance"

       xsi:schemaLocation="http://www.springframework.org/schema/beans http://www.springframework.org/schema/beans/spring-beans.xsd">

    <bean id="peopleBean" class="com.rainbowsea.bean.People">

<!--      value="" 就是将值赋值为一个空字符串-->

        <property name="name">

            <value></value>

        </property>

    </bean>

</beans>
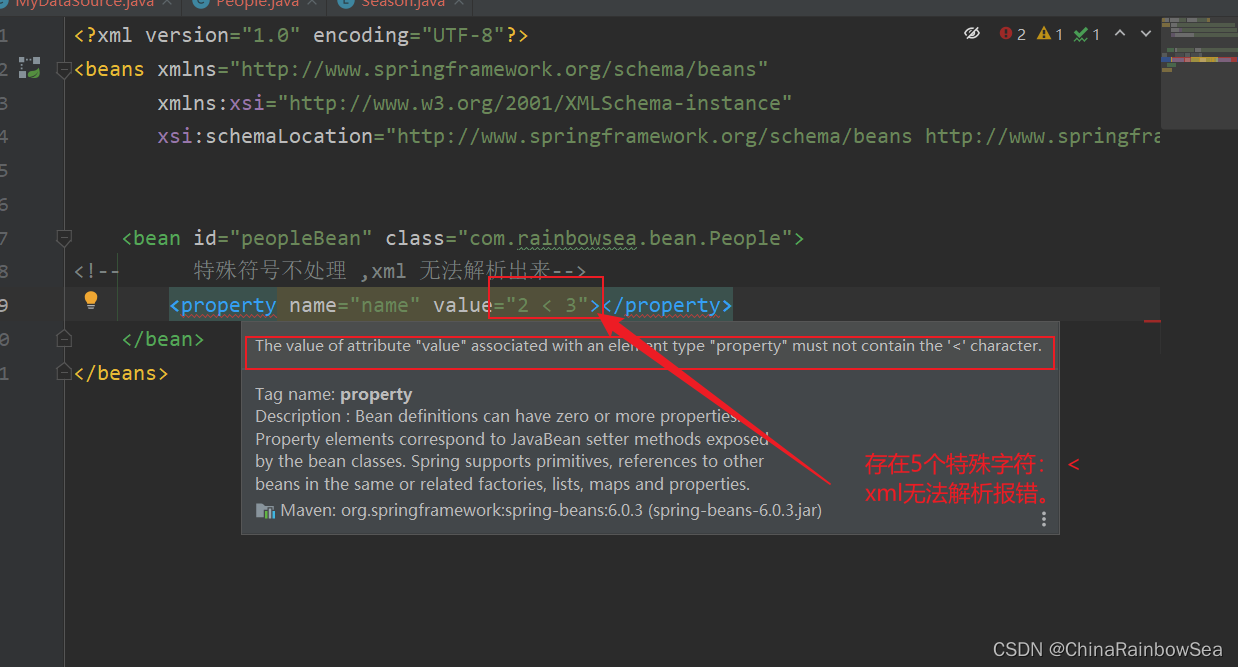
2.11 set 注入的属性值当中含有特殊符号,怎么处理
注意: 当我们在 xml 文件中出现了,特殊的字符串的时候,不然不进行一个特殊的处理的话,是会报错的。
XML 中有 5 个特殊字符,分别是:<、>、'、"、& 。以上这 5 个特殊符号在 xml 中会被特殊对待,会被当做xml语法的一部分进行解析,如果这些特殊符号直接出现注入的字符串当中,会报错的。具体体现如下:
The value of attribute "value" associated with an element type "property" must not contain the '<' character 翻译为: 与元素类型“property”关联的属性“value”的值不能包含“<”字符
解决方案包括两种:
- 第一种:特殊符号使用转义字符代替。
- 第二种:将含有特殊符号的字符串放到: 当中。因为放在CDATA区中的数据不会被XML文件解析器解析。
5个特殊字符对应的转义字符分别是:
需要注意的是: 其中转义字符当中是含有 ; 分号的,不可以省略掉的。这一点需要注意。
| 特殊字符 | 转义字符 |
|---|---|
| > | > |
| < | < |
| ' | ' |
| " | " |
| & | & |
先使用转义字符来代替: 测试如下:
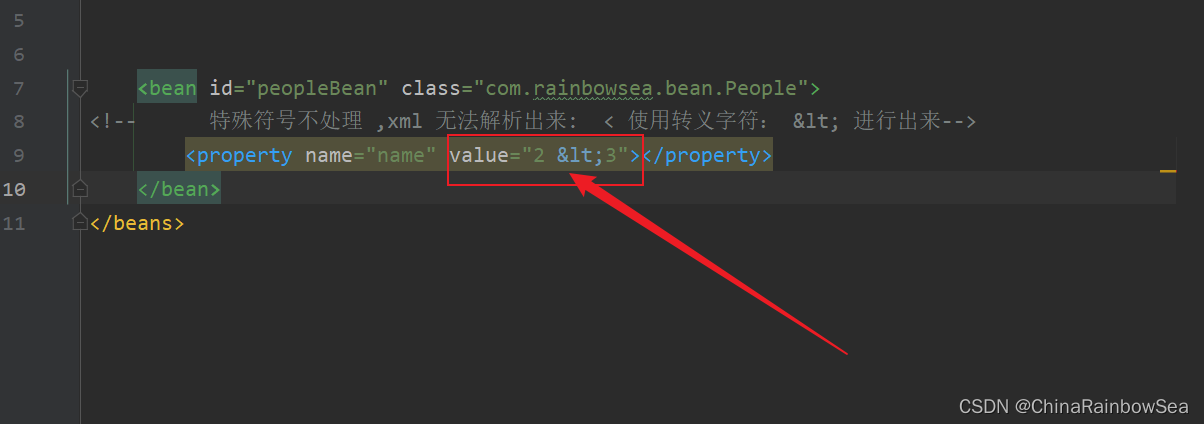
<?xml version="1.0" encoding="UTF-8"?>
<beans xmlns="http://www.springframework.org/schema/beans"
xmlns:xsi="http://www.w3.org/2001/XMLSchema-instance"
xsi:schemaLocation="http://www.springframework.org/schema/beans http://www.springframework.org/schema/beans/spring-beans.xsd">
<bean id="peopleBean" class="com.rainbowsea.bean.People">
<!-- 特殊符号不处理 ,xml 无法解析出来: < 使用转义字符: < 进行出来-->
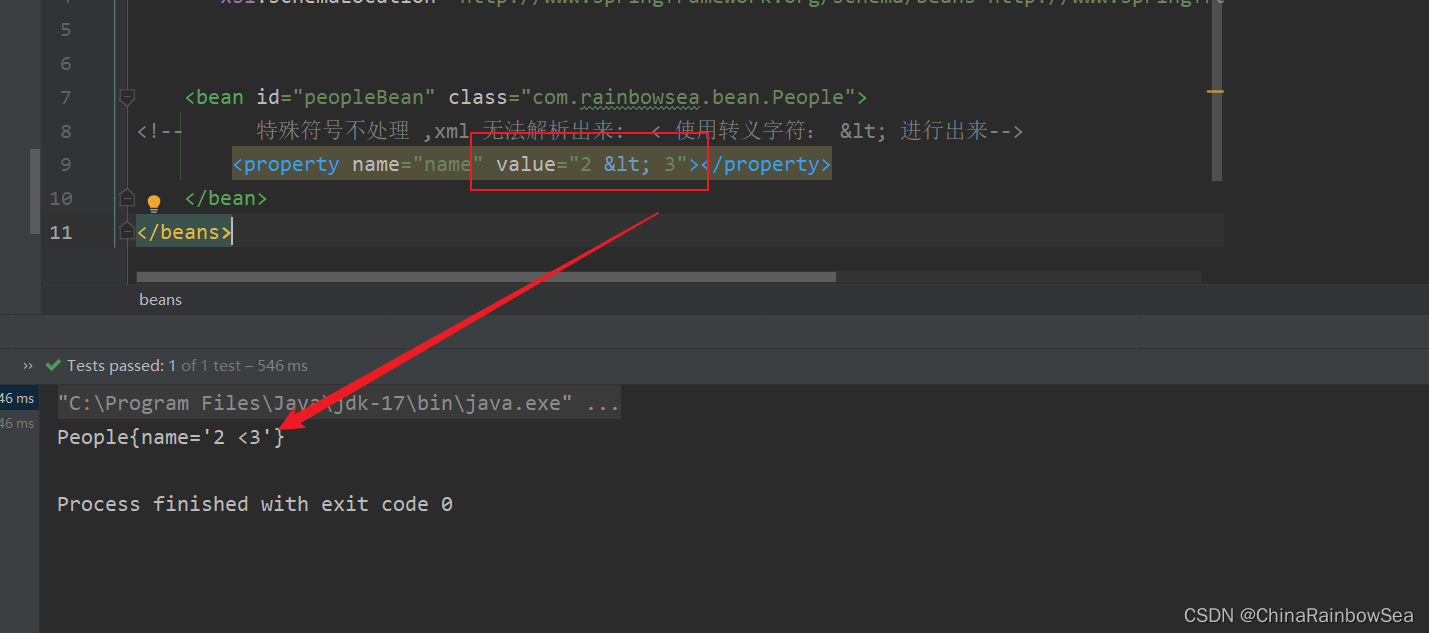
<property name="name" value="2 < 3"></property>
</bean>
</beans>
运行测试:
package com.rainbowsea.test;

import com.rainbowsea.bean.People;

import org.junit.Test;

import org.springframework.context.ApplicationContext;

import org.springframework.context.support.ClassPathXmlApplicationContext;

public class SpringStructure {

    @Test

    public void test() {

        // 获取到对应的 spring6当中的xml的,容器对象

        // 面向接口编程,左边为接口,

        ApplicationContext applicationContext = new ClassPathXmlApplicationContext("spring-sets.xml");

        // 通过 id 获取到对应的类/class

        People peopleBean = applicationContext.getBean("peopleBean", People.class);

        System.out.println(peopleBean);

    }

}
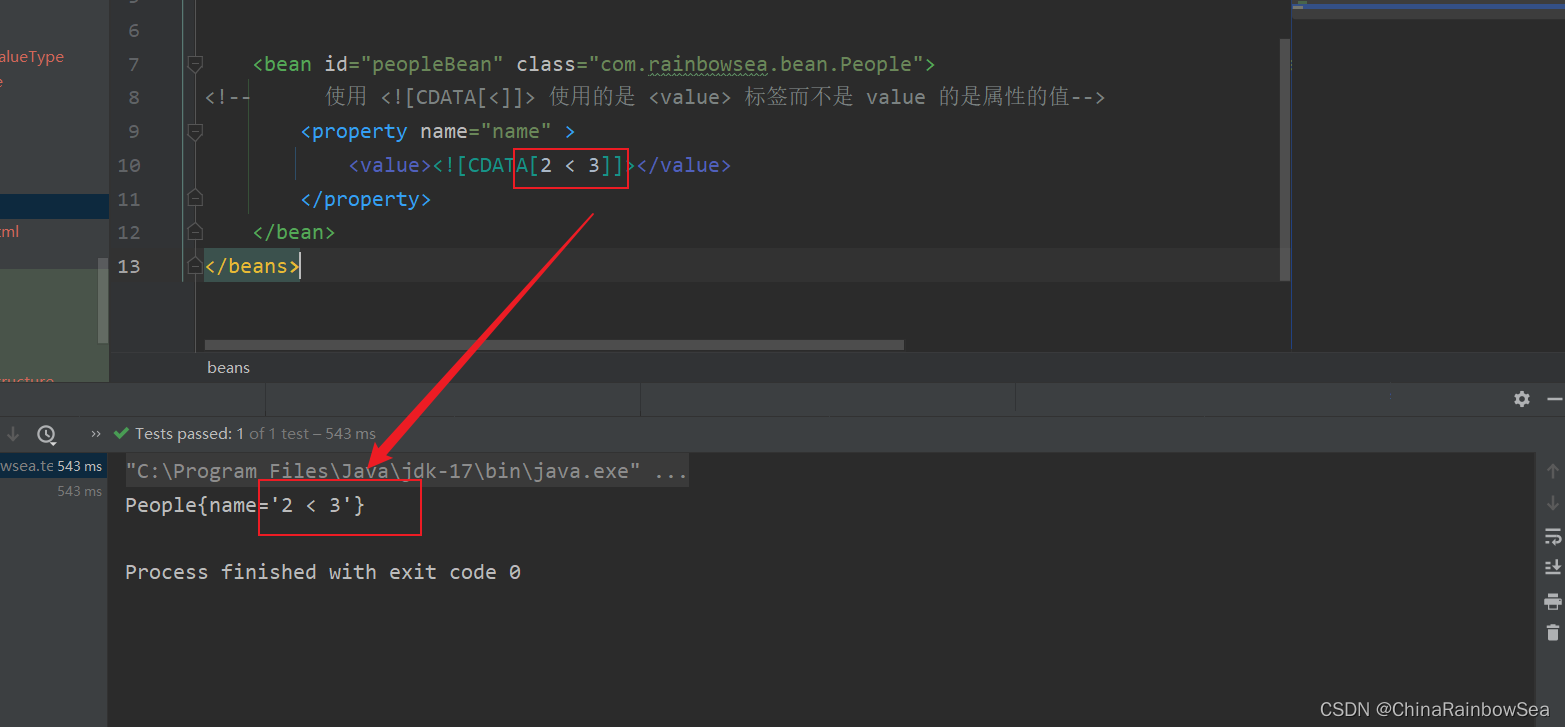
方式二:将含有特殊符号的字符串放到: 当中。因为放在CDATA区中的数据不会被XML文件解析器解析
格式:
  <value><![CDATA[这里放特殊的字符]]></value>

比如:

<value><![CDATA[ 2 < 3 ]></value>
注意:使用CDATA时,不能使用value属性,只能使用value标签。
<?xml version="1.0" encoding="UTF-8"?>

<beans xmlns="http://www.springframework.org/schema/beans"

       xmlns:xsi="http://www.w3.org/2001/XMLSchema-instance"

       xsi:schemaLocation="http://www.springframework.org/schema/beans http://www.springframework.org/schema/beans/spring-beans.xsd">

    <bean id="peopleBean" class="com.rainbowsea.bean.People">

<!--      使用 <![CDATA[<]]> 使用的是 <value> 标签而不是 value 的是属性的值-->

        <property name="name" >

            <value><![CDATA[2 < 3]]></value>

        </property>

    </bean>

</beans>
运行测试:
package com.rainbowsea.test;

import com.rainbowsea.bean.People;

import org.junit.Test;

import org.springframework.context.ApplicationContext;

import org.springframework.context.support.ClassPathXmlApplicationContext;

public class SpringStructure {

    @Test

    public void test() {

        // 获取到对应的 spring6当中的xml的,容器对象

        // 面向接口编程,左边为接口,

        ApplicationContext applicationContext = new ClassPathXmlApplicationContext("spring-sets.xml");

        // 通过 id 获取到对应的类/class

        People peopleBean = applicationContext.getBean("peopleBean", People.class);

        System.out.println(peopleBean);

    }

}
3. 命名空间注入
从上面的案例实践中,我们可以知道的是,在 xml 中我们需要会存在编写一些重复性的信息。
这样导致的结果就是:导致我们的 xml 的代码量过长,以及冗余度过高,等等一些问题。
而解决这一类问题的话,我们可以使用一些命名空间注入 的方式,提高复用性,减少必要的冗余。
命名空间的目的:就是简化配置。
如下介绍了三个命名空间:
- P命名空间注入
- c命名空间注入
- util命名空间注入
上述的三种命名空间我们都会进行一个:不使用命名空间,和使用了命名空间后的一个效果的对比,这样可以更加明显的体现出命名空间的好处。
3.1 p命名空间注入
package com.rainbowsea.bean;

import java.util.Date;

public class People {

    private String name;

    private int age;

    private boolean sex;

    private Date date;

    // set 注入必须提供 set 方法()

    public void setName(String name) {

        this.name = name;

    }

    public void setAge(int age) {

        this.age = age;

    }

    public void setSex(boolean sex) {

        this.sex = sex;

    }

    public void setDate(Date date) {

        this.date = date;

    }

    @Override

    public String toString() {

        return "People{" +

                "name='" + name + '\'' +

                ", age=" + age +

                ", sex=" + sex +

                ", date=" + date +

                '}';

    }

}
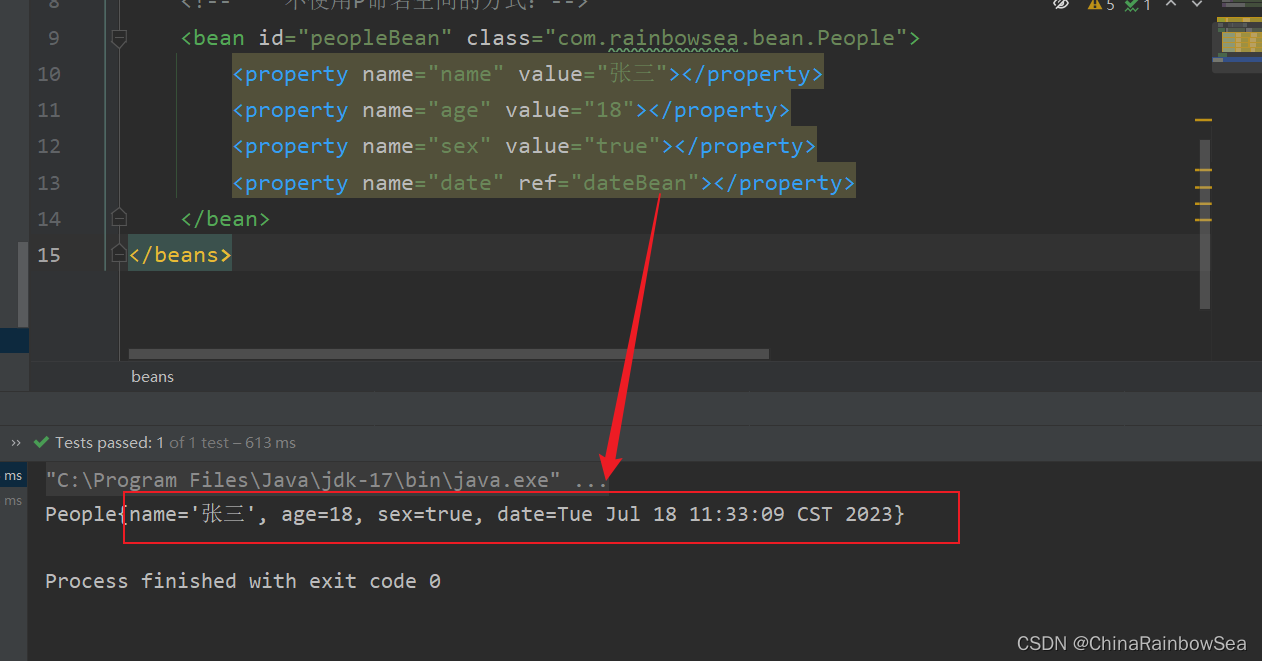
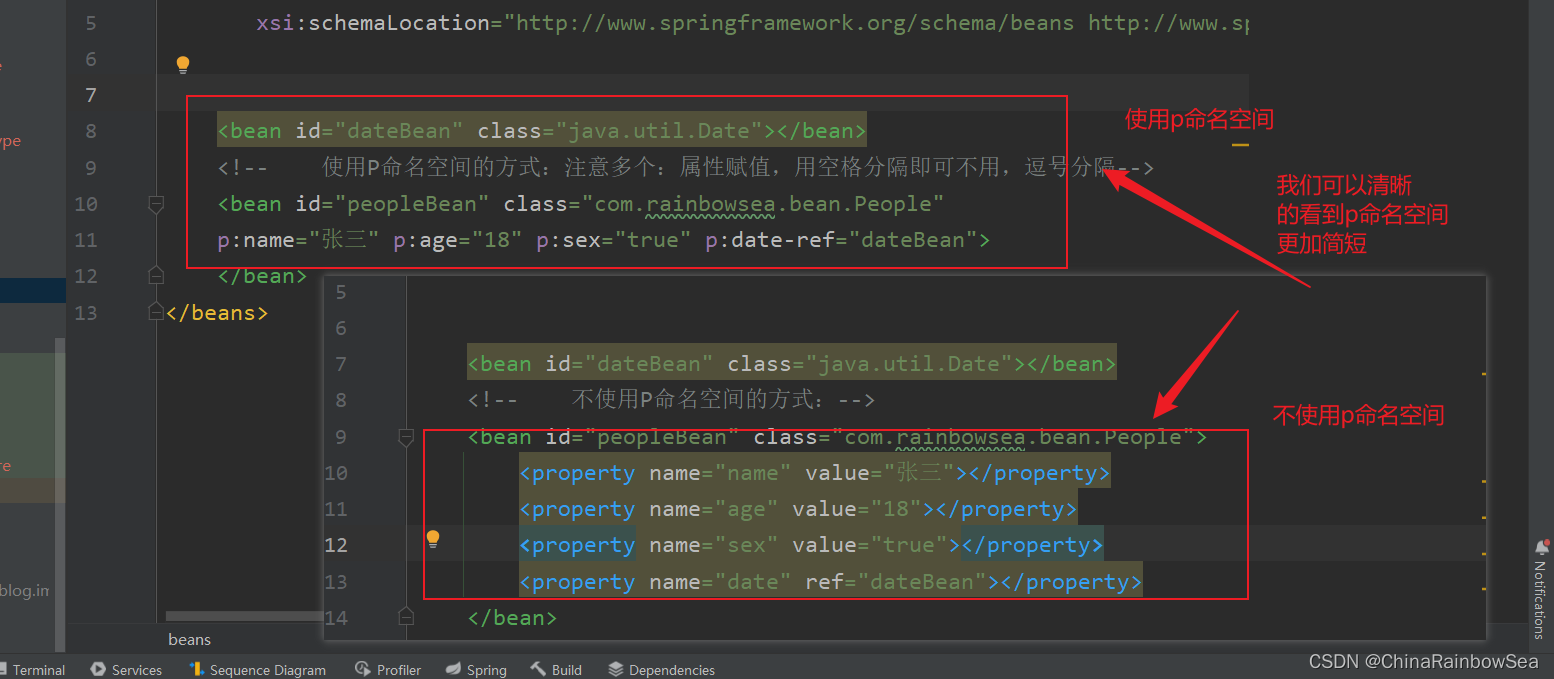
不使用p命名空间编写的 xml 配置信息
<?xml version="1.0" encoding="UTF-8"?>

<beans xmlns="http://www.springframework.org/schema/beans"

       xmlns:xsi="http://www.w3.org/2001/XMLSchema-instance"

       xsi:schemaLocation="http://www.springframework.org/schema/beans http://www.springframework.org/schema/beans/spring-beans.xsd">

    <bean id="dateBean" class="java.util.Date"></bean>

    <!--    不使用P命名空间的方式:-->

    <bean id="peopleBean" class="com.rainbowsea.bean.People">

        <property name="name" value="张三"></property>

        <property name="age" value="18"></property>

        <property name="sex" value="true"></property>

        <property name="date" ref="dateBean"></property>

    </bean>

</beans>
运行测试:
package com.rainbowsea.test;

import com.rainbowsea.bean.People;

import org.junit.Test;

import org.springframework.context.ApplicationContext;

import org.springframework.context.support.ClassPathXmlApplicationContext;

public class SpringStructure {

    @Test

    public void test() {

        // 获取到对应的 spring6当中的xml的,容器对象

        // 面向接口编程,左边为接口,

        ApplicationContext applicationContext = new ClassPathXmlApplicationContext("spring-sets.xml");

        // 通过 id 获取到对应的类/class

        People peopleBean = applicationContext.getBean("peopleBean", People.class);

        System.out.println(peopleBean);

    }

}
使用 p命名空间进行一个 set 注入
目的:简化配置。
使用p命名空间注入的前提条件包括两个:
- 第一:在XML头部信息中添加p命名空间的配置信息:
xmlns:p="http://www.springframework.org/schema/p"
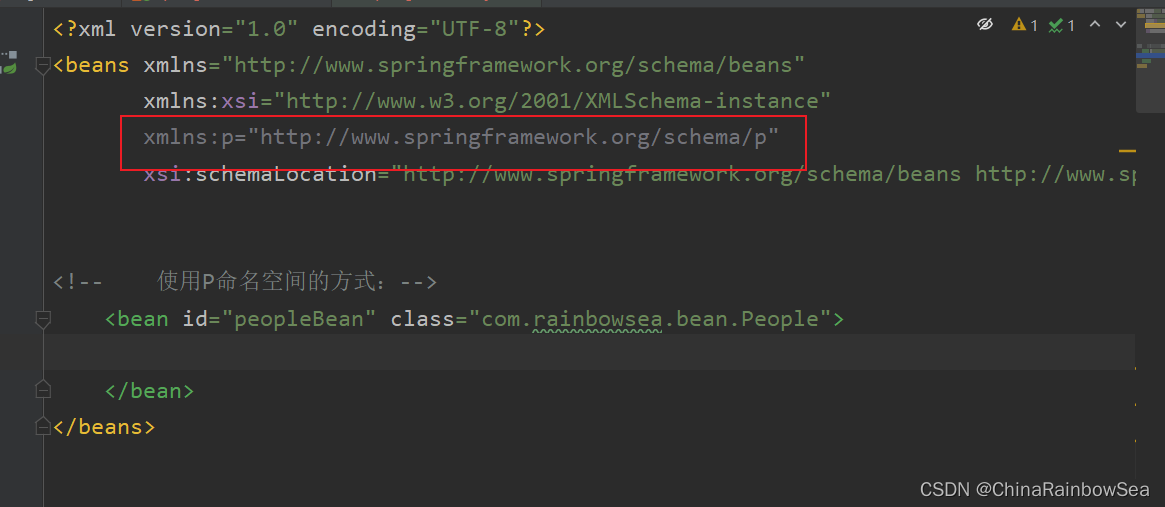
- 第二:p命名空间注入是基于setter方法的,所以需要对应的属性提供setter方法。
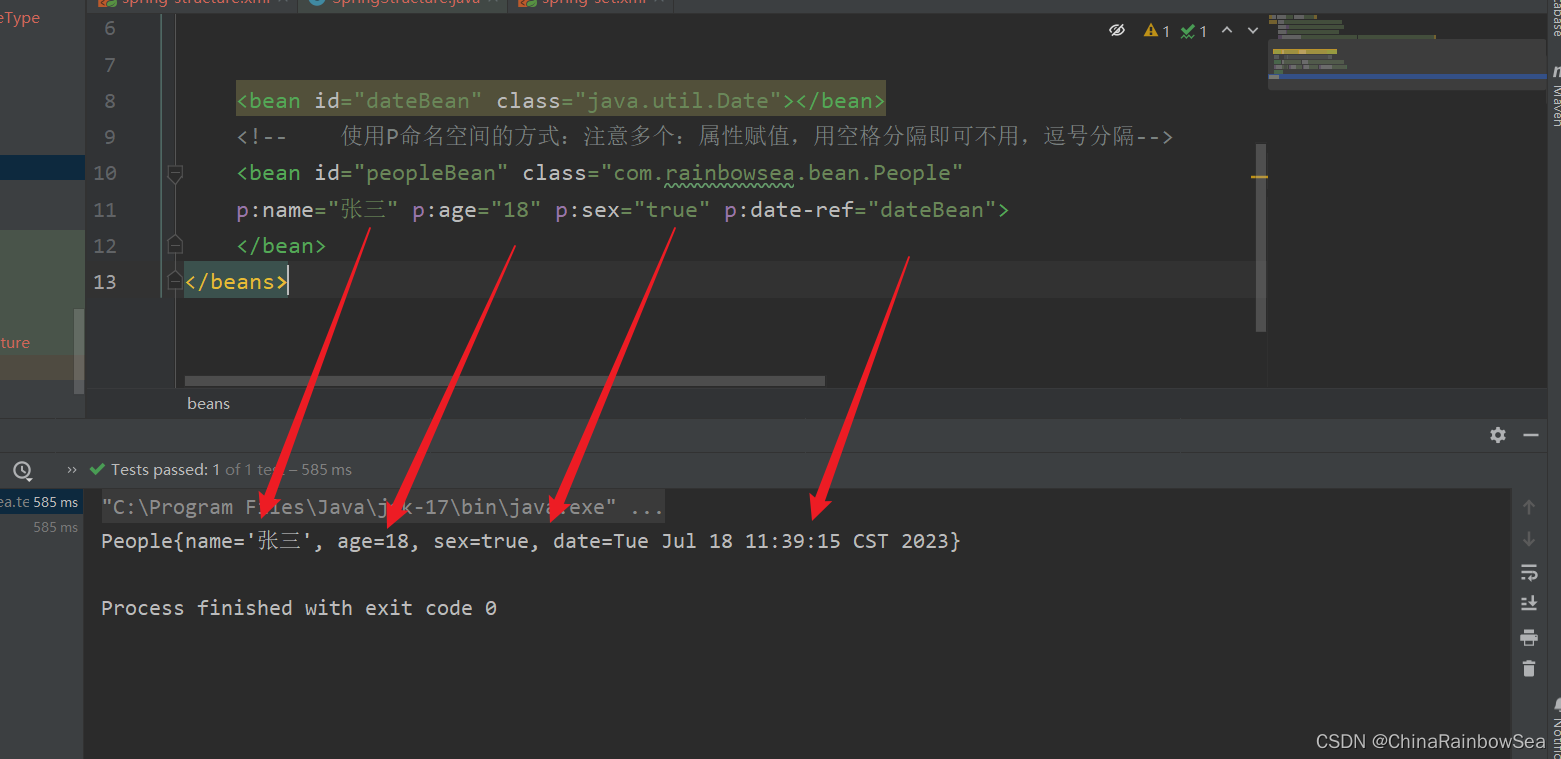
- 第三: 使用p命名空间格式如下: 需要注意的是:使用P命名空间的方式:注意多个:属性赋值,用空格分隔即可,不用逗号分隔,同时其中的 p 是小写的。
- 核心: p命名空间底层使用的还是 set 注入,所以还是必须要实现 set()方法的。
 p:属性名 = "属性值"

 p:birth-ref = 复杂类型
<?xml version="1.0" encoding="UTF-8"?>

<beans xmlns="http://www.springframework.org/schema/beans"

       xmlns:xsi="http://www.w3.org/2001/XMLSchema-instance"

       xmlns:p="http://www.springframework.org/schema/p"

       xsi:schemaLocation="http://www.springframework.org/schema/beans http://www.springframework.org/schema/beans/spring-beans.xsd">

    <bean id="dateBean" class="java.util.Date"></bean>

    <!--    使用P命名空间的方式:注意多个:属性赋值,用空格分隔即可不用,逗号分隔-->

    <bean id="peopleBean" class="com.rainbowsea.bean.People"

    p:name="张三" p:age="18" p:sex="true" p:date-ref="dateBean">

    </bean>

</beans>
运行测试:
package com.rainbowsea.test;

import com.rainbowsea.bean.People;

import org.junit.Test;

import org.springframework.context.ApplicationContext;

import org.springframework.context.support.ClassPathXmlApplicationContext;

public class SpringStructure {

    @Test

    public void test() {

        // 获取到对应的 spring6当中的xml的,容器对象

        // 面向接口编程,左边为接口,

        ApplicationContext applicationContext = new ClassPathXmlApplicationContext("spring-sets.xml");

        // 通过 id 获取到对应的类/class

        People peopleBean = applicationContext.getBean("peopleBean", People.class);

        System.out.println(peopleBean);

    }

}
3.2 c命名空间注入
package com.rainbowsea.bean;

import java.util.Date;

public class People {

    private String name;

    private int age;

    private boolean sex;

    private Date date;

    // c命名空间底层调用的是构造方法,所以必须实现对应的构造方法

    public People(String name, int age, boolean sex, Date date) {

        this.name = name;

        this.age = age;

        this.sex = sex;

        this.date = date;

    }

    @Override

    public String toString() {

        return "People{" +

                "name='" + name + '\'' +

                ", age=" + age +

                ", sex=" + sex +

                ", date=" + date +

                '}';

    }

}
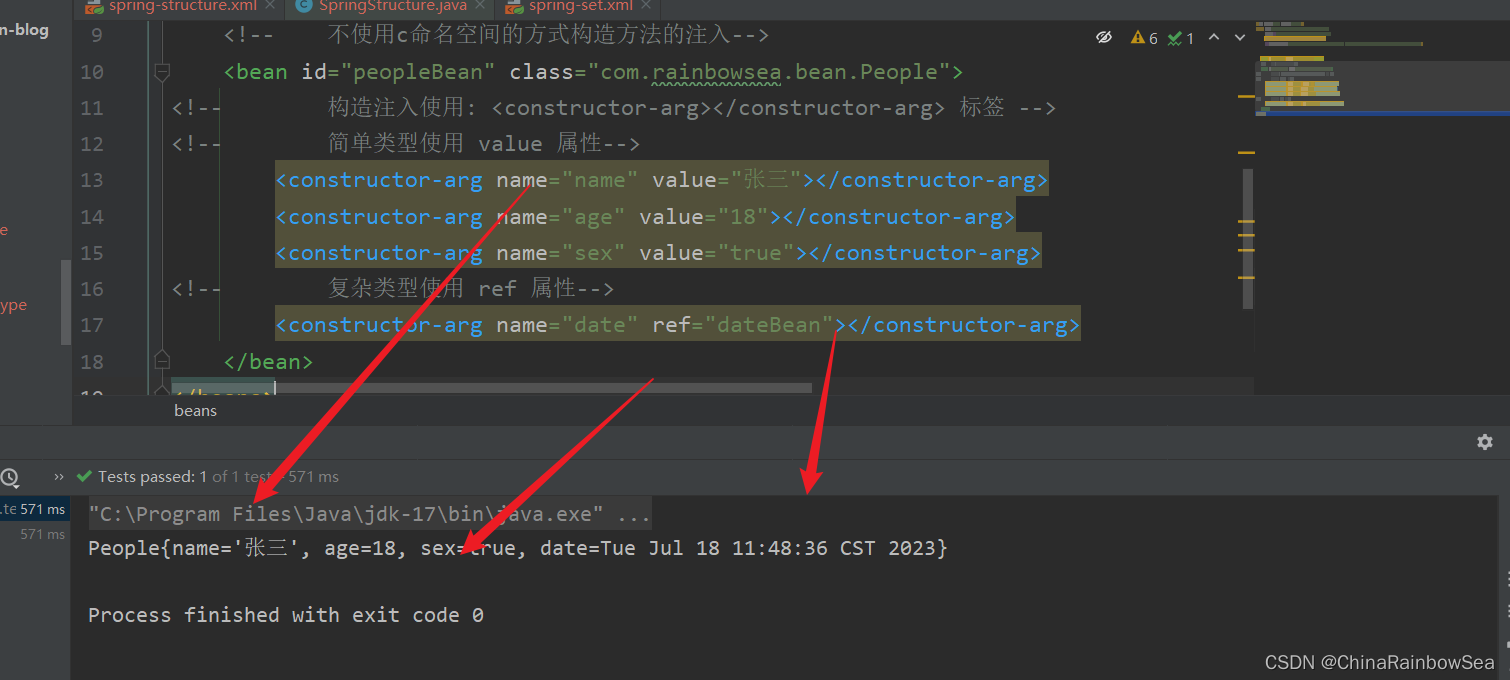
不使用c命名空间注入
构造方法的set注入
<?xml version="1.0" encoding="UTF-8"?>
<beans xmlns="http://www.springframework.org/schema/beans"
xmlns:xsi="http://www.w3.org/2001/XMLSchema-instance"
xmlns:p="http://www.springframework.org/schema/p"
xsi:schemaLocation="http://www.springframework.org/schema/beans http://www.springframework.org/schema/beans/spring-beans.xsd">
<bean id="dateBean" class="java.util.Date"></bean>
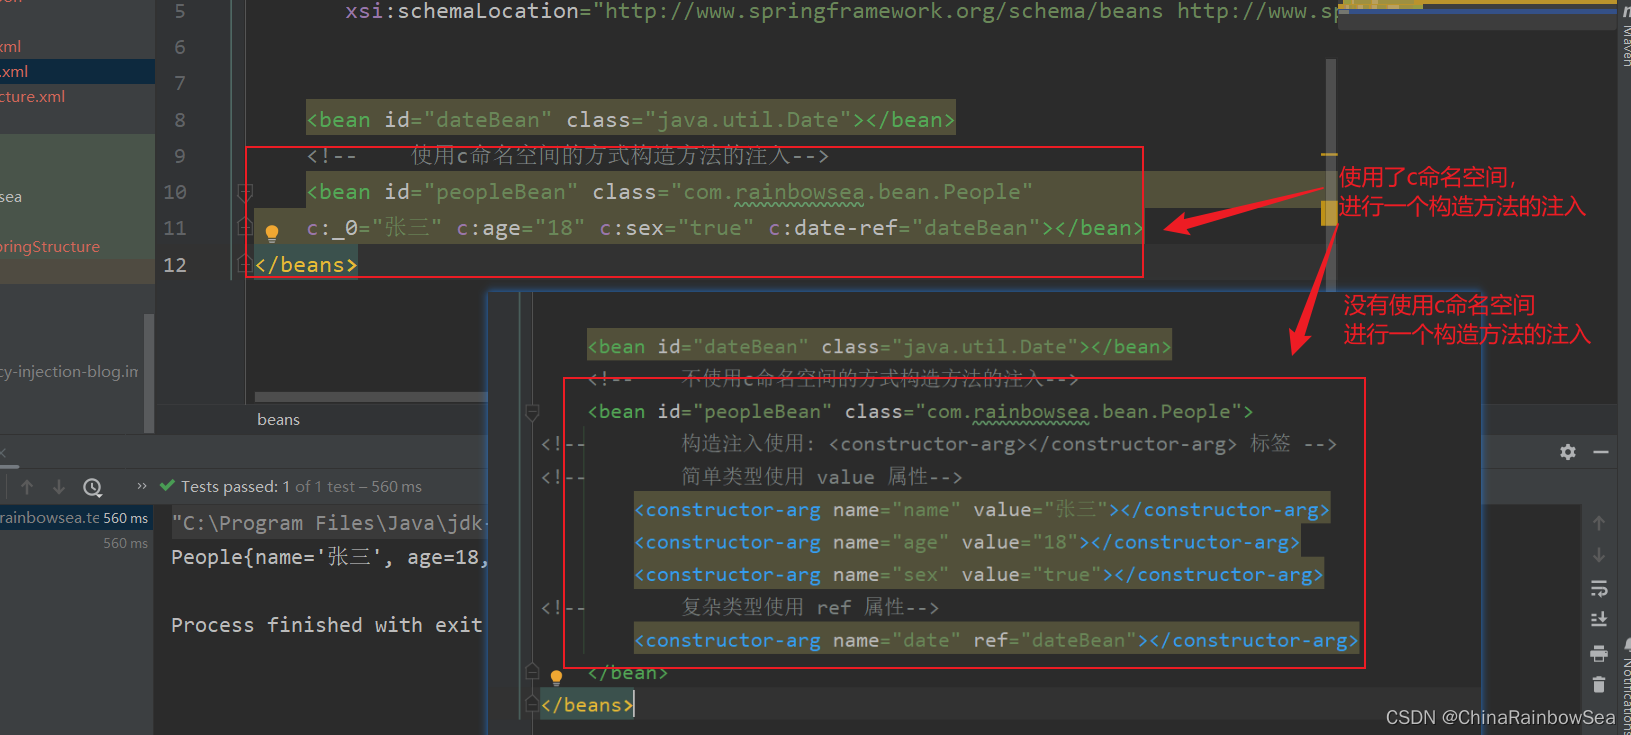
<!-- 不使用c命名空间的方式构造方法的注入-->
<bean id="peopleBean" class="com.rainbowsea.bean.People">
<!-- 构造注入使用: <constructor-arg></constructor-arg> 标签 -->
<!-- 简单类型使用 value 属性-->
<constructor-arg name="name" value="张三"></constructor-arg>
<constructor-arg name="age" value="18"></constructor-arg>
<constructor-arg name="sex" value="true"></constructor-arg>
<!-- 复杂类型使用 ref 属性-->
<constructor-arg name="date" ref="dateBean"></constructor-arg>
</bean>
</beans>
运行测试:
package com.rainbowsea.test;

import com.rainbowsea.bean.People;

import org.junit.Test;

import org.springframework.context.ApplicationContext;

import org.springframework.context.support.ClassPathXmlApplicationContext;

public class SpringStructure {

    @Test

    public void test() {

        // 获取到对应的 spring6当中的xml的,容器对象

        // 面向接口编程,左边为接口,

        ApplicationContext applicationContext = new ClassPathXmlApplicationContext("spring-sets.xml");

        // 通过 id 获取到对应的类/class

        People peopleBean = applicationContext.getBean("peopleBean", People.class);

        System.out.println(peopleBean);

    }

}
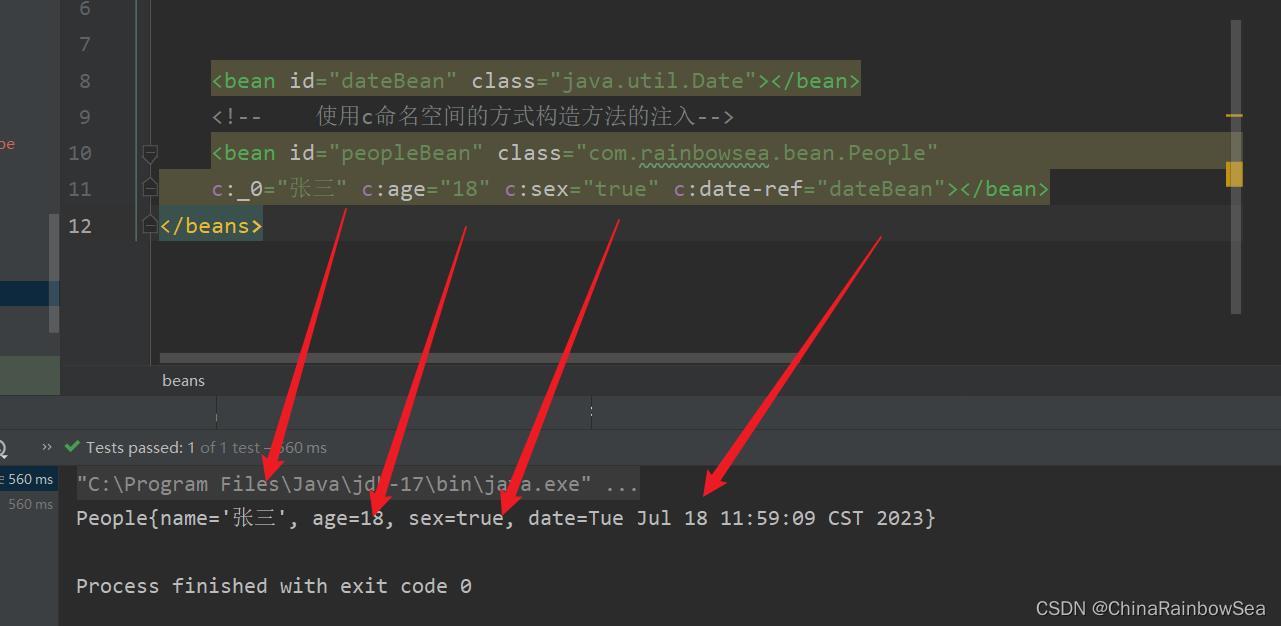
使用 c命名空间进行一个构造方法的 set 注入
c命名空间是简化构造方法注入的。c命名空间底层调用的是构造方法进行一个属性的赋值。所以必须实现对应的构造方法。
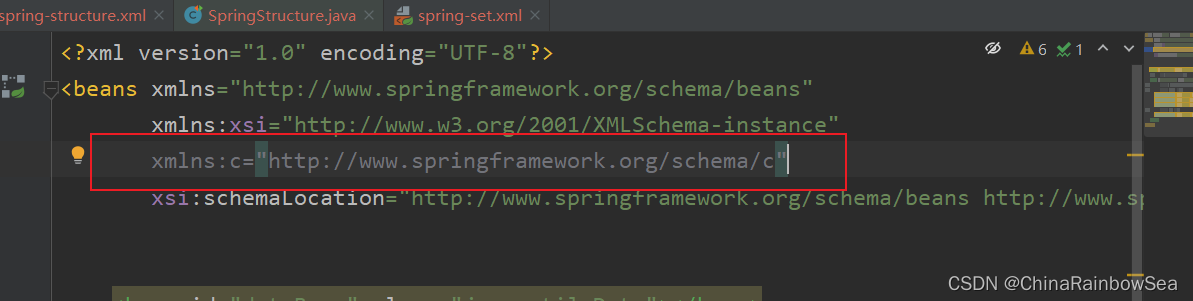
使用c命名空间的两个前提条件:
第一:需要在xml配置文件头部添加信息:xmlns:c="http://www.springframework.org/schema/c"
第二:需要提供构造方法。
第三:使用c命名空间:c命名空间两种格式对属性进行一个赋值c:_o 下标的方式,二 c:name 参数名的方式
注意:多个属性的赋值,使用空格 分隔,不要使用逗号分隔
格式如下:
	c:_0 下标方式

    c:name 参数名方式

    复杂类型:在简单类型的后面加个-ref

    c:name-ref
<?xml version="1.0" encoding="UTF-8"?>

<beans xmlns="http://www.springframework.org/schema/beans"

       xmlns:xsi="http://www.w3.org/2001/XMLSchema-instance"

       xmlns:c="http://www.springframework.org/schema/c"

       xsi:schemaLocation="http://www.springframework.org/schema/beans http://www.springframework.org/schema/beans/spring-beans.xsd">

    <bean id="dateBean" class="java.util.Date"></bean>

    <!--    使用c命名空间的方式构造方法的注入-->

    <bean id="peopleBean" class="com.rainbowsea.bean.People"

    c:_0="张三" c:age="18" c:sex="true" c:date-ref="dateBean"></bean>

</beans>
运行测试:
package com.rainbowsea.test;

import com.rainbowsea.bean.People;

import org.junit.Test;

import org.springframework.context.ApplicationContext;

import org.springframework.context.support.ClassPathXmlApplicationContext;

public class SpringStructure {

    @Test

    public void test() {

        // 获取到对应的 spring6当中的xml的,容器对象

        // 面向接口编程,左边为接口,

        ApplicationContext applicationContext = new ClassPathXmlApplicationContext("spring-sets.xml");

        // 通过 id 获取到对应的类/class

        People peopleBean = applicationContext.getBean("peopleBean", People.class);

        System.out.println(peopleBean);

    }

}
3.3 util命名空间注入
package com.rainbowsea.bean;

import java.util.Properties;

public class MyDataSource02 {

    private Properties properties;

    // set 注入必须提供 set方法

    public void setProperties(Properties properties) {

        this.properties = properties;

    }

    @Override

    public String toString() {

        return "MyDataSource02{" +

                "properties=" + properties +

                '}';

    }

}
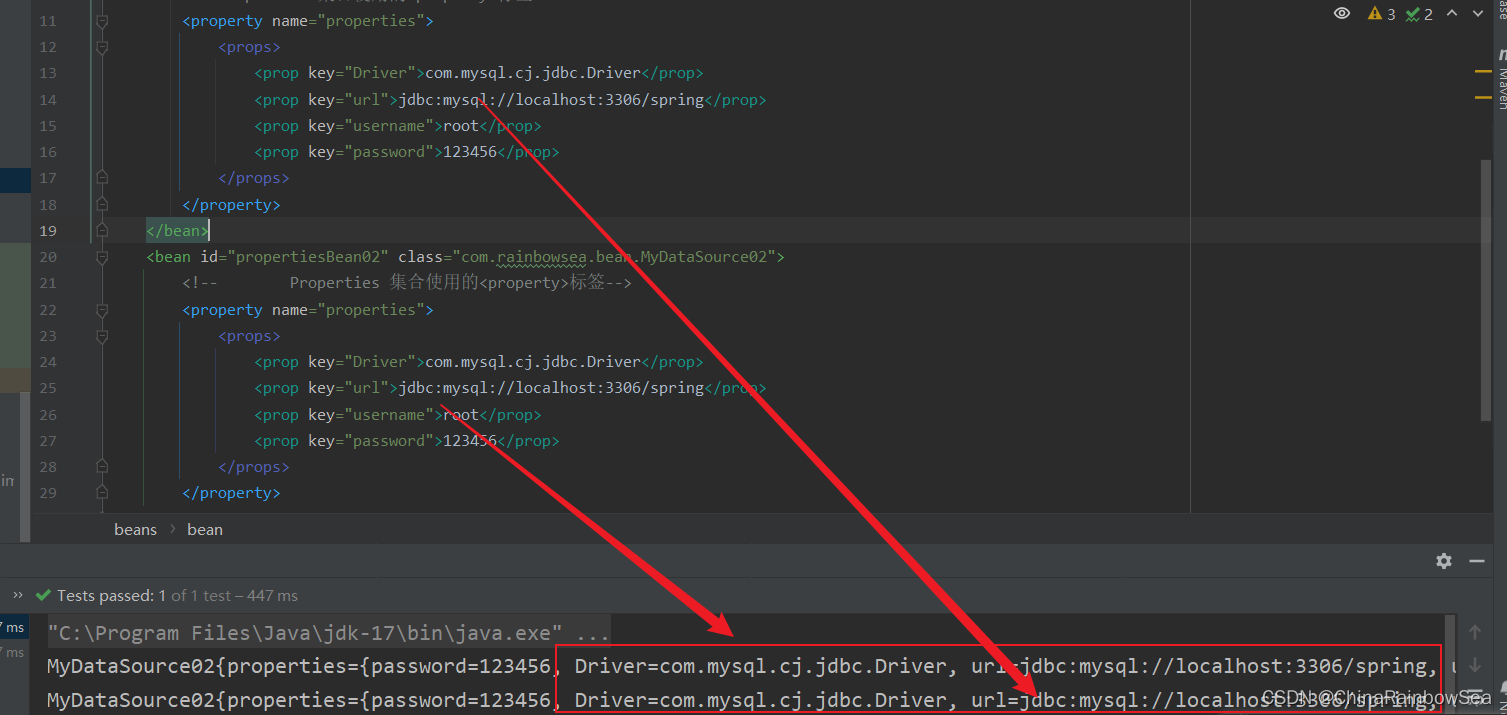
不使用 util 命名空间的效果:
<?xml version="1.0" encoding="UTF-8"?>

<beans xmlns="http://www.springframework.org/schema/beans"

       xmlns:xsi="http://www.w3.org/2001/XMLSchema-instance"

       xsi:schemaLocation="http://www.springframework.org/schema/beans http://www.springframework.org/schema/beans/spring-beans.xsd">

        <bean id="propertiesBean" class="com.rainbowsea.bean.MyDataSource02">

<!--        Properties 集合使用的<property>标签-->

        <property name="properties">

            <props>

                <prop key="Driver">com.mysql.cj.jdbc.Driver</prop>

                <prop key="url">jdbc:mysql://localhost:3306/spring</prop>

                <prop key="username">root</prop>

                <prop key="password">123456</prop>

            </props>

        </property>

    </bean>

    <bean id="propertiesBean02" class="com.rainbowsea.bean.MyDataSource02">

        <!--        Properties 集合使用的<property>标签-->

        <property name="properties">

            <props>

                <prop key="Driver">com.mysql.cj.jdbc.Driver</prop>

                <prop key="url">jdbc:mysql://localhost:3306/spring</prop>

                <prop key="username">root</prop>

                <prop key="password">123456</prop>

            </props>

        </property>

    </bean>

</beans>
运行测试:
package com.rainbowsea.test;

import com.rainbowsea.bean.MyDataSource02;

import com.rainbowsea.bean.People;

import org.junit.Test;

import org.springframework.context.ApplicationContext;

import org.springframework.context.support.ClassPathXmlApplicationContext;

public class SpringStructure {

    @Test

    public void test() {

        // 获取到对应的 spring6当中的xml的,容器对象

        // 面向接口编程,左边为接口,

        ApplicationContext applicationContext = new ClassPathXmlApplicationContext("spring-sets.xml");

        // 通过 id 获取到对应的类/class

        MyDataSource02 propertiesBean = applicationContext.getBean("propertiesBean", MyDataSource02.class);

        System.out.println(propertiesBean);

        MyDataSource02 propertiesBean02 = applicationContext.getBean("propertiesBean02", MyDataSource02.class);

        System.out.println(propertiesBean);

    }

}
使用 util 命名空间的效果
使用util命名空间可以让配置复用。
使用util命名空间的前提是:在spring配置文件头部添加配置信息。如下:
- 第一:在spring 当中的 xml 的配置文件的导入相关的命名空间:
xmlns:util="http://www.springframework.org/schema/util"

http://www.springframework.org/schema/util http://www.springframework.org/schema/util/spring-util.xsd
具体的如下图所示:
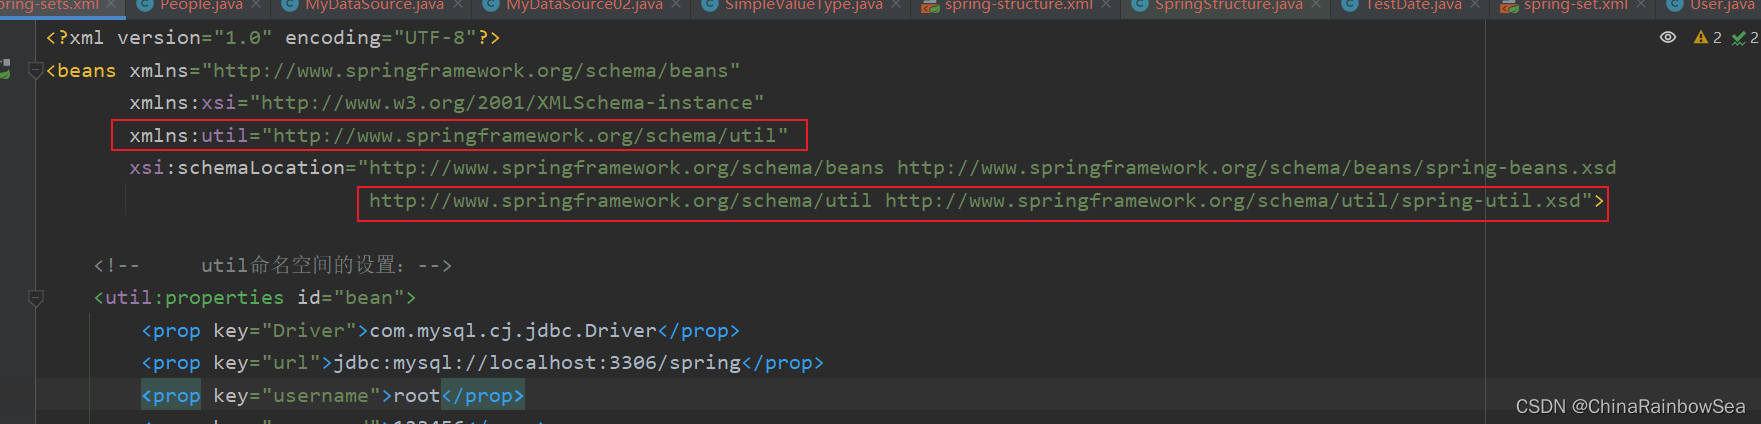
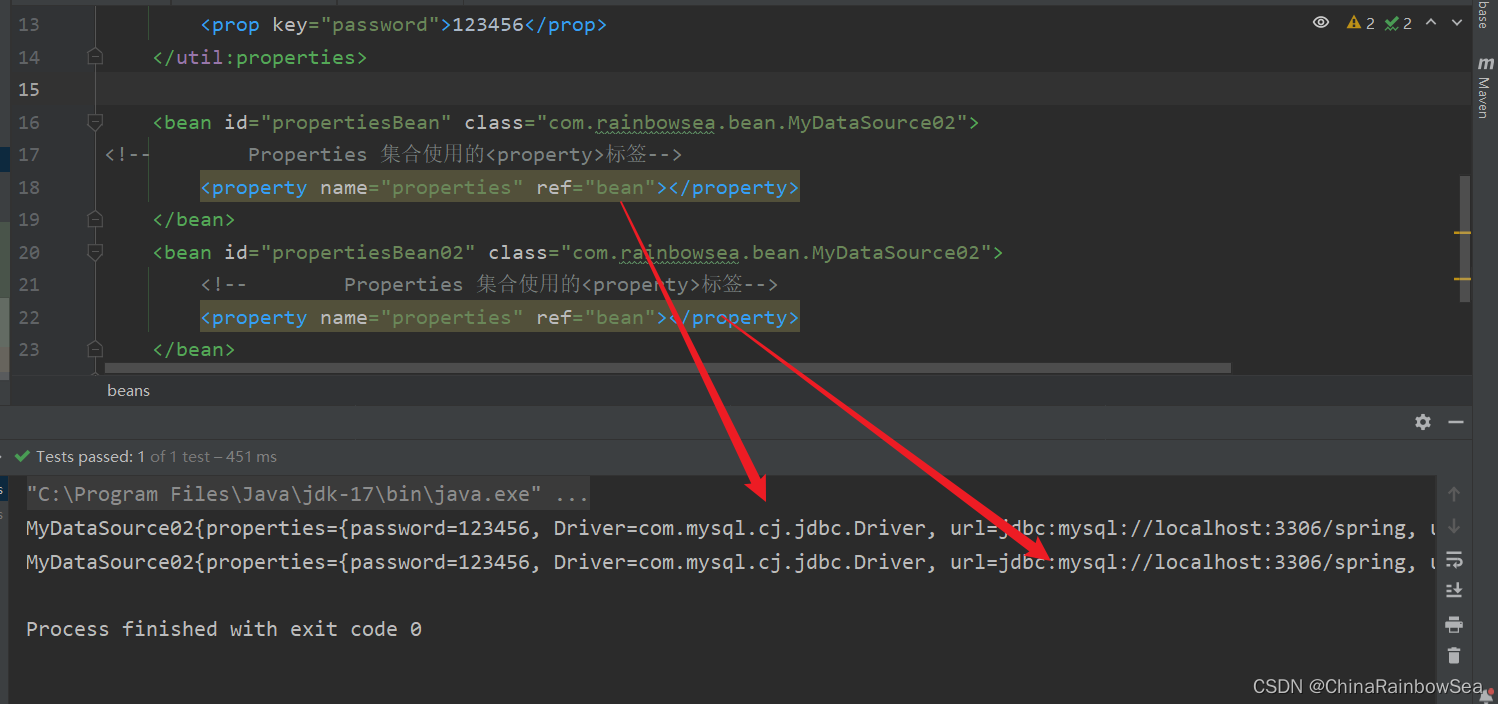
- 第二: 使用 util 命名空间,格式首先需要定义好相对应的 util 的数据源信息。格式如下:使用的话,作为复杂类型进行一个 ref 处理。
<!--     util命名空间的设置:-->

    <util:properties id="bean">

        <prop key="Driver">com.mysql.cj.jdbc.Driver</prop>

        <prop key="url">jdbc:mysql://localhost:3306/spring</prop>

        <prop key="username">root</prop>

        <prop key="password">123456</prop>

    </util:properties>
<?xml version="1.0" encoding="UTF-8"?>

<beans xmlns="http://www.springframework.org/schema/beans"

       xmlns:xsi="http://www.w3.org/2001/XMLSchema-instance"

       xmlns:util="http://www.springframework.org/schema/util"

       xsi:schemaLocation="http://www.springframework.org/schema/beans http://www.springframework.org/schema/beans/spring-beans.xsd

                            http://www.springframework.org/schema/util http://www.springframework.org/schema/beans/spring-util.xsd">

    <!--     util命名空间的设置:-->

    <util:properties id="bean">

        <prop key="Driver">com.mysql.cj.jdbc.Driver</prop>

        <prop key="url">jdbc:mysql://localhost:3306/spring</prop>

        <prop key="username">root</prop>

        <prop key="password">123456</prop>

    </util:properties>

    <bean id="propertiesBean" class="com.rainbowsea.bean.MyDataSource02">

<!--        Properties 集合使用的<property>标签-->

        <property name="properties" ref="bean"></property>

    </bean>

    <bean id="propertiesBean02" class="com.rainbowsea.bean.MyDataSource02">

        <!--        Properties 集合使用的<property>标签-->

        <property name="properties" ref="bean"></property>

    </bean>

</beans>
package com.rainbowsea.test;

import com.rainbowsea.bean.MyDataSource02;

import com.rainbowsea.bean.People;

import org.junit.Test;

import org.springframework.context.ApplicationContext;

import org.springframework.context.support.ClassPathXmlApplicationContext;

public class SpringStructure {

    @Test

    public void test() {

        // 获取到对应的 spring6当中的xml的,容器对象

        // 面向接口编程,左边为接口,

        ApplicationContext applicationContext = new ClassPathXmlApplicationContext("spring-sets.xml");

        // 通过 id 获取到对应的类/class

        MyDataSource02 propertiesBean = applicationContext.getBean("propertiesBean", MyDataSource02.class);

        System.out.println(propertiesBean);

        MyDataSource02 propertiesBean02 = applicationContext.getBean("propertiesBean02", MyDataSource02.class);

        System.out.println(propertiesBean);

    }

}
4. 补充:Spring引入外部属性配置文件
我们都知道编写数据源的时候是需要连接数据库的信息。例如: Driver ,url ,username,password 等信息,这些休息可以单独写到一个属性配置文件中,这样用户修改起来会更加的方便。
Eg: 我们创建一个 jdbc.propertise 配置文件,让spring当中的xml 可以读取到其中的配置信息.
第一步:写一个数据源类,提供相关属性。
package com.rainbowsea.bean;

import javax.sql.DataSource;

import java.io.PrintWriter;

import java.sql.Connection;

import java.sql.SQLException;

import java.sql.SQLFeatureNotSupportedException;

import java.util.logging.Logger;

public class MyDataSource implements DataSource {

    private String driver;

    private String url;

    private String username;

    private String password;

    // set 注入必须提供 set () 方法

    public void setDriver(String driver) {

        this.driver = driver;

    }

    public void setUrl(String url) {

        this.url = url;

    }

    public void setUsername(String username) {

        this.username = username;

    }

    public void setPassword(String password) {

        this.password = password;

    }

    @Override

    public Connection getConnection() throws SQLException {

        return null;

    }

    @Override

    public Connection getConnection(String username, String password) throws SQLException {

        return null;

    }

    @Override

    public PrintWriter getLogWriter() throws SQLException {

        return null;

    }

    @Override

    public void setLogWriter(PrintWriter out) throws SQLException {

    }

    @Override

    public void setLoginTimeout(int seconds) throws SQLException {

    }

    @Override

    public int getLoginTimeout() throws SQLException {

        return 0;

    }

    @Override

    public Logger getParentLogger() throws SQLFeatureNotSupportedException {

        return null;

    }

    @Override

    public <T> T unwrap(Class<T> iface) throws SQLException {

        return null;

    }

    @Override

    public boolean isWrapperFor(Class<?> iface) throws SQLException {

        return false;

    }

    @Override

    public String toString() {

        return "MyDataSource{" +

                "driver='" + driver + '\'' +

                ", url='" + url + '\'' +

                ", username='" + username + '\'' +

                ", password='" + password + '\'' +

                '}';

    }

}
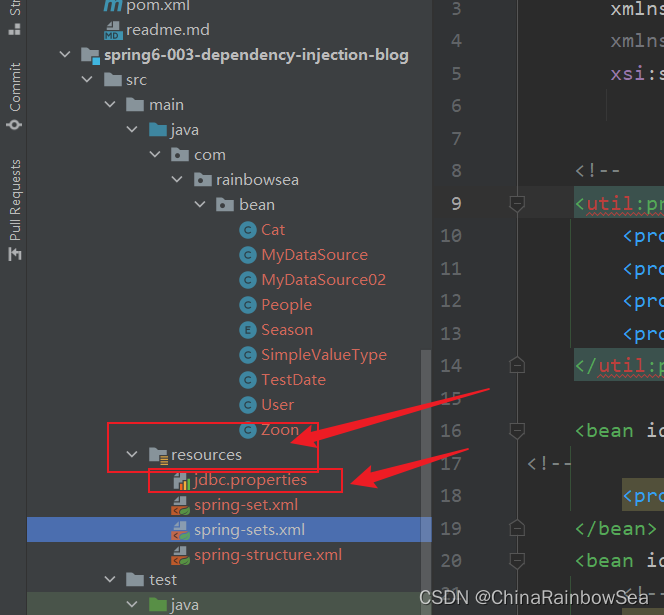
第二步:在类路径下新建jdbc.properties文件,并配置信息。
driverClass=com.mysql.cj.jdbc.Driver

url=jdbc:mysql://localhost:3306/sprin6

username=root

password=123

#特殊的处理加上:jdbc.防止歧义

#jdbc.driverClass=com.mysql.cj.jdbc.Driver

#jdbc.url=jdbc:mysql://localhost:3306/sprin6

#jdbc.username=root

#jdbc.password=123
需要注意的是:我们需要该 jdbc.properties 文件创建到,其中的该 resources 当中去。
第三步:在spring配置文件中引入context命名空间。
xmlns:context="http://www.springframework.org/schema/context"

http://www.springframework.org/schema/context http://www.springframework.org/schema/context/spring-context.xsd"
具体如下图所示:

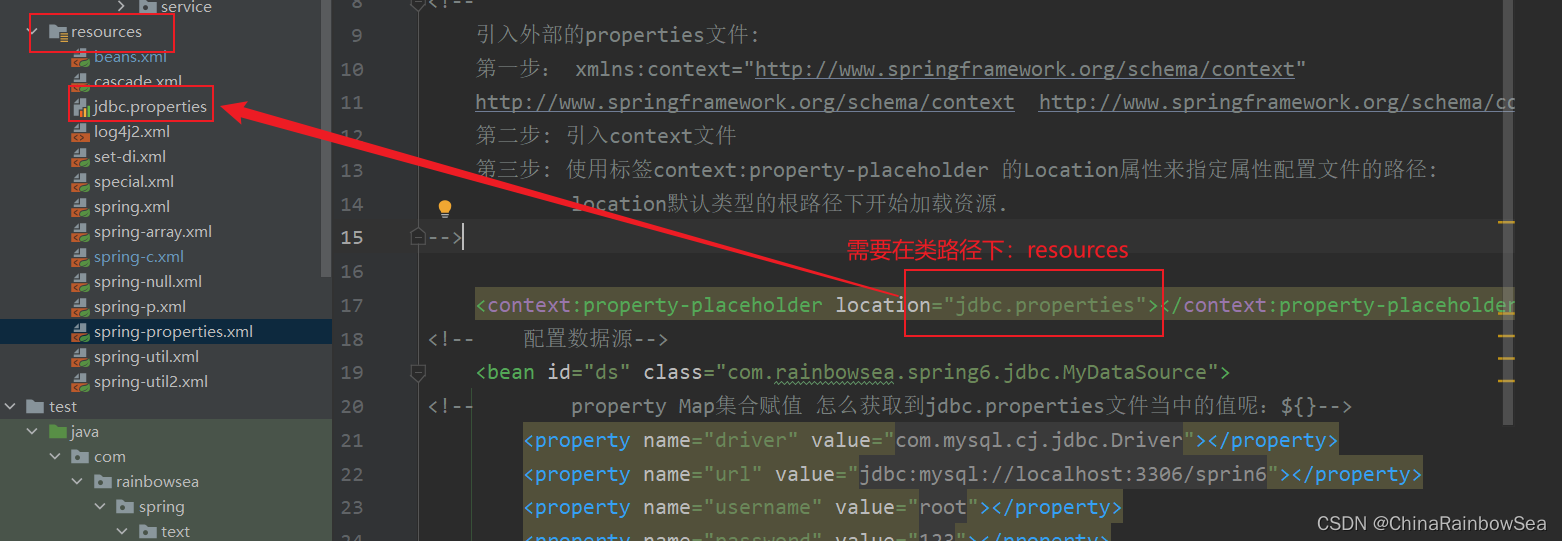
第四步:在spring中配置使用jdbc.properties文件。
格式如下:
  第三步: 使用标签context:property-placeholder 的Location属性来指定属性配置文件的路径:location默认类型的根路径下开始加载资源.

 <context:property-placeholder location="jdbc.properties"></context:property-placeholder>

<!--在: xml 中使用 怎么获取到jdbc.properties文件当中的值呢:使用${}  其中的 ${放的是对应propertise 配置文件当中的 key 名}-->
具体的如下图所示:
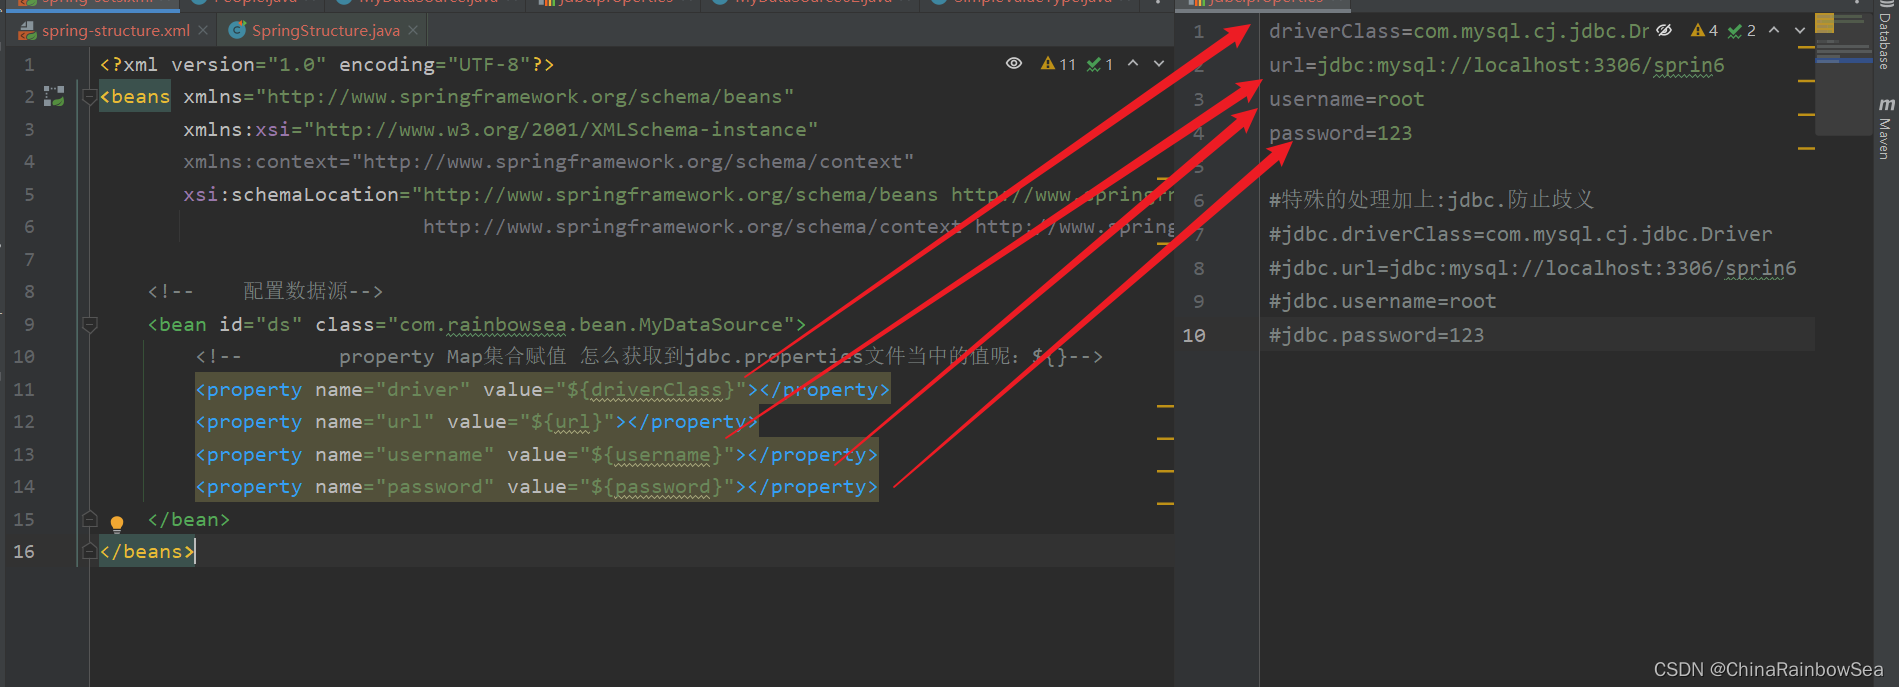
<?xml version="1.0" encoding="UTF-8"?>

<beans xmlns="http://www.springframework.org/schema/beans"

       xmlns:xsi="http://www.w3.org/2001/XMLSchema-instance"

       xmlns:context="http://www.springframework.org/schema/context"

       xsi:schemaLocation="http://www.springframework.org/schema/beans http://www.springframework.org/schema/beans/spring-beans.xsd

                           http://www.springframework.org/schema/context http://www.springframework.org/schema/context/spring-context.xsd">

<!--    xml 读取对应文件当中的 jdbc.properties 文件信息-->

    <context:property-placeholder location="jdbc.properties"></context:property-placeholder>

    <!--    配置数据源-->

    <bean id="ds" class="com.rainbowsea.bean.MyDataSource">

        <!--        property Map集合赋值 怎么获取到jdbc.properties文件当中的值呢:${}-->

        <property name="driver" value="${driverClass}"></property>

        <property name="url" value="${url}"></property>

        <property name="username" value="${username}"></property>

        <property name="password" value="${password}"></property>

    </bean>

</beans>
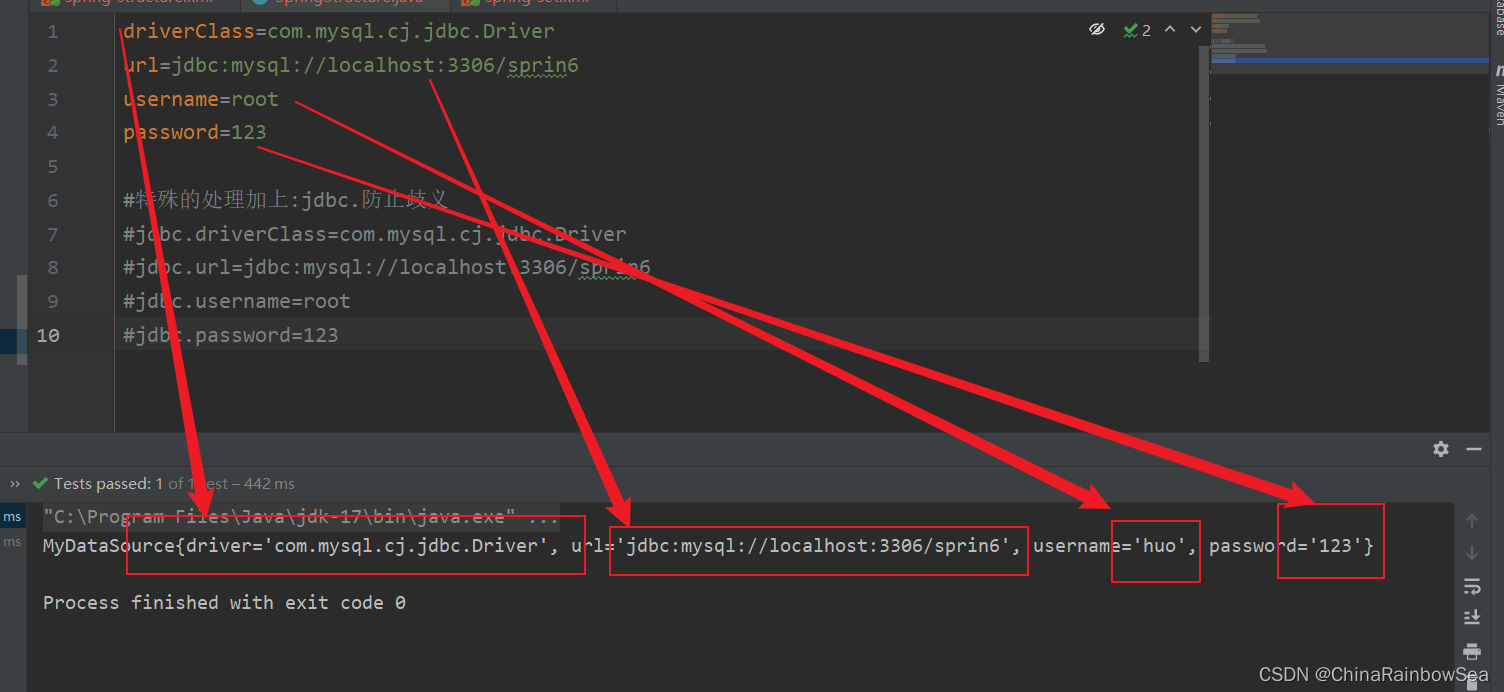
测试程序:
package com.rainbowsea.test;

import com.rainbowsea.bean.MyDataSource;

import org.junit.Test;

import org.springframework.context.ApplicationContext;

import org.springframework.context.support.ClassPathXmlApplicationContext;

public class SpringStructure {

    @Test

    public void test() {

        // 获取到对应的 spring6当中的xml的,容器对象

        // 面向接口编程,左边为接口,

        ApplicationContext applicationContext = new ClassPathXmlApplicationContext("spring-sets.xml");

        // 通过 id 获取到对应的类/class

        MyDataSource ds = applicationContext.getBean("ds", MyDataSource.class);

        System.out.println(ds);

    }

}
5. 总结:
依赖注入:
依赖指的是对象和对象 之间的关联关系。
注入指的是一种数据传递行为,通过注入行为来让对象和对象产生关系。
依赖注入常见的实现方式包括两种:
第一种:set注入 : set 注入必须实现了其中类的 set () 方法不然,是实现 set 注入的。因为set 注入的底层调用的是 set () 方法
第二种: 构造注入: 构造注入必须实现了对应参数的构造方法,不然是无法实现构造注入的。因为构造注入的底层调用的是 对应的构造方法。
使用其中 set 注入的各种应用场景:
- 简单类型的set 注入使用 value 属性操作
- 复杂类型的 set 注入使用 ref 属性进行一个赋值操作
set 注入的各种类型的格式处理:
- 数组类型
- 集合类型: Set,List,Map, Properties 集合
set 注入当中 如何实现 null 指的赋值,以及空字符串 的赋值
在 xml 当中,五种特殊的字符串的处理的方式:XML 中有 5 个特殊字符,分别是:<、>、'、"、& 。以上这 5 个特殊符号在 xml 中会被特殊对待,会被当做xml语法的一部分进行解析,如果这些特殊符号直接出现注入的字符串当中,会报错的。
命名空间上的使用:简化配置信息: p命名空间,c命名空间,util 命名空间。
- p命名空间底层调用的还是 set () 方法
- c命名空间底层调用的是 构造方法
- util 命名空间进行一个配置信息的复用
Spring 当中的 xml 读取到外部的 properties 配置文件的信息的操作。
6. 最后:
“在这个最后的篇章中,我要表达我对每一位读者的感激之情。你们的关注和回复是我创作的动力源泉,我从你们身上吸取了无尽的灵感与勇气。我会将你们的鼓励留在心底,继续在其他的领域奋斗。感谢你们,我们总会在某个时刻再次相遇。”

Spring 的依赖注入的更多相关文章
- (spring-第3回【IoC基础篇】)spring的依赖注入-属性、构造函数、工厂方法等的注入(基于XML)
Spring要把xml配置中bean的属性实例化为具体的bean,"依赖注入"是关卡.所谓的"依赖注入",就是把应用程序对bean的属性依赖都注入到spring ...
- Spring的依赖注入(DI)三种方式
Spring依赖注入(DI)的三种方式,分别为: 1. 接口注入 2. Setter方法注入 3. 构造方法注入 下面介绍一下这三种依赖注入在Spring中是怎么样实现的. 首先我们需要以下几个 ...
- spring的依赖注入的最常见的两种方法
package com.lsz.spring.action; public class User { /** * set注入 */ private String username; public vo ...
- 一步一步深入spring(3)--spring的依赖注入方式
对于spring配置一个bean时,如果需要给该bean提供一些初始化参数,则需要通过依赖注入方式,所谓的依赖注入就是通过spring将bean所需要的一些参数传递到bean实例对象的过程,sprin ...
- spring的依赖注入是什么意思
最近学习spring框架,对依赖注入有些模糊,遂上网翻阅资料,做了下列总结,原博客为CSDN 南夏的 spring的依赖注入是什么意思,侵删! Spring 能有效地组织J2EE应用各层的对象.不管是 ...
- SpringBoot系列: 理解 Spring 的依赖注入(一)
==============================Spring 的依赖注入==============================对于 Spring 程序, Spring 框架为我们提供 ...
- Spring.NET依赖注入框架学习--实例化容器常用方法
Spring.NET依赖注入框架学习---实例化容器常用方法 本篇学习实例化Spring.NET容器的俩种方式 1.通过XmlObjectFactory创建一个Spring.NET容器 IResour ...
- Spring.NET依赖注入框架学习--简单对象注入
Spring.NET依赖注入框架学习--简单对象注入 在前面的俩篇中讲解了依赖注入的概念以及Spring.NET框架的核心模块介绍,今天就要看看怎么来使用Spring.NET实现一个简单的对象注入 常 ...
- Spring.NET依赖注入框架学习--简介
Spring.NET依赖注入框架学习--Spring.NET简介 概述 Spring.NET是一个应用程序框架,其目的是协助开发人员创建企业级的.NET应用程序.它提供了很多方面的功能,比如依赖注入. ...
- Spring.NET依赖注入框架学习--入门
Spring.NET依赖注入框架学习--入门 在学些Spring.net框架之前,有必要先脑补一点知识,比如什么是依赖注入?IOC又是什么?控制反转又是什么意思?它们与Spring.net又有什么关系 ...
随机推荐
- Java中方法的定义及注意事项
一.方法 什么是方法: 方法(method)是程序中最小的执行单元 实际开发中,什么时候用到方法: 重复的代码.具有独立功能的代码可以抽取到方法中 实际开发中,方法有什么好处: 可以提高代码的复用性 ...
- Selenium 打包为.exe执行
前言:不依赖环境执行,拓展UI自动化使用的场景 一.项目结构介绍 case:测试用例次存放目录 config:主要存放yaml文件配置 ele:元素的定位以及执行动作 tools:HTMLTestRu ...
- 基于python爬虫技术对于淘宝的数据分析的设计与实现
本篇仅在于交流学习 本文主要介绍通过 selenium 模块和 requests 模块,同时让机器模拟人在浏览器上的行为,登录指定的网站,通过网站内部的搜索引擎来搜索自己相应的信息,从而获取相应关键字 ...
- pytest测试实战和练习
开头 经过前面几章的学习,这时候要来个测试实战会比较好巩固一下学过的知识 任务要求 1.实现计算器(加法,除法)的测试用例 2.使用数据驱动完成测试用例的自动生成 3.在调用测试方法之前打印[开始计算 ...
- 超实用的Go语言基础教程,让你快速上手刷题!!
背景 工欲善其事,必先利其器.掌握Go的基础语法还不够,还需要勤加练习,修习"外功",才能达到出奇制胜的效果. 在大致了解Go语言的基本语法后,我就迫不得已地想使用这门语言.可是我 ...
- 2022-12-27:etcd是无界面的,不好看,joinsunsoft/etcdv3-browser是etcd的web可视化工具之一。请问在k3s中部署,yaml如何写?
2022-12-27:etcd是无界面的,不好看,joinsunsoft/etcdv3-browser是etcd的web可视化工具之一.请问在k3s中部署,yaml如何写? 答案2022-12-27: ...
- 2022-06-02:一开始在0位置,每一次都可以向左或者向右跳, 第i次能向左或者向右跳严格的i步。 请问从0到x位置,至少跳几次可以到达。 来自字节。 力扣754. 到达终点数字。
2022-06-02:一开始在0位置,每一次都可以向左或者向右跳, 第i次能向左或者向右跳严格的i步. 请问从0到x位置,至少跳几次可以到达. 来自字节. 力扣754. 到达终点数字. 答案2022- ...
- 2021-10-22:颠倒二进制位。颠倒给定的 32 位无符号整数的二进制位。提示:请注意,在某些语言(如 Java)中,没有无符号整数类型。在这种情况下,输入和输出都将被指定为有符号整数类型,并且不
2021-10-22:颠倒二进制位.颠倒给定的 32 位无符号整数的二进制位.提示:请注意,在某些语言(如 Java)中,没有无符号整数类型.在这种情况下,输入和输出都将被指定为有符号整数类型,并且不 ...
- VB.NET 截取字符串
在VB.NET中,您可以使用Substring方法或Split方法来截取字符串. Substring方法允许您从字符串中提取一个子字符串,该子字符串从指定的起始索引开始,并继续到字符串的末尾或指定的长 ...
- AcWing 3729. 改变数组元素
给定一个空数组 V 和一个整数数组 a1,a2,-,an. 现在要对数组 V进行 n次操作. 第 i次操作的具体流程如下: 从数组 V尾部插入整数 0. 2.将位于数组 V末尾的 ai 个元素都 ...