基于SpringBoot从零构建博客网站 - 技术选型和整合开发环境
技术选型和整合开发环境
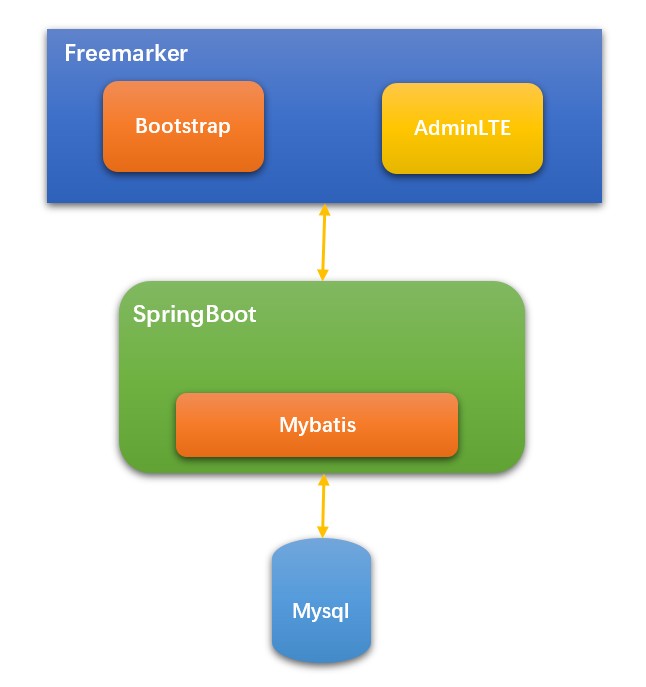
1、技术选型
博客网站是基于SpringBoot整合其它模块而开发的,那么每个模块选择的技术如下:
- SpringBoot版本选择目前较新的2.1.1.RELEASE版本
- 持久化框架选择Mybatis
- 页面模板引擎选择Freemarker
- 前台框架选择Bootstrap
- 后台框架选择AdminLTE
- 数据库选择Mysql
- 数据库版本管理选择Flyway
技术选型概览图,如下:
2、代码分包
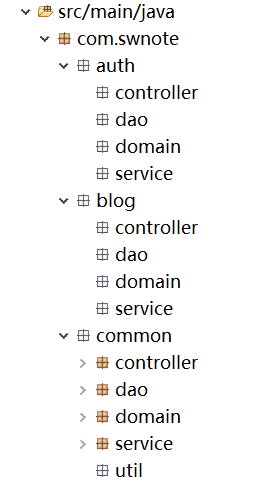
首先确定本工程为sw-blog(即:守望博客),基础包名为:
com.swnote
通过前面同系列的两篇文章可知,本博客网站主要分成3个模块,即用户管理及权限相关模块、文章及专栏等博文相关模块和公共模块。为此这3个模块分别所属的包为auth、blog和common,即:
com.swnote.auth

com.swnote.blog

com.swnote.common
然后每个模块下都是有本模块的controller、service、dao和domain,所以本工程包的结构如下:
3、整合开发环境
根据前面所确定的技术,那么工程的pom文件内容如下:
<project xmlns="http://maven.apache.org/POM/4.0.0" xmlns:xsi="http://www.w3.org/2001/XMLSchema-instance"

    xsi:schemaLocation="http://maven.apache.org/POM/4.0.0 http://maven.apache.org/xsd/maven-4.0.0.xsd">

    <parent>

        <groupId>org.springframework.boot</groupId>

        <artifactId>spring-boot-starter-parent</artifactId>

        <version>2.1.1.RELEASE</version>

    </parent>

    <modelVersion>4.0.0</modelVersion>

    <groupId>com.swnote</groupId>

    <artifactId>sw-blog</artifactId>

    <version>1.0</version>

    <packaging>jar</packaging>

    <name>sw-blog</name>

    <url>http://maven.apache.org</url>

    <properties>

        <project.build.sourceEncoding>UTF-8</project.build.sourceEncoding>

    </properties>

    <dependencies>

        <dependency>

            <groupId>org.springframework.boot</groupId>

            <artifactId>spring-boot-starter-web</artifactId>

        </dependency>

        <dependency>

            <groupId>org.springframework.boot</groupId>

            <artifactId>spring-boot-starter-freemarker</artifactId>

        </dependency>

        <dependency>

            <groupId>org.mybatis.spring.boot</groupId>

            <artifactId>mybatis-spring-boot-starter</artifactId>

            <version>1.3.2</version>

        </dependency>

        <dependency>

            <groupId>com.alibaba</groupId>

            <artifactId>druid-spring-boot-starter</artifactId>

            <version>1.1.10</version>

        </dependency>

        <dependency>

            <groupId>org.springframework.boot</groupId>

            <artifactId>spring-boot-starter-test</artifactId>

            <scope>test</scope>

        </dependency>

        <dependency>

            <groupId>mysql</groupId>

            <artifactId>mysql-connector-java</artifactId>

        </dependency>

        <dependency>

            <groupId>org.flywaydb</groupId>

            <artifactId>flyway-core</artifactId>

        </dependency>

    </dependencies>

    <build>

        <plugins>

            <plugin>

                <groupId>org.apache.maven.plugins</groupId>

                <artifactId>maven-compiler-plugin</artifactId>

                <configuration>

                    <source>1.8</source>

                    <target>1.8</target>

                </configuration>

            </plugin>

            <plugin>

                <groupId>org.springframework.boot</groupId>

                <artifactId>spring-boot-maven-plugin</artifactId>

                <executions>

                    <execution>

                        <goals>

                            <goal>repackage</goal>

                        </goals>

                    </execution>

                </executions>

            </plugin>

        </plugins>

        <resources>

            <resource>

                <directory>src/main/java</directory>

                <excludes>

                    <exclude>**/*.java</exclude>

                </excludes>

            </resource>

            <resource>

                <directory>src/main/resources</directory>

            </resource>

        </resources>

    </build>

</project>
application.yml的配置内容如下:
spring:

  application:

    name: swblog

  datasource:

    url: ${SWBLOG_DB_URL:jdbc:mysql://localhost:3306/swblog?characterEncoding=utf8}

    username: ${SWBLOG_DB_USERNAME:root}

    password: ${SWBLOG_DB_PWD:12345678}

    driver-class-name: com.mysql.cj.jdbc.Driver

  flyway:

    clean-disabled: true

    enabled: true

    locations: classpath:db/migration

    baseline-on-migrate: true

  freemarker:

    suffix: .ftl

    content-type: text/html

    charset: UTF-8

    cache: false

    template-loader-path:

      - classpath:/templates

  mvc:

    static-path-pattern: /static/**

server:

  port: ${SWBLOG_PORT:80}

mybatis:

  mapper-locations: classpath:com/swnote/*/dao/*.xml

  type-aliases-package: com.swnote.auth.domain,com.swnote.blog.domain,com.swnote.common.domain
其中配置主要数据库的配置、flyway的配置、freemarker的配置和mybatis的配置,同时还设置4个以“SWBLOG_”开头环境变量,为后期注入值用的,如果还需要有其它的环境变量后期也会慢慢的加。
4、测试
为了检测开发环境是否正确,为此测试从数据库中获取一条数据,然后将数据传递到页面上显示。
利用comm_config表测试,首先往该表中插入一条记录,即:

Dao的Mapper文件:
<?xml version="1.0" encoding="UTF-8"?>

<!DOCTYPE mapper PUBLIC "-//mybatis.org//DTD Mapper 3.0//EN" "http://mybatis.org/dtd/mybatis-3-mapper.dtd" >

<mapper namespace="com.swnote.common.dao.ConfigDao">

    <sql id="fields">

        configId, configValue, description

    </sql>

    <!-- 根据主键获取配置信息 -->

    <select id="retrieve" parameterType="String" resultType="Config">

        select <include refid="fields"/> from comm_config where configId = #{configId}

    </select>

</mapper>
Service层代码:
package com.swnote.common.service.impl;

import org.springframework.beans.factory.annotation.Autowired;

import org.springframework.stereotype.Service;

import org.springframework.transaction.annotation.Propagation;

import org.springframework.transaction.annotation.Transactional;

import com.swnote.common.dao.ConfigDao;

import com.swnote.common.domain.Config;

import com.swnote.common.service.IConfigService;

/**

 * 站点相关配置信息服务类

 *

 * @author lzj

 * @since 1.0

 * @date [2019-04-04]

 */

@Transactional

@Service

public class ConfigService implements IConfigService {

    @Autowired

    private ConfigDao configDao;

    @Transactional(propagation = Propagation.NOT_SUPPORTED)

    @Override

    public Config retrieve(String configId) {

        return configDao.retrieve(configId);

    }

}
Controller层的测试代码:
package com.swnote.common.controller;

import org.springframework.beans.factory.annotation.Autowired;

import org.springframework.stereotype.Controller;

import org.springframework.ui.ModelMap;

import org.springframework.web.bind.annotation.RequestMapping;

import org.springframework.web.bind.annotation.RequestMethod;

import com.swnote.common.domain.Config;

import com.swnote.common.service.IConfigService;

@Controller

@RequestMapping("/test")

public class TestController {

    @Autowired

    private IConfigService configService;

    @RequestMapping(value = "/index", method = RequestMethod.GET)

    public String test(ModelMap model) {

        Config config = configService.retrieve("name");

        model.addAttribute("config", config);

        return "test";

    }

}
页面代码:
<!doctype html>

<html>

    <head>

        <title>测试</title>

        <meta charset="utf-8">

    </head>

    <body>

        <h2>${config.configValue}</h2>

    </body>

</html>
启动工程后,访问:http://127.0.0.1/test/index,结果如下:
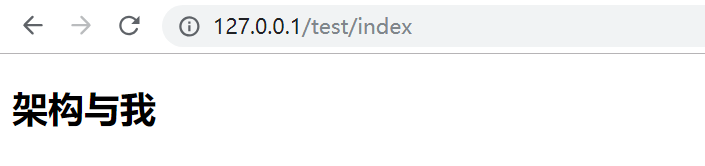
结果是正确的,所以开发环境整合完成了。
关注我
以你最方便的方式关注我:
微信公众号:

基于SpringBoot从零构建博客网站 - 技术选型和整合开发环境的更多相关文章
- 基于SpringBoot从零构建博客网站 - 整合lombok和mybatis-plus提高开发效率
在上一章节中<技术选型和整合开发环境>,确定了开发的技术,但是如果直接这样用的话,可能开发效率会不高,为了提高开发的效率,这里再整合lombok和mybatis-plus两个组件. 1.l ...
- 基于SpringBoot从零构建博客网站 - 确定需求和表结构
要确定一个系统的需求,首先需要明确该系统的用户有哪些,然后针对每一类用户,确定其需求.对于博客网站来说,用户有3大类,分别是: 作者,也即是注册用户 游客,也即非注册用户 管理员,网站维护人员 那么从 ...
- 基于SpringBoot从零构建博客网站 - 新增创建、修改、删除专栏功能
守望博客是支持创建专栏的功能,即可以将一系列相关的文章归档到专栏中,方便用户管理和查阅文章.这里主要讲解专栏的创建.修改和删除功能,至于专栏还涉及其它的功能,例如关注专栏等后续会穿插着介绍. 1.创建 ...
- 基于SpringBoot从零构建博客网站 - 设计可扩展上传模块和开发修改头像密码功能
上传模块在web开发中是很常见的功能也是很重要的功能,在web应用中需要上传的可以是图片.pdf.压缩包等其它类型的文件,同时对于图片可能需要回显,对于其它文件要能够支持下载等.在守望博客系统中对于上 ...
- 基于SpringBoot从零构建博客网站 - 集成editor.md开发发布文章功能
发布文章功能里面最重要的就是需要集成富文本编辑器,目前富文本编辑器有很多,例如ueditor,CKEditor.editor.md等.这里守望博客里面是集成的editor.md,因为editor.md ...
- 基于SpringBoot从零构建博客网站 - 开发设置主页标识和修改个人信息功能
由于守望博客系统中支持由用户自己设置个人主页的URL的后半段,所以必须要用户设置该标识的功能,而且是用户注册登录之后自动弹出的页面,如果用户没有设置该标识,其它的操作是不能够操作的,同时要求主页标识只 ...
- 基于SpringBoot从零构建博客网站 - 开发文章详情页面
文章详情页面是博客系统中最为重要的页面,登录用户与游客都可以浏览文章详情页面,只不过只有登录用户才能进行其它的一些操作,比如评论.点赞和收藏等等. 本次的开发任务只是将文章详情页面展示出来,至于一些收 ...
- 基于SpringBoot从零构建博客网站 - 整合ehcache和开发注册登录功能
对于程序中一些字典信息.配置信息应该在程序启动时加载到缓存中,用时先到缓存中取,如果没有命中,再到数据库中获取同时放到缓存中,这样做可以减轻数据库层的压力.目前暂时先整合ehcache缓存,同时预留了 ...
- 基于SpringBoot从零构建博客网站 - 分页显示文章列表功能
显示文章列表一般都是采用分页显示,比如每页10篇文章显示.这样就不用每次就将所有的文章查询出来,而且当文章数量特别多的时候,如果一次性查询出来很容易出现OOM异常. 后台的分页插件采用的是mybati ...
随机推荐
- Java获取当日的起始时间,结束时间,现在时间,是否在时间段中。
当日的起始时间 public static Date getTodayStartTime() { Calendar todayStart = Calendar.getInstance(); today ...
- Java的精确整数计算-Bigdecimal学习总结和工具类
随笔:随着最近工作需要,回首需要涉及到一些精确的数据计算,就需要用到Bigdecimal,索性就趁着闲暇之余整理收集一下关于Bigdecimal的使用方法,由于时间的原因,整理的并不是特别详细,但相信 ...
- kaggle入门项目:Titanic存亡预测 (一)比赛简介
自从入了数据挖掘的坑,就在不停的看视频刷书,但是总觉得实在太过抽象,在结束了coursera上Andrew Ng 教授的机器学习课程还有刷完一整本集体智慧编程后更加迷茫了,所以需要一个实践项目来扎实之 ...
- SpringCloud实战-Eureka
熟悉微服务架构或Dubbo框架的都知道,微服务中最核心.最基础的组件就是注册中心了.下面利用Spring Cloud Eureka实现服务注册中心.并注册一个简单的服务提供者. 首先先创建一个spir ...
- Solr(六)Solr索引数据存放到HDFS下
Solr索引数据存放到HDFS下 一 新建solr core hdfs 方法:http://www.cnblogs.com/Matchman/p/7287385.html 二 修改solrconfig ...
- WinForm
参考文章:http://blog.csdn.net/clb929/article/list/7 用三层架构来做winform程序: http://blog.csdn.net/clb929/articl ...
- -bash: ./switch.sh: /bin/bash^M: bad interpreter: No such file or directory
问题: 偶然使用 windows 进行编写脚本.使用 wsl (windows subsystem for linux) 进行运行的时候,什么事情没有.但是当把脚本移植到远程服务器进行运行的时候,发现 ...
- 团队项目第二阶段个人进展——Day7
一.昨天工作总结 冲刺第七天,动手完成了一个demo来实现数据的上传与下载 二.遇到的问题 代码逻辑没看太懂 三.今日工作规划 对发布页面的数据进行处理,实现能够请求和响应,并学习如何实现图片的上传与 ...
- Java动态代理(一)
好久没有动笔了,最近想巩固一下自己的基础知识,最近听到一同事问为什么JDK动态代理不能代理类,一听感觉懵逼呀!自己好像也不能很好的描述出来,所以想用2篇文章来复习一下动态代理知识: 一.什么是静态代理 ...
- react native 1跳2 2跳3 3跳4 4pop回2
网上有介绍导航的很多了 就不一一说了 直接说一个小功能 popToRoute pop回指定页面 第一次写 组织能力不是特别好 直接贴代码 例如 我们有四个页面 从第四个pop到第二个页面 先 ...