
Tensorflow模型加载与保存、Tensorboard简单使用
先上代码:
from __future__ import absolute_import

from __future__ import division

from __future__ import print_function

# -*- coding: utf-8 -*-

"""

Created on Tue Nov 14 20:34:00 2017

@author: HJL

"""

# Copyright 2015 The TensorFlow Authors. All Rights Reserved.

#

# Licensed under the Apache License, Version 2.0 (the "License");

# you may not use this file except in compliance with the License.

# You may obtain a copy of the License at

#

#     http://www.apache.org/licenses/LICENSE-2.0

#

# Unless required by applicable law or agreed to in writing, software

# distributed under the License is distributed on an "AS IS" BASIS,

# WITHOUT WARRANTIES OR CONDITIONS OF ANY KIND, either express or implied.

# See the License for the specific language governing permissions and

# limitations under the License.

# ==============================================================================

"""A deep MNIST classifier using convolutional layers.

See extensive documentation at

https://www.tensorflow.org/get_started/mnist/pros

"""

# Disable linter warnings to maintain consistency with tutorial.

# pylint: disable=invalid-name

# pylint: disable=g-bad-import-order

import argparse

import sys

#import tempfile

import time

from tensorflow.examples.tutorials.mnist import input_data

import tensorflow as tf

FLAGS = None

def deepnn(x):

  """deepnn builds the graph for a deep net for classifying digits.

  Args:

    x: an input tensor with the dimensions (N_examples, 784), where 784 is the

    number of pixels in a standard MNIST image.

  Returns:

    A tuple (y, keep_prob). y is a tensor of shape (N_examples, 10), with values

    equal to the logits of classifying the digit into one of 10 classes (the

    digits 0-9). keep_prob is a scalar placeholder for the probability of

    dropout.

  """

  # Reshape to use within a convolutional neural net.

  # Last dimension is for "features" - there is only one here, since images are

  # grayscale -- it would be 3 for an RGB image, 4 for RGBA, etc.

  with tf.name_scope('reshape'):

    x_image = tf.reshape(x, [-1, 28, 28, 1])

    tf.summary.image('input_image', x_image)

  # First convolutional layer - maps one grayscale image to 32 feature maps.

  with tf.name_scope('conv1'):

    W_conv1 = weight_variable([5, 5, 1, 32])

    b_conv1 = bias_variable([32])

    h_conv1 = tf.nn.relu(conv2d(x_image, W_conv1) + b_conv1)

    tf.summary.histogram('W_conv1', W_conv1)

  # Pooling layer - downsamples by 2X.

  with tf.name_scope('pool1'):

    h_pool1 = max_pool_2x2(h_conv1)

  # Second convolutional layer -- maps 32 feature maps to 64.

  with tf.name_scope('conv2'):

    W_conv2 = weight_variable([5, 5, 32, 64])

    b_conv2 = bias_variable([64])

    h_conv2 = tf.nn.relu(conv2d(h_pool1, W_conv2) + b_conv2)

  # Second pooling layer.

  with tf.name_scope('pool2'):

    h_pool2 = max_pool_2x2(h_conv2)

  # Fully connected layer 1 -- after 2 round of downsampling, our 28x28 image

  # is down to 7x7x64 feature maps -- maps this to 1024 features.

  with tf.name_scope('fc1'):

    W_fc1 = weight_variable([7 * 7 * 64, 1024])

    b_fc1 = bias_variable([1024])

    h_pool2_flat = tf.reshape(h_pool2, [-1, 7*7*64])

    h_fc1 = tf.nn.relu(tf.matmul(h_pool2_flat, W_fc1) + b_fc1)

  # Dropout - controls the complexity of the model, prevents co-adaptation of

  # features.

  with tf.name_scope('dropout'):

    keep_prob = tf.placeholder(tf.float32)

    h_fc1_drop = tf.nn.dropout(h_fc1, keep_prob)

  # Map the 1024 features to 10 classes, one for each digit

  with tf.name_scope('fc2'):

    W_fc2 = weight_variable([1024, 10])

    b_fc2 = bias_variable([10])

    y_conv = tf.matmul(h_fc1_drop, W_fc2) + b_fc2

  return y_conv, keep_prob

def conv2d(x, W):

  """conv2d returns a 2d convolution layer with full stride."""

  return tf.nn.conv2d(x, W, strides=[1, 1, 1, 1], padding='SAME')

def max_pool_2x2(x):

  """max_pool_2x2 downsamples a feature map by 2X."""

  return tf.nn.max_pool(x, ksize=[1, 2, 2, 1],

                        strides=[1, 2, 2, 1], padding='SAME')

def weight_variable(shape):

  """weight_variable generates a weight variable of a given shape."""

  initial = tf.truncated_normal(shape, stddev=0.1)

  return tf.Variable(initial)

def bias_variable(shape):

  """bias_variable generates a bias variable of a given shape."""

  initial = tf.constant(0.1, shape=shape)

  return tf.Variable(initial)

def main(_):

  # Import data

  mnist = input_data.read_data_sets('./', one_hot=True)

  # Create the model

  x = tf.placeholder(tf.float32, [None, 784])

  # Define loss and optimizer

  y_ = tf.placeholder(tf.float32, [None, 10])

  # Build the graph for the deep net

  y_conv, keep_prob = deepnn(x)

  with tf.name_scope('loss'):

    cross_entropy = tf.nn.softmax_cross_entropy_with_logits(labels=y_,

                                                            logits=y_conv)

  cross_entropy = tf.reduce_mean(cross_entropy)

  with tf.name_scope('adam_optimizer'):

    #train_step = tf.train.AdadeltaOptimizer(1e-4).minimize(cross_entropy)

    train_step = tf.train.AdamOptimizer(1e-4).minimize(cross_entropy)

  with tf.name_scope('accuracy'):

    correct_prediction = tf.equal(tf.argmax(y_conv, 1), tf.argmax(y_, 1))

    correct_prediction = tf.cast(correct_prediction, tf.float32)

  accuracy = tf.reduce_mean(correct_prediction)

  graph_location = "./log/"  #tempfile.mkdtemp()

  print('Saving graph to: %s' % graph_location)

  train_writer = tf.summary.FileWriter(graph_location)

  train_writer.add_graph(tf.get_default_graph())#保存默认的图

  tf.summary.scalar('cross_entropy', cross_entropy)

  tf.summary.scalar('accuracy', accuracy)

  merged = tf.summary.merge_all()

  with tf.Session() as sess:

    #模型保存  step1

    saver = tf.train.Saver()

    checkpoint_dir="./"

    #返回checkpoint文件中checkpoint的状态

    ckpt = tf.train.get_checkpoint_state(checkpoint_dir)

    #print(ckpt)

    if ckpt and ckpt.model_checkpoint_path:#如果存在以前保存的模型

      print('Restore the model from checkpoint %s' % ckpt.model_checkpoint_path)

        # Restores from checkpoint

      saver.restore(sess, ckpt.model_checkpoint_path)#加载模型

      start_step = int(ckpt.model_checkpoint_path.split('/')[-1].split('-')[-1])

    else:#如果不存在之前保存的模型

      sess.run(tf.global_variables_initializer())#变量初始化

      start_step = 0

      print('start training from new state')

    for i in range(start_step,start_step+20000):

      batch = mnist.train.next_batch(50)

      if i % 100 == 0:

        train_accuracy = accuracy.eval(feed_dict={

            x: batch[0], y_: batch[1], keep_prob: 1.0})

        print('step %d, training accuracy %g' % (i, train_accuracy))

        #step2   每隔一段时间 保存模型

        saver.save(sess, './log/my_test_model',global_step=i)

      summary,_=sess.run([merged, train_step],feed_dict={x: batch[0], y_: batch[1], keep_prob: 0.5})

      train_writer.add_summary(summary, i)

      #time.sleep(0.5)

    print('test accuracy %g' % accuracy.eval(feed_dict={

        x: mnist.test.images, y_: mnist.test.labels, keep_prob: 1.0}))

if __name__ == '__main__':

  #main()

  parser = argparse.ArgumentParser()

  parser.add_argument('--data_dir', type=str,

                      default='./data/MNIST/',

                      help='Directory for storing input data')

  FLAGS, unparsed = parser.parse_known_args()

  tf.app.run(main=main, argv=[sys.argv[0]] + unparsed)
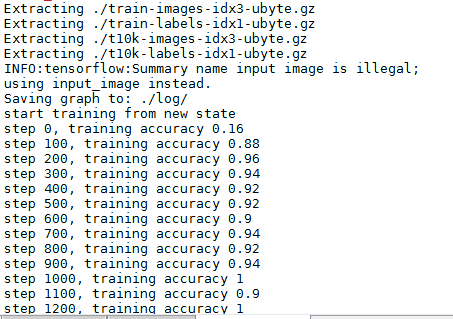
上述代码输出如下:
模型的加载与保存
模型的保存涉及到两个函数:
saver = tf.train.Saver()
和
saver.save(sess, './log/my_test_model',global_step=i)
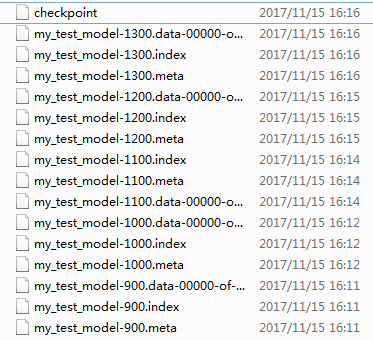
即,先创建tf.train.Saver 对象,用于后续模型保存与加载,默认保存所有参数。saver.save用于将模型及参数保存到文件中,通过传递一个值给可选参数 global_step ,你可以编号checkpoint 名字。上述代码中每隔100步,将模型保存一次。保存结果如下(默认保存最新的5个模型):
对于模型的加载,涉及如下函数:
saver = tf.train.Saver()
和
saver.restore(sess, ckpt.model_checkpoint_path)
- sess: 用于恢复参数的Session
- save_path: 参数之前保存的路径
TensorBoard简单使用
涉及如下几个函数:
train_writer = tf.summary.FileWriter(graph_location)

train_writer.add_graph(tf.get_default_graph())

...

tf.summary.scalar('cross_entropy', cross_entropy)#

tf.summary.scalar('accuracy', accuracy)

tf.summary.image('input_image', x_image)

tf.summary.histogram('W_conv1', W_conv1)

merged = tf.summary.merge_all()

...

summary,_=sess.run([merged, train_step],feed_dict={x: batch[0], y_: batch[1], keep_prob: 0.5})

train_writer.add_summary(summary, i)
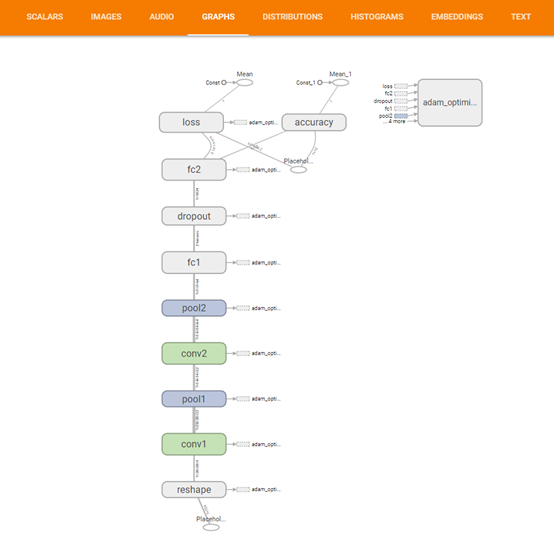
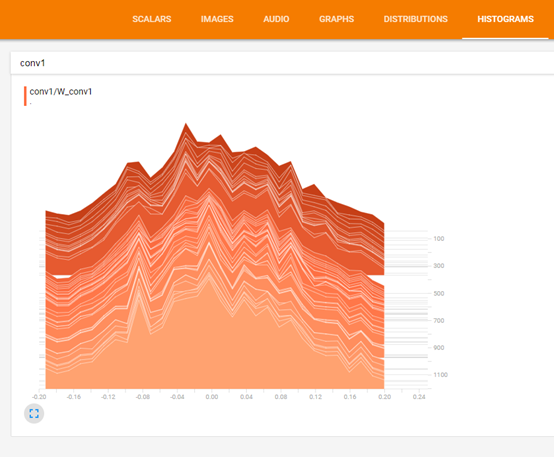
Summary:所有需要在TensorBoard上展示的统计结果。tf.name_scope():为Graph中的Tensor添加层级,TensorBoard会按照代码指定的层级进行展示,初始状态下只绘制最高层级的效果,点击后可展开层级看到下一层的细节。tf.summary.scalar():添加标量统计结果。tf.summary.histogram():添加任意shape的Tensor,统计这个Tensor的取值分布。tf.summary.merge_all():添加一个操作,代表执行所有summary操作,这样可以避免人工执行每一个summary op。tf.summary.FileWrite:用于将Summary写入磁盘,需要制定存储路径logdir,如果传递了Graph对象,则在Graph Visualization会显示Tensor Shape Information。执行summary op后,将返回结果传递给add_summary()方法即可。
最后结果:
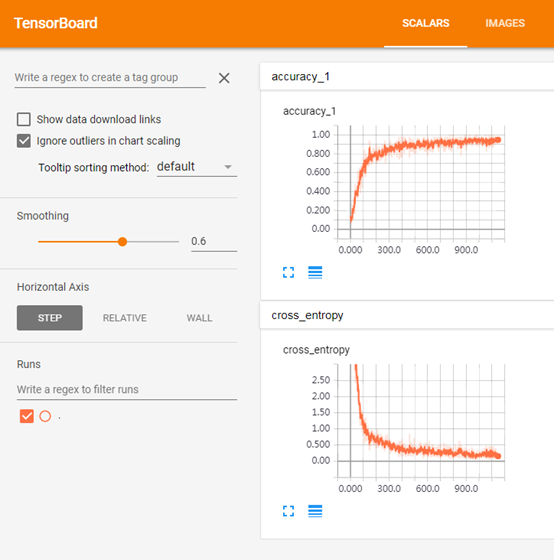
Scalar
(对应:
tf.summary.scalar('cross_entropy', cross_entropy)

tf.summary.scalar('accuracy', accuracy)
)
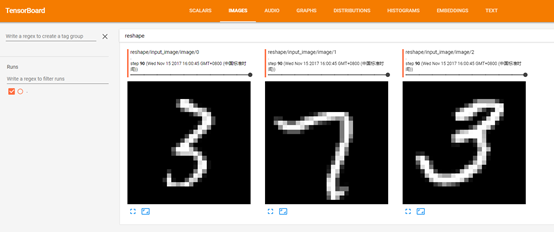
对应:
tf.summary.image('input_image', x_image)
对应:
train_writer.add_graph(tf.get_default_graph())
对应:
tf.summary.histogram('W_conv1', W_conv1)
Tensorflow模型加载与保存、Tensorboard简单使用的更多相关文章
- TensorFlow模型加载与保存
我们经常遇到训练时间很长,使用起来就是Weight和Bias.那么如何将训练和测试分开操作呢? TF给出了模型的加载与保存操作,看了网上都是很简单的使用了一下,这里给出一个神经网络的小程序去测试. 本 ...
- PyTorch模型加载与保存的最佳实践
一般来说PyTorch有两种保存和读取模型参数的方法.但这篇文章我记录了一种最佳实践,可以在加载模型时避免掉一些问题. 第一种方案是保存整个模型: 1 torch.save(model_object, ...
- tensorflow 模型加载(没有checkpoint文件或者说只加载其中一个模型)
1.如果有checkpoint文件的话,加载模型很简单: 第一步:都是加载图: with tf.Session() as sess: saver=tf.train.import_meta_graph( ...
- Tensorflow同时加载使用多个模型
在Tensorflow中,所有操作对象都包装到相应的Session中的,所以想要使用不同的模型就需要将这些模型加载到不同的Session中并在使用的时候申明是哪个Session,从而避免由于Sessi ...
- KnockoutJS 3.X API 第七章 其他技术(1) 加载和保存JSON数据
Knockout允许您实现复杂的客户端交互性,但几乎所有Web应用程序还需要与服务器交换数据,或至少将本地存储的数据序列化. 最方便的交换或存储数据的方式是JSON格式 - 大多数Ajax应用程序今天 ...
- DirectX11 With Windows SDK--19 模型加载:obj格式的读取及使用二进制文件提升读取效率
前言 一个模型通常是由三个部分组成:网格.纹理.材质.在一开始的时候,我们是通过Geometry类来生成简单几何体的网格.但现在我们需要寻找合适的方式去表述一个复杂的网格,而且包含网格的文件类型多种多 ...
- OpenGL OBJ模型加载.
在我们前面绘制一个屋,我们可以看到,需要每个立方体一个一个的自己来推并且还要处理位置信息.代码量大并且要时间.现在我们通过加载模型文件的方法来生成模型文件,比较流行的3D模型文件有OBJ,FBX,da ...
- 从零开始openGL——三、模型加载及鼠标交互实现
前言 在上篇文章中,介绍了基本图形的绘制.这篇博客中将介绍模型的加载.绘制以及鼠标交互的实现. 模型加载 模型存储 要实现模型的读取.绘制,我们首先需要知道模型是如何存储在文件中的. 通常模型是由网格 ...
- 6.Knockout.Js(加载或保存JSON数据)
前言 Knockout可以实现很复杂的客户端交互,但是几乎所有的web应用程序都要和服务器端交换数据(至少为了本地存储需要序列化数据),交换数据最方便的就是使用JSON格式 – 大多数的Ajax应用程 ...
随机推荐
- [模拟赛] T3 Exploit
Description 4X概念体系,是指在PC战略游戏中一种相当普及和成熟的系统概念,得名自4个同样以"EX"为开头的英语单词. eXplore(探索) eXpand(拓张与发展 ...
- Eclipse安卓开发环境搭建
前提,Java SDK和Eclipse搭建完毕 下载android SDK并安装 (官网:http://sdk.android-studio.org/ ) 找到安装目录,运行“SDK Manager. ...
- PAT-L3-球队“食物链”-dfs-状压-set
题目分析: 1. 一场双循环赛制的篮球赛,注意双循环,双循环! 2. 共有n只球队,两两之间有胜有负有平局: 3. 输入: 举例: 第一行:W:代表球队1打赢过这只队伍 L:代表球队2没打赢过这只队伍 ...
- 【Flask】 flask-socketio实现WebSocket
[flask-socektio] 之前不知道在哪个场合下提到过如何从web后台向前台推送消息.听闻了反向ajax技术这种模式之后,大呼神奇,试了一下之后发现也确实可以用.不过,反向ajax的代价也很明 ...
- table 表格的增删和修改
如上图,图片的增删都没有问题:唯一的问题就是我改变下一行的内容时,把上面一行给覆盖了,费了好久,终于找到原因了,直接贴代码: 效果如下:
- h5移动端屏幕适配
1.rem <!DOCTYPE html> <html lang="en"> <head> <meta charset="UTF ...
- JavaScript 通过队列实现异步流控制
知乎上面看到一个面试题. 某个应用模块由文本框 input,以及按钮 A,按钮 B 组成.点击按钮 A,会向地址 urlA 发出一个 ajax 请求,并将返回的字符串填充到 input 中(覆盖 in ...
- Hibernate学习(4)- Hibernate对象的生命周期
1.Hibernate对象的生命周期(瞬时状态.持久化状态.游离状态) 1.瞬时状态(Transient): 使用new操作符初始化的对象就是瞬时状态,没有跟任何数据库数据相关联:2.持久化状态(Pa ...
- Spring MVC之适配器的获取及执行(RequestMappingHandlerAdapter)
首先看下doDispatch()方法如何找到适合的适配器来执行方法的: protected HandlerAdapter getHandlerAdapter(Object handler) throw ...
- Git 建立仓库及常用命令速查表
Git新建仓库两种模式: 一.项目在本地时,本地初始化仓库并提交至Coding.Net 新建一个空白目录并进入,执行如下流程 1.git init2.项目代码复制到当前目录3.git add *4.g ...