SpringMVC的流程分析(二)—— HandlerMapping组件
1.HandlerMapping的类结构
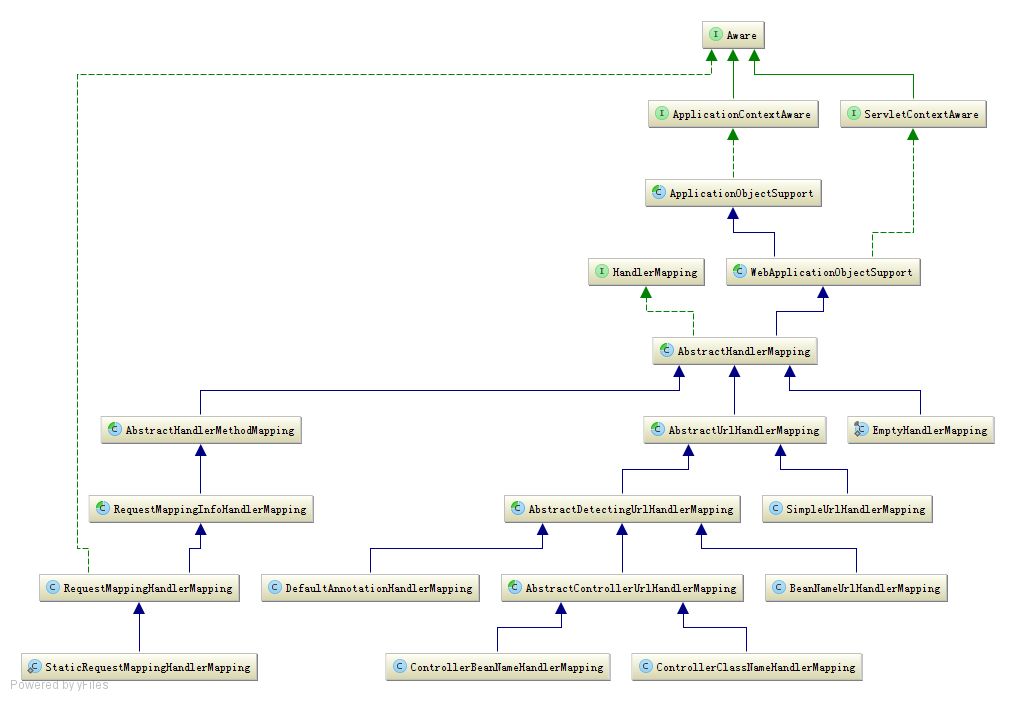
如上图所示,HandlerMapping接口有一个叫做;getHandler()的方法,这个方法是用来回去HandlerMapping对应的处理器的,由此也就可以看出HandlerMapping主要是用来映射请求和处理器的。
AbstractHandlerMapping实现了HandlerMapping接口,还继承了WebApplicationObjectSupport,而WebApplicationObjectSupport最终实现了ApplicationContextAware接口,这个接口使用来扩展
Spring的,ApplicationContextAware可以对应用上下文进行加工,加入自己的逻辑,SpringMVC就是通过它来实现的url和处理器的映射。
接下来我们看到AbstractHandlerMethodMapping和AbstractUrlHandlerMapping都继承了AbstractHandlerMapping,这两个类分别从不同的角度来映射请求和处理器。
2.AbstractHandlerMapping具体的实现
2.1 AbstractUrlHandlerMapping
我们分开来看,首先分析AbstractUrlHandlerMapping,这个类是用来映射url和handler的,它维护了一个handlerMap用来存储url相应的处理器,它的实现类AbstractDetectingUrlHandlerMapping重写了
initApplictionContext()方法:
@Override

    public void initApplicationContext() throws ApplicationContextException {

        super.initApplicationContext();

        detectHandlers();

    }
可以看到他调用了父类的initApplicationContext方法,然后又调用了detectHandlers()方法来处理请求映射,看detectHandler()源码:
protected void detectHandlers() throws BeansException {

        String[] beanNames = (this.detectHandlersInAncestorContexts ?

                BeanFactoryUtils.beanNamesForTypeIncludingAncestors(getApplicationContext(), Object.class) :

                getApplicationContext().getBeanNamesForType(Object.class));

        // Take any bean name that we can determine URLs for.

        for (String beanName : beanNames) {

            String[] urls = determineUrlsForHandler(beanName);

            if (!ObjectUtils.isEmpty(urls)) {

                // URL paths found: Let's consider it a handler.

                registerHandler(urls, beanName);

            }

            else {

                if (logger.isDebugEnabled()) {

                    logger.debug("Rejected bean name '" + beanName + "': no URL paths identified");

                }

            }

        }

    }
第一步,获取所有的beanname,第二步,根据这个beanName查询它是不是一个处理器,并取出他的url,
determineUrlsForHandler有多种实现,我们拿AbstractControllerUrlHandlerMapping举例说明:
@Override

    protected String[] determineUrlsForHandler(String beanName) {

        Class<?> beanClass = getApplicationContext().getType(beanName);

        if (isEligibleForMapping(beanName, beanClass)) {

            return buildUrlsForHandler(beanName, beanClass);

        }

        else {

            return null;

        }

    }
首先从应用上下文中根据beanname获取到bean的class对象,然后判断有没有成为处理器的资格,即判断是否实现了Controller接口。
然后调用buildUrlsForHandler()方法获取处理器的url,然后返回。
接下来执行 registerHandler(urls, beanName) :
protected void registerHandler(String[] urlPaths, String beanName) throws BeansException, IllegalStateException {

        Assert.notNull(urlPaths, "URL path array must not be null");

        for (String urlPath : urlPaths) {

            registerHandler(urlPath, beanName);

        }

    }
registerHandler(url,beanname)
protected void registerHandler(String urlPath, Object handler) throws BeansException, IllegalStateException {

        Object resolvedHandler = handler;

        // Eagerly resolve handler if referencing singleton via name.

        if (!this.lazyInitHandlers && handler instanceof String) {

            String handlerName = (String) handler;

            if (getApplicationContext().isSingleton(handlerName)) {

                resolvedHandler = getApplicationContext().getBean(handlerName);

            }

        }

        Object mappedHandler = this.handlerMap.get(urlPath);

        if (mappedHandler != null) {

            if (mappedHandler != resolvedHandler) {

                throw new IllegalStateException(

                        "Cannot map " + getHandlerDescription(handler) + " to URL path [" + urlPath +

                        "]: There is already " + getHandlerDescription(mappedHandler) + " mapped.");

            }

        }

        else {

            if (urlPath.equals("/")) {

                if (logger.isInfoEnabled()) {

                    logger.info("Root mapping to " + getHandlerDescription(handler));

                }

                setRootHandler(resolvedHandler);

            }

            else if (urlPath.equals("/*")) {

                if (logger.isInfoEnabled()) {

                    logger.info("Default mapping to " + getHandlerDescription(handler));

                }

                setDefaultHandler(resolvedHandler);

            }

            else {

                this.handlerMap.put(urlPath, resolvedHandler);

                if (logger.isInfoEnabled()) {

                    logger.info("Mapped URL path [" + urlPath + "] onto " + getHandlerDescription(handler));

                }

            }

        }

    }
首先从上下文拿到一个处理器实例,然后根据url的不同,将它设置到不同的处理器存储位置,例如,如果url是"/"就将处理器设置为根处理器,
如果url是"/*"就将处理器设置为默认处理器。如果都不是就放进handleMap中。
通过以上步骤,我们就将上下文中所有的bean循环了一遍,只要是符合HandlerMapping的规则的处理器,就会将他的映射关系存储起来。
2.2 AbstractHandlerMethodMapping
AbstractHandlerMethodMapping和AbstractUrlMethodMapping有所不同,他实现了InitializingBean接口,通过实现afterPropertiesSet()方法来扩展相应的业务
public void afterPropertiesSet() {

        initHandlerMethods();

    }
调用了initHandlerMethods()
protected void initHandlerMethods() {

        String[] beanNames = (this.detectHandlerMethodsInAncestorContexts ?

                BeanFactoryUtils.beanNamesForTypeIncludingAncestors(getApplicationContext(), Object.class) :

                getApplicationContext().getBeanNamesForType(Object.class));

        for (String beanName : beanNames) {

            if (!beanName.startsWith(SCOPED_TARGET_NAME_PREFIX) &&

                    isHandler(getApplicationContext().getType(beanName))){

                detectHandlerMethods(beanName);

            }

        }

        handlerMethodsInitialized(getHandlerMethods());

    }
首先获取所有的beanname,然后遍历这些bean,判断他是不是处理器,不同的实现有不同的判断方法,那我们最常用的@Controller为例说明
protected boolean isHandler(Class<?> beanType) {

        return ((AnnotationUtils.findAnnotation(beanType, Controller.class) != null) ||

                (AnnotationUtils.findAnnotation(beanType, RequestMapping.class) != null));

    }
判断这个类有没有@Controller或者@ReuqestMapping注解就可以了.
接下来执行detectHandlerMethods(beanName)
protected void detectHandlerMethods(final Object handler) {

        Class<?> handlerType =

                (handler instanceof String ? getApplicationContext().getType((String) handler) : handler.getClass());

        // Avoid repeated calls to getMappingForMethod which would rebuild RequestMappingInfo instances

        final Map<Method, T> mappings = new IdentityHashMap<Method, T>();

        final Class<?> userType = ClassUtils.getUserClass(handlerType);

        Set<Method> methods = HandlerMethodSelector.selectMethods(userType, new MethodFilter() {

            @Override

            public boolean matches(Method method) {

                T mapping = getMappingForMethod(method, userType);

                if (mapping != null) {

                    mappings.put(method, mapping);

                    return true;

                }

                else {

                    return false;

                }

            }

        });

        for (Method method : methods) {

            registerHandlerMethod(handler, method, mappings.get(method));

        }

    }
可以看到它首先会得到所有的方法,然后对方法进行过滤,调用matches方法,还是拿@Controller举例:
protected RequestMappingInfo getMappingForMethod(Method method, Class<?> handlerType) {

        RequestMappingInfo info = null;

        RequestMapping methodAnnotation = AnnotationUtils.findAnnotation(method, RequestMapping.class);

        if (methodAnnotation != null) {

            RequestCondition<?> methodCondition = getCustomMethodCondition(method);

            info = createRequestMappingInfo(methodAnnotation, methodCondition);

            RequestMapping typeAnnotation = AnnotationUtils.findAnnotation(handlerType, RequestMapping.class);

            if (typeAnnotation != null) {

                RequestCondition<?> typeCondition = getCustomTypeCondition(handlerType);

                info = createRequestMappingInfo(typeAnnotation, typeCondition).combine(info);

            }

        }

        return info;

    }
可以看到他是判断方法有没有RequestMapping注解来过滤方法的,所有过滤出来的方法都会生成一个 RequestMappingInfo,(它包含该方法的所有的注解信息),放进maps里面,
接下来就是将所有的方法进行注册:
protected void registerHandlerMethod(Object handler, Method method, T mapping) {

        HandlerMethod newHandlerMethod = createHandlerMethod(handler, method);

        HandlerMethod oldHandlerMethod = this.handlerMethods.get(mapping);

        if (oldHandlerMethod != null && !oldHandlerMethod.equals(newHandlerMethod)) {

            throw new IllegalStateException("Ambiguous mapping found. Cannot map '" + newHandlerMethod.getBean() +

                    "' bean method \n" + newHandlerMethod + "\nto " + mapping + ": There is already '" +

                    oldHandlerMethod.getBean() + "' bean method\n" + oldHandlerMethod + " mapped.");

        }

        this.handlerMethods.put(mapping, newHandlerMethod);

        if (logger.isInfoEnabled()) {

            logger.info("Mapped \"" + mapping + "\" onto " + newHandlerMethod);

        }

        Set<String> patterns = getMappingPathPatterns(mapping);

        for (String pattern : patterns) {

            if (!getPathMatcher().isPattern(pattern)) {

                this.urlMap.add(pattern, mapping);

            }

        }

        if (this.namingStrategy != null) {

            String name = this.namingStrategy.getName(newHandlerMethod, mapping);

            updateNameMap(name, newHandlerMethod);

        }

    }
首先创建一个HandlerMethod对象,用来包装处理器和对应的方法。然后判断是否有重复的handlermethod,然后将映射类和处理类放进handlerMethods中,
可以看到,他还会将url和映射信息放进一个urlMap来记录,这说明多个请求可能对应同一个映射。
以上就是HandlerMapping的大体作用和流程信息,用来呈放web应用的映射信息,关于如何根据request寻找到对应的映射器,将在下一章介绍。
SpringMVC的流程分析(二)—— HandlerMapping组件的更多相关文章
- 框架-springmvc源码分析(二)
框架-springmvc源码分析(二) 参考: http://www.cnblogs.com/leftthen/p/5207787.html http://www.cnblogs.com/leftth ...
- SpringMVC的流程分析(一)—— 整体流程概括
SpringMVC的整体概括 之前也写过springmvc的流程分析,只是当时理解的还不透彻所以那篇文章就放弃了,现在比之前好了些,想着写下来分享下,也能增强记忆,也希望可以帮助到人,如果文章中有什么 ...
- Android 7.1 WindowManagerService 屏幕旋转流程分析 (二)
一.概述 从上篇[Android 7.1 屏幕旋转流程分析]知道实际的旋转由WindowManagerService来完成,这里接着上面具体详细展开. 调了三个函数完成了三件事,即首先调用update ...
- Gradle之Android Gradle Plugin 主要流程分析(二)
[Android 修炼手册]Gradle 篇 -- Android Gradle Plugin 主要流程分析 预备知识 理解 gradle 的基本开发 了解 gradle task 和 plugin ...
- Android 4.4 音量调节流程分析(二)
之前在Android 4.4 音量调节流程分析(一)里已经有简单的分析音量控制的流程,今天想接着继续分析下音量大小计算的方法.对于任一播放文件而言其本身都有着固定大小的音量Volume_Max,而在A ...
- MSM8909中LK阶段LCM屏适配与显示流程分析(二)
1.前言 在前面的文章MSM8909中LK阶段LCM屏适配与显示流程分析(一),链接如下: https://www.cnblogs.com/Cqlismy/p/12019317.html 介绍了如何使 ...
- Uboot启动流程分析(二)
1.前言 在前面的文章Uboot启动流程分析(一)中,链接如下: https://www.cnblogs.com/Cqlismy/p/12000889.html 已经简单地分析了low_level_i ...
- Netty执行流程分析与重要组件介绍
一.环境搭建 创建工程,引入Netty依赖 二.基于Netty的请求响应Demo 1.TestHttpServerHandle 处理器.读取客户端发送过来的请求,并且向客户端返回hello worl ...
- Nginx-HTTP之静态网页访问流程分析二
11. HTTP 阶段执行 下面会依次执行以下阶段: NGX_HTTP_SERVER_REWRITE_PHASE: 在将请求的 URI 与 location 表达式匹配前,修改请求的 URI (所谓重 ...
随机推荐
- Spark单机版集群
一.创建用户 # useradd spark # passwd spark 二.下载软件 JDK,Scala,SBT,Maven 版本信息如下: JDK jdk-7u79-linux-x64.gz S ...
- 压力测试(webbench、ab、siege)
在本地安装webbench,步骤如下: wget http://www.ha97.com/code/webbench-1.5.tar.gz tar zxvf webbench-1.5.tar.gz m ...
- Android中文API (110) —— CursorTreeAdapter
前言 本章内容是android.widget.CursorTreeAdapter,版本为Android 3.0 r1,翻译来自"深夜未眠",欢迎访问它的博客:"http: ...
- 以太坊开发DApp入门教程——区块链投票系统(一)
概述 对初学者,首先要了解以太坊开发相关的基本概念. 学习以太坊开发的一般前序知识要求,最好对以下技术已经有一些基本了解: 一种面向对象的开发语言,例如:Python,Ruby,Java... 前 ...
- 实现Windows程序的数据的绑定
1.创建DataSet对象 语法: DataSet 数据集对象 =new DataSet("数据集的名称字符串"); 语法中的参数是数据集的名称字符串,可以有,也可以没有.如 ...
- JVM学习九:JVM之GC算法和种类
我们前面说到了JVM的常用的配置参数,其中就涉及了GC相关的知识,趁热打铁,我们今天就学习下GC的算法有哪些,种类又有哪些,让我们进一步的认识GC这个神奇的东西,帮助我们解决了C 一直挺头疼的内存回收 ...
- JS常见操作,日期操作,字符串操作,表单验证等
复制代码 //第一篇博文,希望大家多多支持 /***** BasePage.js 公共的 脚本文件 部分方法需引用jquery库 *****/ //#region 日期操作 //字符串转化为时间. f ...
- 从零部署Spring boot项目到云服务器(准备工作)
自己的博客终于成功部署上线了,回过头来总结记录一下整个项目的部署过程! 测试地址:47.94.154.205:8084 注:文末有福利! 一.Linux下应用Shell通过SSH连接云服务器 //ss ...
- Leetcode 27——Remove Element
Given an array and a value, remove all instances of that value in-place and return the new length. D ...
- 第七周PTA作业
第一题: #include<stdio.h> int main() { ; ; ){ sum=sum+i; i++; } printf("sum = %d\n",sum ...