
Android 自定义AlertDialog的实现
Android默认的AlertDialog太单调,我们可以通过继承原生的Dialog来实现自定义的Dialog。
本文的自定义Dialog和原生的AlertDialog的创建方式类似,通过一个静态Builder类来设置Dialog的图标、标题、内容和按钮。
如果想要在Dialog中使用输入框或者其他控件,方法也是类似的,只要写好布局再加载就可以了。
Github:https://github.com/imcloudfloating/DesignApp
效果:
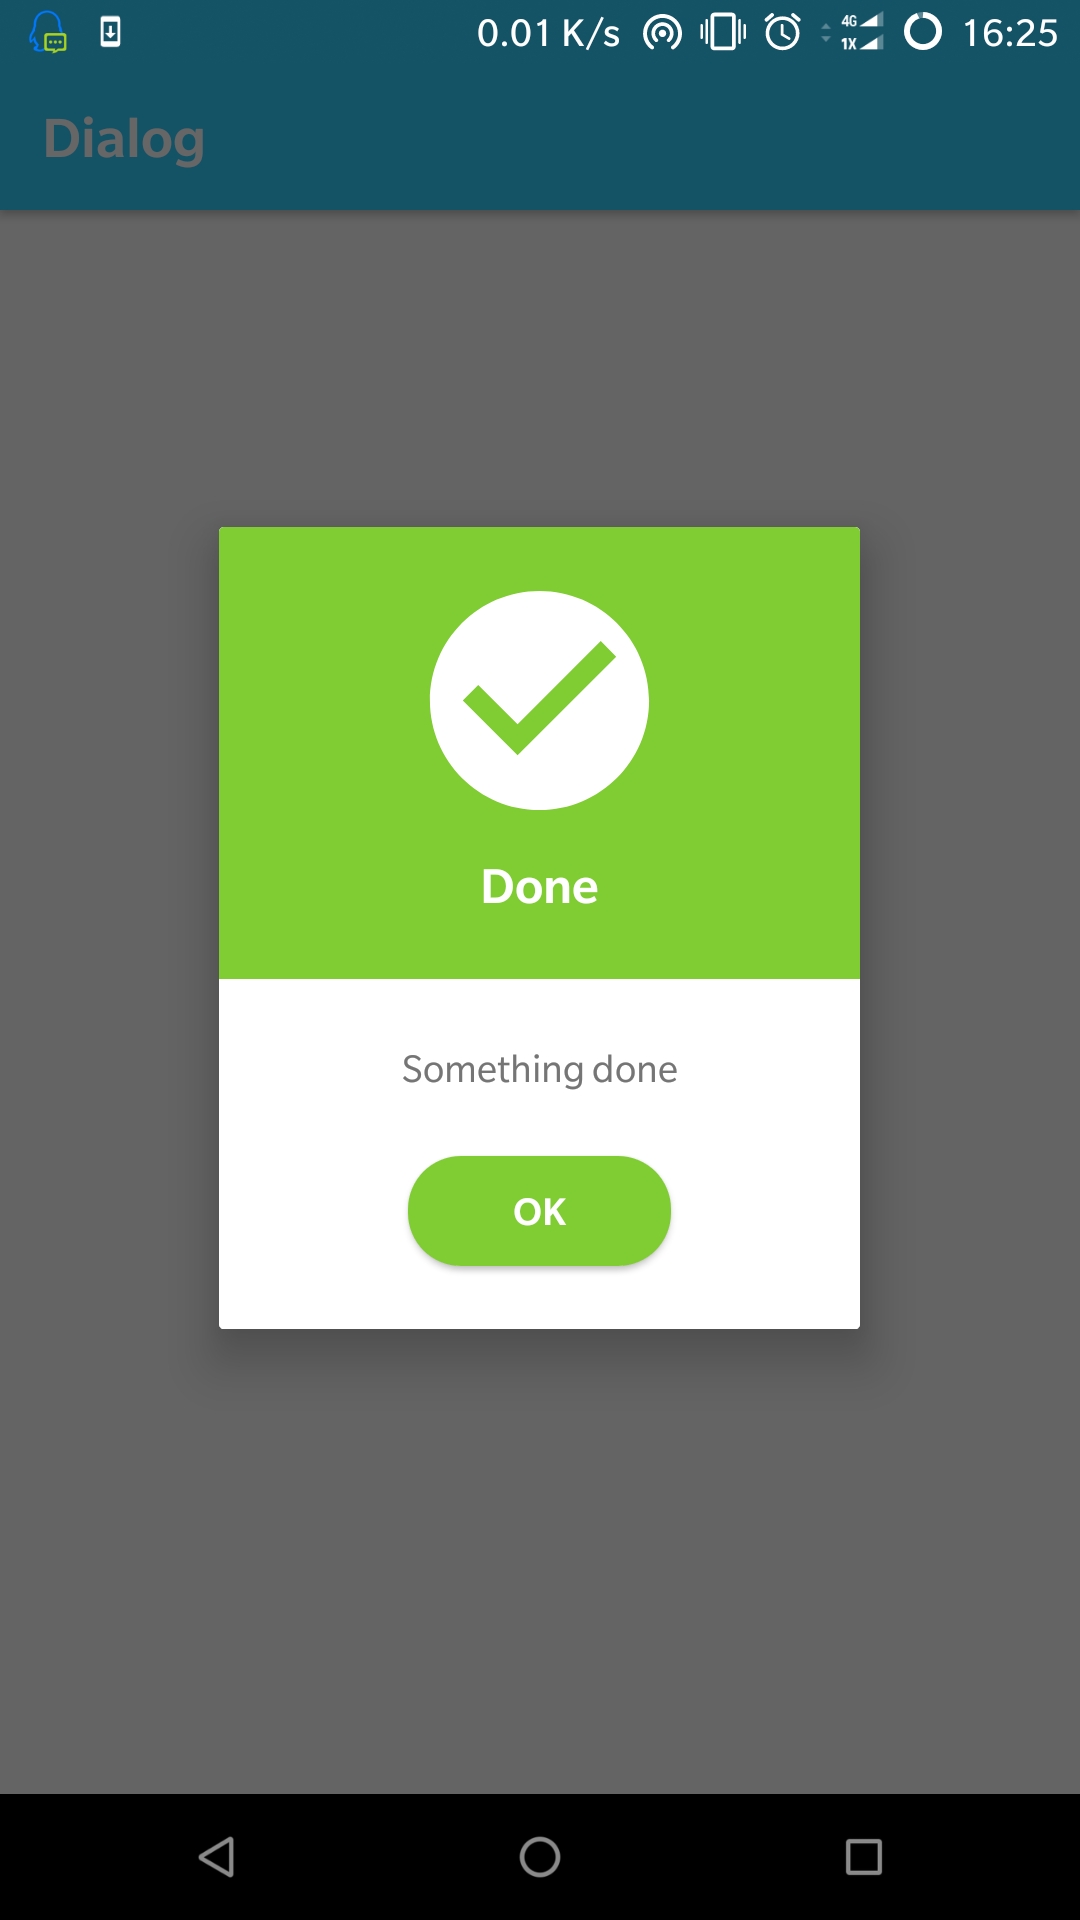
布局文件代码:
(注意这里的根布局的宽高如果用match_parent或者设置为具体的数值都和wrap_conten效果一样,可以通过设置子控件的大小来撑开)
 <?xml version="1.0" encoding="utf-8"?>

 <android.support.constraint.ConstraintLayout

     xmlns:android="http://schemas.android.com/apk/res/android"

     xmlns:app="http://schemas.android.com/apk/res-auto"

     xmlns:tools="http://schemas.android.com/tools"

     android:layout_width="wrap_content"

     android:layout_height="wrap_content"

     android:background="#ffffff">

     <LinearLayout

         android:id="@+id/dialog_header"

         android:orientation="vertical"

         android:layout_width="220dp"

         android:layout_height="wrap_content"

         android:padding="16dp"

         android:gravity="center"

         android:background="@color/colorGreen"

         app:layout_constraintTop_toTopOf="parent"

         app:layout_constraintStart_toStartOf="parent"

         app:layout_constraintEnd_toEndOf="parent">

         <!-- Icon -->

         <ImageView

             android:contentDescription="@id/dialog_title"

             android:id="@+id/dialog_icon"

             android:layout_width="100dp"

             android:layout_height="100dp"

             android:src="@drawable/ic_check_circle" />

         <!-- Title(default is gone) -->

         <TextView

             android:id="@+id/dialog_title"

             android:layout_width="wrap_content"

             android:layout_height="wrap_content"

             android:padding="8dp"

             android:textSize="18sp"

             android:textStyle="bold"

             android:textColor="#ffffff"

             android:visibility="gone" />

     </LinearLayout>

     <LinearLayout

         android:orientation="vertical"

         android:layout_width="wrap_content"

         android:layout_height="wrap_content"

         android:padding="16dp"

         android:gravity="center"

         app:layout_constraintTop_toBottomOf="@+id/dialog_header"

         app:layout_constraintStart_toStartOf="parent"

         app:layout_constraintEnd_toEndOf="parent"

         app:layout_constraintBottom_toBottomOf="parent">

         <!-- Dialog Message -->

         <TextView

             android:id="@+id/dialog_message"

             android:layout_width="wrap_content"

             android:layout_height="wrap_content"

             android:padding="8dp"

             tools:text="Dialog Message" />

         <Button

             android:id="@+id/dialog_button"

             android:layout_width="100dp"

             android:layout_height="42dp"

             android:layout_marginTop="16dp"

             android:layout_marginBottom="8dp"

             android:background="@drawable/bg_dialog_button"

             android:textColor="#ffffff"

             android:text="@string/dialog_button">

         </Button>

     </LinearLayout>

 </android.support.constraint.ConstraintLayout>
InfoDialog类:
 package com.cloud.design.dialog;

 import android.app.Dialog;

 import android.content.Context;

 import android.graphics.Bitmap;

 import android.support.annotation.NonNull;

 import android.view.LayoutInflater;

 import android.view.View;

 import android.view.ViewGroup;

 import android.widget.Button;

 import android.widget.ImageView;

 import android.widget.TextView;

 import com.cloud.design.R;

 public class InfoDialog extends Dialog {

     private InfoDialog(Context context, int themeResId) {

         super(context, themeResId);

     }

     public static class Builder {

         private View mLayout;

         private ImageView mIcon;

         private TextView mTitle;

         private TextView mMessage;

         private Button mButton;

         private View.OnClickListener mButtonClickListener;

         private InfoDialog mDialog;

         public Builder(Context context) {

             mDialog = new InfoDialog(context, R.style.Theme_AppCompat_Dialog);

             LayoutInflater inflater =

                     (LayoutInflater) context.getSystemService(Context.LAYOUT_INFLATER_SERVICE);

             //加载布局文件

             mLayout = inflater.inflate(R.layout.dialog, null, false);

             //添加布局文件到 Dialog

             mDialog.addContentView(mLayout, new ViewGroup.LayoutParams(ViewGroup.LayoutParams.MATCH_PARENT,

                     ViewGroup.LayoutParams.WRAP_CONTENT));

             mIcon = mLayout.findViewById(R.id.dialog_icon);

             mTitle = mLayout.findViewById(R.id.dialog_title);

             mMessage = mLayout.findViewById(R.id.dialog_message);

             mButton = mLayout.findViewById(R.id.dialog_button);

         }

         /**

          * 通过 ID 设置 Dialog 图标

          */

         public Builder setIcon(int resId) {

             mIcon.setImageResource(resId);

             return this;

         }

         /**

          * 用 Bitmap 作为 Dialog 图标

          */

         public Builder setIcon(Bitmap bitmap) {

             mIcon.setImageBitmap(bitmap);

             return this;

         }

         /**

          * 设置 Dialog 标题

          */

         public Builder setTitle(@NonNull String title) {

             mTitle.setText(title);

             mTitle.setVisibility(View.VISIBLE);

             return this;

         }

         /**

          * 设置 Message

          */

         public Builder setMessage(@NonNull String message) {

             mMessage.setText(message);

             return this;

         }

         /**

          * 设置按钮文字和监听

          */

         public Builder setButton(@NonNull String text, View.OnClickListener listener) {

             mButton.setText(text);

             mButtonClickListener = listener;

             return this;

         }

         public InfoDialog create() {

             mButton.setOnClickListener(view -> {

                 mDialog.dismiss();

                 mButtonClickListener.onClick(view);

             });

             mDialog.setContentView(mLayout);

             mDialog.setCancelable(true);                //用户可以点击后退键关闭 Dialog

             mDialog.setCanceledOnTouchOutside(false);   //用户不可以点击外部来关闭 Dialog

             return mDialog;

         }

     }

 }
弹出:
 public class MainActivity extends AppCompatActivity {

     @Override

     protected void onCreate(Bundle savedInstanceState) {

         super.onCreate(savedInstanceState);

         setContentView(R.layout.activity_main);

         findViewById(R.id.button_show_dialog).setOnClickListener(v -> {

             InfoDialog infoDialog = new InfoDialog.Builder(this)

                     .setTitle("Done")

                     .setMessage("Something done")

                     .setButton("OK", view ->

                         Toast.makeText(this, "OK Clicked.", Toast.LENGTH_SHORT).show()

                     ).create();

             infoDialog.show();

         });

     }

 }
Android 自定义AlertDialog的实现的更多相关文章
- Android 自定义AlertDialog退出对话框
Android 自定义AlertDialog退出对话框 转 https://blog.csdn.net/wkh11/article/details/53081634在项目中很多时候会出现点击返回键出现 ...
- Android自定义AlertDialog
常见的一种方法: [html] view plaincopyprint? AlertDialog.Builder builder; AlertDialog alertDialog; LayoutInf ...
- android 自定义AlertDialog(一段)
java: final AlertDialog dialog = new AlertDialog.Builder(mContext) .create(); dialog.setCancelable(f ...
- Android 自定义AlertDialog(退出提示框)
有时候我们需要在游戏或应用中用一些符合我们样式的提示框(AlertDialog) 以下是我在开发一个小游戏中总结出来的.希望对大家有用. 先上效果图: 下面是用到的背景图或按钮的图片 经过查找资料和参 ...
- Android 自定义AlertDialog的写法和弹出软键盘和覆盖状态栏
private void showMyDialog(int layoutId){ AlertDialog myDialog = new AlertDialog.Builder(context).cre ...
- android 自定义alertdialog和取消dialog
看代码: public class MainActivity extends AppCompatActivity { @Override protected void onCreate(Bundle ...
- android 自定义AlertDialog
xml: alter_dialog_two <?xml version="1.0" encoding="utf-8"?> <LinearLay ...
- Android之自定义AlertDialog和PopupWindow实现(仿微信Dialog)
我们知道,在很多时候,我们都不用Android内置的一些控件,而是自己自定义一些自己想要的控件,这样显得界面更美观. 今天主要是讲自定义AlertDialog和popupWindow的使用,在很多需求 ...
- Xamarin.Android 记事本(二)自定义AlertDialog
导读 1.自定义一个AlertDialog 2.添加一条数据 正文 记事本应当有一个添加功能,这里我打算在右上角放一个item,然后点击这个item弹出一个对话框,输入名称,点击确定跳转到另一个act ...
随机推荐
- 根据sockfd获取TCP连接本地地址以及对端地址
摘抄自muduo代码实现. 获取本地地址(LocalAddr): struct sockaddr_in6 sockets::getLocalAddr(int sockfd) { struct sock ...
- deepin安装docker
deepin在debian的基础上进行了一些修改,因此导致按照debian的安装指引是很难安装上docker的. 最近想学习docker,故尝试了安装docker(个人使用:deepin15.7桌面版 ...
- 【hadoop】1、MapReduce进行日志分析,并排序统计结果
1.网上很多关于搭建Hadoop集群的知识,这里不多做叙述,并且本机运行Hadoop程序是不需要hdfs集群的,我们本机运行只做个demo样式,当真的需要运行大数据的时候,才需要真正的集群 2.还有就 ...
- Http状态信息
一.HTTP协议1.简介:http超文本传输协议,基于请求与响应模式的,无状态的,应用层的协议.绝大读书的web开发都是建立在http协议之上的.2.http工作过程:当请求一个超链接时,http就开 ...
- Jenkins技巧:如何启动、停止、重启、重载Jenkins
----------------------------------------------------------------- 原创博文,如需转载请通知作者并注明出处! 博主:疲惫的豆豆 链接:h ...
- [ Talk is Cheap Show me the CODE ] : jQuery Mobile页面布局
当我们专注地研究人类生活的空虚,并考虑荣华富贵空幻无常时,也许我们正在阿谀逢迎自己懒惰的天性. Written In The Font 为了app的手机端,我选择了 jQuery Mobile ,学 ...
- kafka配置项host.name advertised.host.name
遇到的问题: 在本机或者其他机器telnet IP 9092,通,使用域名也通,telnet 127.0.0.1 9092不通 host.name:按配置文件说明,是Kafka绑定的interface ...
- Win32线程安全问题.同步函数
线程安全问题.同步函数 一丶简介什么是线程安全 通过上面几讲.我们知道了线程怎么创建.线程切换的原理(CONTEXT结构) 每个线程在切换的时候都有自己的堆栈. 但是这样会有安全问题. 为什么? 我 ...
- c# Console application Open/Get Url by Browser
C# url 用 浏览器打开.C#获取浏览器的url static void Main(string[] args) { string file = @"C:\Users\Hero\Desk ...
- PCA实现教程
数据是机器学习模型的生命燃料.对于特定的问题,总有很多机器学习技术可供选择,但如果没有很多好的数据,问题将不能很好的解决.数据通常是大部分机器学习应用程序中性能提升背后的驱动因素. 有时,数据可能很复 ...