前端 高级 (二十五)vue2.0项目实战一 配置简要说明、代码简要说明、Import/Export、轮播和列表例子
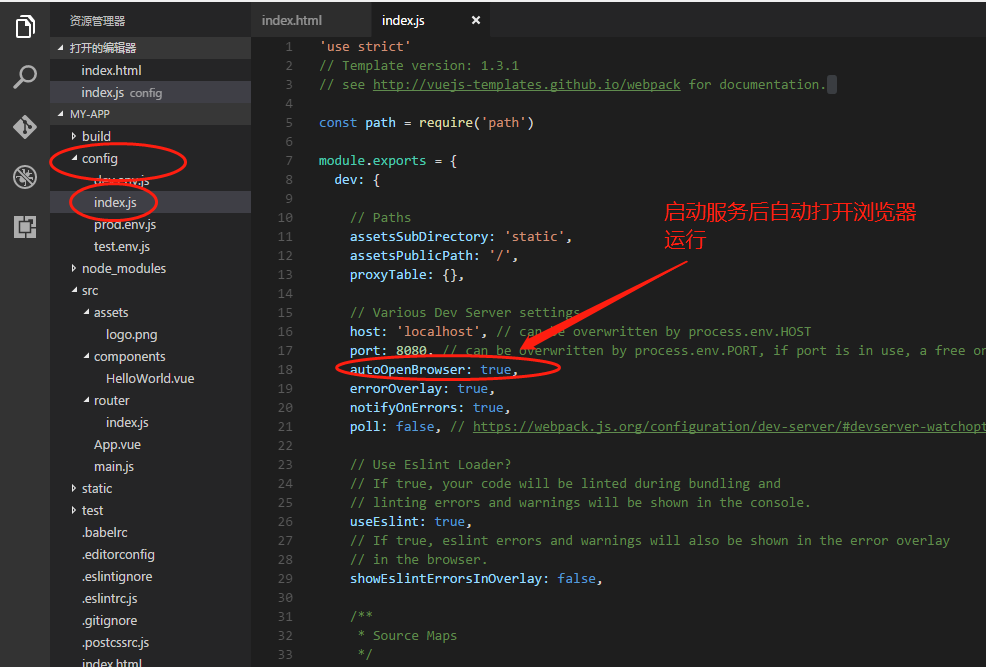
一、启动服务自动打开浏览器运行
二、配置简要说明
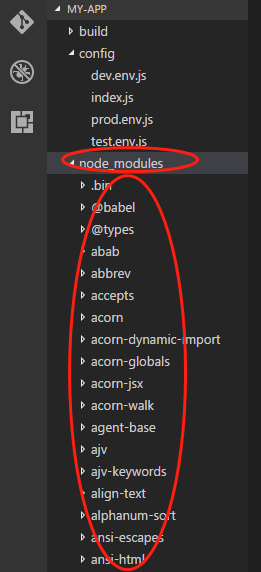
1、node_modules
安装好的依赖文件,中间件等,所在位置
2、package.jason
配置当前项目要安装的中间件和依赖文件
{

  "name": "my-app",

  "version": "1.0.0",

  "description": "A Vue.js project",

  "author": "",

  "private": true,

  "scripts": {

    "dev": "webpack-dev-server --inline --progress --config build/webpack.dev.conf.js",

    "start": "npm run dev",//项目的启动方式

    "unit": "jest --config test/unit/jest.conf.js --coverage",

    "e2e": "node test/e2e/runner.js",

    "test": "npm run unit && npm run e2e",

    "lint": "eslint --ext .js,.vue src test/unit test/e2e/specs",

    "build": "node build/build.js"//项目如何打包

  },

  "dependencies": {

    "vue": "^2.5.2",

    "vue-router": "^3.0.1"

  },

  "devDependencies": {//当前项目要安装的依赖文件,后边是版本

    "autoprefixer": "^7.1.2",

    "babel-core": "^6.22.1",

    "babel-eslint": "^8.2.1",

    "babel-helper-vue-jsx-merge-props": "^2.0.3",

    "babel-jest": "^21.0.2",

    "babel-loader": "^7.1.1",

    "babel-plugin-dynamic-import-node": "^1.2.0",

    "babel-plugin-syntax-jsx": "^6.18.0",

    "babel-plugin-transform-es2015-modules-commonjs": "^6.26.0",

    "babel-plugin-transform-runtime": "^6.22.0",

    "babel-plugin-transform-vue-jsx": "^3.5.0",

    "babel-preset-env": "^1.3.2",

    "babel-preset-stage-2": "^6.22.0",

    "babel-register": "^6.22.0",

    "chalk": "^2.0.1",

    "chromedriver": "^2.27.2",

    "copy-webpack-plugin": "^4.0.1",

    "cross-spawn": "^5.0.1",

    "css-loader": "^0.28.0",

    "eslint": "^4.15.0",

    "eslint-config-standard": "^10.2.1",

    "eslint-friendly-formatter": "^3.0.0",

    "eslint-loader": "^1.7.1",

    "eslint-plugin-import": "^2.7.0",

    "eslint-plugin-node": "^5.2.0",

    "eslint-plugin-promise": "^3.4.0",

    "eslint-plugin-standard": "^3.0.1",

    "eslint-plugin-vue": "^4.0.0",

    "extract-text-webpack-plugin": "^3.0.0",

    "file-loader": "^1.1.4",

    "friendly-errors-webpack-plugin": "^1.6.1",

    "html-webpack-plugin": "^2.30.1",

    "jest": "^22.0.4",

    "jest-serializer-vue": "^0.3.0",

    "nightwatch": "^0.9.12",

    "node-notifier": "^5.1.2",

    "optimize-css-assets-webpack-plugin": "^3.2.0",

    "ora": "^1.2.0",

    "portfinder": "^1.0.13",

    "postcss-import": "^11.0.0",

    "postcss-loader": "^2.0.8",

    "postcss-url": "^7.2.1",

    "rimraf": "^2.6.0",

    "selenium-server": "^3.0.1",

    "semver": "^5.3.0",

    "shelljs": "^0.7.6",

    "uglifyjs-webpack-plugin": "^1.1.1",

    "url-loader": "^0.5.8",

    "vue-jest": "^1.0.2",

    "vue-loader": "^13.3.0",

    "vue-style-loader": "^3.0.1",

    "vue-template-compiler": "^2.5.2",

    "webpack": "^3.6.0",

    "webpack-bundle-analyzer": "^2.9.0",

    "webpack-dev-server": "^2.9.1",

    "webpack-merge": "^4.1.0"

  },

  "engines": {

    "node": ">= 6.0.0",

    "npm": ">= 3.0.0"

  },

  "browserslist": [

    "> 1%",

    "last 2 versions",

    "not ie <= 8"

  ]

}
node_modules文件夹下的文件就是这里定义需要安装的依赖文件或中间件等。
3、build文件夹
webpack的一些配置文件
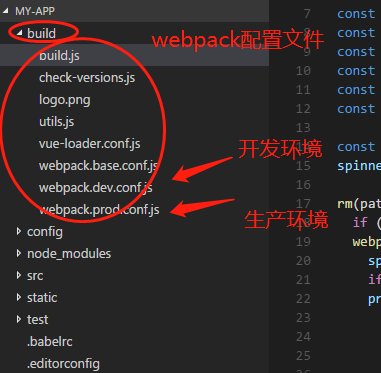
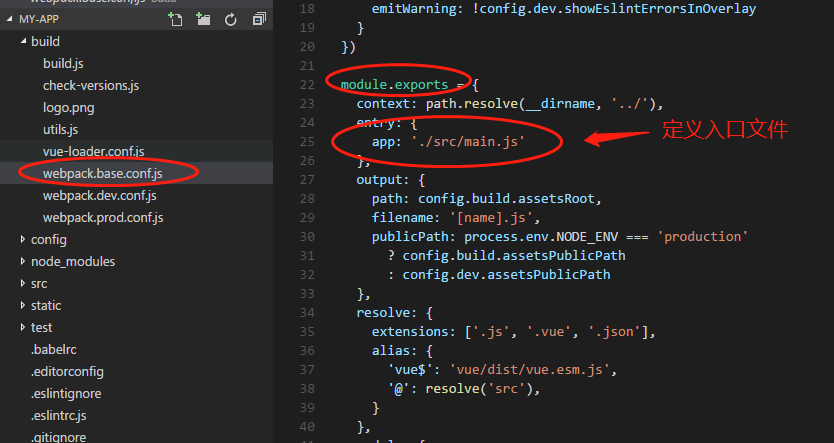
main.js入口文件定义
webpack.base.conf.js中定义
4、config
项目核心配置
5、src

6、static
静态文件资源也可以放这里
7、test
测试相关
webpack打包后,会成为常规的html,js,css,再放到服务里执行,不会把这些源文件放到服务器执行。对这么多类别文件该解析的解析,该处理的处理,该丢弃的丢弃。
三、模块化 代码说明

模块化:把一个较大的项目拆分成很多小的互相有依赖的部分,主要有两个命令 import 输入其他模块, export 对外输出接口,如
入口main.js里边的代码
 导入的中间件或依赖文件,在node_modules文件夹下
 ./当前目录
 阻止vue在启动时候生产生产提示
入口组件App.vue
路由 index.js

加载的组件HelloWorld.vue
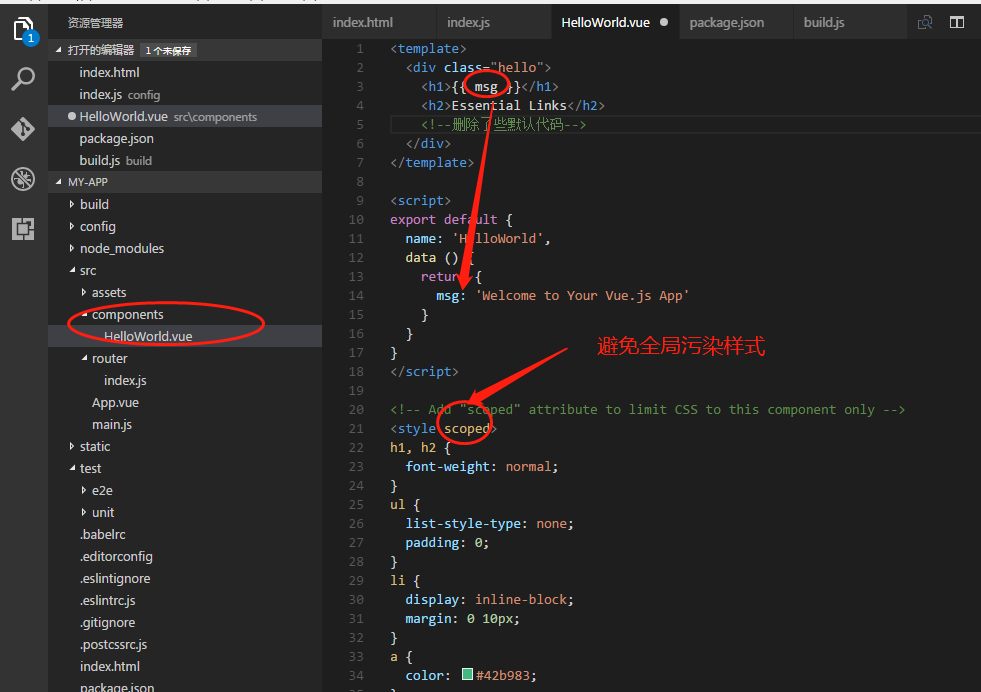
四、Import/Export
1、导出一个export default 导出一个组件
testB.vue
<template>

  <div>

    <h1>{{ msg }}</h1>

  </div>

</template>

<script>

export default {--只导出一个

  name: 'testB',

  data () {

    return {

      msg: 'testbbbb'

    }

  }

}

</script>
export default 只可以导出一个
APP.vue导入使用:
<template>

  <div id="app">

    <img src="./assets/logo.png">

    <testA/><!--3、模板里使用-->

  </div>

</template>

<script>

import testA from './components/testA';--1、导入testA和export的name保持一致

export default {

  name: 'App',

  data(){

    return {

     a:'a'

    }

  },

  components:{

    testA --2、引用组件

  }

}

</script>

<style>

#app {

  font-family: 'Avenir', Helvetica, Arial, sans-serif;

  -webkit-font-smoothing: antialiased;

  -moz-osx-font-smoothing: grayscale;

  text-align: center;

  color: #2c3e50;

  margin-top: 60px;

}

</style>
2、导出多个
var name='sonia';

var age = 18;

var msg = 'hello';

export {name,age,msg};--导出多个
<template>

  <div id="app">

    <img src="./assets/logo.png">

    {{name}}--3、使用

  </div>

</template>

<script>

import {name,age,msg} from './components/testA';--1、导入需要一个{}

export default {

  name: 'App',

  data(){

    return {

      name:name--2、要使用先要放到data中

    }

  }

}

</script>

<style>

#app {

  font-family: 'Avenir', Helvetica, Arial, sans-serif;

  -webkit-font-smoothing: antialiased;

  -moz-osx-font-smoothing: grayscale;

  text-align: center;

  color: #2c3e50;

  margin-top: 60px;

}

</style>
3、将多个导出一个对象
export default {

     name:'12345',

     age:20

}
<template>

  <div id="app">

    <img src="./assets/logo.png">

    {{name.age}}--对象的使用方法

  </div>

</template>

<script>

import abc from './components/testA';--一个abc是个对象,就是export default只是是一个对象

export default {

  name: 'App',

  data(){

    return {

      name:abc--放到一个属性上

    }

  }

}

</script>

<style>

#app {

  font-family: 'Avenir', Helvetica, Arial, sans-serif;

  -webkit-font-smoothing: antialiased;

  -moz-osx-font-smoothing: grayscale;

  text-align: center;

  color: #2c3e50;

  margin-top: 60px;

}

</style>
4、导出函数
function num(x,y) {

     alert(x+y);

 };

export {num};
<template>

  <div id="app">

    <img src="./assets/logo.png">

    {{num(1,2)}}--3、函数调用

  </div>

</template>

<script>

import {num} from './components/testA';--1、导入函数,需要{},因为导出就是以多个的方式导出

export default {

  name: 'App',

  data(){

    return {

      num:num--2、附加到data

    }

  }

}

</script>

<style>

#app {

  font-family: 'Avenir', Helvetica, Arial, sans-serif;

  -webkit-font-smoothing: antialiased;

  -moz-osx-font-smoothing: grayscale;

  text-align: center;

  color: #2c3e50;

  margin-top: 60px;

}

</style>
5、爷父子组件引用
APP.vue 包含TestA.vue,其又包含TestB.vue
TestB.vue
<template>

  <div>

    <h1>{{ msg }}</h1>

  </div>

</template>

<script>

export default {

  name: 'testB',

  data () {

    return {

      msg: 'testbbbb'

    }

  }

}

</script>
TestA.vue
<template>

  <div>

    <testB/> --使用组件testB

  </div>

</template>

<script>

import testB from './testB';--导入组件testB

export default {

  name: 'testA',

  data () {

    return {

      msg: 'testAAAA'

    }

  },

  components:{

    testB--引用组件testB

  }

}

</script>
<template>

  <div id="app">

    <img src="./assets/logo.png">

    <testA/>--使用组件A

  </div>

</template>

<script>

import testA from './components/testA';--导入组件testA

export default {

  name: 'App',

  data(){

    return {

      a:"a"

    }

  },

  components:{

    testA--引用组件testA

  }

}

</script>
五、轮播脚手架写法例子
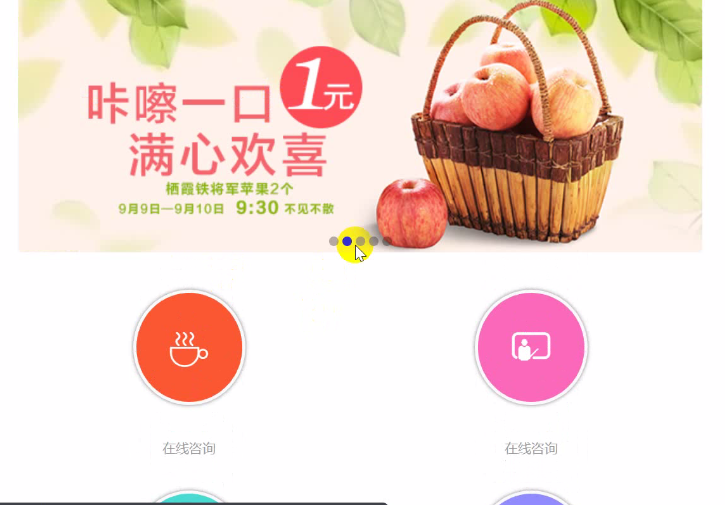
分两个组件banner.vue,list.vue,一个轮播组件,一个列表组件
banner.vue
<template>

  <div class="banner">

        <img v-for="(img,index) in imges" :src="img" v-show="index==num"/>

        <div class="banner-circle">

            <ul>

                <li v-for="(img,index) in imges" :class="{'selected':index==num}"></li>

            </ul>

        </div>

    </div>

</template>

<script>

export default {

  //name: 'testB',

  data () {

    return {

        num:0,

        imges:[require('../assets/img/banner1.jpg'),--本地图片要导入需要用require要不webpack不认识

            require('../assets/img/banner2.jpg'),

            require('../assets/img/banner3.jpg'),

            require('../assets/img/banner4.jpg'),

            require('../assets/img/banner5.jpg')],

    }

  },

    mounted:function(){   //生命周期  挂载完成

        this.play();

    },

    methods:{   //方法

        autoPlay:function(){

            this.num++;

            if(this.num == this.imges.length){

                this.num = 0;

            }

        },

        play:function(){

            setInterval(this.autoPlay,2000);

        }

    }

}

</script>

<style>

*{

    margin:0;

    padding:0;

}

ul {

    list-style-type:none;

}

body {

    font-size: 14px;

    background: #fff;

    overflow-y:scroll;

    overflow-x:hidden;

}

html,body {

    max-width:720px;

    height:100%;

    margin:0 auto;

}

/*index*/

.banner {

    position: relative;

}

.banner .banner-circle {

    position: absolute;

    bottom: 5px;

    left: 0;

    right: 0;

    color: #fff;

}

.banner .banner-circle li{

    display:inline-block;

    background: rgba(0,0,0,.3);

    border-radius: 50%;

    padding:5px;

    margin:2px;

}

.banner .banner-circle ul {

    text-align: center;

}

.banner .banner-circle .selected {

    background: rgba(0,0,0,.8);

}

.banner img {

    width: 100%;

    margin: 0;

    padding: 0;

}

</style>
list.vue
<template>

  <div class="index-category">

        <div class="category" v-for="list in lists"><i class="iconfont" v-bind:class="list.icon"></i><label>{{list.title}}</label></div>

  </div>

</template>

<script>

export default {

  //name: 'testB',

  data () {

    return {

      lists:[{title:'在线咨询',icon:'icon-shenghuo'},

                {title:'在线咨询',icon:'icon-jiaoyu'},

                {title:'在线咨询',icon:'icon-11'},

                {title:'在线咨询',icon:'icon-jiazheng'},

                {title:'在线咨询',icon:'icon-shenghuo'},

                {title:'在线咨询',icon:'icon-shenghuo'}]

    }

  }

}

</script>

<style>

/*index-category*/

.index-category {

    margin-top: 5%;

}

.index-category .category {

    width: 50%;

    float:left;

    text-align:center;

}

.index-category .category .iconfont {

    font-size: 40px;

    display:inline-block;

    padding: 10%;

    border-radius: 50%;

    color:#fff;

    border: 3px solid #f9f9f9;

    box-shadow: 0px 0px 6px rgba(0,0,0,.5);

}

.index-category .category:nth-child(1) .iconfont{

    background: #f95730;

}

.index-category .category:nth-child(2)  .iconfont{

    background: #fa69b9;

}

.index-category .category:nth-child(3)  .iconfont{

    background: #49dacf;

}

.index-category .category:nth-child(4)  .iconfont{

    background: #908cfd;

}

.index-category .category:nth-child(5)  .iconfont{

    background: #92d85c;

}

.index-category .category:nth-child(6)  .iconfont{

    background: #ecbe35;

}

.index-content .index-category .category label {

    display: block;

    padding: 10% 0;

    color: #999;

}

/*index-category end*/

</style>
APP.vue使用上边两个组件
<template>

  <div id="app">

    <banner/>--使用两个组件

    <list/>

  </div>

</template>

<script>

import banner from './components/banner';--导入两个组件

import list from './components/list';

export default {

  name: 'App',

  data(){

    return {

    }

  },

  components:{

    banner,--引用两个组件

    list

  }

}

</script>

<style>

#app {

  font-family: 'Avenir', Helvetica, Arial, sans-serif;

  -webkit-font-smoothing: antialiased;

  -moz-osx-font-smoothing: grayscale;

  text-align: center;

  color: #2c3e50;

  margin-top: 60px;

}

</style>
前端 高级 (二十五)vue2.0项目实战一 配置简要说明、代码简要说明、Import/Export、轮播和列表例子的更多相关文章
- vue2.0项目实战(1)基础入门
最近公司的H5项目准备重构,部门老大说前端使用vue2.0来开发,所以就准备把整个项目的开发过程记录下来,一方面是为了记录开发过程中遇到的坑,另一方面也加强自己写作的能力. 什么是 Vue? 简要介绍 ...
- vue2.0项目实战(4)生命周期和钩子函数详解
最近的项目都使用vue2.0来开发,不得不说,vue真的非常好用,大大减少了项目的开发周期.在踩坑的过程中,因为对vue的生命周期不是特别了解,所以有时候会在几个钩子函数里做一些事情,什么时候做,在哪 ...
- vue2.0项目实战(5)vuex快速入门
Vuex 是一个专为 Vue.js 应用程序开发的状态管理模式.它采用集中式存储管理应用的所有组件的状态,并以相应的规则保证状态以一种可预测的方式发生变化.Vuex 也集成到 Vue 的官方调试工具 ...
- Vue2.0项目实战语法
一.安装配置依赖 1) vue init webpack-simple 项目名称 2) cnpm install 3 ) npm run dev 4 ) cnpm install vuex vue ...
- vue2.0项目实战(3)使用axios发送请求
在Vue1.0的时候有一个官方推荐的 ajax 插件 vue-resource,但是自从 Vue 更新到 2.0 之后,官方就不再更新 vue-resource. 关于为什么放弃推荐? -> 尤 ...
- vue2.0项目实战(2)使用 vue-cli 搭建项目
Vue-cli是官方推荐的快速构建单页应用的脚手架.官方给的建议,如果你是初次尝试Vue,哪就老老实实用普通的书写引入js文件,这里牵扯太多的东西,例如webpack .npm .nodejs 等等, ...
- vue2.0项目的环境配置以及有哪些的坑
npm run dev项目运行:$ git pull origin master 更新代码项目的提交代码git push -u origin master 这里就开始准备提交到网络上了 项目的地址gi ...
- vue2.0项目实战使用axios发送请求
在Vue1.0的时候有一个官方推荐的 ajax 插件 vue-resource,但是自从 Vue 更新到 2.0 之后,官方就不再更新 vue-resource. 关于为什么放弃推荐? -> 尤 ...
- vue2.0与实战开发
慕课网实战 百度云 web前端实战: Node.js入门到企业Web开发中的应用 Web前端性能优化 让你的页面飞起来 前端跳槽面试必备技巧 前端JavaScript面试技巧全套 node.JS 线上 ...
随机推荐
- paloalto防火墙的优势
1.所有 Palo Alto Networks 防火墙提供一个可用于执行防火墙管理功能的带外管理端口 (MGT).通过使用该 MGT 端口,可以将防火墙的管理功能与数据处理功能分开,从而保护对防火墙的 ...
- c#: .net framework 2.0支持扩展方法的办法
c#之扩展方法是个好方法,可惜只在.net framework 3.5及以上版本中用. 2.0版本若用,其编译报错如下: 错误 无法定义新的扩展方法,因为找不到编译器所需的类型“System.Runt ...
- python的单元测试unittest模块
首先需要导入unittest模块 import unittest import HTMLTestRunner # TestCase 也就是测试用例## TestSuite 多个测试用例集合在一起,就 ...
- WebSocket 实现链接 群聊(low low low 版本)
py 文件: """ 下载 gevent-websocket 0.10.1 基于Flask + geventWebSocket 建立连接,发送消息,实现群消息功能. &q ...
- Unity 角色移动贴墙行走
直接贴上代码,旋转角色角度检测碰撞 Vector2 v2Normal = new Vector2(normal.x, normal.y); float fAngle = Vector2.SignedA ...
- Disk
一.简介 二.其他 1)Disk I/O
- linux下修改时间戳
Linux下touch是一个非常有用的命令. touch语法结构如下: touch [-acfm][-d <日期时间>][-r <参考文件或目录>][-t <日期时间&g ...
- 201771010134杨其菊《面向对象程序设计(java)》第十六周学习总结
第十六周学习总结 第一部分:理论知识 1. 程序是一段静态的代码,它是应用程序执行的蓝本.进程是程序的一次动态执行,它对应了从代码加载.执行至执行完毕的一个完整过程.操作系统为每个进程分配一段独立的内 ...
- mysql的初次使用操作
一.mysql 登录 mysql 参数 mysql -uroot -p123 -P3306 -h127.0.0.1 127.0.0.1本地回环地址 二.mysql退出 mysql >exit; ...
- 201621123002《java程序设计》第九周学习总结
1. 本周学习总结 1.1 以你喜欢的方式(思维导图或其他)归纳总结集合与泛型相关内容. 1.2 选做:收集你认为有用的代码片段 //功能需求:将所有大于5的生成一个新的List对象 List lis ...