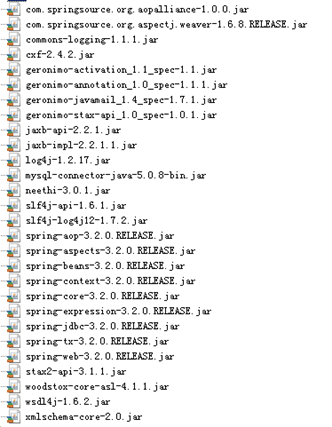
spring_cxf_basic_sender
jar
applicationContent.xml
<?xml version="1.0" encoding="UTF-8"?>

<beans xmlns="http://www.springframework.org/schema/beans"

xmlns:xsi="http://www.w3.org/2001/XMLSchema-instance"

xmlns:jaxws="http://cxf.apache.org/jaxws"

xmlns:soap="http://cxf.apache.org/bindings/soap"

    xmlns:context="http://www.springframework.org/schema/context"

    xmlns:aop="http://www.springframework.org/schema/aop"

    xmlns:tx="http://www.springframework.org/schema/tx"

xsi:schemaLocation="http://www.springframework.org/schema/beans

                    http://www.springframework.org/schema/beans/spring-beans.xsd

                    http://cxf.apache.org/bindings/soap

                    http://cxf.apache.org/schemas/configuration/soap.xsd

                    http://cxf.apache.org/jaxws

                    http://cxf.apache.org/schemas/jaxws.xsd

                    http://www.springframework.org/schema/context

                        http://www.springframework.org/schema/context/spring-context.xsd

                        http://www.springframework.org/schema/aop

                        http://www.springframework.org/schema/aop/spring-aop.xsd

                        http://www.springframework.org/schema/tx

                        http://www.springframework.org/schema/tx/spring-tx.xsd">

    <!-- 引入CXF Bean定义如下,早期的版本中使用 -->

    <import resource="classpath:META-INF/cxf/cxf.xml" />

    <import resource="classpath:META-INF/cxf/cxf-extension-soap.xml" />

    <import resource="classpath:META-INF/cxf/cxf-servlet.xml" />

    <!-- 配置数据源 -->

    <bean id="dataSource" class="org.springframework.jdbc.datasource.DriverManagerDataSource">

        <property name="driverClassName" value="com.mysql.jdbc.Driver"/>

        <property name="url" value="jdbc:mysql:///crmwebservice"/>

        <property name="username" value="root"/>

        <property name="password" value="manager123"/>

    </bean>

    <!-- 事务管理器 -->

    <bean id="txManager" class="org.springframework.jdbc.datasource.DataSourceTransactionManager">

        <property name="dataSource" ref="dataSource"/>

    </bean>

    <!-- 支持事务注解 -->

    <tx:annotation-driven transaction-manager="txManager"/>

    <bean id="jdbcTemplate" class="org.springframework.jdbc.core.JdbcTemplate">

        <property name="dataSource" ref="dataSource"/>

    </bean>

    <bean id="customerService" class="com.shan.crm.service.CustomerServiceImpl">

        <property name="jdbcTemplate" ref="jdbcTemplate"/>

    </bean>

    <!-- 注册服务 -->

    <jaxws:server id="myService" address="/customer">

        <jaxws:serviceBean>

            <ref bean="customerService"/>

        </jaxws:serviceBean>

    </jaxws:server>

</beans>
web.xml
<?xml version="1.0" encoding="UTF-8"?>

<web-app xmlns:xsi="http://www.w3.org/2001/XMLSchema-instance" xmlns="http://java.sun.com/xml/ns/javaee" xsi:schemaLocation="http://java.sun.com/xml/ns/javaee http://java.sun.com/xml/ns/javaee/web-app_2_5.xsd" id="WebApp_ID" version="2.5">

  <display-name>crm_webservice</display-name>

  <welcome-file-list>

    <welcome-file>index.html</welcome-file>

    <welcome-file>index.htm</welcome-file>

    <welcome-file>index.jsp</welcome-file>

    <welcome-file>default.html</welcome-file>

    <welcome-file>default.htm</welcome-file>

    <welcome-file>default.jsp</welcome-file>

  </welcome-file-list>

  <!-- 配置spring配置文件位置 -->

  <context-param>

  <param-name>contextConfigLocation</param-name>

  <param-value>classpath:cxf.xml</param-value>

  </context-param>

  <!-- 配置spring监听器 -->

  <listener>

     <listener-class>org.springframework.web.context.ContextLoaderListener</listener-class>

  </listener>

  <!-- 配置CXF框架提供的servlet -->

  <servlet>

  <servlet-name>cxf</servlet-name>

  <servlet-class> org.apache.cxf.transport.servlet.CXFServlet</servlet-class>

  <!-- 通过初始化参数指定cxf框架的配置文件位置 -->

      <init-param>

      <param-name>config-location</param-name>

      <param-value>classpath:cxf.xml</param-value>

      </init-param>

  </servlet>

  <servlet-mapping>

  <servlet-name>cxf</servlet-name>

  <url-pattern>/service/*</url-pattern>

  </servlet-mapping>

</web-app>
在要发布的接口上

《浏览器》访问
http:ocalhost:8080/项目名 / web.xml中url-pattern名/ 发布服务的路径
http://localhost:8080/CxfwebService/service/cxfService
《接收端applicationContent.xml》
<?xml version="1.0" encoding="UTF-8"?>

<beans xmlns="http://www.springframework.org/schema/beans"

    xmlns:xsi="http://www.w3.org/2001/XMLSchema-instance"

    xmlns:context="http://www.springframework.org/schema/context"

    xmlns:aop="http://www.springframework.org/schema/aop"

    xmlns:tx="http://www.springframework.org/schema/tx"

         xmlns:jaxws="http://cxf.apache.org/jaxws"

         xmlns:soap="http://cxf.apache.org/bindings/soap"

    xsi:schemaLocation="http://www.springframework.org/schema/beans

                        http://www.springframework.org/schema/beans/spring-beans.xsd

                        http://www.springframework.org/schema/context

                        http://www.springframework.org/schema/context/spring-context.xsd

                        http://www.springframework.org/schema/aop

                        http://www.springframework.org/schema/aop/spring-aop.xsd

                        http://www.springframework.org/schema/tx

                        http://www.springframework.org/schema/tx/spring-tx.xsd

                            http://cxf.apache.org/bindings/soap

                            http://cxf.apache.org/schemas/configuration/soap.xsd

                               http://cxf.apache.org/jaxws

                            http://cxf.apache.org/schemas/jaxws.xsd">

    <!-- 加载属性文件 -->

    <context:property-placeholder location="classpath:jdbc.properties"/>

    <!-- 配置数据源 -->

    <bean id="dataSource" class="com.mchange.v2.c3p0.ComboPooledDataSource">

        <property name="driverClass" value="${jdbc.driverClass}"/>

        <property name="jdbcUrl" value="${jdbc.jdbcUrl}"/>

        <property name="user" value="${jdbc.user}"/>

        <property name="password" value="${jdbc.password}"/>

    </bean>

    <!-- 配置LocalSessionFactoryBean,spring提供的用于整合hibernate的工厂bean -->

    <bean id="sessionFactory" class="org.springframework.orm.hibernate5.LocalSessionFactoryBean">

        <property name="dataSource" ref="dataSource"/>

        <!-- 注入hibernate相关的属性配置 -->

        <property name="hibernateProperties">

            <props>

                <prop key="hibernate.dialect">org.hibernate.dialect.MySQL5Dialect</prop>

                <prop key="hibernate.hbm2ddl.auto">update</prop>

                <prop key="hibernate.show_sql">true</prop>

                <prop key="hibernate.format_sql">true</prop>

            </props>

        </property>

        <!-- 注入hibernate的映射文件 -->

        <property name="mappingLocations">

            <list>

                <value>classpath:com/shan/bos/domain/*.xml</value>

            </list>

        </property>

    </bean>

    <!-- 配置事务管理器 -->

    <bean id="transactionManager" class="org.springframework.orm.hibernate5.HibernateTransactionManager">

        <property name="sessionFactory" ref="sessionFactory"/>

    </bean>

    <!-- 组件扫描 -->

    <context:component-scan base-package="com.shan.bos"/>

    <!-- 支持spring注解 -->

    <context:annotation-config/>

    <tx:annotation-driven/>

 <!-- 注册crm客户端代理对象 -->

    <jaxws:client id="myClient" serviceClass="com.shan.crm.service.CustomerService" address="http://localhost:8080/crm_webservice/service/customer" ></jaxws:client>

<!-- /*********************shiro框架与spring整合的部分配置***********************/ -->

<!-- 配置shiro框架的工厂bean -->

    <bean id="shiroFilter" class="org.apache.shiro.spring.web.ShiroFilterFactoryBean">

        <property name="securityManager" ref="securityManager"></property>

        <property name="loginUrl" value="/login.jsp"></property>

        <property name="successUrl" value="/index.jsp"></property>

        <property name="unauthorizedUrl" value="/unauthorized.jsp"></property>

        <!-- 指定    url级别拦截策略 -->

        <property name="filterChainDefinitions">

            <value>

                /css/**=anon

                /js/**=anon

                /images/**=anon

                /login.jsp*=anon

                /validatecode.jsp*=anon

                /userAction_login=anon

               /page_base_staff.action=perms["staff"]

                /*=authc

            </value>

        </property>

    </bean>

<!-- 安全管理器 -->

<bean id="securityManager" class="org.apache.shiro.web.mgt.DefaultWebSecurityManager" >

   <!-- 注入realm -->

   <property name="realm" ref="bosRealm"></property>

   <!-- 将缓存管理器注入 -->

   <property name="cacheManager" ref="cacheManager"></property>

</bean>

<!-- ****配置encached缓存管理器,然后将缓存管理器并注入给安全管理器对象***** -->

<!-- 配置缓存管理器 -->

<bean id="cacheManager" class="org.apache.shiro.cache.ehcache.EhCacheManager">

   <!-- 注入ehcache的配置文件 -->

   <property name="cacheManagerConfigFile" value="classpath:ehcache.xml"></property>

</bean>

<!-- 注册自定义的realm -->

<bean id="bosRealm" class="com.shan.bos.service.realm.BosRealm"> </bean>

<!-- ***************使用shiro的方法注解方式权限控制*********************** -->

  <!-- 开启shiro框架注解支持(由spring提供的) -->

       <bean id="DefaultAdvisorAutoProxyCreator" class="org.springframework.aop.framework.autoproxy.DefaultAdvisorAutoProxyCreator">

        <!-- 必须使用cglb方式为Action对象创建代理 -->

        <property name="proxyTargetClass" value="true"></property>

       </bean>

  <!-- 配置shiro框架提供的切面类,用于创建代理对象 -->

 <bean class="org.apache.shiro.spring.security.interceptor.AuthorizationAttributeSourceAdvisor"></bean>

<!-- ******************定时任务quartz配置********************* -->

<!-- 注册自定义作业类 -->

    <bean id="myJob" class="com.shan.bos.service.jobs.MailJob">

        <property name="username" value="lshan523@163.com"/>

        <property name="password" value="liushan511094523"/>

        <property name="smtpServer" value="smtp.163.com"/>

    </bean>

    <!-- 配置JobDetail -->

    <bean id="jobDetail" class="org.springframework.scheduling.quartz.MethodInvokingJobDetailFactoryBean">

        <!-- 注入目标对象 -->

        <property name="targetObject" ref="myJob"/>

        <!-- 注入目标方法 -->

        <property name="targetMethod" value="execute"/>

    </bean>

    <!-- 配置触发器 -->

    <bean id="myTrigger" class="org.springframework.scheduling.quartz.CronTriggerFactoryBean">

        <!-- 注入任务详情对象 -->

        <property name="jobDetail" ref="jobDetail"/>

        <!-- 注入cron表达式,通过这个表达式指定触发的时间点 -->

        <property name="cronExpression">

            <value>0/10 * * * * ? 2019</value>

        </property>

    </bean>

    <!-- 配置调度工厂 -->

    <bean id="schedulerFactoryBean" class="org.springframework.scheduling.quartz.SchedulerFactoryBean">

        <!-- 注入触发器 -->

        <property name="triggers">

            <list>

                <ref bean="myTrigger"/>

            </list>

        </property>

    </bean>

</beans>
调用: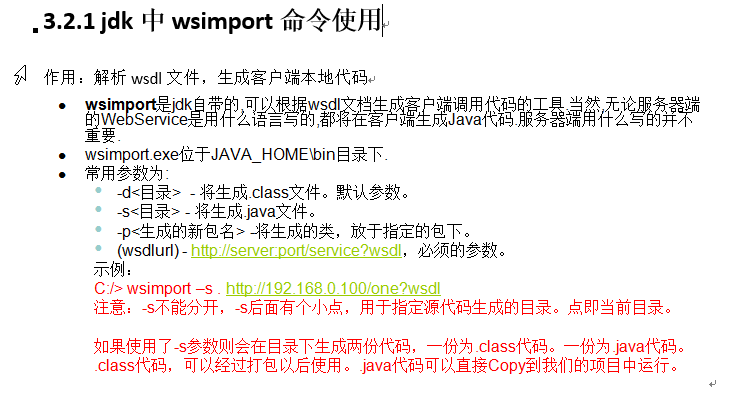
spring_cxf_basic_sender的更多相关文章
随机推荐
- SPOJCOT2 Count on a tree II
分析 树上莫队裸题. 好博客 树剖的时候不能再次dfs重儿子.(好像是废话,但我因为这个问题调了三小时) 代码 #include<cstdlib> #include<cstdio&g ...
- 在 php 7.3 中 switch 语句中使用 continue
在 php 7.3 中 switch 语句中使用 continue 在 php 7.3 的 switch 中使用 continue 会出现警告.1 2 3 while ($foo) { switch ...
- centos7 取消自动锁屏
CentOS7默认短时间会锁屏,这带来了一定的麻烦,比如看电影时,你不得不时不时的动动鼠标,才能防止锁屏.在网上查了一些资料,也没有找到相关的解决办法,不过最终还是找到了. 1.打开 applicat ...
- HBase常用指令
disable 'smsFlow'drop 'smsFlow'create 'smsFlow','info','partition'count 'smsFlow'scan 'smsFlow' trun ...
- Ionic 中MD5加密使用
1. 下载安装ts-md5 在项目的命令行工具里输入 npm install ts-md5 --save 2. 使用 导入 import {Md5} from "ts-md5/dist/m ...
- JZ2440 裸机驱动 第12章 I2C接口
本章目标: 了解I2C总线协议: 掌握S3C2410/S3C2440中I2C接口的使用方法: 12.1 I2C总线协议及硬件介绍 12.1.1 I2C总线协议 1 I2C总线的概念 2 I2C总线的信 ...
- visual studio 2010 c++ fatal error LNK1123: 转换到 COFF 期间失败: 文件无效或
解决方案: 1,在项目 上 选择 “视图”- “属性页” 2,选择 “配置属性” - “清单工具” - “输入输出”,将 “嵌入清单”的值设置为 “否”
- java 装饰设计模式模式
对已有功能进行增强 示例 已有的类 调用 增强后的类 调用 思考? 为什么要这么做呢? SuperPerson 继承 Person 可以达到同样的效果. 继承的写法,其中MyBuffer... ...
- BASIC-1_蓝桥杯_闰年判断
正确代码: #include <stdio.h> int main(void){ int year = 0 ; scanf("%d",&year); if (y ...
- dede:channel的type改为son,currentstyle当前样式就不起作用
我在修改得闲佬设计作品展示列表页的时候,遇到一个问题,就是channel的type改为son时,currentstyle属性不起作用,试了好久都没办法,后来上网找资料,就找到了解决方法,记录一下. ...