MySQL Server类型之MySQL客户端工具的下载、安装和使用(博主推荐)
本博文的主要内容有
.MySQL Server 5.5系列的下载
.MySQL Server 5.5系列的安装
.MySQL Server 5.5系列的使用
.MySQL Server 5.5系列的卸载
注意啊!
对于noinstall方式安装的MySQL,系统的参数配置、服务的启动和关闭都需要手工在命令窗口中完成。
对于图形化方式安装的MySQL,提供了一个图形化的实例配置向导,可以引导用户逐步进行实例参数的配置。
说明
首先,说明,在mysql官网里,没有mysqlSetup.exe,这是自行修改的命名。
1、MySQL Server 5.5系列的下载
http://dev.mysql.com/downloads/mysql/5.0.html#linux
J 进入MySQL的官方网站
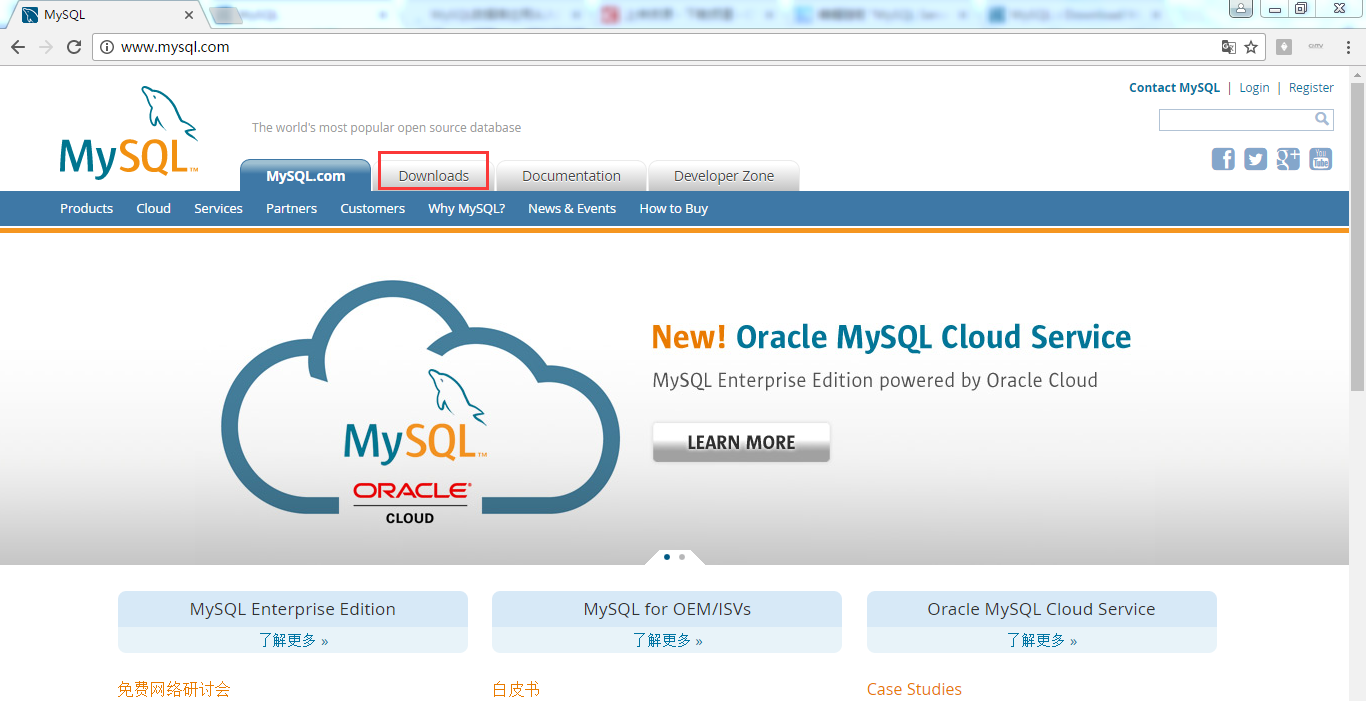
点击“Downloads”。
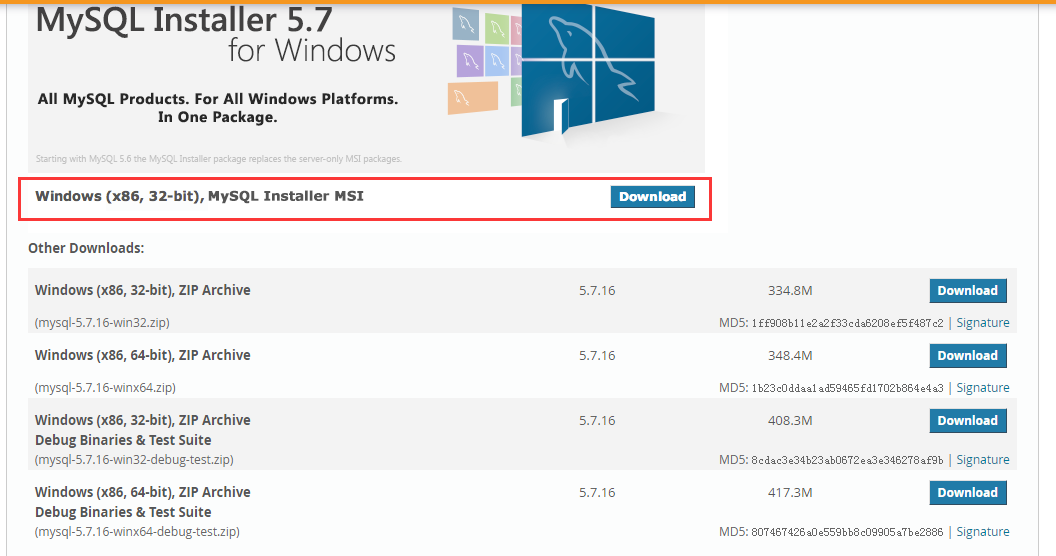
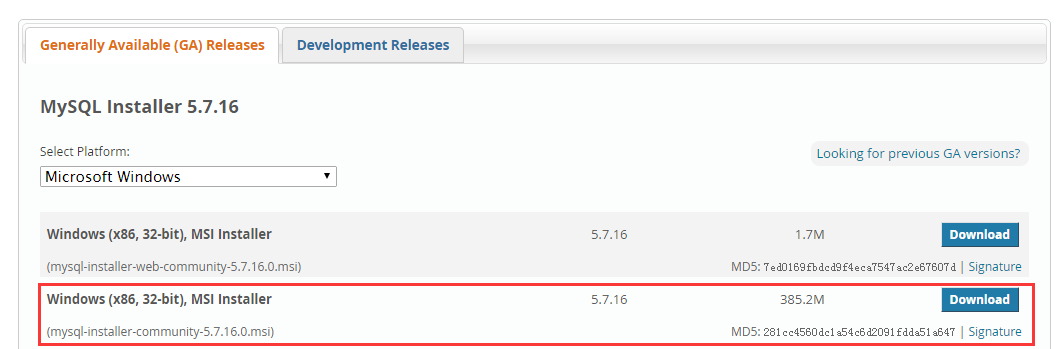
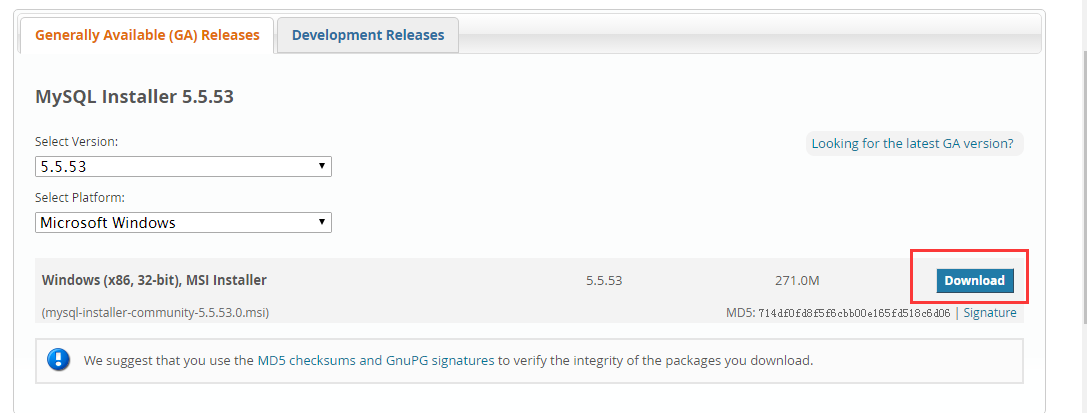
首先在“Select Platform”下拉菜单中选择“Microsoft Windows”平台,然后单击"Windows (x86,32bit)",MSI Installer
选项右边的Download按钮,下载32位的MySQL安装软件。
http://dev.mysql.com/downloads/windows/installer/5.5.html
注意,MySQL 5.5是公认的稳定版本。

2、MySQL Server 5.5系列的安装
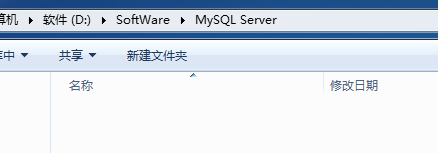
1、新建MySQL Server目录
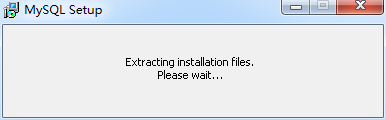
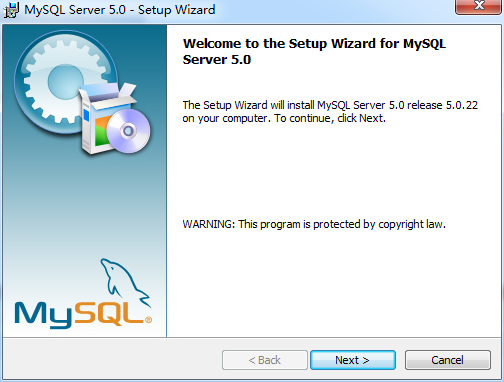
2、安装:双击Setup.exe文件,开始mysql的安装。出现下面的窗口

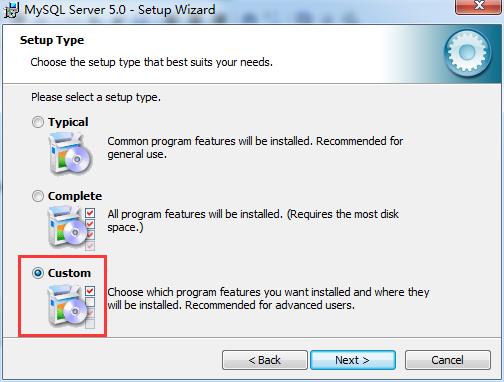
3、点击Next开始下一步安装。默认是Typical,选择Custom,(因为Typical模式不允许改变安装路径,只能安装在C盘)
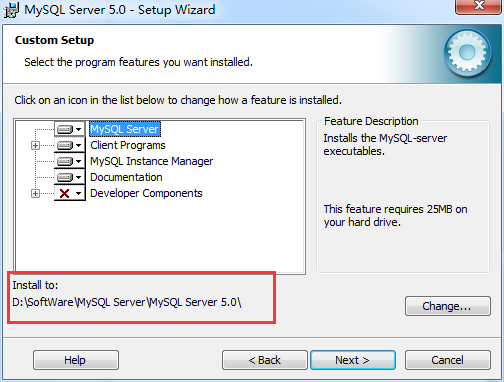
4、这里需要选择组件和更改文件夹位置,组件可以默认的,位置要选择Change来改变(
注意:安装mysql的路径中,不能含有中文)

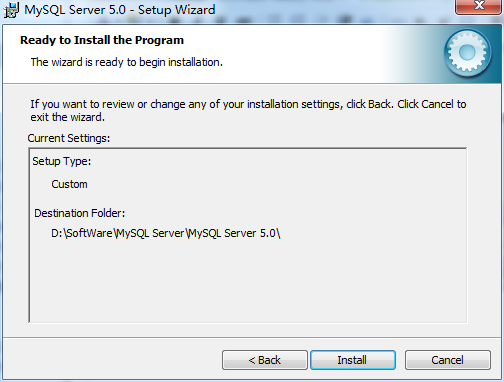
5、点击Install开始安装
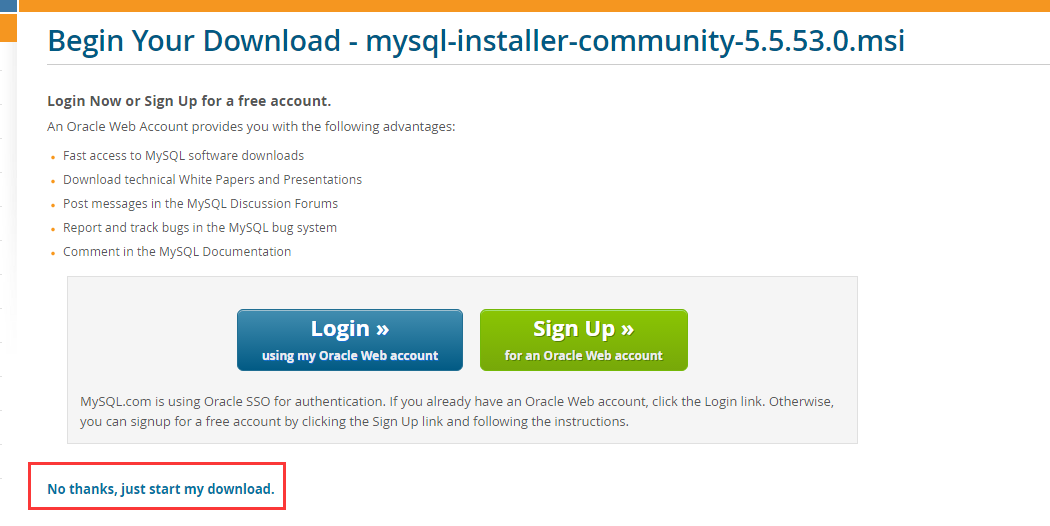
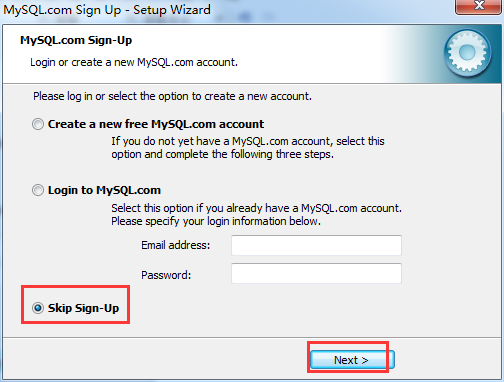
6、安装完成,看到下面。当然,我们选择“Skip Sign-Up”。
7、点击完成“Finsh”
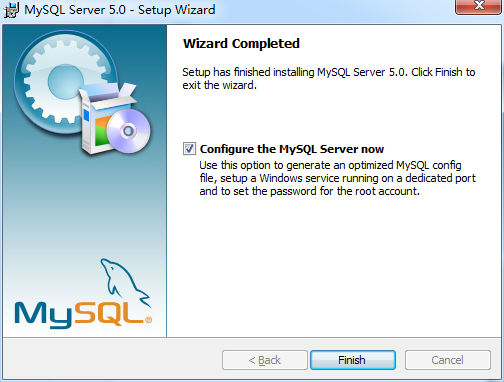
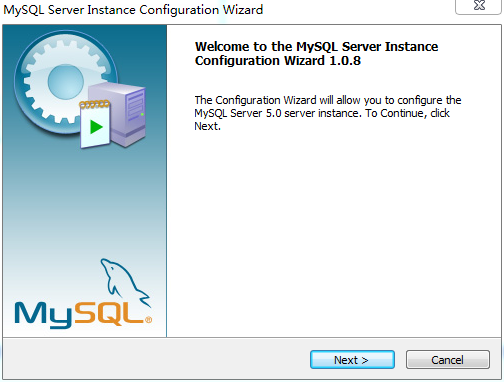
8、现在开始配置的工作了。点击Next继续。
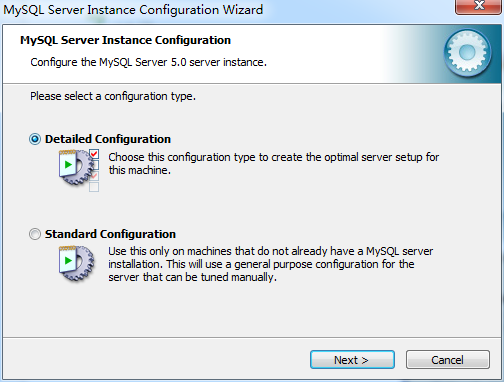
选择Detailed Configuration,点Next。
9、下面这个选项是选择mysql应用类型
(第一种是开发服务器,将只用尽量少的内存,第二种是普通WEB服务器,将使用中等数量内存,最后一种是这台服务器上面只跑mysql数据库,将占用全部的内存,)这里示例选择开发服务器,占用尽量少的内存,用户可根据自己的需求,选择其他选项。这里,选择“Developer machine”

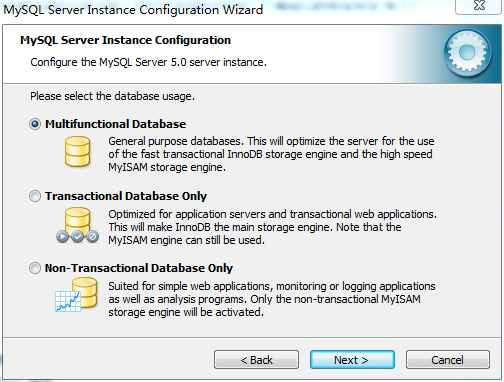
10、接下来选择数据库用途,
(第一种是多功能用途,将把数据库优化成很好的innodb存储类型和高效率的myisam存储类型,第二种是只用于事务处理类型,最好的优化innodb,但同时也支持myisam,最后一种是非事务处理类型,适合于简单的应用,只有不支持事务的myisam类型是被支持的。)一般选择第一种多功能。这里,选择“Multifunctional Database”。
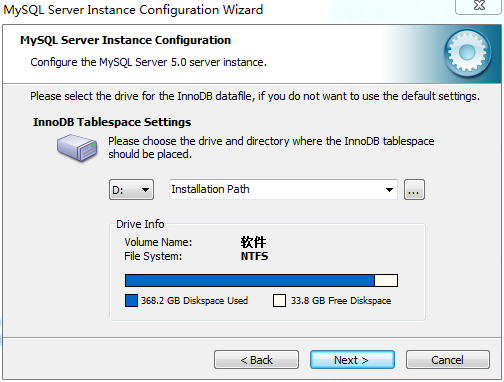
11、下面是选择数据存放位置,默认。 选择“Next”
12、选择mysql允许的最大连接数,第一种是最大20个连接并发数,第二种是最大500个并发连接数,最后一种是自定义,你可以根据自己的需要选择。
我这里,选择“Decision Support(DSS)/OLAP”。

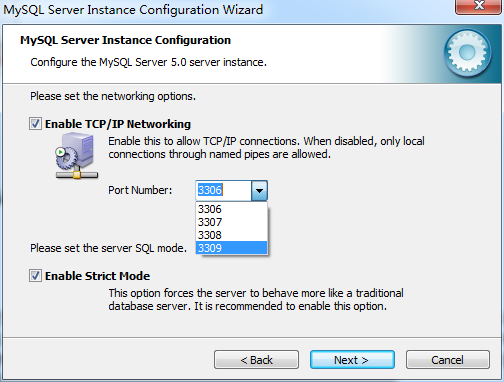
13、下面是选择数据库监听的端口,一般默认是3306,如果改成其他端口,以后连接数据库的时候都要记住修改的端口,否则不能连接mysql数据库,比较麻烦,这里不做修改,用mysq的默认端口:3306。接下来默认latin1。
但是呢,这里,
MySQL Workbench类型之MySQL客户端工具的下载、安装和使用
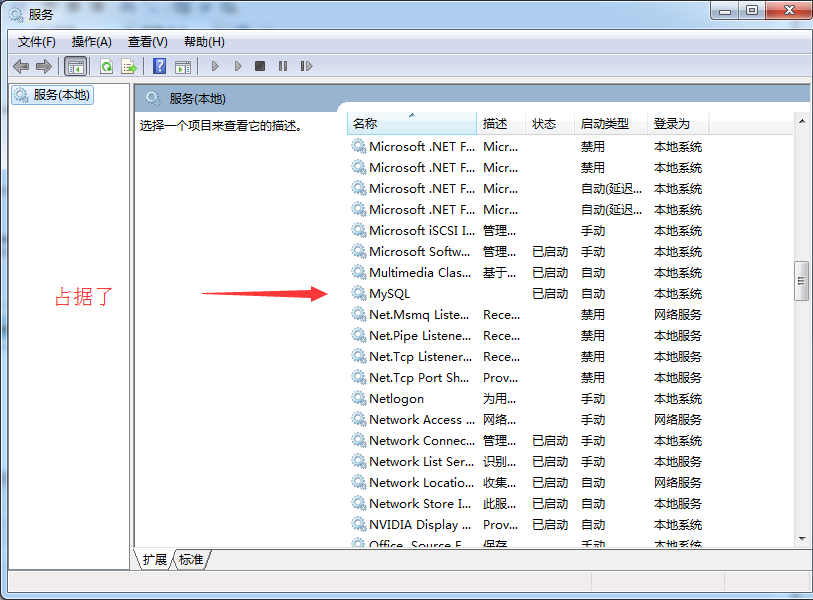
已经安装过一个MySQL客户端了。(它已经占据了3306端口)。
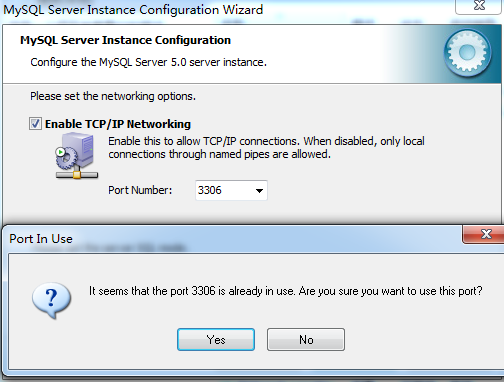
所以,这里,选择“”。
14、西文编码,第二个是多字节的通用utf8编码,都不是我们通用的编码,这里选择第三个,然后在Character Set那里选择或填入“gbk”,当然也可以用“gb2312”,区别就是gbk的字库容量大,包括了gb2312的所有汉字,并且加上了繁体字、和其它 乱七八糟的字——使用mysql的时候,在执行数据操作命令之前运行一次“SET NAMES GBK;”(运行一次就行了,GBK可以替换为其它值,视这里的设置而定),就可以正常的使用汉字(或其它文字)了,否则不能正常显示汉字。当然我们脚本 是utf8编码也可以在者选择,也可以在创建数据库的时候选择按 “Next”继续。

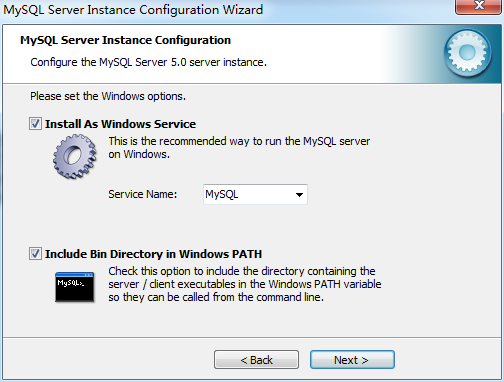
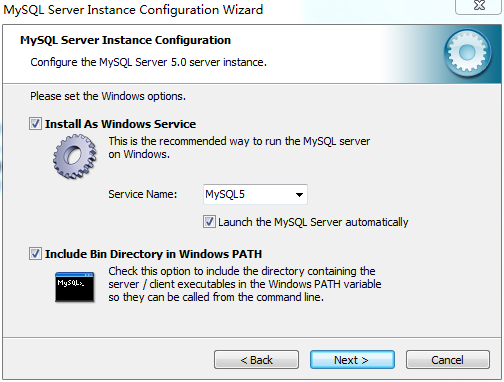
15、选择是否将mysql安装为windows服务,还可以指定Service Name(服务标识名称),是否将mysql的bin目录加入到Windows PATH(加入后,就可以直接使用bin下的文件,而不用指出目录名,比如连接,“mysql.exe -uusername -ppassword;”就可以了,不用指出mysql.exe的完整地址,很方便),我这里全部打上了勾,Service Name不变。按“Next”继续。选择是否将mysql安装为windows服务,还可以指定Service Name(服务标识名称),是否将mysql的bin目录加入到Windows PATH(加入后,就可以直接使用bin下的文件,而不用指出目录名,比如连接,“mysql.exe -uusername -ppassword;”就可以了,不用指出mysql.exe的完整地址,很方便),我这里全部打上了勾,Service Name改变。按“Next”继续。
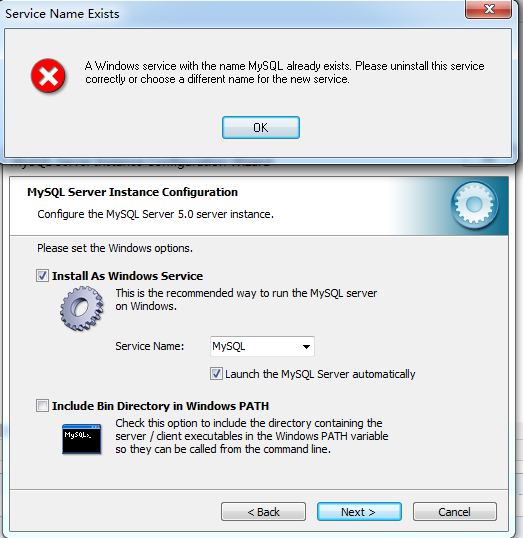
由于,
所以,这里选择“MySQL5”。
也是为了与MySQL Server 5.0方便对应!
16、这一步询问是否要修改默认root用户(超级管理)的密码(默认为空),“New root password”如果要修改,就在此填入新密码(如果是重装,并且之前已经设置了密码,在这里更改密码可能会出错,请留空,并将“Modify Security Settings”前面的勾去掉,安装配置完成后另行修改密码),“Confirm(再输一遍)”内再填一次,防止输错。 “Enable root access from remote machines(是否允许root用户在其它的机器上登陆,如果要安全,就不要勾上,如果要方便,就勾上它)”。最后“Create An Anonymous Account(新建一个匿名用户,匿名用户可以连接数据库,不能操作数据,包括查询)”,一般就不用勾了,设置完毕,按“Next”继续。

17、确认设置无误,如果有误,按“Back”返回检查。按“Execute”使设置生效。
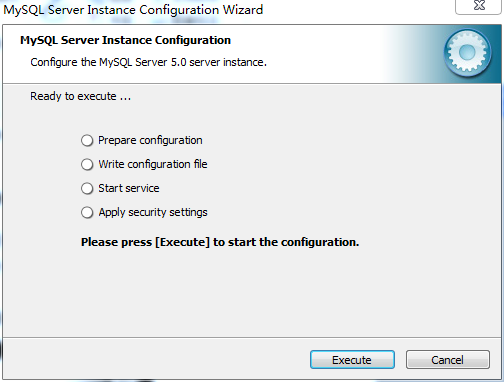
需要一段时间...
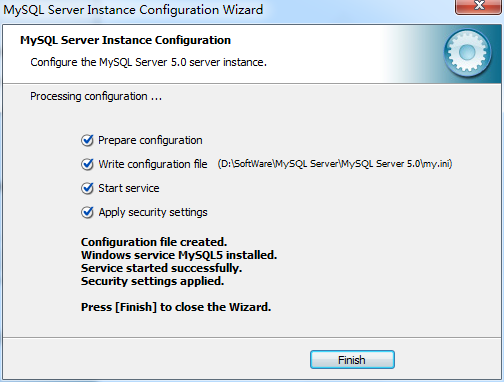
18、设置完毕,按“Finish”结束mysql的安装与配置——这里有一个比较常见的错误,就是不能“Start service”,一般出现在以前有安装mysql的服务器上, 解决的办法,先保证以前安装的mysql服务器彻底卸载掉了;不行的话,检查是否按上面一步所说,之前的密码是否有修改,照上面的操作;如果依然还是不行,将 mysql安装目录下的data文件夹备份,然后删除,在安装完成后,将安装生成的 data文件夹删除,备份的data文件夹移回来,再重启mysql服务就可以了,这种情况下,可能需要将数据库检查一下,然后修复一次,防止数据出错。
容易出现的问题:mysql 安装到最后一步时,start service 为失败状态。
- · 解决方法:
- 方式1 MySQL安装是出现could not start the service mysql error:0 提示错误,解决方法: 首 先,在管理工具->服务里面将MySQL的服务给停止,然后打开cmd 进入你的MySQL bin目录下,例如 C:\Program Files\MySQL\MySQL Server 5.0\bin 然后使用如下命令mysqld-nt -remove 然后就会显示......success! 好了下面进入添加删除程序,找到MySQL选择卸载,记得选择remove。最后将MySQL目录删除,还有数据库的目录也删除
- · 方式2
- 查看服务中有没有mysql,如果有将该服务停掉; 安装mysql 5.1.33,在运行Server Instance Configuration wizard时的Execute configurattion步骤中的第三项Start Service进出错,错误提示为Could not start the service MySQL (出现这种情况一般是因为装过mysql,卸载不干净造成的。卸载后重启后再重装。注意看下服务,如果未能卸载,可以用mysqld-nt -remove卸载)
- 在控制面板中运行添加删除程序,将mysql卸载; 卸载后打开注册表,查看
- HKEY_LOCAL_MACHINE\SYSTEM\CurrentControlSet\Services 下的键值,如果有相关mysql键值(mysql、mysqladmin)则删掉,即可;
- 重启,将mysql的安装残余目录删掉 (查看服务,此时服务中已没有mysql); 重新安装mysql.安装后先不要运行Server Instance Configuration wizard,重启后在开始菜单中运行该向导,即可
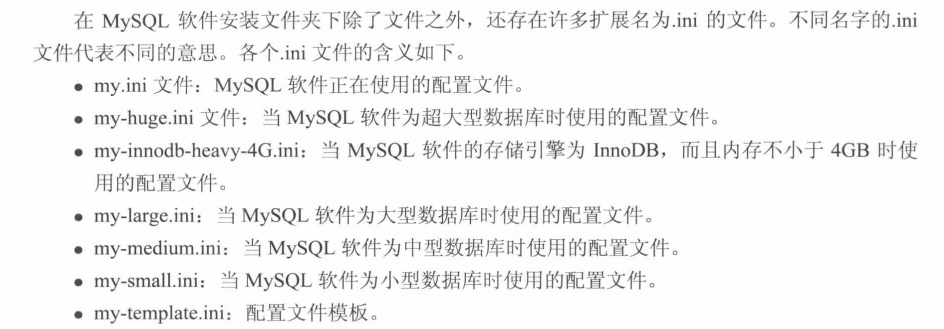
在这里啊,安装好MySQL 之后,默认生产的文件情况,如下:
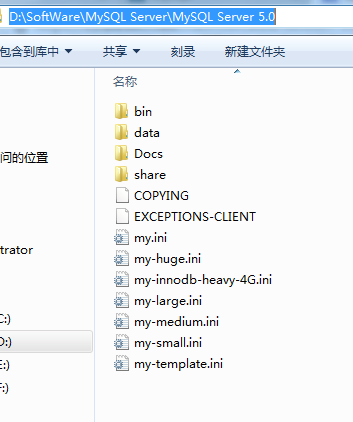
其中,


我这里,安装之后,默认产生的my.ini配置文件的内容如下:
# MySQL Server Instance Configuration File
# ----------------------------------------------------------------------
# Generated by the MySQL Server Instance Configuration Wizard
#
#
# Installation Instructions
# ----------------------------------------------------------------------
#
# On Linux you can copy this file to /etc/my.cnf to set global options,
# mysql-data-dir/my.cnf to set server-specific options
# (@localstatedir@ for this installation) or to
# ~/.my.cnf to set user-specific options.
#
# On Windows you should keep this file in the installation directory
# of your server (e.g. C:\Program Files\MySQL\MySQL Server X.Y). To
# make sure the server reads the config file use the startup option
# "--defaults-file".
#
# To run run the server from the command line, execute this in a
# command line shell, e.g.
# mysqld --defaults-file="C:\Program Files\MySQL\MySQL Server X.Y\my.ini"
#
# To install the server as a Windows service manually, execute this in a
# command line shell, e.g.
# mysqld --install MySQLXY --defaults-file="C:\Program Files\MySQL\MySQL Server X.Y\my.ini"
#
# And then execute this in a command line shell to start the server, e.g.
# net start MySQLXY
#
#
# Guildlines for editing this file
# ----------------------------------------------------------------------
#
# In this file, you can use all long options that the program supports.
# If you want to know the options a program supports, start the program
# with the "--help" option.
#
# More detailed information about the individual options can also be
# found in the manual.
#
#
# CLIENT SECTION
# ----------------------------------------------------------------------
#
# The following options will be read by MySQL client applications.
# Note that only client applications shipped by MySQL are guaranteed
# to read this section. If you want your own MySQL client program to
# honor these values, you need to specify it as an option during the
# MySQL client library initialization.
#
[client]
port=3309
[mysql]
default-character-set=latin1
# SERVER SECTION
# ----------------------------------------------------------------------
#
# The following options will be read by the MySQL Server. Make sure that
# you have installed the server correctly (see above) so it reads this
# file.
#
[mysqld]
# The TCP/IP Port the MySQL Server will listen on
port=3309
#Path to installation directory. All paths are usually resolved relative to this.
basedir="D:/SoftWare/MySQL Server/MySQL Server 5.0/"
#Path to the database root
datadir="D:/SoftWare/MySQL Server/MySQL Server 5.0/Data/"
# The default character set that will be used when a new schema or table is
# created and no character set is defined
default-character-set=latin1
# The default storage engine that will be used when create new tables when
default-storage-engine=INNODB
# Set the SQL mode to strict
sql-mode="STRICT_TRANS_TABLES,NO_AUTO_CREATE_USER,NO_ENGINE_SUBSTITUTION"
# The maximum amount of concurrent sessions the MySQL server will
# allow. One of these connections will be reserved for a user with
# SUPER privileges to allow the administrator to login even if the
# connection limit has been reached.
max_connections=100
# Query cache is used to cache SELECT results and later return them
# without actual executing the same query once again. Having the query
# cache enabled may result in significant speed improvements, if your
# have a lot of identical queries and rarely changing tables. See the
# "Qcache_lowmem_prunes" status variable to check if the current value
# is high enough for your load.
# Note: In case your tables change very often or if your queries are
# textually different every time, the query cache may result in a
# slowdown instead of a performance improvement.
query_cache_size=0
# The number of open tables for all threads. Increasing this value
# increases the number of file descriptors that mysqld requires.
# Therefore you have to make sure to set the amount of open files
# allowed to at least 4096 in the variable "open-files-limit" in
# section [mysqld_safe]
table_cache=256
# Maximum size for internal (in-memory) temporary tables. If a table
# grows larger than this value, it is automatically converted to disk
# based table This limitation is for a single table. There can be many
# of them.
tmp_table_size=5M
# How many threads we should keep in a cache for reuse. When a client
# disconnects, the client's threads are put in the cache if there aren't
# more than thread_cache_size threads from before. This greatly reduces
# the amount of thread creations needed if you have a lot of new
# connections. (Normally this doesn't give a notable performance
# improvement if you have a good thread implementation.)
thread_cache_size=8
#*** MyISAM Specific options
# The maximum size of the temporary file MySQL is allowed to use while
# recreating the index (during REPAIR, ALTER TABLE or LOAD DATA INFILE.
# If the file-size would be bigger than this, the index will be created
# through the key cache (which is slower).
myisam_max_sort_file_size=100G
# If the temporary file used for fast index creation would be bigger
# than using the key cache by the amount specified here, then prefer the
# key cache method. This is mainly used to force long character keys in
# large tables to use the slower key cache method to create the index.
myisam_max_extra_sort_file_size=100G
# If the temporary file used for fast index creation would be bigger
# than using the key cache by the amount specified here, then prefer the
# key cache method. This is mainly used to force long character keys in
# large tables to use the slower key cache method to create the index.
myisam_sort_buffer_size=8M
# Size of the Key Buffer, used to cache index blocks for MyISAM tables.
# Do not set it larger than 30% of your available memory, as some memory
# is also required by the OS to cache rows. Even if you're not using
# MyISAM tables, you should still set it to 8-64M as it will also be
# used for internal temporary disk tables.
key_buffer_size=8M
# Size of the buffer used for doing full table scans of MyISAM tables.
# Allocated per thread, if a full scan is needed.
read_buffer_size=64K
read_rnd_buffer_size=256K
# This buffer is allocated when MySQL needs to rebuild the index in
# REPAIR, OPTIMZE, ALTER table statements as well as in LOAD DATA INFILE
# into an empty table. It is allocated per thread so be careful with
# large settings.
sort_buffer_size=212K
#*** INNODB Specific options ***
# Use this option if you have a MySQL server with InnoDB support enabled
# but you do not plan to use it. This will save memory and disk space
# and speed up some things.
#skip-innodb
# Additional memory pool that is used by InnoDB to store metadata
# information. If InnoDB requires more memory for this purpose it will
# start to allocate it from the OS. As this is fast enough on most
# recent operating systems, you normally do not need to change this
# value. SHOW INNODB STATUS will display the current amount used.
innodb_additional_mem_pool_size=2M
# If set to 1, InnoDB will flush (fsync) the transaction logs to the
# disk at each commit, which offers full ACID behavior. If you are
# willing to compromise this safety, and you are running small
# transactions, you may set this to 0 or 2 to reduce disk I/O to the
# logs. Value 0 means that the log is only written to the log file and
# the log file flushed to disk approximately once per second. Value 2
# means the log is written to the log file at each commit, but the log
# file is only flushed to disk approximately once per second.
innodb_flush_log_at_trx_commit=1
# The size of the buffer InnoDB uses for buffering log data. As soon as
# it is full, InnoDB will have to flush it to disk. As it is flushed
# once per second anyway, it does not make sense to have it very large
# (even with long transactions).
innodb_log_buffer_size=1M
# InnoDB, unlike MyISAM, uses a buffer pool to cache both indexes and
# row data. The bigger you set this the less disk I/O is needed to
# access data in tables. On a dedicated database server you may set this
# parameter up to 80% of the machine physical memory size. Do not set it
# too large, though, because competition of the physical memory may
# cause paging in the operating system. Note that on 32bit systems you
# might be limited to 2-3.5G of user level memory per process, so do not
# set it too high.
innodb_buffer_pool_size=8M
# Size of each log file in a log group. You should set the combined size
# of log files to about 25%-100% of your buffer pool size to avoid
# unneeded buffer pool flush activity on log file overwrite. However,
# note that a larger logfile size will increase the time needed for the
# recovery process.
innodb_log_file_size=10M
# Number of threads allowed inside the InnoDB kernel. The optimal value
# depends highly on the application, hardware as well as the OS
# scheduler properties. A too high value may lead to thread thrashing.
innodb_thread_concurrency=10

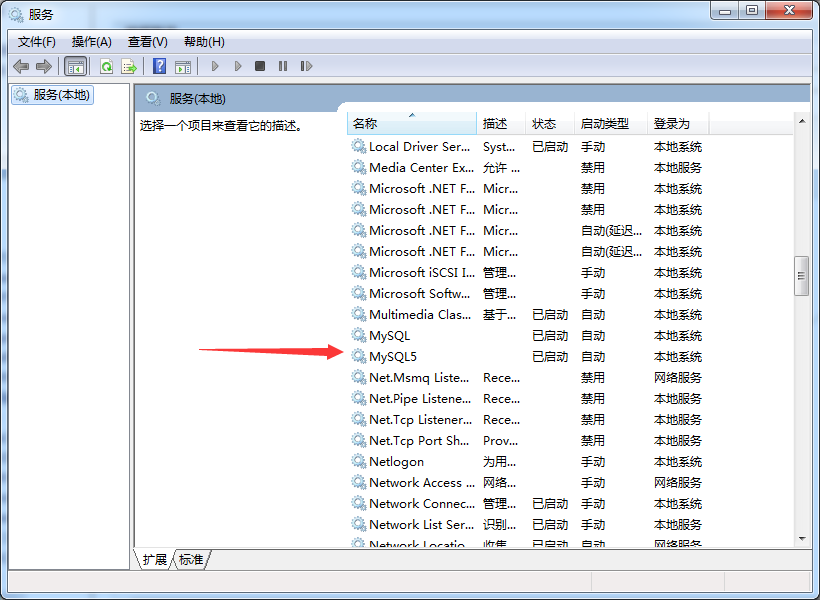
点击“Finish”按钮后,安装过程全部完成。这时可以发现,Windows的服务列表中已经增加了“MySQL5”这一选项。
可以通过启动、停止这个服务来启动和关闭MySQL。


3、MySQL Server 5.5系列的使用
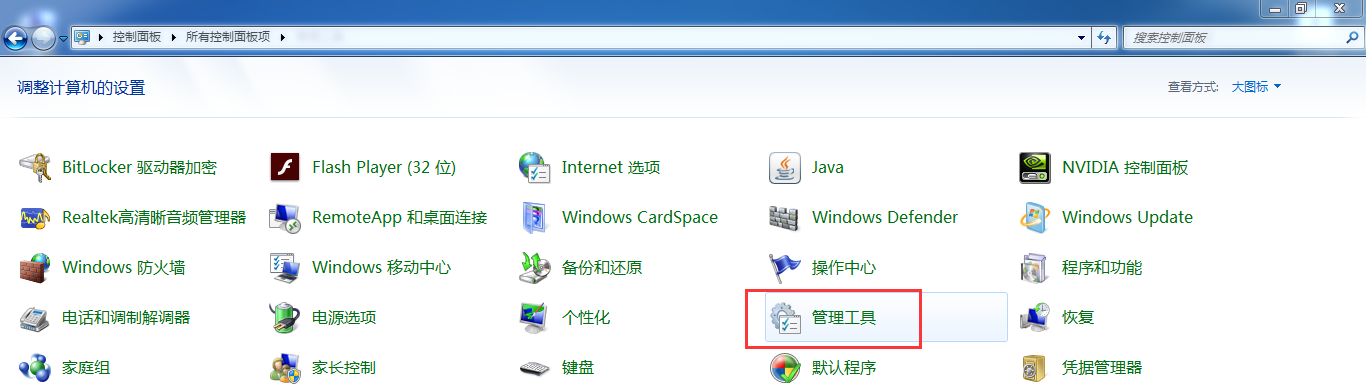
因为,这是对于采用图形化方式安装的MySQL,可以直接通过Windows的“开始”菜单 --> “控制面板” --> "管理工具" --> “服务”菜单。
来启动和关闭MySQL5。
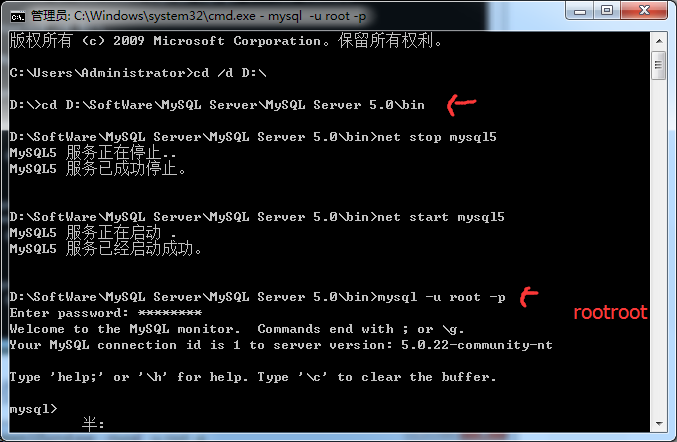
当然,也可以,通过命令行来,手工启动和关闭MySQL5服务。
这里,学会使用技巧,
在命令提示符(cmd)下怎样复制粘贴(详细版)
http://jingyan.baidu.com/article/1876c852bcab82890b13768f.html
版权所有 (c) 2009 Microsoft Corporation。保留所有权利。
C:\Users\Administrator>cd /d D:\
D:\>cd D:\SoftWare\MySQL Server\MySQL Server 5.0\bin
D:\SoftWare\MySQL Server\MySQL Server 5.0\bin>net stop mysql5 (默认开机,mysql5服务是启动的)
MySQL5 服务正在停止..
MySQL5 服务已成功停止。
D:\SoftWare\MySQL Server\MySQL Server 5.0\bin>net start mysql5
MySQL5 服务正在启动 .
MySQL5 服务已经启动成功。
D:\SoftWare\MySQL Server\MySQL Server 5.0\bin>mysql -u root -p
Enter password: ******** (rootroot)
Welcome to the MySQL monitor. Commands end with ; or \g.
Your MySQL connection id is 1 to server version: 5.0.22-community-nt
Type 'help;' or '\h' for help. Type '\c' to clear the buffer.
mysql>
Type 'help;' or '\h' for help. Type '\c' to clear the buffer.
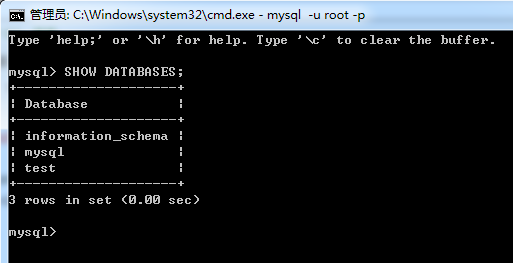
mysql> SHOW DATABASES;
+--------------------+
| Database |
+--------------------+
| information_schema |
| mysql |
| test |
+--------------------+
3 rows in set (0.00 sec)
mysql>
得到,默认,是以上的一些数据库。

4、MySQL Server 5.5系列的卸载

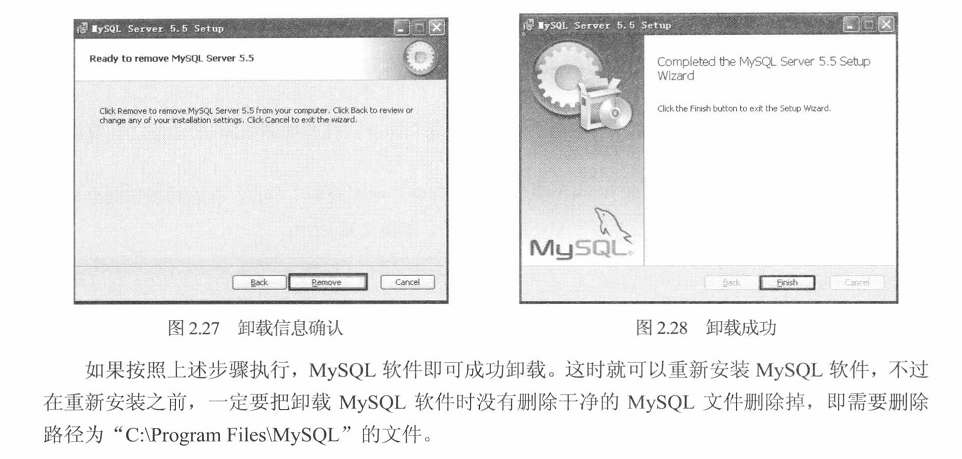
路径优点出入,自行对比参考。
感谢下面博主:
http://www.cnblogs.com/xiaoxiaojia/p/5366704.html
推荐书籍:


MySQL Server类型之MySQL客户端工具的下载、安装和使用(博主推荐)的更多相关文章
- MySQL Server类型之MySQL客户端工具的下载、安装和使用
本博文的主要内容有 .MySQL Server 5.5系列的下载 .MySQL Server 5.5系列的安装 .MySQL Server 5.5系列的使用 .MySQL Server 5.5系列的卸 ...
- MySQL Server类型的MySQL 客户端的下载、安装和使用
mysql server 5.5的下载 下载地址:https://dev.mysql.com/downloads/mysql/5.0.html#linux mysql server 5.5的安装 双击 ...
- Azkaban2.5安装部署(系统时区设置 + 安装和配置mysql + Azkaban Web Server 安装 + Azkaban Executor Server安装 + Azkaban web server插件安装 + Azkaban Executor Server 插件安装)(博主推荐)(五)
Azkaban是什么?(一) Azkaban的功能特点(二) Azkaban的架构(三) Hadoop工作流引擎之Azkaban与Oozie对比(四) 不多说,直接上干货! http://www.cn ...
- Navicat Premium之MySQL客户端的下载、安装和使用(博主推荐)
不多说,直接上干货! 前期工作 若需使用Navicat Premium,则需要先安装MySQL,在此就不叙述了.具体可见我的博客: MySQL Server类型之MySQL客户端工具的下载.安装和使用 ...
- PHP连接MySQL报错:SQLSTATE[HY000] [2002] Can't connect to local MySQL server through socket 'MySQL' (2)
如下所示,PHP连接MySQL报错: SQLSTATE[HY000] [2002] Can't connect to local MySQL server through socket 'MySQL' ...
- Failed to connect to MySQL server as DBD::mysql module is not installed 问题的解决
部署PXC ,卸了旧的MySQL perl-DBD-MySQL-4.013-3.el6.x86_64 这个包已经安装了,innobackup时一直在报错: Failed to connect to M ...
- Starting MySQL ERROR! Couldn't find MySQL server (/usr/local/mysql/bin/mysqld_safe)
centos7.5 安装mysql数据库报错 问题: [root@db04-54 scripts]# /etc/init.d/mysqld start /etc/init.d/mysqld: line ...
- percona innobackupex 遇到 connect to MySQL server as DBD::mysql module is not installed 问题
percona innobackupex connect to MySQL server as DBD::mysql module is not installed [root@mysql softw ...
- Redis安装教程及可视化工具RedisDesktopManager下载安装
Redis安装教程: 1. Windows下安装教程: 下载:https://github.com/MSOpenTech/redis/releases Redis 支持 32 位和 64 位.这个需要 ...
随机推荐
- 20145122 《Java程序设计》第8周学习总结
教材学习内容总结 1.NIO使用频道(channel)来衔接数据节点,对数据区的标记提供了clear(),rewind(),flip(),compact()等高级操作. 2.想要取得channel的操 ...
- 20145205 武钰 《网络对抗》Exp8 Web基础
一点题外话 本次实验我三号完成的,由于一些原因吧,一直没发博客,拖到了现在,这里说就是评判一下自己的懒惰. 实验后问题回答 (1)什么是表单 表单在网页中主要负责数据采集功能. 一个表单有三个基本组成 ...
- Android实践项目汇报(三)
Google天气客户端 本周学习计划 调试代码使之成功运行并实现天气预报功能. 实际完成情况 由于google取消api接口服务,天气源的传输.所以我换了一个使用 haoserver API接口的程序 ...
- 平衡树之伸展树(Splay Tree)题目整理
目录 前言 练习1 BZOJ 3224 普通平衡树 练习2 BZOJ 3223 文艺平衡树 练习3 BZOJ 1588 [HNOI2002]营业额统计 练习4 BZOJ 1208 [HNOI2004] ...
- Luogu P1533 可怜的狗狗
题目链接:https://www.luogu.org/problemnew/show/P1533 没人写$fhq\ treap$做法,那我就补一篇qwq 看到这题第一时间想主席树,然后发现我还没学主席 ...
- 前端验证用户登陆状态(vue.js)
首先用户需要进行登陆(请求登陆接口),接口请求成功之后后台会返回对应的用户信息(可以把用户信息存放在浏览器缓存中),并且后台会设置浏览器的cookie值(可以在network->header-& ...
- hdu 1005 矩阵快速幂
#include<iostream> #include<cstdio> #include<cmath> #include<string> #includ ...
- Jmeter 抓app包 抓到一半不好用了
错误描述: java.net.ConnectException: Connection refused (Connection refused) at java.net.PlainSocketImpl ...
- SetCommMask
SetCommMask 用途:设置串口通信事件 原型:BOOL SetCommMask(HANDLE hFile, //标识通信端口的句柄 DWORD dwEvtMask ...
- VC6的VCVARS32.BAT所在位置
1. C:\Program Files (x86)\Microsoft Visual Studio\VC98\Bin\VCVARS32.BAT 2.