
C#Windows Service服务程序的安装/卸载、启动/停止 桌面客户端管理程序设计
C#Windows Service服务程序的安装/卸载、启动/停止 桌面客户端管理程序设计
关于Windows Service程序的安装与卸载如果每次使用命令行操作,那简直要奔溃了,太麻烦而且还容易出错
那么如果你只是用一次就不用了那么命令行业无所谓
关于Windows Service程序的创建可以参考上一篇
C#Windows Service程序的创建安装与卸载
一、命令行安装与卸载
安装服务:
installutil.exe filename
卸载服务:
installutil.exe /u filename
安装服务程序
因为Installutil.exe程序在 C:\Windows\Microsoft.NET\Framework64\v4.0.30319\ 目录下,需要通过cmd命令 "cd" 切换目录。v4.0.30319是编译该Windows Service程序的版本(自己选择对应的版本)
二、开发环境
操作系统:Windows7x64 sp1 专业版
开发环境:Visual studio 2013
编程语言:C#
.NET版本: .NET Frmework 4.0
三、新建一个客户端程序进行安装/卸载、启动/停止
1.新建一个WinForm窗体应用程序起名为Windows Service Client
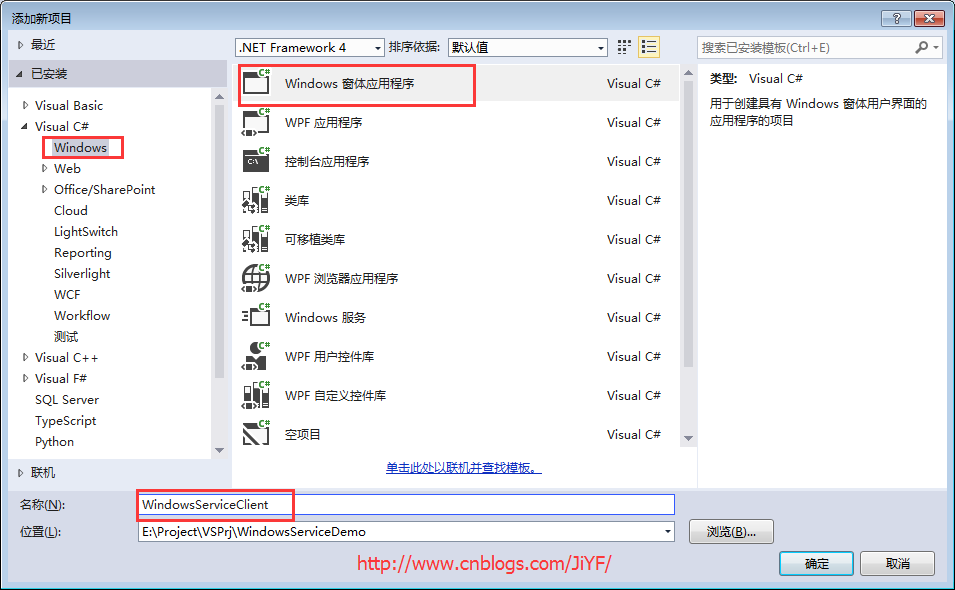
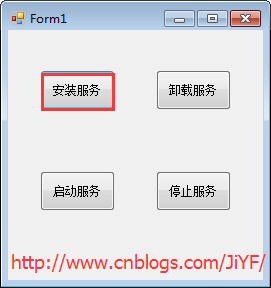
2.添加四个按钮分别为安装服务/卸载服务、启动服务/停止服务
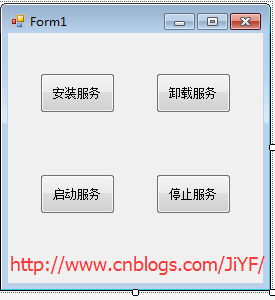
3.引入俩个命名空间引用“System.ServiceProcess”及“System.Configuration.Install”
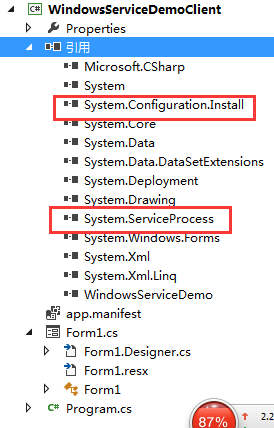
4.编写代码如下
         string serviceFilePath = Environment.CurrentDirectory + "\\WindowsServiceDemo.exe";

         //string serviceFilePath = $"{Application.StartupPath}\\MyWindowsService.exe";

         string serviceName = "ServiceDemo";

         public Form1()

         {

             InitializeComponent();

         }

         /// <summary>

         /// 安装服务

         /// </summary>

         /// <param name="sender"></param>

         /// <param name="e"></param>

         private void button1_Click(object sender, EventArgs e)

         {

             if (this.IsServiceExisted(serviceName))

             {

                 this.UninstallService(serviceName);

             }

             this.InstallService(serviceFilePath);

         }

         /// <summary>

         /// 卸载服务

         /// </summary>

         /// <param name="sender"></param>

         /// <param name="e"></param>

         private void button2_Click(object sender, EventArgs e)

         {

             if (this.IsServiceExisted(serviceName))

             {

                 this.ServiceStop(serviceName);

                 this.UninstallService(serviceFilePath);

             }

         }

         /// <summary>

         /// 启动服务程序

         /// </summary>

         /// <param name="sender"></param>

         /// <param name="e"></param>

         private void button3_Click(object sender, EventArgs e)

         {

             if (this.IsServiceExisted(serviceName))

             {

                 this.ServiceStart(serviceName);

             }

         }

         /// <summary>

         /// 停止服务程序

         /// </summary>

         /// <param name="sender"></param>

         /// <param name="e"></param>

         private void button4_Click(object sender, EventArgs e)

         {

             if (this.IsServiceExisted(serviceName))

             {

                 this.ServiceStop(serviceName);

             }

         }

         /// <summary>

         /// 判断服务是否存在

         /// </summary>

         /// <param name="serviceName"></param>

         /// <returns></returns>

         private bool IsServiceExisted(string serviceName)

         {

             ServiceController[] services = ServiceController.GetServices();

             foreach (ServiceController sc in services)

             {

                 if (sc.ServiceName.ToLower() == serviceName.ToLower())

                 {

                     return true;

                 }

             }

             return false;

         }

         /// <summary>

         /// 安装服务

         /// </summary>

         /// <param name="serviceFilePath"></param>

         private void InstallService(string serviceFilePath)

         {

             using (AssemblyInstaller installer = new AssemblyInstaller())

             {

                 installer.UseNewContext = true;

                 installer.Path = serviceFilePath;

                 IDictionary savedState = new Hashtable();

                 installer.Install(savedState);

                 installer.Commit(savedState);

             }

         }

         /// <summary>

         /// 卸载服务

         /// </summary>

         /// <param name="serviceFilePath"></param>

         private void UninstallService(string serviceFilePath)

         {

             using (AssemblyInstaller installer = new AssemblyInstaller())

             {

                 installer.UseNewContext = true;

                 installer.Path = serviceFilePath;

                 installer.Uninstall(null);

             }

         }

         /// <summary>

         /// 启动服务

         /// </summary>

         /// <param name="serviceName"></param>

         private void ServiceStart(string serviceName)

         {

             using (ServiceController control = new ServiceController(serviceName))

             {

                 if (control.Status == ServiceControllerStatus.Stopped)

                 {

                     control.Start();

                 }

             }

         }

         /// <summary>

         /// 停止服务

         /// </summary>

         /// <param name="serviceName"></param>

         private void ServiceStop(string serviceName)

         {

             using (ServiceController control = new ServiceController(serviceName))

             {

                 if (control.Status == ServiceControllerStatus.Running)

                 {

                     control.Stop();

                 }

             }

         }
5.引入WindowsServerDemo程序到本项目中便于安装等
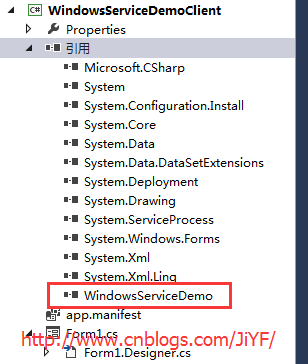
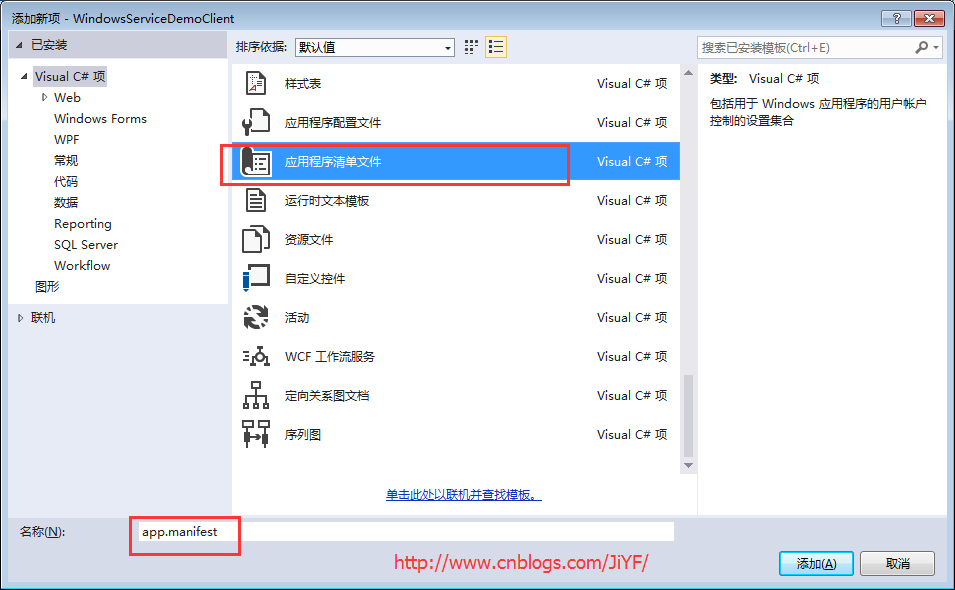
6.由于需要安装服务,故需要使用UAC中Administrator的权限,鼠标右击项目“WindowsServiceClient”,在弹出的上下文菜单中选择“添加”->“新建项”,在弹出的选择窗体中选择“应用程序清单文件”并单击确定,如下图所示:
7.打开该文件,并将<requestedExecutionLevel level="asInvoker" uiAccess="false" />改为<requestedExecutionLevel level="requireAdministrator" uiAccess="false" />
         <!--修改前

         <requestedExecutionLevel level="asInvoker" uiAccess="false" />

         -->

         <!--修改后-->

         <requestedExecutionLevel level="requireAdministrator" uiAccess="false" />
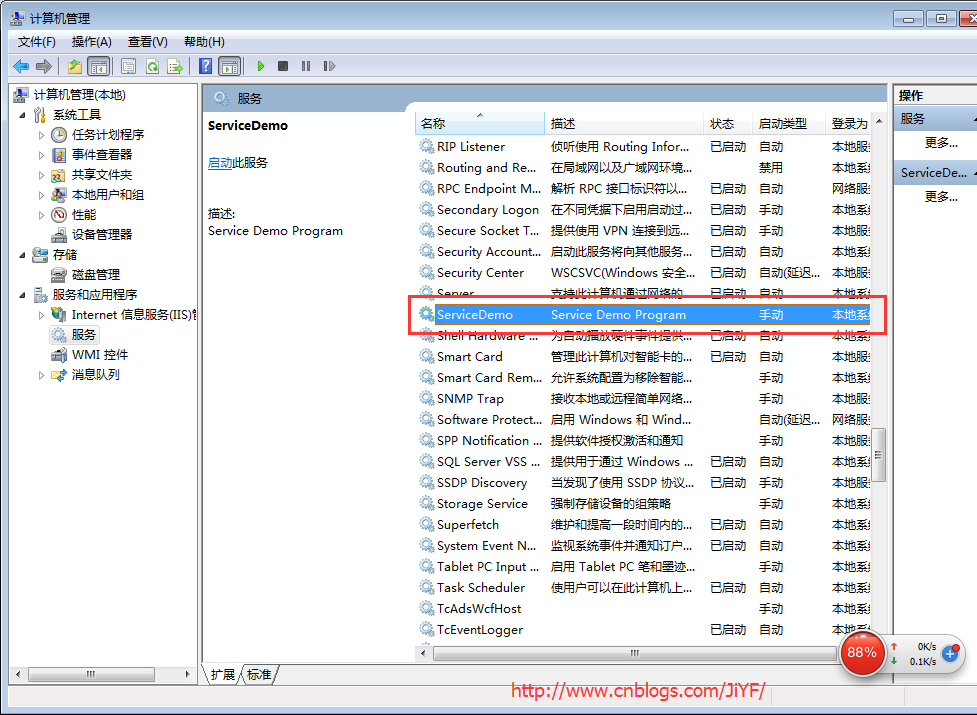
8.启动程序记住(Visual studio 2013也得用管理员身份运行),顺便开启计算机->管理-->服务来查看
分别单击测试安装服务,启动服务,停止服务,卸载服务,分别查看服务列表
服务列表
源代码工程文件下载
参考博客:https://www.cnblogs.com/mq0036/p/7875864.html
C#Windows Service服务程序的安装/卸载、启动/停止 桌面客户端管理程序设计的更多相关文章
- windows Service程序的安装、启动、卸载命令
安装:%SystemRoot%\Microsoft.NET\Framework\v4.0.30319\installutil.exe ServiceTest.exe 启动:Net Start serv ...
- 通过批处理进行Windows服务的安装/卸载&启动/停止
安装服务 @echo off set checked=2 set PATHS=%~sdp0 echo 按任意键执行安装……? pause>nul if %checked% EQU 2 ( %PA ...
- python实现windows Service服务程序
python实现windows Service服务程序 win32serviceutil.ServiceFramework是封装得很好的Windows服务框架,本文通过继承它来实现. 通过SvcDoR ...
- 使用Advanced Installer 13.1打包发布 Windows Service服务程序
原文: 使用Advanced Installer 13.1打包发布 Windows Service服务程序 项目中需要用到一个定时推送案件状态的需求,本人小菜一只,在同事建议下要写成一个windows ...
- Windows下的Nessus安装与启动
Windows下的Nessus安装与启动 一.安装 在https://www.tenable.com/downloads/nessus下载对应windows版本 双击安装,完成后,访问 https:/ ...
- windows service 2008 R2 安装net4.6环境失败,windows service 2008 R2 升级sp1问题
一.错误 1.因为我的程序是以vs2017开发的,在windows service 2008 R2 IIS部署项目文件报出错误,因此要安装net4.6的环境. 2.windows service 2 ...
- redis的安装部署启动停止<17.3.21已更新>
--------------------------------------------------------- 启动redis时使用下面两条命令: redis-server /etc/redis. ...
- 使用Python写Windows Service服务程序
1.背景 如果你想用Python开发Windows程序,并让其开机启动等,就必须写成windows的服务程序Windows Service,用Python来做这个事情必须要借助第三方模块pywin32 ...
- mariaDB 安装/卸载+启动/关闭 服务
1.设置环境变量 无论是用户环境变量还是系统环境变量 2.启动服务 进入根目录 名字根据 --install 后的 参数来决定 叫MariaDB,MySQL 都可以 mysqld.exe --inst ...
随机推荐
- ‘百度杯’十月场web ---login
首先一看的题,既然是是web类的,就要查看源码,一看,最先有一行注释,估摸着是用户名和密码 果然登录上去了,显示一段乱码,源码也没有什么东西, 那就抓一次包吧 发现响应头里边有个show:0的响应,而 ...
- RS485 VS 20mA 电流环
RS485采用差分信号负逻辑,+2V-+6V表示“0”,- 6V-- 2V表示“1”.RS485有两线制和四线制两种接线,四线制只能实现点对点的通信方式,现很少采用,现在多采用的是两线制接线方式,这种 ...
- jQuery鼠标悬停3d菜单展开动画
效果体验:http://hovertree.com/texiao/jquery/93/ 竖直的主菜单贴着页面左侧,当光标移入菜单项时,以3D动画的方式弹出对应的二级菜单.采用jQuery和CSS3实现 ...
- 使用ScriptableObject创建.asset文件
.asset一般用来存储一些配置,比如SDK初始化的相关参数. using System.Collections.Generic; using UnityEngine; namespace XXX { ...
- Creating an LMDB database in Python
LMDB is the database of choice when using Caffe with large datasets. This is a tutorial of how to cr ...
- MUI框架开发HTML5手机APP(二)--页面跳转传值&底部选项卡切换
概 述 JRedu 在上一篇博客中,我们学习了如何使用Hbuilder创建一个APP,同时如何使用MUI搭建属于自己的第一款APP,没有学习的同学可以戳链接学习: http://www.cnblo ...
- 命令 上传项目到git中
点击Clone or dowload会出现一个地址,copy这个地址备用. 接下来就到本地操作了,首先右键你的项目,如果你之前安装git成功的话,右键会出现两个新选项,分别为Git Gui Here, ...
- 【Google设计冲刺】一种适合于创新小组的协作方式
传统的产品闭环是1.产品策划-2.研发-3.上线-4.等待市场反馈,4个步骤.对于一个创新项目来说,试错成本过高,等待周期过长[注释1].那么,有没有一种适合创新项目的协作方式呢?谷歌风投杰克·纳普发 ...
- 【MAC】Mac下部分常用的小工具
Homebrew: 官方介绍:The missing package manager for OS X(OS X 不可或缺的套件管理器) /usr/bin/ruby -e "$(curl - ...
- CentOS7 安装FastDFS分布式文件系统
CentOS7 安装FastDFS分布式文件系统 最近要用到fastDFS,所以自己研究了一下,在搭建FastDFS的过程中遇到过很多的问题,为了能帮忙到以后搭建FastDFS的同学,少走弯路,与大家 ...