
互联网同步yum服务器,中科大 rsync createrepo
参考文章
https://blog.csdn.net/chenjia6605/article/details/82734945
1、本机安装所需工具:
yum -y install rsync createrepo
2、创建目录(位置随意):
(1)、centos仓库目录,centosplus可以不同步,一般用不到:
mkdir -p /storage/repos/centos/7/{os,updates,extras,centosplus}/x86_64
(2)、epel仓库目录:
mkdir -p /storage/repos/epel/7/x86_64
#如果需要EPEL软件的源码,请同时创建以下目录
mkdir -p /storage/repos/epel/7/SRPMS/
3、同步远程镜像(该过程需要很长时间,与你的外网带宽有关,如果你需要将centos的官方资源和epel资源都同步的话,则至少需要80G的磁盘空间,为了避免走弯路,磁盘分区的时候要考虑一下存放rpm包目录被挂载的大小)
以下为我做完centos官方资源和epel资源之后磁盘使用情况
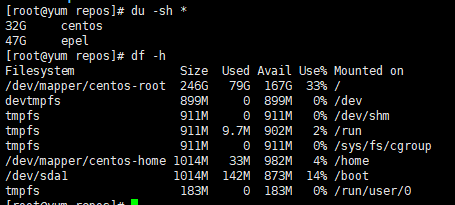
#同步centos官方资源
rsync -avz --delete --exclude='repodata' rsync://mirrors.ustc.edu.cn/centos/7/os/x86_64/ /storage/repos/centos/7/os/x86_64/
rsync -avz --delete --exclude='repodata' rsync://mirrors.ustc.edu.cn/centos/7/updates/x86_64/ /storage/repos/centos/7/updates/x86_64/
rsync -avz --delete --exclude='repodata' rsync://mirrors.ustc.edu.cn/centos/7/extras/x86_64/ /storage/repos/centos/7/extras/x86_64/
rsync -avz --delete --exclude='repodata' rsync://mirrors.ustc.edu.cn/centos/7/centosplus/x86_64/ /storage/repos/centos/7/centosplus/x86_64/
#同步epel资源(不知道是rsync本身的事还是中科大对epel源的速度做了限制,上面同步centos官方源的资源的时候速度很快,基本上能达到本地网络的包和带宽,但是同步epel资源的时候,速度极慢,如果哪位大牛有更快的方法可以在评论区教一下小弟我)
rsync -avz --delete --exclude='repodata' rsync://mirrors.ustc.edu.cn/epel/7/x86_64/ /storage/repos/epel/7/x86_64/
rsync -avz --delete --exclude='repodata' rsync://mirrors.ustc.edu.cn/epel/7/SRPMS/ /storage/repos/epel/7/SRPMS/
#同步gpgkey
rsync -avz --delete --exclude='repodata' rsync://mirrors.ustc.edu.cn/centos/RPM-GPG-KEY-CentOS-7 /storage/repos/centos/
---------------------
创建索引centos官方包的索引
createrepo /storage/repos/centos/7/os/x86_64/
createrepo /storage/repos/centos/7/updates/x86_64/
createrepo /storage/repos/centos/7/extras/x86_64/
createrepo /storage/repos/centos/7/centosplus/x86_64/
epel扩展源索引
createrepo /storage/repos/epel/7/x86_64/
createrepo /storage/repos/epel/7/SRPMS/
5、同步脚本,如果你的服务器一直连接外网可以配置在定时任务里,定期与远程镜像保持同步:
vi /etc/cron.daily/update-repos
#脚本内容开始
# create new
#!/bin/bash
VER='7'
ARCH='x86_64'
CENTOS_REPOS=(os updates extras centosplus)
#同步centos镜像
for REPO in ${CENTOS_REPOS[@]}
do
rsync -avz --delete --exclude='repodata' rsync://mirrors.ustc.edu.cn/centos/${VER}/${CENTOS_REPOS}/${ARCH}/ /storage/repos/centos/${VER}/${CENTOS_REPOS}/${ARCH}/
createrepo /storage/repos/centos/${VER}/${CENTOS_REPOS}/${ARCH}/
done
#同步gpgkey
rsync -avz --delete --exclude='repodata' rsync://mirrors.ustc.edu.cn/centos/RPM-GPG-KEY-CentOS-7 /storage/repos/centos/
#同步epel镜像
rsync -avz --delete --exclude='repodata' rsync://mirrors.ustc.edu.cn/epel/7/x86_64/ /storage/repos/epel/7/x86_64/
createrepo /storage/repos/epel/7/x86_64/
#如果需要epel软件的源码,同步epel软件源码仓库
#rsync -avz --delete --exclude='repodata' rsync://mirrors.ustc.edu.cn/epel/7/SRPMS/ /storage/repos/epel/7/SRPMS/
#createrepo /storage/repos/epel/7/SRPMS/
#同步gpgkey
rsync -avz --delete --exclude='repodata' rsync://mirrors.ustc.edu.cn/epel/RPM-GPG-KEY-EPEL-7 /storage/repos/epel/
# wq 保存退出后,给脚本赋予可执行权限
# chmod 755 /etc/cron.daily/update-repo
#脚本内容结束
6、安装nginx
yum install -y nginx
以下为nginx.conf配置文件的内容
#nginx.conf内容开始
# For more information on configuration, see:
# * Official English Documentation: http://nginx.org/en/docs/
# * Official Russian Documentation: http://nginx.org/ru/docs/
user nginx;
worker_processes auto;
error_log /var/log/nginx/error.log;
pid /run/nginx.pid;
# Load dynamic modules. See /usr/share/nginx/README.dynamic.
include /usr/share/nginx/modules/*.conf;
events {
worker_connections 1024;
}
http {
log_format main '$remote_addr - $remote_user [$time_local] "$request" '
'$status $body_bytes_sent "$http_referer" '
'"$http_user_agent" "$http_x_forwarded_for"';
access_log /var/log/nginx/access.log main;
sendfile on;
tcp_nopush on;
tcp_nodelay on;
keepalive_timeout 65;
types_hash_max_size 2048;
include /etc/nginx/mime.types;
default_type application/octet-stream;
# Load modular configuration files from the /etc/nginx/conf.d directory.
# See http://nginx.org/en/docs/ngx_core_module.html#include
# for more information.
include /etc/nginx/conf.d/*.conf;
server {
listen 80 default_server;
listen [::]:80 default_server;
server_name _;
root /storage/repos; #此处为网站根目录,请指向以上创建的repos目录
# Load configuration files for the default server block.
include /etc/nginx/default.d/*.conf;
location / {
autoindex on; #打开目录浏览功能
autoindex_exact_size off; # off:以可读的方式显示文件大小
autoindex_localtime on; # on、off:是否以服务器的文件时间作为显示的时间
charset utf-8,gbk; #展示中文文件名
index index.html;
}
error_page 404 /404.html;
location = /40x.html {
}
error_page 500 502 503 504 /50x.html;
location = /50x.html {
}
}
# Settings for a TLS enabled server.
#
# server {
# listen 443 ssl http2 default_server;
# listen [::]:443 ssl http2 default_server;
# server_name _;
# root /usr/share/nginx/html;
#
# ssl_certificate "/etc/pki/nginx/server.crt";
# ssl_certificate_key "/etc/pki/nginx/private/server.key";
# ssl_session_cache shared:SSL:1m;
# ssl_session_timeout 10m;
# ssl_ciphers HIGH:!aNULL:!MD5;
# ssl_prefer_server_ciphers on;
#
# # Load configuration files for the default server block.
# include /etc/nginx/default.d/*.conf;
#
# location / {
# }
#
# error_page 404 /404.html;
# location = /40x.html {
# }
#
# error_page 500 502 503 504 /50x.html;
# location = /50x.html {
# }
# }
}
#nginx.conf内容结束
7、测试nginx
重启nginx服务
systemctl restart nginx.service
之后使用其他主机的浏览器连接该主机的80端口,能够看到yum源的目录即可,如果无法访问,请检查防火墙,selinux等,和nginx.conf。
8、客户端配置
修改客户端的repo文件内容
repo文件位于/etc/yum.repos.d/下
以下为CentOS-Base.repo文件的全部内容,也可以删除所有注释行,仅保留生效的代码,也可以仅使用绝对路径的url连接
#CentOS-Base.repo文件内容开始
# CentOS-Base.repo
#
# The mirror system uses the connecting IP address of the client and the
# update status of each mirror to pick mirrors that are updated to and
# geographically close to the client. You should use this for CentOS updates
# unless you are manually picking other mirrors.
#
# If the mirrorlist= does not work for you, as a fall back you can try the
# remarked out baseurl= line instead.
#
#
[base]
name=CentOS-$releasever - Base
#mirrorlist=http://mirrorlist.centos.org/?release=$releasever&arch=$basearch&repo=os&infra=$infra
#baseurl=http://mirror.centos.org/centos/$releasever/os/$basearch/
baseurl=http://192.168.197.40/centos/$releasever/os/$basearch/
gpgcheck=1
#gpgkey=file:///etc/pki/rpm-gpg/RPM-GPG-KEY-CentOS-7
gpgkey=http://192.168.197.40/centos/RPM-GPG-KEY-CentOS-7
#released updates
[updates]
name=CentOS-$releasever - Updates
#mirrorlist=http://mirrorlist.centos.org/?release=$releasever&arch=$basearch&repo=updates&infra=$infra
#baseurl=http://mirror.centos.org/centos/$releasever/updates/$basearch/
baseurl=http://192.168.197.40/centos/$releasever/updates/$basearch/
gpgcheck=1
#gpgkey=file:///etc/pki/rpm-gpg/RPM-GPG-KEY-CentOS-7
gpgkey=http://192.168.197.40/centos/RPM-GPG-KEY-CentOS-7
#additional packages that may be useful
[extras]
name=CentOS-$releasever - Extras
#mirrorlist=http://mirrorlist.centos.org/?release=$releasever&arch=$basearch&repo=extras&infra=$infra
#baseurl=http://mirror.centos.org/centos/$releasever/extras/$basearch/
baseurl=http://192.168.197.40/centos/$releasever/extras/$basearch/
gpgcheck=1
#gpgkey=file:///etc/pki/rpm-gpg/RPM-GPG-KEY-CentOS-7
gpgkey=http://192.168.197.40/centos/RPM-GPG-KEY-CentOS-7
#additional packages that extend functionality of existing packages
[centosplus]
name=CentOS-$releasever - Plus
#mirrorlist=http://mirrorlist.centos.org/?release=$releasever&arch=$basearch&repo=centosplus&infra=$infra
#baseurl=http://mirror.centos.org/centos/$releasever/centosplus/$basearch/
baseurl=http://192.168.197.40/centos/$releasever/centosplus/$basearch/
gpgcheck=1
enabled=1
#gpgkey=file:///etc/pki/rpm-gpg/RPM-GPG-KEY-CentOS-7
gpgkey=http://192.168.197.40/centos/RPM-GPG-KEY-CentOS-7
[epel]
name=Extra Packages for Enterprise Linux 7 - $basearch
#baseurl=http://download.fedoraproject.org/pub/epel/7/$basearch
#metalink=https://mirrors.fedoraproject.org/metalink?repo=epel-7&arch=$basearch
baseurl=http://192.168.197.40/epel/7/$basearch
failovermethod=priority
enabled=1
gpgcheck=1
#gpgkey=file:///etc/pki/rpm-gpg/RPM-GPG-KEY-EPEL-7
gpgkey=http://192.168.197.40/epel/RPM-GPG-KEY-EPEL-7
[epel-debuginfo]
name=Extra Packages for Enterprise Linux 7 - $basearch - Debug
#baseurl=http://download.fedoraproject.org/pub/epel/7/$basearch/debug
#metalink=https://mirrors.fedoraproject.org/metalink?repo=epel-debug-7&arch=$basearch
baseurl=http://192.168.197.40/epel/7/$basearch/debug
failovermethod=priority
enabled=0 #此项1表示开启,0表示关闭
#gpgkey=file:///etc/pki/rpm-gpg/RPM-GPG-KEY-EPEL-7
gpgkey=http://192.168.197.40/epel/RPM-GPG-KEY-EPEL-7
gpgcheck=1
[epel-source] #如果已同步SRPMS仓库,请取消该配置注释
name=Extra Packages for Enterprise Linux 7 - $basearch - Source
#baseurl=http://download.fedoraproject.org/pub/epel/7/SRPMS
#metalink=https://mirrors.fedoraproject.org/metalink?repo=epel-source-7&arch=$basearch
baseurl=http://192.168.197.40/epel/7/SRPMS
failovermethod=priority
enabled=1
#gpgkey=file:///etc/pki/rpm-gpg/RPM-GPG-KEY-EPEL-7
gpgkey=http://192.168.197.40/epel/RPM-GPG-KEY-EPEL-7
gpgcheck=1
#CentOS-Base.repo文件内容结束
或者使用以下脚本
把脚本里面的IP地址更改为实际的IP地址即可,如果epel要开启gpg检查的话,对应的需要去中科大镜像站下载检查文件,放到对应的目录中,如果不检查gpg的话,那么直接将gpgcheck的参数设置0即可,gpgcheck=0,中科大镜像站的epel根目录http://mirrors.ustc.edu.cn/epel/,下载RPM-GPG-KEY-EPEL-7文件,放入/storage/repos/epel即可!
#脚本内容开始
#!/bin/bash
cd /etc/yum.repos.d/
tar -zcvf yum.bak.tar.gz CentOS-*
rm -rf CentOS*
touch /etc/yum.repos.d/a.repo
cat>/etc/yum.repos.d/a.repo <<EOF
[base]
name=base
baseurl=http://172.16.103.3/centos/7/os/x86_64
gpgcheck=1
enabled=1
gpgkey=http://172.16.103.3/centos/RPM-GPG-KEY-CentOS-7
[update]
name=update
baseurl=http://172.16.103.3/centos/7/updates/x86_64/
gpgcheck=1
enabled=1
gpgkey=http://172.16.103.3/centos/RPM-GPG-KEY-CentOS-7
[extras]
name=extras
baseurl=http://172.16.103.3/centos/7/extras/x86_64
gpgcheck=1
enabled=1
gpgkey=http://172.16.103.3/centos/RPM-GPG-KEY-CentOS-7
[centosplus]
name=centosplus
baseurl=http://172.16.103.3/centos/7/centosplus/x86_64
gpgcheck=1
enabled=1
gpgkey=http://172.16.103.3/centos/RPM-GPG-KEY-CentOS-7
[epel]
name=epel
baseurl=http://172.16.103.3/epel/7/x86_64
gpgcheck=0
enabled=1
gpgkey=http://172.16.103.3/epel/RPM-GPG-KEY-EPEL-7
[epel-source]
name=epel-source
baseurl=http://172.16.103.3/epel/7/SRPMS
gpgcheck=0
enabled=1
gpgkey=http://172.16.103.3/epel/RPM-GPG-KEY-EPEL-7
EOF
yum clean all
yum makecache
#脚本内容结束
9,客户端清除yum缓存,并重新制作缓存
yum clean all
yum makecache
10,后记
让yum服务器支持yum grouplist 需要添加xml文件,具体步骤为:
插入centos的系统的everything包,然后挂载光盘,找到光盘目录下/mnt/cdrom/repodata中的xml文件,改文件名字为:*-c7-x86_64-comps.xml,*代表乱码。
这里的名字是d87379a47bc2060f833000b9cef7f9670195fe197271d37fce5791e669265e8b-c7-x86_64-comps.xml
拷贝该文件到yum服务器中,例如拷贝到/storage/repos/,然后使用ceraterepo -g 使用该文件重建组索引
具体命令为
createrepo -g /storage/repos/d87379a47bc2060f833000b9cef7f9670195fe197271d37fce5791e669265e8b-c7-x86_64-comps.xml /storage/repos/centos/7/os/x86_64/
指定的xml文件要使用绝对路径,后面的路径是rpm包的上层Packages目录的所在目录。
执行成功后,会在Packages同级目录下的repodata目录下创建新的xml文件。
同理,如果yum源服务器内除了base源服务,还提供其他源服务的话,那么如果存在软件包组的话,那么也需要得到对应源服务的xml文件,然后使用createrepo -g 命令来重新创建软件包组的索引信息。
11,疑问
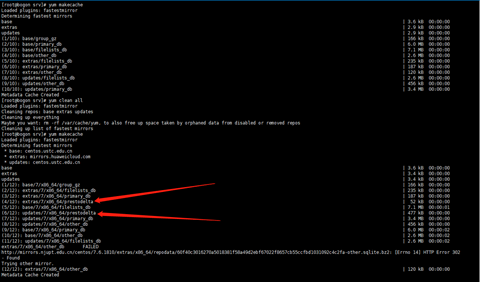
如图所示,上面的yum makecache 信息为通过以上教程自建的yum源,下面的使用centos默认配置的yum源,有没有叼大的说一下为啥我使用人家的yum生成缓存的时候就有prestodelta 用我自建的yum就没有?prestodelta 里面的内容又是啥,何种应用场景?
互联网同步yum服务器,中科大 rsync createrepo的更多相关文章
- 互联网同步yum服务器阿里云 reposync createrepo
参考文章: https://www.cnblogs.com/lldsn/p/10479493.html 系统版本centos 7.5 最小化安装 修改主机名 hostnamectl set-hostn ...
- [转帖]互联网同步yum服务器阿里云 reposync createrepo
https://www.cnblogs.com/withfeel/p/10635529.html 这篇文章 比较齐整 参考文章: https://www.cnblogs.com/lldsn/p/104 ...
- yum服务器搭建(深入理解yum工作原理)
作者:firefoxbug 时间:July 27, 2014 分类:Linux 前言 在前面一篇rpm包制作描述了rpm的打包过程,这篇文章主要讲述yum的工作原理. yum 运行原理 yum的工作需 ...
- centos7中使用Rsync和inotify同步文件
一. 环境说明 由于web服务器所提供的网站数据需要保持一致,但当服务器越来越多时,这些主机之间同步网站数据会很麻烦. 解决方案是在后端建立一个数据发布服务器,该服务器作为rsync客户端,通过ino ...
- [转]在Windows中配置Rsync同步
在Windows中配置Rsync同步 Rsync是一款不错的文件免费同步软件,可以镜像保存整个目录树和文件系统,同 时保持原来文件的权限.时间.软硬链接.第一次同步时 rsync 会复制全部内容,下次 ...
- 在Windows中配置Rsync同步
Rsync是一款不错的文件免费同步软件,可以镜像保存整个目录树和文件系统,同时保持原来文件的权限.时间.软硬链接.第一次同步时 rsync 会复制全部内容,下次只传输修改过的文件部分.传输数据过程中可 ...
- Linux小项目/rhel-基于同步官网yum仓库数据搭建本地yum服务器
本文的实验环境:aws上的Redhat 7.x , 同样也适用于Centos 7.x 简单说主要分为三步: (1) 向官网同步yum数据,可以根据具体情况,创建脚本及配置周期例行任务 (2) 搭建w ...
- 搭建yum服务器
一.yum服务器端配置1.安装FTP软件#yum install vsftpd #service vsftpd start#chkconfig --add vsftpd#chkconfig vsftp ...
- Linux命令中:rsync和cp之间的区别
rsync:只拷贝那些更新的文件: cp -u:也可以实现类似效果: 两者都基本可以满足备份的需求: 只是一般情况下,用rsync做这类备份之类的事情,更多见: 在备份的操作中,拷贝,过期文件的删除是 ...
随机推荐
- [Spring MVC] 表单提交日期转换问题,比如可能导致封装实体类时400错误
三种格式的InitBinder @InitBinder//https://stackoverflow.com/questions/20616319/the-request-sent-by-the-cl ...
- LINUX介绍
Linux操作系统被称为领先的服务器操作系统之一,它被普遍和广泛使用着.全球大约有数百款的Linux系统版本,每个系统版本都有自己的特性和目标人群. Linux的发行版本可以大体分为两类,一类是商业公 ...
- php 安装 redis扩展
https://segmentfault.com/a/1190000009422920 wget 源码编译
- C++使用: C++中map的基本操作和用法
在阅读SSD代码中发现作者使用了C++中的map方法,因此搜索该关联式容器的使用方法,在这里一并总结. 一.Map 簡介 Map是STL的一個容器,它提供一對一的hash. 第一個可以稱為關鍵字(ke ...
- ie 下date对象
var t = '2014-02-26T21:18:02.497' var a = t.replace(/(\d{4})-(\d{2})-(\d{2})T(.*)?\.(.*)/, "$1/ ...
- css颜色的五种表示方法
一.最简单.最古老的颜色类型在CSS颜色的关键词,如red blue等. 二.十六进制值,如#0000. 三.RGB: rgb(255,0,0),这是给定的三个参数表示的红色,绿色和蓝色通道的颜色值每 ...
- python之函数入门
python之函数入门 一. 什么是函数 二. 函数定义, 函数名, 函数体以及函数的调用 三. 函数的返回值 四. 函数的参数 五.函数名->第一类对象 六.闭包 一,什么是函数 函数: 对代 ...
- Java框架部分---面试题
说说Spring? Spring的核心是控制反转.依赖注入,Aop(面向切面)相当于把每个bean与bean之间的关系交给第 三方容器进行管理. 说SpringIOC.SpringAOP? Sprin ...
- Eureka的使用
一.项目配置文件:application.yml #------ eureka配置,默认不开启,如需使用rest负载模式需开启 start ------------- eureka: instance ...
- NSIS脚本 打包安装程序
相关工具 nsis http://nsis.sourceforge.net/Special_Builds HM NIS Edit http://hmne.sourceforge.net/ 例子: ; ...