Retrofit2与RxJava用法大全
Retrofit2是square公司出品的一个网络请求库,网上有很多相关的介绍。我很久以前都想去研究了,但一直都有各种事情耽搁,现在就让我们一起去捋一捋,这篇主要讲解Retrofit2与RxJava的基本用法。
get请求post请求文件上传
文件下载
开启日志拦截
与RxJava结合使用
什么是Retrofit2
官网是这么介绍的:
Retrofit adapts a Java interface to HTTP calls by using annotations on the declared methods to

define how requests are made。
我翻译的可能不准确,他的大概意思是说:Retrofit 是一个 java 接口类,以注解的方式用于 HTTP 网络请求。那下面我们一起来看看是怎么使用的?
使用前的配置
build.gradle 的 dependencies 添加:
    compile 'com.google.code.gson:gson:2.3.1'

    compile 'com.squareup.retrofit2:retrofit:2.0.0'

    compile 'com.squareup.retrofit2:converter-gson:2.0.0'

    compile 'com.squareup.okhttp3:logging-interceptor:3.2.0'
获取Retrofit实例
Retrofit retrofit = new Retrofit.Builder()

    .baseUrl("http://plus31.366ec.net/")

    .addConverterFactory(GsonConverterFactory.create())

    .build();
需要注意的是baseUrl添加的是地址的主域名。
申明RestService接口类
public interface RestService {

    @GET("/Route.axd?method=vast.Store.manager.list")

    Call<ResponseBody> getManagerData(@Query("StoreId") int id);

}
@GET 包含的是请求地址,是主域名之后的地址。举个例子,请求的
全地址:http://plus31.366ec.net/Route.axd?method=vast.Store.manager.list,
主域名为:http://plus31.366ec.net/
@GET包含的地址为:/Route.axd?method=vast.Store.manager.list
这样就完成了一个简单的@GET封装。
创建RestClient类
public class RestClient {

    private Retrofit mRetrofit;

    private static final String BASE_URL = "http://plus31.366ec.net/";

    private RestService mService;

    //构造方法

    public RestClient() {

        mRetrofit = new Retrofit.Builder()

                .baseUrl(BASE_URL)

                .addConverterFactory(GsonConverterFactory.create())

                .build();

        mService = mRetrofit.create(RestService.class);

    }

    public RestService getRectService() {

        if (mService != null) {

            return mService;

        }

        return null;

    }

}
这样就生成了一个简单的代理类,然后就可以进行相应请求了。
Get请求
public class SimpleGetActivity extends AppCompatActivity {

    private Button btnGet;

    private TextView tvResult;

    private RestClient mRestClient;

    @Override

    protected void onCreate(@Nullable Bundle savedInstanceState) {

        super.onCreate(savedInstanceState);

        setContentView(R.layout.activity_simple_get);

        btnGet = (Button) findViewById(R.id.btn_get);

        tvResult = (TextView) findViewById(R.id.tv_result);

        btnGet.setOnClickListener(new View.OnClickListener() {

            @Override

            public void onClick(View view) {

                //获取实例

                mRestClient = new RestClient();

                Call<ResponseBody> responseBodyCall = mRestClient.getRectService().getManagerData();

                //调用回调接口

                responseBodyCall.enqueue(new Callback<ResponseBody>() {

                    @Override

                    public void onResponse(Call<ResponseBody> call, Response<ResponseBody> response) {

                        try {

                            tvResult.setText(response.body().string());

                        } catch (IOException e) {

                            e.printStackTrace();

                        }

                    }

                    @Override

                    public void onFailure(Call<ResponseBody> call, Throwable t) {

                    }

                });

            }

        });

    }

}
一起来看看效果:
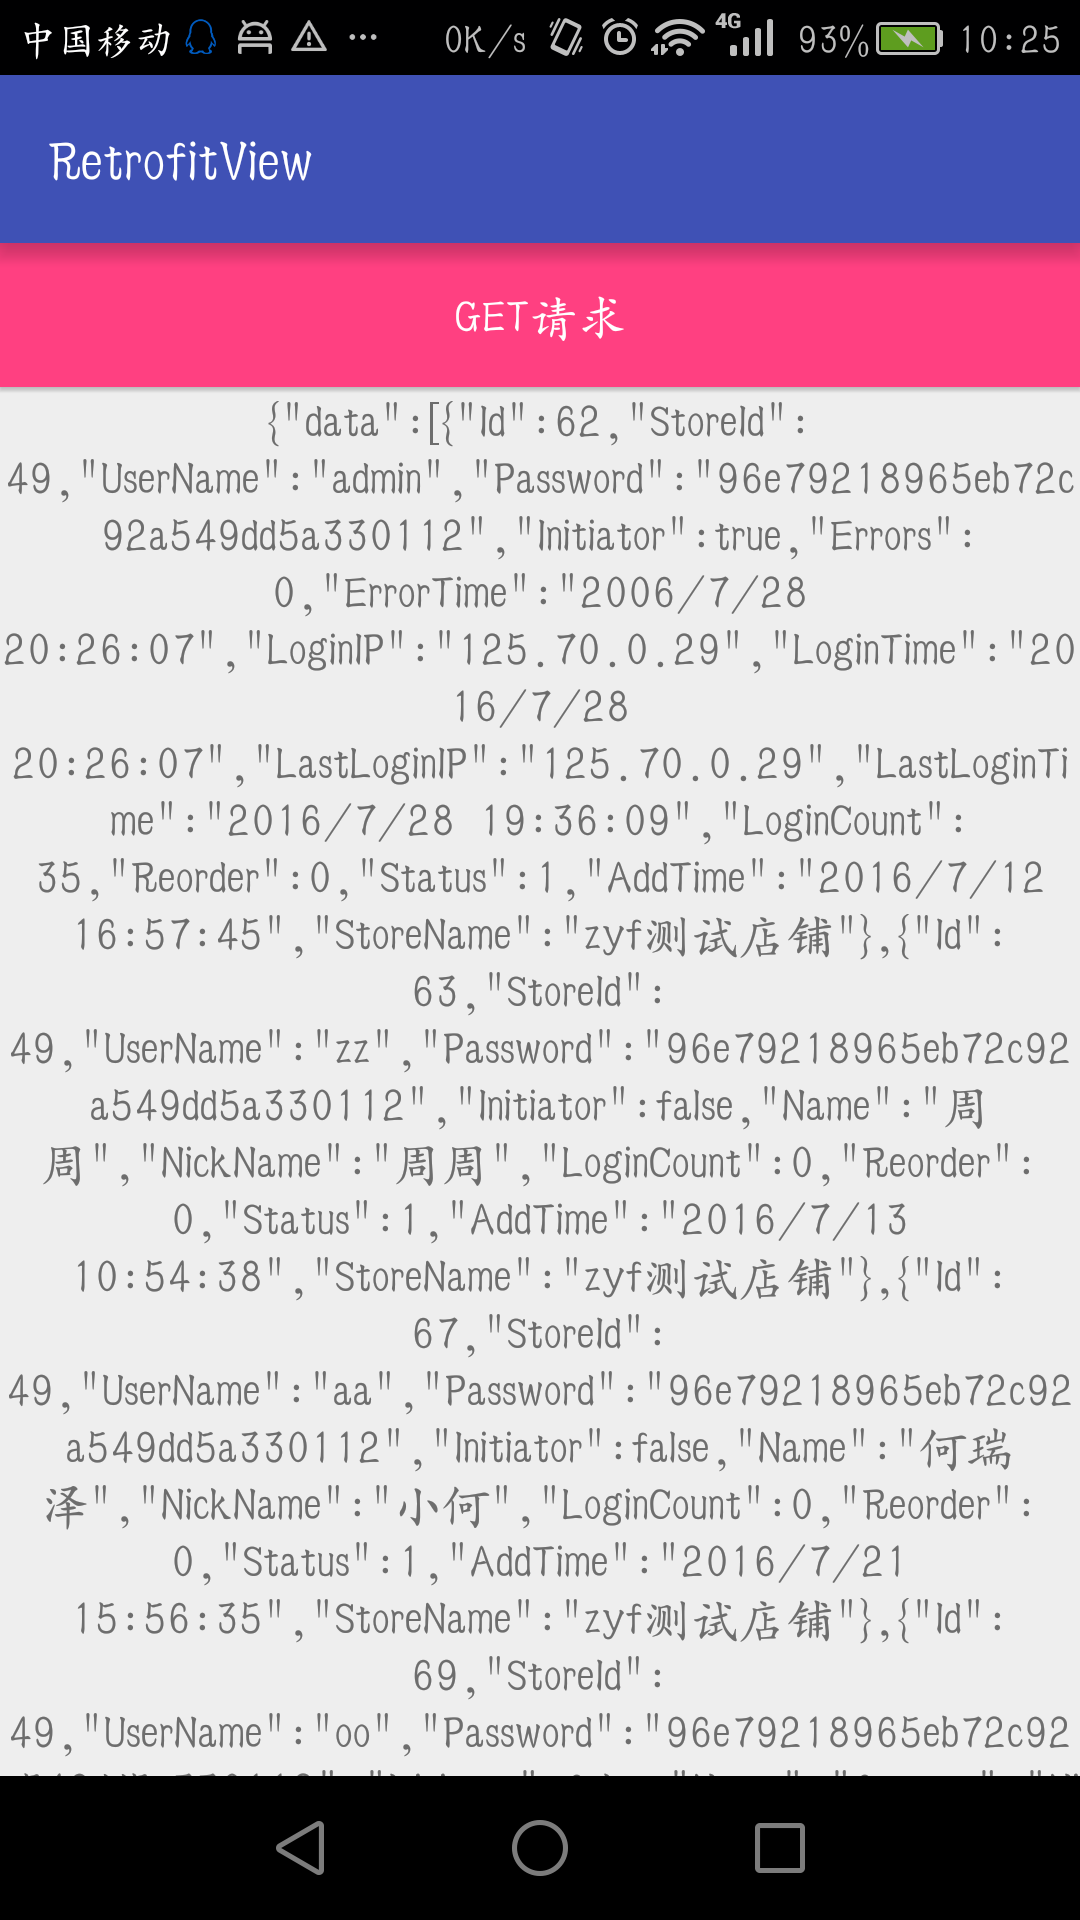
分析返回的 json数据,包含集合,那么我们可以进一步对接口返回值进行数据的封装。
BaseResponse类
public class BaseResponse<T> {

    @SerializedName("data")

    public List<T> managerList;

    @SerializedName("code")

    public int code;

    @SerializedName("message")

    public String message;

}
注意:BaseResponse类的字段,根据自己返回json数据新增或者删除。
根据返回的json集合,那么我们肯定有个实体类了。
Manager类
public class Manager {

    public int Id;

    public String UserName;

}
Manager 类你可以替换成你自己的实体类。
Get的进一步封装
@GET("/Route.axd?method=vast.Store.manager.list")

Call<BaseResponse<Manager>> getManagerDatas(@Query("StoreId") int id);
注意:我们这里对方法的返回值进行了一个修改Call<BaseResponse<Manager>>
来看看封装后的Activity类:
public class GetActivity extends AppCompatActivity {

    private Button btnGet;

    private RestClient mRestClient;

    private RecyclerView mRecyclerView;

    private BaseRecyclerAdapter<Manager> mAdapter;

    @Override

    protected void onCreate(@Nullable Bundle savedInstanceState) {

        super.onCreate(savedInstanceState);

        setContentView(R.layout.activity_get);

        btnGet = (Button) findViewById(R.id.btn_get);

        mRecyclerView = (RecyclerView) findViewById(R.id.rv);

        mRecyclerView.setLayoutManager(new LinearLayoutManager(this));

        btnGet.setOnClickListener(new View.OnClickListener() {

            @Override

            public void onClick(View view) {

                //获取实例

                mRestClient = new RestClient();

                Call<BaseResponse<Manager>> baseResponseCall = mRestClient.getRectService().getManagerDatas();

                baseResponseCall.enqueue(new Callback<BaseResponse<Manager>>() {

                    @Override

                    public void onResponse(Call<BaseResponse<Manager>> call, Response<BaseResponse<Manager>> response) {

                        //获取返回的集合数据

                        //response.body().managerList

                        mAdapter = new BaseRecyclerAdapter<Manager>(GetActivity.this, response.body().managerList, R.layout.rv_item) {

                            @Override

                            protected void convert(BaseViewHolder helper, Manager item) {

                                helper.setText(R.id.tv_item_text, item.UserName);

                            }

                        };

                        mRecyclerView.setAdapter(mAdapter);

                    }

                    @Override

                    public void onFailure(Call<BaseResponse<Manager>> call, Throwable t) {

                    }

                });

            }

        });

    }

}
来看看效果:
Get常用技巧
HashMap组装参数:
@GET("/Route.axd?method=vast.Store.manager.list")

    Call<BaseResponse<Manager>> getManagerDatas(@QueryMap HashMap<String, String> hm);
Get 请求就讲到这里了,下面一起来看看 Post请求。
Post请求
 @FormUrlEncoded

    @POST("/Route.axd?method=vast.Store.manager.list")

    Call<BaseResponse<Manager>> postManagerDatas(@Field("StoreId") int id);
@Field("StoreId") int id可以替换@Body,@Body你可以传入HashMap、实体 beans 等对象。
注意:以@Body上传参数,会默认加上Content-Type: application/json; charset=UTF-8的请求头,即以JSON格式请求,再以JSON格式响应。
单个文件上传
 @Multipart

    @POST("/UploadProduct.axd")

    Call<ResponseBody> uploadSimpleFile(@Part MultipartBody.Part file);
文件上传稍微复杂点,具体请看以下代码:
 File file = new File("/sdcard/", "a.xlxs");

    //file

    RequestBody requestFile = RequestBody.create(MediaType.parse("multipart/form-data"), file);

    //监听上传进度

    CountingRequestBody countingRequestBody = new CountingRequestBody(requestFile, new CountingRequestBody.Liste

        @Override

        public void onRequestProgress(long bytesWritten, long contentLength) {

            tvFile.setText("上传进度:" + contentLength + ":" + bytesWritten);

        }

    });

    MultipartBody.Part body =

            MultipartBody.Part.createFormData("file", file.getName(),countingRequestBody);

    mRestClient = new RestClient("http://192.168.4.111:686/");

    Call<ResponseBody> responseBodyCall = mRestClient.getRectService().uploadSimpleFile(body);

    responseBodyCall.enqueue(new Callback<ResponseBody>() {

        @Override

        public void onResponse(Call<ResponseBody> call, Response<ResponseBody> response) {

            tvFile.setText("上传成功");

        }

        @Override

        public void onFailure(Call<ResponseBody> call, Throwable t) {

            tvFile.setText(t.toString());

        }

    });
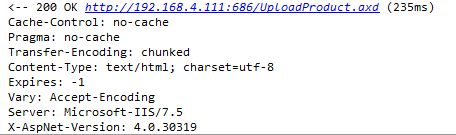
看看效果图:
多文件上传
@Multipart

@POST("/HpWens/ProgressDemos/")

Call<ResponseBody> uploads(@PartMap Map<String, RequestBody> params);
private void initData() {

        //保证文件按顺序上传 使用LinkedHashMap

        params = new LinkedHashMap<>();

        File file1 = new File("/sdcard/", "a.xlxs");

        final RequestBody requestBody1 = RequestBody.create(MediaType.parse("multipart/form-data"), file1);

        //监听上传进度

        CountingRequestBody countingRequestBody1 = new CountingRequestBody(requestBody1, new CountingRequestBody.Listener() {

            @Override

            public void onRequestProgress(long bytesWritten, long contentLength) {

                tvFile1.setText("上传进度:" + contentLength + ":" + bytesWritten);

            }

        });

        params.put("file\";filename=\"" + file1.getName(), countingRequestBody1);

        File file2 = new File("/sdcard/", "a.xlxs");

        RequestBody requestBody2 = RequestBody.create(MediaType.parse("multipart/form-data"), file2);

        //监听上传进度

        CountingRequestBody countingRequestBody2 = new CountingRequestBody(requestBody2, new CountingRequestBody.Listener() {

            @Override

            public void onRequestProgress(long bytesWritten, long contentLength) {

                tvFile2.setText("上传进度:" + contentLength + ":" + bytesWritten);

            }

        });

        params.put("file\";filename=\"" + file2.getName(), countingRequestBody2);

        mRestClient = new RestClient("http://192.168.4.111:686/");

        btnUpload.setOnClickListener(new View.OnClickListener() {

            @Override

            public void onClick(View view) {

                Call<ResponseBody> responseBodyCall = mRestClient.getRectService().uploadMultiFiles(params);

                responseBodyCall.enqueue(new Callback<ResponseBody>() {

                    @Override

                    public void onResponse(Call<ResponseBody> call, Response<ResponseBody> response) {

                        tvFile1.setText("上传成功");

                        tvFile2.setText("上传成功");

                    }

                    @Override

                    public void onFailure(Call<ResponseBody> call, Throwable t) {

                    }

                });

            }

        });

    }
在文章的后面我会附上源码,这里我就不在贴图了,具体请看demo
文件下载
@Streaming

@GET("/image/h%3D360/sign=86aee1fbf1deb48fe469a7d8c01e3aef/{filename}")

Call<ResponseBody> downFile(@Path("filename") String fileName);
处理方式基本和上面几种差不多:
public class DownFileActivity extends AppCompatActivity {

    private ImageView iv;

    private Button btnDown;

    private RestClient mRestClient;

    private String fileName;

    @Override

    protected void onCreate(@Nullable Bundle savedInstanceState) {

        super.onCreate(savedInstanceState);

        setContentView(R.layout.activity_down_file);

        iv = (ImageView) findViewById(R.id.iv);

        btnDown = (Button) findViewById(R.id.btn_down);

        mRestClient = new RestClient("http://d.hiphotos.baidu.com/");

        fileName = "b812c8fcc3cec3fd8757dcefd488d43f8794273a.jpg";

        btnDown.setOnClickListener(new View.OnClickListener() {

            @Override

            public void onClick(View view) {

                Call<ResponseBody> userCall = mRestClient.getRectService().downFile(fileName);

                userCall.enqueue(new Callback<ResponseBody>() {

                    @Override

                    public void onResponse(Call<ResponseBody> call, Response<ResponseBody> response) {

                        iv.setImageBitmap(BitmapFactory.decodeStream(response.body().byteStream()));

                        //saveFile(response.body().byteStream());

                    }

                    @Override

                    public void onFailure(Call<ResponseBody> call, Throwable t) {

                    }

                });

            }

        });

    }

    public void saveFile(InputStream is){

        try {

            String fn = Environment.getExternalStorageDirectory() + "/" + fileName;

            FileOutputStream fos = new FileOutputStream(fn);

            byte[] buf = new byte[];

            int len;

            while ((len = is.read(buf)) != -) {

                fos.write(buf, , len);

            }

            is.close();

            fos.close();

        } catch (Exception ex) {

        }

    }

}
效果一览:
开启OKHttp的日志拦截
开启日志后,会记录request和response的相关信息,非常实用,也非常强大,不知道是否是编码格式,我下载图片打印的全是乱码。
public void initRestClint(String baseUrl) {

    logging.setLevel(HttpLoggingInterceptor.Level.BODY);

    OkHttpClient.Builder httpClient = new OkHttpClient.Builder();

    httpClient.addInterceptor(logging);

    mRetrofit = new Retrofit.Builder()

            .baseUrl(baseUrl)

            .addConverterFactory(GsonConverterFactory.create())

            .addCallAdapterFactory(RxJavaCallAdapterFactory.create())

            .client(httpClient.build())

            .build();

    mService = mRetrofit.create(RestService.class);

}
类似这样的logcat日志:
Retrofit2与RxJava结合使用
添加库:
   compile 'io.reactivex:rxandroid:1.1.0'

    compile 'com.squareup.retrofit2:adapter-rxjava:2.0.0'
添加addCallAdapterFactory(RxJavaCallAdapterFactory.create())到Retrofit.Builder中:
mRetrofit = new Retrofit.Builder()

        .baseUrl(baseUrl)

        .addConverterFactory(GsonConverterFactory.create())

        .addCallAdapterFactory(RxJavaCallAdapterFactory.create())

        .client(httpClient.build())

        .build();
那么我们结合RxJava一起使用呢,下面我们一起来看一看:
@GET("/Route.axd?method=vast.Store.manager.list")

Observable<BaseResponse<Manager>> getManagers(@Query("StoreId") int id);
通过我们的观察是不是发现只有返回值发送了变化,Observable类型。
//获取实例

mRestClient = new RestClient();

mRestClient.getRectService().getManagers()

        .subscribeOn(Schedulers.io())

        .observeOn(AndroidSchedulers.mainThread())

        .subscribe(new Subscriber<BaseResponse<Manager>>() {

            @Override

            public void onCompleted() {

            }

            @Override

            public void onError(Throwable e) {

            }

            @Override

            public void onNext(BaseResponse<Manager> managerBaseResponse) {

            }

        });
RxJava支持链式写法,可以处理一些很复杂的问题。
Retrofit2与RxJava用法大全的更多相关文章
- MVC5 + EF6 + Bootstrap3 (9) HtmlHelper用法大全(下)
文章来源:Slark.NET-博客园 http://www.cnblogs.com/slark/p/mvc5-ef6-bs3-get-started-httphelper-part2.html 上一节 ...
- MVC5 + EF6 + Bootstrap3 (8) HtmlHelper用法大全(上)
文章来源:Slark.NET-博客园 http://www.cnblogs.com/slark/p/mvc5-ef6-bs3-get-started-httphelper-part1.html 上一节 ...
- MVC HtmlHelper用法大全
MVC HtmlHelper用法大全HtmlHelper用来在视图中呈现 HTML 控件.以下列表显示了当前可用的一些 HTML 帮助器. 本主题演示所列出的带有星号 (*) 的帮助器. ·Actio ...
- C# MessageBox 用法大全(转)
C# MessageBox 用法大全 http://www.cnblogs.com/Tammie/archive/2011/08/05/2128623.html 我们在程序中经常会用到MessageB ...
- MVC中HtmlHelper用法大全参考
MVC中HtmlHelper用法大全参考 解析MVC中HtmlHelper控件7个大类中各个控件的主要使用方法(1) 2012-02-27 16:25 HtmlHelper类在命令System.Web ...
- pandas用法大全
pandas用法大全 一.生成数据表 1.首先导入pandas库,一般都会用到numpy库,所以我们先导入备用: import numpy as np import pandas as pd12 2. ...
- Retrofit2.0+RxJava+Dragger2实现不一样的Android网络架构搭建
Tamic :csdn http://blog.csdn.net/sk719887916 众所周知,手机APP的核心就在于调用后台接口,展示相关信息,方便我们在手机上就能和外界交互.所以APP中网络框 ...
- Android基于Retrofit2.0 +RxJava 封装的超好用的RetrofitClient工具类(六)
csdn :码小白 原文地址: http://blog.csdn.net/sk719887916/article/details/51958010 RetrofitClient 基于Retrofit2 ...
- 基于Retrofit2.0+RxJava+Dragger2实现不一样的Android网络构架搭建(转载)
转载请注明出处:http://blog.csdn.net/finddreams/article/details/50849385#0-qzone-1-61707-d020d2d2a4e8d1a374a ...
随机推荐
- unreal3对象管理模块分析
凡是稍微大一点的引擎框架,必然都要自己搞一套对象管理机制,如mfc.qt.glib等等,unreal自然也不例外. 究其原因,还是c++这种静态语言天生的不足,缺乏运行时类型操作功能,对于复杂庞大的逻 ...
- GC算法与种类
- 20169219 linux内核原理与分析第二周作业
"linux内核分析"的第一讲主要讲了计算机的体系结构,和各寄存器之间对数据的处理过程. 通用寄存器 AX:累加器 BX:基地址寄存器 CX:计数寄存器 DX:数据寄存器 BP:堆 ...
- UT源码116
2)NextDate函数问题 NextDate函数说明一种复杂的关系,即输入变量之间逻辑关系的复杂性 NextDate函数包含三个变量month.day和year,函数的输出为输入日期后一天的日期. ...
- CSS中position的absolute和relative用法
static: HTML元素的默认定位方式 absolute: 将对象从文档流中拖出,使用left,right,top,bottom等属性进行绝对定位.而其层叠通过z-index属性定义.绝对定位的元 ...
- Python Day23
Django之Model操作 一.字段 字段列表 AutoField(Field) - int自增列,必须填入参数 primary_key=True BigAutoField(AutoField) - ...
- Educational Codeforces Round 48 (Rated for Div. 2) B 1016B Segment Occurrences (前缀和)
B. Segment Occurrences time limit per test 2 seconds memory limit per test 256 megabytes input stand ...
- HTTP/TCP协议基础
HTTP协议 基本概念 HTTP协议(超文本传输协议 HyperText Transfer Protocol):是用于从WWW服务器传输超文本到本地浏览器的传送协议.它不仅保证计算机正确快速地传输超文 ...
- EIGRP-3-EIGRP的多参数度量
带宽度量参数本身无法区分10Gbit/s及更高速率的接口.对1Gbit/s接口,默认延迟度量参数已设置为最低值1(10微妙).而且EIGRP承载的是经过换算的参数,每台路由器需要将其换算回再计算新开销 ...
- Luogu P3546 [POI2012]PRE-Prefixuffix 神奇的递推+哈希
设$f[i]$表示切掉前$i$位和后$i$位后,即剩下$s[i+1]到s[n-i]$,的公共前后缀长度.此时我们发现,$f[i-1]$相对于$f[i]$少切了两个$char$,所以有$f[i-1]\l ...