
NIO学习总结
第一.NIO概述
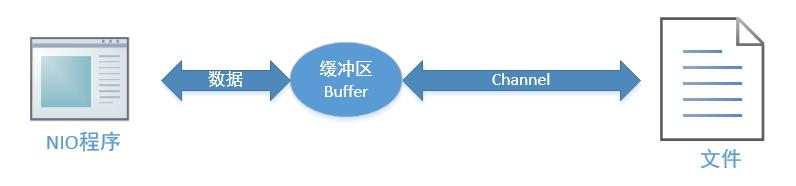
NIO以块的方式处理数据,块IO的效率比流IO的效率高很多,NIO是非阻塞式的,使用它可以提供非阻塞的高伸缩性网络。
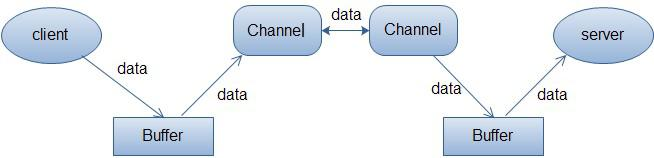
NIO主要有三大核心:Channel(通道)、Buffer(缓冲区)、Selector(选择器)。NIO是基于Channel和缓冲区进行操作的,数据是从通道读取到缓冲区,或者是缓冲区写入到通道中。
Selector(选择区)用于监听多个通道的事件(比如:连接请求、数据到达等),使用单个线程就可以监听到多个客户端通道
第二.NIO的三大核心
2.1.缓冲区Buffer
2.1.1Buffer操作API
在 NIO 中,所有的缓冲区类型都继承于抽象类 Buffer,最常用的就是 ByteBuffer,对于 Java 中的基本类型,基本都有一个具体 Buffer 类型与之相对应,它们之间的继承关系如下图所示:

ByteBuffer,存储字节数据到缓冲区
ShortBuffer,存储字符串数据到缓冲区
public class BuffferDemo01 {

    public static void main(String[] args) {

        //分配新的 int 缓冲区,参数为缓冲区容量

        // 新缓冲区的当前位置将为零,其界限(限制位置)将为其容量。它将具有一个底层实现数组,其数组偏移量将为零。

        ByteBuffer byteBuffer = ByteBuffer.allocate(10);

        for (int i = 0; i < byteBuffer.capacity(); i++) {

            int j = 2*(i+1);

            // 将给定整数写入此缓冲区的当前位置,当前位置递增

            byteBuffer.put((byte) j);

        }

        // 重设此缓冲区,将限制设置为当前位置,然后将当前位置设置为 0

        byteBuffer.flip();

        //查看在当前位置和限制位置之间是否有元素

        while (byteBuffer.hasRemaining()){

            //读取此缓冲区当前位置的整数,然后当前位置递增

            int j = byteBuffer.get();

            System.out.print(j+" \t");

        }

    }

}
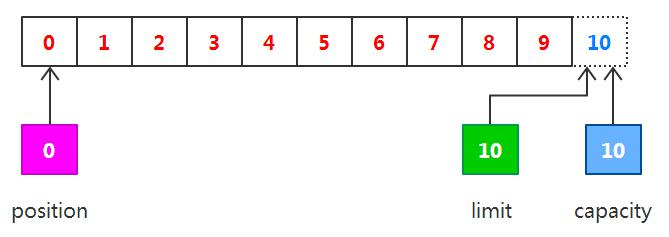
2.1.2Buffer的基本原理
public class NIODemo01 {

    @Test

    public void test01()throws Exception{

        //文件输出通道

        FileInputStream fis = new FileInputStream("demo.txt");

        //获取通道

        FileChannel channel = fis.getChannel();

        //分配一个 10 个大小缓冲区,说白了就是分配一个 10 个大小的 byte 数组

        ByteBuffer buffer = ByteBuffer.allocate(10);

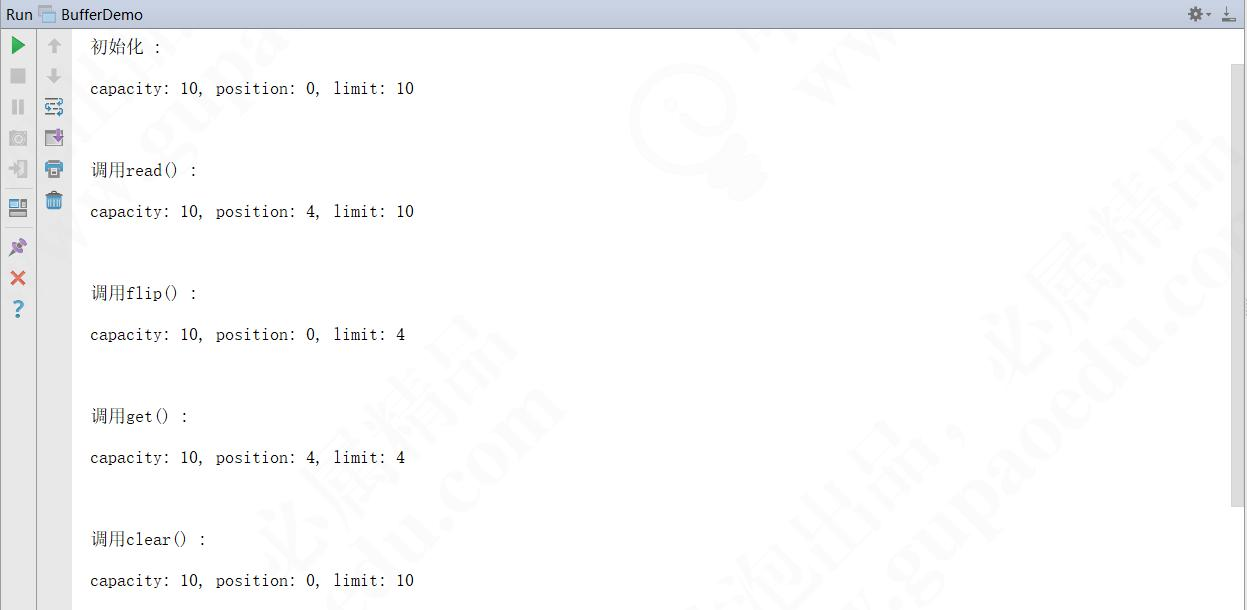
        output("初始化",buffer);

        //先读取一下

        channel.read(buffer);

        output("调用read():",buffer);

        //准备之前先锁定范围

        buffer.flip();

        output("调用 flip()", buffer);

        //判断有没有读取的数据

        while (buffer.remaining()>0){

            byte b = buffer.get();

            System.out.println("读取的数据:"+String.valueOf(b));

        }

        output("调用get():",buffer);

        //解锁

        buffer.clear();

        output("调用 clear()", buffer);

        //关闭通道

    }

    //把这个缓冲里面实时状态给打印出来

    private void output(String step , ByteBuffer buffer) {

        System.out.println(step+":");

        //数组 容量 大小

        System.out.print("capacity: " + buffer.capacity() + ", ");

        //当前操作数据所在的位置,也可以叫做游标

        System.out.println("position: "+buffer.position()+",");

        //锁定值,flip,数据操作范围索引只能在 position - limit 之间

        System.out.println("limit: " + buffer.limit());

        System.out.println();

    }

}
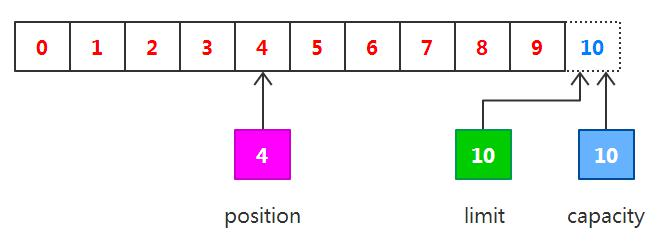
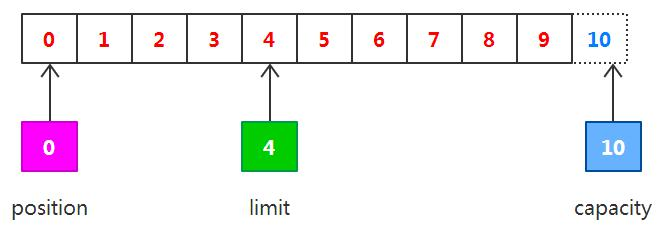
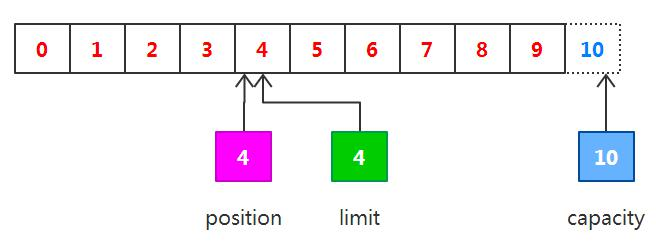
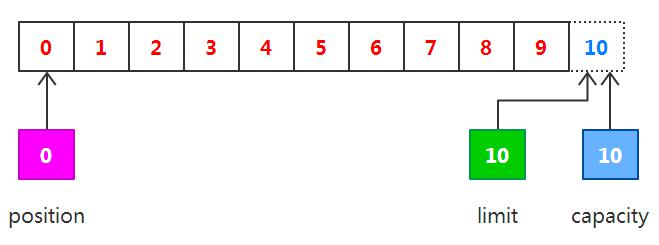
2.2通道Channel
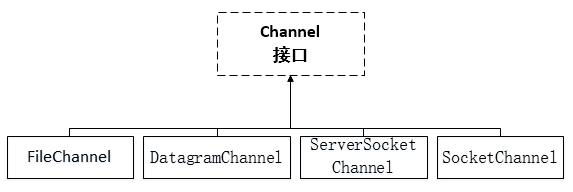
以FileChannel类为例,该类主要用来本地文件进行IO操作该有的方法如下:
public void read(ByteBuffer dst),从通道读取数据并存放到缓冲区
public void writer(ByteBuffer dst)把缓冲区的数据写到通道
public long transferFrom(ReadableByteChannel src, long position, long count) 从目标通道复制数据到当前通道
public long transferTo(ReadableByteChannel src, long position, long count) 把数据从当前通道复制给目标通道
2.2.1案例
1.往本地写入数据
 /**

     * 写数据

     */

    @Test

    public void test01() throws Exception{

        //写入内容

        String content = "hell,NIO 写入文件";

        //创建文件路径

        FileOutputStream fos  = new FileOutputStream("demo1.txt");

        //获取通道

        FileChannel channel = fos.getChannel();

        //设置缓冲区

        ByteBuffer byteBuffer= ByteBuffer.allocate(1024);

        //像缓冲区写入内容

        byteBuffer.put(content.getBytes());

        byteBuffer.flip();

        //把缓冲区的内容写入通道

        channel.write(byteBuffer);

        fos.close();

    }

}
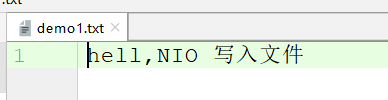
2.从本地读取文件
    /**

     * 往本地读取数据

     */

    @Test

    public void test02() throws Exception{

        //创建文件路径

        FileInputStream fis  = new FileInputStream("demo1.txt");

        //获取通道

        FileChannel channel = fis.getChannel();

        //设置缓冲区

        ByteBuffer byteBuffer = ByteBuffer.allocate(1024);

        //读取数据到缓冲区

        channel.read(byteBuffer);

        String str = new String(byteBuffer.array());

        System.out.println(str);

        fis.close();

    }
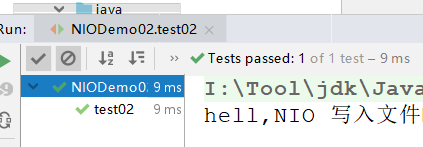
3.复制文件
   /**

     * 复制视频文件

     */

    @Test

    public void test03() throws Exception{

        FileInputStream fis =

                new FileInputStream("E:\\尚硅谷\\22 SpringBoot整合篇\\SpringBoot高级\\视频\\1、缓存-JSR107简介.avi");

        FileOutputStream fos = new FileOutputStream("E:\\1.avi");

        FileChannel sourceChannel = fis.getChannel();

        FileChannel destChannel = fos.getChannel();

        destChannel.transferFrom(sourceChannel,0,sourceChannel.size());

        destChannel.close();

        sourceChannel.close();

    }
2.3Selector选择器
2.3.1核心API

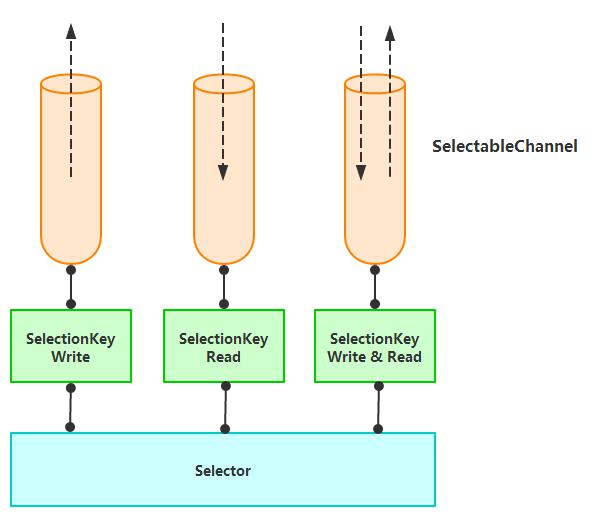
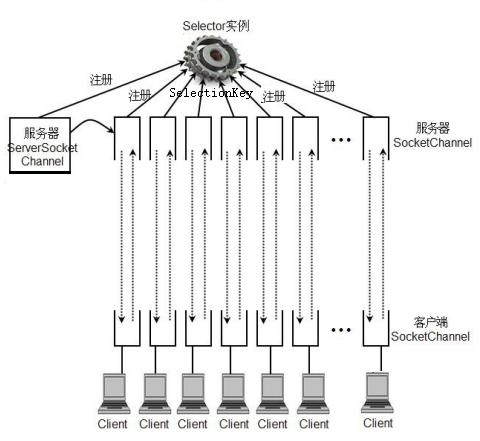
2.3.2入门案例
/**

 * 客户端

 */

public class NIOClient {

    public static void main(String[] args) throws Exception{

        //得到一个网络通道

        SocketChannel socketChannel = SocketChannel.open();

        //设置非阻塞

        socketChannel.configureBlocking(false);

        //连接网络

        InetSocketAddress address = new InetSocketAddress("localhost",8081);

        //判断是否连接

        if(!socketChannel.connect(address)){

            while(!socketChannel.finishConnect()){

                System.out.println("没有服务端进行连接");

            }

        }

        //发送任务

        String str = "hell Nio服务端";

        ByteBuffer byteBuffer = ByteBuffer.wrap(str.getBytes());

        //写入通道

        socketChannel.write(byteBuffer);

        System.in.read();

    }

}

/**

 * 服务端

 */

public class NIOServer {

    public static void main(String[] args) throws Exception{

        //得到通道

        ServerSocketChannel serverSocketChannel = ServerSocketChannel.open();

        //得到selector对象

        Selector selector = Selector.open();

        //设置为非阻塞

        serverSocketChannel.configureBlocking(false);

        //设置端口

        serverSocketChannel.bind(new InetSocketAddress(8081));

        //注册到selector对象上

        serverSocketChannel.register(selector, SelectionKey.OP_ACCEPT);

        while(true){

            //监控客户端

            if(selector.select(200)==0){

                System.out.println("没有服务端连接");

                continue;

            }

            Iterator<SelectionKey> iterator = selector.selectedKeys().iterator();

            while (iterator.hasNext()){

                //获取所有的监听对象

                SelectionKey selectionKey = iterator.next();

                //连接客户端

                if(selectionKey.isAcceptable()){

                    //得到通道

                    SocketChannel socketChannel = serverSocketChannel.accept();

                    socketChannel.configureBlocking(false);

                    socketChannel.register(selector,SelectionKey.OP_READ, ByteBuffer.allocate(1023));

                }

                //读取数据

                if(selectionKey.isReadable()){

                    SocketChannel socketChannel = (SocketChannel) selectionKey.channel();

                    ByteBuffer buffer = (ByteBuffer) selectionKey.attachment();

                    socketChannel.read(buffer);

                    System.out.printf("客户端发来的数据:%s%n", new String(buffer.array()));

                }

                //删除防止重复发送

                iterator.remove();

            }

        }

    }

}
2.3.3网络聊天案例
客户端
/**

 * 客户端

 */

public class ChatClient {

    private SocketChannel socketChannel;

    private String host = "127.0.0.1";

    private Integer port = 8083;

    private String userName;

    public ChatClient(){

        try {

            //得到传输通道

            socketChannel = SocketChannel.open();

            //设置非阻塞

            socketChannel.configureBlocking(false);

            //设置网络连接

            InetSocketAddress address = new InetSocketAddress(host,port);

            //连接服务器

            if (!socketChannel.connect(address)){

                while (!socketChannel.finishConnect()){

                    System.out.println("client:没有服务端进行连接");

                }

            }

            //得到客户端 IP 地址和端口信息,作为聊天用户名使用

            userName = socketChannel.getLocalAddress().toString().substring(1);

            System.out.println("---------------Client(" + userName + ") is ready---------------");

        } catch (IOException e) {

            e.printStackTrace();

        }

    }

    /**

     * 往服务端发送数据

     */

    public void sendMsg(String msg){

        try {

            //如果控制台输入 bye 就关闭通道,结束聊天

            if (msg.equalsIgnoreCase("bye")) {

                socketChannel.close();

                socketChannel = null;

                return;

            }

            msg = userName + "说: " + msg;

            ByteBuffer byteBuffer = ByteBuffer.wrap(msg.getBytes());

            socketChannel.write(byteBuffer);

        } catch (IOException e) {

            e.printStackTrace();

        }

    }

    /**

     * 接收服务端消息

     */

    public void receiveMsg(){

        ByteBuffer byteBuffer = ByteBuffer.allocate(1024);

        try {

            int count = socketChannel.read(byteBuffer);

            if(count>=1){

                String msg = new String(byteBuffer.array());

                System.out.println(msg.trim());

            }

        } catch (IOException e) {

            e.printStackTrace();

        }

    }

}
TestClient
//启动聊天程序客户端

public class TestClient {

    public static void main(String[] args) {

        ChatClient chatClient = new ChatClient();

        new Thread(()->{

            while (true){

                chatClient.receiveMsg();

                try {

                    Thread.sleep(2000);

                } catch (InterruptedException e) {

                    e.printStackTrace();

                }

            }

        }).start();

        Scanner sc = new Scanner(System.in);

        while (sc.hasNextLine()){

            chatClient.sendMsg(sc.nextLine());

        }

    }

}
服务端
/**

 * 聊天服务端

 */

public class ChatServer {

    private ServerSocketChannel serverSocketChannel;

    private Selector selector;

    private int port = 8083;

    public ChatServer(){

        try {

            //获取监听通道

            serverSocketChannel = ServerSocketChannel.open();

            //获取选择器

            selector = Selector.open();

            //设置非阻塞

            serverSocketChannel.configureBlocking(false);

            //绑定端口

            serverSocketChannel.bind(new InetSocketAddress(port));

            //将选择器绑定到监听通道并监听accept通道

            serverSocketChannel.register(selector, SelectionKey.OP_ACCEPT);

            printInfo("Chat Server is ready.......");

        } catch (IOException e) {

            e.printStackTrace();

        }

    }

    /**

     * 开始聊天

     */

    public void startChat(){

        while (true){

            try {

                if(selector.select(200)==0){

                    System.out.println("没有人上线:");

                }

                //获取被监听的accept

                Iterator<SelectionKey> iterator = selector.selectedKeys().iterator();

                while(iterator.hasNext()){

                    SelectionKey selectionKey = iterator.next();

                    //监听accept

                    if(selectionKey.isAcceptable()){

                        //获取通道

                        SocketChannel socketChannel = serverSocketChannel.accept();

                        //设置为非阻塞

                        socketChannel.configureBlocking(false);

                        //注册

                        socketChannel.register(selector,SelectionKey.OP_READ);

                        System.out.println(socketChannel.getRemoteAddress().toString().substring(1)+"上线了...");

                    }

                    //读取数据

                    if(selectionKey.isReadable()){

                        //获取通道

                        SocketChannel socketChannel = (SocketChannel) selectionKey.channel();

                        //读取数据

                        readMsg(socketChannel);

                    }

                    //防止重复

                    iterator.remove();

                }

            } catch (IOException e) {

                e.printStackTrace();

            }

        }

    }

    /**

     * 读取数据

     * @param socketChannel

     */

    private void readMsg(SocketChannel socketChannel) {

        ByteBuffer buffer = ByteBuffer.allocate(1024);

        try {

            int count = socketChannel.read(buffer);

            if (count>=1){

                //打印数据

                String msg = new String(buffer.array());

                printInfo(new String(buffer.array()));

                //广播消息

                broadCast(socketChannel,msg);

            }

        } catch (IOException e) {

            e.printStackTrace();

        }

    }

    /**

     * 广播消息

     * @param socketChannel

     */

   private void broadCast(SocketChannel socketChannel,String msg){

       System.out.println("发送广播");

       try {

           //广播数据到所有的 SocketChannel 中

           for (SelectionKey key : selector.keys()) {

               Channel targetChannel = key.channel();

               //排除自身

               if(targetChannel instanceof SocketChannel &&targetChannel!=socketChannel){

                   SocketChannel destChannel = (SocketChannel) targetChannel;

                   //把数据存入到缓冲区

                   ByteBuffer buffer = ByteBuffer.wrap(msg.getBytes());

                   //往通道里面写数据

                   destChannel.write(buffer);

               }

           }

           ;

       } catch (IOException e) {

           e.printStackTrace();

       }

   }

    /**

     * 打印内容

     * @param content

     */

    private void printInfo(String content) {

        SimpleDateFormat format = new SimpleDateFormat("yyyy-HH-dd HH:mm:ss");

        System.out.println("["+format.format(new Date())+"]->"+content);

    }

    public static void main(String[] args) {

        ChatServer server = new ChatServer();

        server.startChat();

    }

}
NIO学习总结的更多相关文章
- JAVA NIO学习一:NIO简介、NIO&IO的主要区别
在前面学习了IO之后,今天我们开始进入NIO学习环节,首先我们会NIO做一个简单的介绍,让大家认识NIO,然后会和IO进行一个对比认识进行区分.好了,下面我们就开始学习: 一.NIO简介 1.概述 从 ...
- Java NIO学习与记录(八): Reactor两种多线程模型的实现
Reactor两种多线程模型的实现 注:本篇文章例子基于上一篇进行:Java NIO学习与记录(七): Reactor单线程模型的实现 紧接着上篇Reactor单线程模型的例子来,假设Handler的 ...
- Java NIO学习笔记
Java NIO学习笔记 一 基本概念 IO 是主存和外部设备 ( 硬盘.终端和网络等 ) 拷贝数据的过程. IO 是操作系统的底层功能实现,底层通过 I/O 指令进行完成. 所有语言运行时系统提供执 ...
- 零拷贝详解 Java NIO学习笔记四(零拷贝详解)
转 https://blog.csdn.net/u013096088/article/details/79122671 Java NIO学习笔记四(零拷贝详解) 2018年01月21日 20:20:5 ...
- Java NIO 学习笔记(七)----NIO/IO 的对比和总结
目录: Java NIO 学习笔记(一)----概述,Channel/Buffer Java NIO 学习笔记(二)----聚集和分散,通道到通道 Java NIO 学习笔记(三)----Select ...
- Java NIO 学习笔记(六)----异步文件通道 AsynchronousFileChannel
目录: Java NIO 学习笔记(一)----概述,Channel/Buffer Java NIO 学习笔记(二)----聚集和分散,通道到通道 Java NIO 学习笔记(三)----Select ...
- Java NIO 学习笔记(五)----路径、文件和管道 Path/Files/Pipe
目录: Java NIO 学习笔记(一)----概述,Channel/Buffer Java NIO 学习笔记(二)----聚集和分散,通道到通道 Java NIO 学习笔记(三)----Select ...
- Java NIO 学习笔记(四)----文件通道和网络通道
目录: Java NIO 学习笔记(一)----概述,Channel/Buffer Java NIO 学习笔记(二)----聚集和分散,通道到通道 Java NIO 学习笔记(三)----Select ...
- Java NIO 学习笔记(三)----Selector
目录: Java NIO 学习笔记(一)----概述,Channel/Buffer Java NIO 学习笔记(二)----聚集和分散,通道到通道 Java NIO 学习笔记(三)----Select ...
- Java NIO 学习笔记(二)----聚集和分散,通道到通道
目录: Java NIO 学习笔记(一)----概述,Channel/Buffer Java NIO 学习笔记(二)----聚集和分散,通道到通道 Java NIO 学习笔记(三)----Select ...
随机推荐
- 逆向知识第九讲,switch case语句在汇编中表达的方式
一丶Switch Case语句在汇编中的第一种表达方式 (引导性跳转表) 第一种表达方式生成条件: case 个数偏少,那么汇编中将会生成引导性的跳转表,会做出 if else的情况(类似,但还是能分 ...
- js 怎样判断用户是否在浏览当前页面
有些时候我们需要在项目中判断用户是否在浏览当前页面,或者当前页面是否处于激活状态.然后再进行相关的操作.浏览器中可通过window对象的onblur.onfocus判断,或者document的hidd ...
- PowerDesigner最基础的使用方法
1:入门级使用PowerDesigner软件创建数据库(直接上图怎么创建,其他的概念知识可自行学习) 我的PowerDesigner版本是16.5的,如若版本不一样,请自行参考学习即可.(打开软件即是 ...
- C#学习基础资料记录---字典(Dictionary),时间表示方法(DateTime.Now),文件操作
1.字典 https://www.cnblogs.com/gengaixue/p/4002244.html 2.时间的表示方法 DateTime.Now的多种用法 https://www.cnblog ...
- 按Excel的模板导出数据
思路:把Excel模板上传到服务器:然后读取文档,写入数据,另存为新的文件 然后就是导出的时候处理数据定义的字符串,按数据导出:注意读取的数据流要处理下,不然会报异常 public Stream Ge ...
- json字符转java bean忽略大小写
使用objectMapper进行json字符的解析 com.fasterxml.jackson.databind.ObjectMapper ob =new com.fasterxml.jackson. ...
- 弹性盒模型display:flex
Flex布局意为"弹性布局",用来为盒模型提供更多灵活性.此外,Flex定义的容器可以对块级元素(display: flex;)或行内元素(display: inline-flex ...
- list 字符串拼接效率实验
ist 字符串拼接有多种方法,我就其中常用三种做了实验,实验代码如下: 第一次是为了初始化静态方法,后面的才是效率比较. 结果如下: StringUtils join 方法用的是StringBuild ...
- 如何对Nginx日志文件进行切割保存
日积月累下,日志文件会越来越大,日志文件太大严重影响服务器效率,须要定时对日志文件进行切割. 切割的方式有按月切割.按天切割.按小时切割,一般都是按天切割. 那么如何进行切割呢? 思路: 创建日志文件 ...
- 最简单的SAP云平台开发教程 - 如何开发UI5应用并运行在SAP云平台上
选择Services Catalog,根据关键字搜索到WebIDE服务,点击超链接打开WebIDE: 进入workspace,选择Git->Clone Repository: 从我的github ...