
openpose-opencv 的coco数据多人体姿态估计
介绍
opencv除了支持常用的物体检测模型和分类模型之外,还支持openpose模型,同样是线下训练和线上调用。这里不做特别多的介绍,先把源代码和数据放出来~
实验模型获取地址:https://github.com/CMU-Perceptual-Computing-Lab/openpose
基于coco数据的代码实现
import cv2

import time

import numpy as np

from random import randint

image1 = cv2.imread("E:\\usb_test\\example\\yolov3\\OpenPose-Multi-Person\\111.jpg")

protoFile = "E:\\usb_test\\example\\yolov3\\OpenPose-Multi-Person\\pose\\coco\\pose_deploy_linevec.prototxt"

weightsFile = "E:\\usb_test\\example\\yolov3\\OpenPose-Multi-Person\\pose\\coco\\pose_iter_440000.caffemodel"

nPoints = 18

# COCO Output Format

keypointsMapping = ['Nose', 'Neck', 'R-Sho', 'R-Elb', 'R-Wr', 'L-Sho', 'L-Elb', 'L-Wr', 'R-Hip', 'R-Knee', 'R-Ank', 'L-Hip', 'L-Knee', 'L-Ank', 'R-Eye', 'L-Eye', 'R-Ear', 'L-Ear']

POSE_PAIRS = [[1,2], [1,5], [2,3], [3,4], [5,6], [6,7],

              [1,8], [8,9], [9,10], [1,11], [11,12], [12,13],

              [1,0], [0,14], [14,16], [0,15], [15,17],

              [2,17], [5,16] ]

# index of pafs correspoding to the POSE_PAIRS

# e.g for POSE_PAIR(1,2), the PAFs are located at indices (31,32) of output, Similarly, (1,5) -> (39,40) and so on.

mapIdx = [[31,32], [39,40], [33,34], [35,36], [41,42], [43,44],

          [19,20], [21,22], [23,24], [25,26], [27,28], [29,30],

          [47,48], [49,50], [53,54], [51,52], [55,56],

          [37,38], [45,46]]

colors = [ [0,100,255], [0,100,255], [0,255,255], [0,100,255], [0,255,255], [0,100,255],

         [0,255,0], [255,200,100], [255,0,255], [0,255,0], [255,200,100], [255,0,255],

         [0,0,255], [255,0,0], [200,200,0], [255,0,0], [200,200,0], [0,0,0]]

def getKeypoints(probMap, threshold=0.1):

    mapSmooth = cv2.GaussianBlur(probMap,(3,3),0,0)

    mapMask = np.uint8(mapSmooth>threshold)

    keypoints = []

    #find the blobs

    _, contours, hierarchy = cv2.findContours(mapMask, cv2.RETR_TREE, cv2.CHAIN_APPROX_SIMPLE)

    #for each blob find the maxima

    for cnt in contours:

        #print(cnt)

        blobMask = np.zeros(mapMask.shape)

        blobMask = cv2.fillConvexPoly(blobMask, cnt, 1)

        maskedProbMap = mapSmooth * blobMask

        _, maxVal, _, maxLoc = cv2.minMaxLoc(maskedProbMap)

        keypoints.append(maxLoc + (probMap[maxLoc[1], maxLoc[0]],))

    return keypoints

# Find valid connections between the different joints of a all persons present

def getValidPairs(output):

    valid_pairs = []

    invalid_pairs = []

    n_interp_samples = 10

    paf_score_th = 0.1

    conf_th = 0.7

    # loop for every POSE_PAIR

    for k in range(len(mapIdx)):

        # A->B constitute a limb

        pafA = output[0, mapIdx[k][0], :, :]

        pafB = output[0, mapIdx[k][1], :, :]

        pafA = cv2.resize(pafA, (frameWidth, frameHeight))

        pafB = cv2.resize(pafB, (frameWidth, frameHeight))

        # Find the keypoints for the first and second limb

        candA = detected_keypoints[POSE_PAIRS[k][0]]

        candB = detected_keypoints[POSE_PAIRS[k][1]]

        nA = len(candA)

        nB = len(candB)

        # If keypoints for the joint-pair is detected

        # check every joint in candA with every joint in candB

        # Calculate the distance vector between the two joints

        # Find the PAF values at a set of interpolated points between the joints

        # Use the above formula to compute a score to mark the connection valid

        if( nA != 0 and nB != 0):

            valid_pair = np.zeros((0,3))

            for i in range(nA):

                max_j=-1

                maxScore = -1

                found = 0

                for j in range(nB):

                    # Find d_ij

                    d_ij = np.subtract(candB[j][:2], candA[i][:2])

                    norm = np.linalg.norm(d_ij)

                    if norm:

                        d_ij = d_ij / norm

                    else:

                        continue

                    # Find p(u)

                    interp_coord = list(zip(np.linspace(candA[i][0], candB[j][0], num=n_interp_samples),

                                            np.linspace(candA[i][1], candB[j][1], num=n_interp_samples)))

                    # Find L(p(u))

                    paf_interp = []

                    for k in range(len(interp_coord)):

                        paf_interp.append([pafA[int(round(interp_coord[k][1])), int(round(interp_coord[k][0]))],

                                           pafB[int(round(interp_coord[k][1])), int(round(interp_coord[k][0]))] ])

                    # Find E

                    paf_scores = np.dot(paf_interp, d_ij)

                    avg_paf_score = sum(paf_scores)/len(paf_scores)

                    # Check if the connection is valid

                    # If the fraction of interpolated vectors aligned with PAF is higher then threshold -> Valid Pair

                    if ( len(np.where(paf_scores > paf_score_th)[0]) / n_interp_samples ) > conf_th :

                        if avg_paf_score > maxScore:

                            max_j = j

                            maxScore = avg_paf_score

                            found = 1

                # Append the connection to the list

                if found:

                    valid_pair = np.append(valid_pair, [[candA[i][3], candB[max_j][3], maxScore]], axis=0)

            # Append the detected connections to the global list

            valid_pairs.append(valid_pair)

        else: # If no keypoints are detected

            print("No Connection : k = {}".format(k))

            invalid_pairs.append(k)

            valid_pairs.append([])

    return valid_pairs, invalid_pairs

# This function creates a list of keypoints belonging to each person

# For each detected valid pair, it assigns the joint(s) to a person

def getPersonwiseKeypoints(valid_pairs, invalid_pairs):

    # the last number in each row is the overall score

    personwiseKeypoints = -1 * np.ones((0, 19))

    for k in range(len(mapIdx)):

        if k not in invalid_pairs:

            partAs = valid_pairs[k][:,0]

            partBs = valid_pairs[k][:,1]

            indexA, indexB = np.array(POSE_PAIRS[k])

            for i in range(len(valid_pairs[k])):

                found = 0

                person_idx = -1

                for j in range(len(personwiseKeypoints)):

                    if personwiseKeypoints[j][indexA] == partAs[i]:

                        person_idx = j

                        found = 1

                        break

                if found:

                    personwiseKeypoints[person_idx][indexB] = partBs[i]

                    personwiseKeypoints[person_idx][-1] += keypoints_list[partBs[i].astype(int), 2] + valid_pairs[k][i][2]

                # if find no partA in the subset, create a new subset

                elif not found and k < 17:

                    row = -1 * np.ones(19)

                    row[indexA] = partAs[i]

                    row[indexB] = partBs[i]

                    # add the keypoint_scores for the two keypoints and the paf_score

                    row[-1] = sum(keypoints_list[valid_pairs[k][i,:2].astype(int), 2]) + valid_pairs[k][i][2]

                    personwiseKeypoints = np.vstack([personwiseKeypoints, row])

    return personwiseKeypoints

frameWidth = image1.shape[1]

frameHeight = image1.shape[0]

t = time.time()

net = cv2.dnn.readNetFromCaffe(protoFile, weightsFile)

# Fix the input Height and get the width according to the Aspect Ratio

inHeight = 368

inWidth = int((inHeight/frameHeight)*frameWidth)

inpBlob = cv2.dnn.blobFromImage(image1, 1.0 / 255, (inWidth, inHeight),(0, 0, 0), swapRB=False, crop=False)

print("", inpBlob.shape )

net.setInput(inpBlob)

output = net.forward()

print(output.shape)

print("Time Taken in forward pass = {}".format(time.time() - t))

detected_keypoints = []

keypoints_list = np.zeros((0,3))

keypoint_id = 0

threshold = 0.1

for part in range(nPoints):

    probMap = output[0,part,:,:]

    probMap = cv2.resize(probMap, (image1.shape[1], image1.shape[0]))

    keypoints = getKeypoints(probMap, threshold)

    print("Keypoints - {} : {}".format(keypointsMapping[part], keypoints))

    keypoints_with_id = []

    for i in range(len(keypoints)):

        keypoints_with_id.append(keypoints[i] + (keypoint_id,))

        keypoints_list = np.vstack([keypoints_list, keypoints[i]])

        keypoint_id += 1

    detected_keypoints.append(keypoints_with_id)

frameClone = image1.copy()

for i in range(nPoints):

    for j in range(len(detected_keypoints[i])):

        cv2.circle(frameClone, detected_keypoints[i][j][0:2], 5, colors[i], -1, cv2.LINE_AA)

cv2.imshow("Keypoints",frameClone)

valid_pairs, invalid_pairs = getValidPairs(output)

personwiseKeypoints = getPersonwiseKeypoints(valid_pairs, invalid_pairs)

for i in range(17):

    for n in range(len(personwiseKeypoints)):

        index = personwiseKeypoints[n][np.array(POSE_PAIRS[i])]

        if -1 in index:

            continue

        B = np.int32(keypoints_list[index.astype(int), 0])

        A = np.int32(keypoints_list[index.astype(int), 1])

        cv2.line(frameClone, (B[0], A[0]), (B[1], A[1]), colors[i], 3, cv2.LINE_AA)

cv2.imshow("Detected Pose" , frameClone)

cv2.waitKey(0)
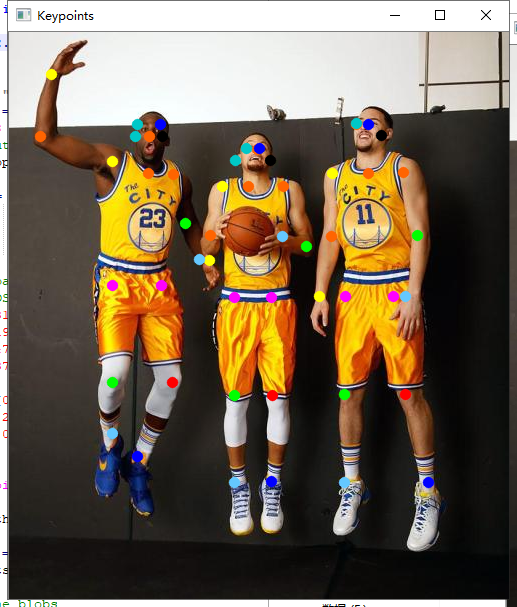
实验效果

openpose-opencv 的coco数据多人体姿态估计的更多相关文章
- openpose-opencv 的body数据多人体姿态估计
介绍 opencv除了支持常用的物体检测模型和分类模型之外,还支持openpose模型,同样是线下训练和线上调用.这里不做特别多的介绍,先把源代码和数据放出来- 实验模型获取地址:https://gi ...
- Facebook提出DensePose数据集和网络架构:可实现实时的人体姿态估计
https://baijiahao.baidu.com/s?id=1591987712899539583 选自arXiv 作者:Rza Alp Güler, Natalia Neverova, Ias ...
- 快速人体姿态估计:CVPR2019论文阅读
快速人体姿态估计:CVPR2019论文阅读 Fast Human Pose Estimation 论文链接: http://openaccess.thecvf.com/content_CVPR_201 ...
- 人体姿态和形状估计的视频推理:CVPR2020论文解析
人体姿态和形状估计的视频推理:CVPR2020论文解析 VIBE: Video Inference for Human Body Pose and Shape Estimation 论文链接:http ...
- 从DeepNet到HRNet,这有一份深度学习“人体姿势估计”全指南
从DeepNet到HRNet,这有一份深度学习"人体姿势估计"全指南 几十年来,人体姿态估计(Human Pose estimation)在计算机视觉界备受关注.它是理解图像和视频 ...
- CVPR 2020几篇论文内容点评:目标检测跟踪,人脸表情识别,姿态估计,实例分割等
CVPR 2020几篇论文内容点评:目标检测跟踪,人脸表情识别,姿态估计,实例分割等 CVPR 2020中选论文放榜后,最新开源项目合集也来了. 本届CPVR共接收6656篇论文,中选1470篇,&q ...
- 人体姿态的相似性评价基于OpenCV实现最近邻分类KNN K-Nearest Neighbors
最近学习了人体姿态的相似性评价.需要用到KNN来统计与当前姿态相似的k个姿态信息. 假设我们已经有了矩阵W和给定的测试样本姿态Xi,需要寻找与Xi相似的几个姿态,来估计当前Xi的姿态标签. //knn ...
- 利用RGB-D数据进行人体检测 带dataset
利用RGB-D数据进行人体检测 LucianoSpinello, Kai O. Arras 摘要 人体检测是机器人和智能系统中的重要问题.之前的研究工作使用摄像机和2D或3D测距器.本文中我们提出一种 ...
- 头部姿态估计 - Android
概括 通过Dlib获得当前人脸的特征点,然后通过旋转平移标准模型的特征点进行拟合,计算标准模型求得的特征点与Dlib获得的特征点之间的差,使用Ceres不断迭代优化,最终得到最佳的旋转和平移参数. A ...
随机推荐
- 【miscellaneous】GStreamer下的音视频播放
Gst-launch命令: gst-launch filesrc location=*.* ! demux name=demux demux.video_00 ! queue ! decoder ! ...
- 使用自定义Comparator对TreeSet中的数据进行多条件排序
代码记录(需求:根据店铺等级和店铺到某个点的距离进行排序,其中店铺等级由高到低,距离由近及远) 需要排序的对象Store,Store.java package com.zhipengs.work.te ...
- 解决电脑开机连不上网问题(Windows检测:远程计算机或设备将不接受连接)
打开Google Chrome浏览器 -----> 设置 ------> 高级设置 -----> 打开代理设置 -----> 连接 -----> 局域网设置 ----& ...
- sudo: /usr/bin/sudo must be owned by uid 0 and have the setuid bit set 的解决办法
Linux新建用户 ,sudo报错: sudo: /usr/bin/sudo must be owned by uid 0 and have the setuid bit set 解决办法:重置一下s ...
- Python视频教程免费分享(2020年最新版)
为期92天的全套Python视频教程免费分享,总计57G! 里面还有我的笔记,希望对大家有帮助哈~ 1-32天 … … 65-92天 百度云网盘: 链接: https://pan.baidu.com/ ...
- 路由器02---PandoraBox配置
1.安装libc 什么是libc,这里贴一个gnu官方的解释 Any Unix-like operating system needs a C library: the library which d ...
- 【51nod】1602 矩阵方程的解
[51nod]1602 矩阵方程的解 这个行向量显然就是莫比乌斯函数啦,好蠢的隐藏方法= = 然后我们尝试二分,二分的话要求一个这个东西 \(H(n) = \sum_{i = 1}^{n} \mu(i ...
- 在VMware Workstation10下CentOS7虚拟机中创建与主机共享文件夹的详细步骤
一.前言 在使用虚拟机时,常常需要与宿主计算机(以下简称为主机)操作系统交换文件,为此需要在虚拟机与主机之间建立共享文件夹. 二. 安装VMTools 要使用共享文件机制,必须首先安装VMTools. ...
- 理解Python函数和方法
什么是函数? 函数是抽象出的一组执行特定功能的重复代码,通俗理解,就是对一些重复的工作进行封装和然后直接调用,避免重复造轮子. Python中的函数如何定义? 使用def关键字,结构如下: def 函 ...
- MySQL explain功能展示的各种信息的解释
1.id: MySQL Query Optimizer 选定的执行计划中查询的序列号. 2.select_type: 所使用的查询类型,主要有以下这几种查询类型. DEPENDENT SUBQUER ...