
Vue + Springboot 开发的简单的用户管理系统
后台接口如下:
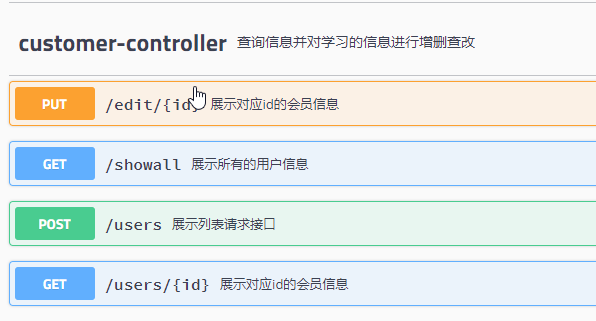
页面如下:
1. 主页,显示所有的用户信息
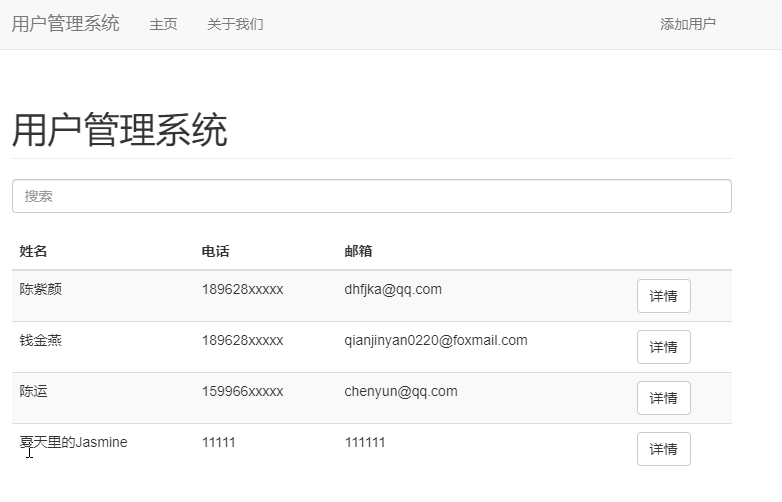
2. 点击详情,看到某个id的用户的详细信息
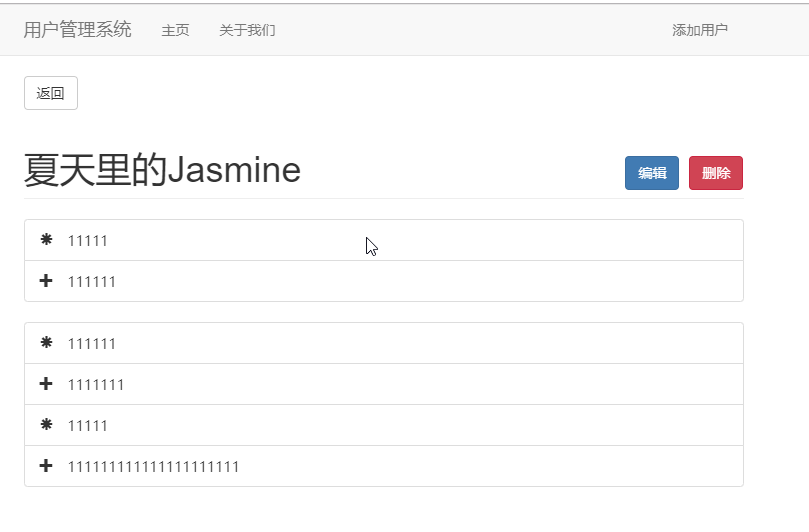
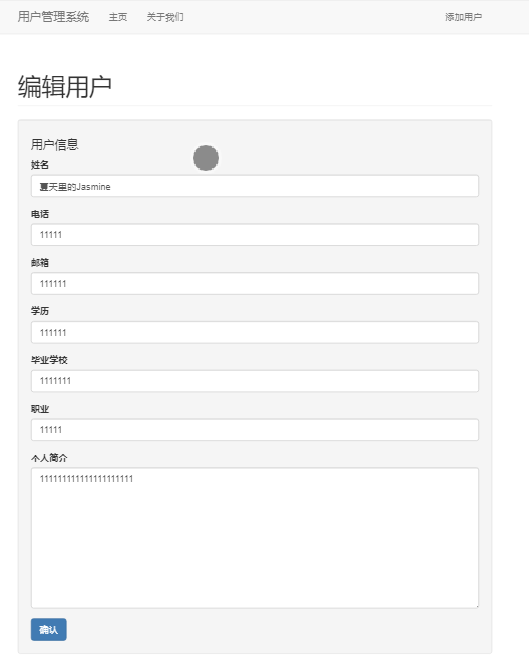
3. 点击编辑按钮,跳转到的详细的编辑(更新)页面
4. 添加用户页面
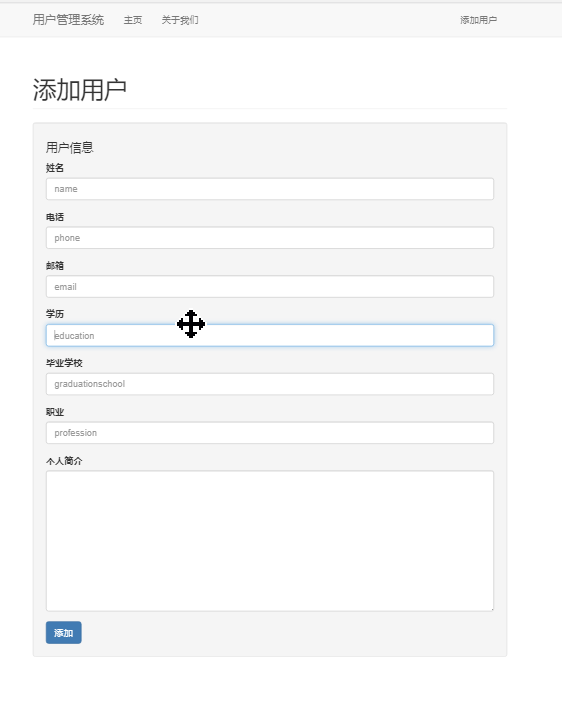
对应的vue代码如下
1. 查看所有用户的信息
<template>

  <div class="customers container">

    <Alert v-if="alert"  v-bind:message="alert"></Alert>

    <h1 class="page-header">用户管理系统</h1>

    <input type="text" class="form-control" placeholder="搜索" v-model="filterInput">

    <br>

    <table class="table table-striped">

      <thead>

        <tr>

          <th>姓名</th>

          <th>电话</th>

          <th>邮箱</th>

          <th></th>

        </tr>

      </thead>

      <tbody>

        <tr v-for="customer in filterBy(customers,filterInput)" :key="customer.name">

          <td>{{customer.name}}</td>

          <td>{{customer.phone}}</td>

          <td>{{customer.email}}</td>

          <td><router-link class="btn btn-default" v-bind:to="'/customer/'+customer.id">详情</router-link></td>

        </tr>

      </tbody>

    </table>

  </div>

</template>

<script>

import Alert from './Alert'

export default {

  name: 'customers',

  data () {

    return {

      customers:[],

      alert:"",

      filterInput:""

    }

  },

  methods:{

    fetchCustomers(){

      this.$http.get("http://10.201.11.128:8085/showall")

          .then((response) => {

            console.log(response);

            this.customers = response.data;

          })

    },

    filterBy(customers,value){

      return customers.filter(function(customer){

         return customer.name.match(value);

      })

    }

  },

  created(){

    if (this.$route.query.alert) {

      this.alert = this.$route.query.alert;

    }

    this.fetchCustomers();

  },

  updated(){

    this.fetchCustomers();

  },

  components:{

    Alert

  }

}

</script>
2. 某个id的用户的详细信息,页面中有编辑和删除按钮
<template>

  <div class="details container">

  	<router-link to="/" class="btn btn-default">返回</router-link>

    <h1 class="page-header">

    	{{customer.name}}

    	<span class="pull-right">

    		<router-link class="btn btn-primary" v-bind:to="'/edit/'+customer.id">

    			编辑

    		</router-link>

    		<button class="btn btn-danger" @click="deleteCustomer(customer.id)">删除</button>

    	</span>

    </h1>

    <ul class="list-group">

    	<li class="list-group-item">

    		<span class="glyphicon glyphicon-asterisk">

    			{{customer.phone}}

    		</span>

    	</li>

    	<li class="list-group-item">

    		<span class="glyphicon glyphicon-plus">

    			{{customer.email}}

    		</span>

    	</li>

    </ul>

    <ul class="list-group">

    	<li class="list-group-item">

    		<span class="glyphicon glyphicon-asterisk">

    			{{customer.education}}

    		</span>

    	</li>

    	<li class="list-group-item">

    		<span class="glyphicon glyphicon-plus">

    			{{customer.graduationschool}}

    		</span>

    	</li>

		<li class="list-group-item">

			<span class="glyphicon glyphicon-asterisk">

				{{customer.profession}}

			</span>

		</li>

		<li class="list-group-item">

			<span class="glyphicon glyphicon-plus">

				{{customer.profile}}

			</span>

		</li>

    </ul>

  </div>

</template>

<script>

export default {

  name: 'cumstomerdetails',

  data () {

    return {

      customer:""

    }

  },

  methods:{

  	fetchCustomers(id){

      this.$http.get("http://10.201.11.128:8085/users/"+id)

          .then((response) => {

            console.log(response);

            this.customer = response.data;

          })

    },

    deleteCustomer(id){

    	console.log(id);

    	this.$http.delete("http://10.201.11.128:8085/users/"+id)

    		.then((response) => {

    			this.$router.push({path:"/",query:{alert:"用户删除成功!"}});

    		})

    }

  },

  created(){

  	this.fetchCustomers(this.$route.params.id);

  }

}

</script>
3. 更新页面
<template>

  <div class="edit container">

    <Alert v-if="alert" v-bind:message="alert"></Alert>

    <h1 class="page-header">编辑用户</h1>

    <form v-on:submit="updateCustomer">

    	<div class="well">

    		<h4>用户信息</h4>

    		<div class="form-group">

    			<label>姓名</label>

    			<input type="text" class="form-control" placeholder="name" v-model="customer.name">

    		</div>

    		<div class="form-group">

    			<label>电话</label>

    			<input type="text" class="form-control" placeholder="phone" v-model="customer.phone">

    		</div>

    		<div class="form-group">

    			<label>邮箱</label>

    			<input type="text" class="form-control" placeholder="email" v-model="customer.email">

    		</div>

    		<div class="form-group">

    			<label>学历</label>

    			<input type="text" class="form-control" placeholder="education" v-model="customer.education">

    		</div>

    		<div class="form-group">

    			<label>毕业学校</label>

    			<input type="text" class="form-control" placeholder="graduationschool" v-model="customer.graduationschool">

    		</div>

    		<div class="form-group">

    			<label>职业</label>

    			<input type="text" class="form-control" placeholder="profession" v-model="customer.profession">

    		</div>

    		<div class="form-group">

    			<label>个人简介</label>

    			<!-- <input type="text" class="form-control" placeholder="profile" v-model="customer.profile"> -->

    			<textarea class="form-control" rows="10" v-model="customer.profile"></textarea>

    		</div>

    		<button type="submit" class="btn btn-primary">确认</button>

    	</div>

    </form>

  </div>

</template>

<script>

import Alert from './Alert'

export default {

  name: 'add',

  data () {

    return {

      customer:{},

      alert:""

    }

  },

  methods:{

    fetchCustomer(id){

        this.$http.get("http://10.201.11.128:8085/users/"+id)

            .then((response) => {

              console.log(response);

              this.customer = response.data;

            })

    },

  	updateCustomer(e){

  		// console.log(123);

  		if (!this.customer.name || !this.customer.phone || !this.customer.email) {

        // console.log("请添加对应的信息!");

  			this.alert = "请添加对应的信息!";

  		}else{

  			let updateCustomer = {

  				name:this.customer.name,

  				phone:this.customer.phone,

  				email:this.customer.email,

  				education:this.customer.education,

  				graduationschool:this.customer.graduationschool,

  				profession:this.customer.profession,

  				profile:this.customer.profile

  			}

  			this.$http.put("http://10.201.11.128:8085/edit/"+this.$route.params.id,updateCustomer)

  				.then((response) => {

  					console.log(response);

  					this.$router.push({path:"/",query:{alert:"用户信息更新成功!"}});

  				})

  			e.preventDefault();

  		}

  		e.preventDefault();

  	}

  },

  created(){

    this.fetchCustomer(this.$route.params.id);

  },

  components:{

    Alert

  }

}

</script>
4. 注册页面
<template>

  <div class="add container">

  	<Alert v-if="alert" v-bind:message="alert"></Alert>

    <h1 class="page-header">添加用户</h1>

    <form v-on:submit="addCustomer">

    	<div class="well">

    		<h4>用户信息</h4>

    		<div class="form-group">

    			<label>姓名</label>

    			<input type="text" class="form-control" placeholder="name" v-model="customer.name">

    		</div>

    		<div class="form-group">

    			<label>电话</label>

    			<input type="text" class="form-control" placeholder="phone" v-model="customer.phone">

    		</div>

    		<div class="form-group">

    			<label>邮箱</label>

    			<input type="text" class="form-control" placeholder="email" v-model="customer.email">

    		</div>

    		<div class="form-group">

    			<label>学历</label>

    			<input type="text" class="form-control" placeholder="education" v-model="customer.education">

    		</div>

    		<div class="form-group">

    			<label>毕业学校</label>

    			<input type="text" class="form-control" placeholder="graduationschool" v-model="customer.graduationschool">

    		</div>

    		<div class="form-group">

    			<label>职业</label>

    			<input type="text" class="form-control" placeholder="profession" v-model="customer.profession">

    		</div>

    		<div class="form-group">

    			<label>个人简介</label>

    			<!-- <input type="text" class="form-control" placeholder="profile" v-model="customer.profile"> -->

    			<textarea class="form-control" rows="10" v-model="customer.profile"></textarea>

    		</div>

    		<button type="submit" class="btn btn-primary">添加</button>

    	</div>

    </form>

  </div>

</template>

<script>

import Alert from './Alert'

export default {

  name: 'add',

  data () {

    return {

      customer:{},

      alert:""

    }

  },

  methods:{

  	addCustomer(e){

  		// console.log(123);

  		if (!this.customer.name || !this.customer.phone || !this.customer.email) {

  			// console.log("请添加对应的信息!");

  			this.alert = "请添加对应的信息!";

  		}else{

  			let newCustomer = {

  				name:this.customer.name,

  				phone:this.customer.phone,

  				email:this.customer.email,

  				education:this.customer.education,

  				graduationschool:this.customer.graduationschool,

  				profession:this.customer.profession,

  				profile:this.customer.profile

  			}

  			this.$http.post("http://10.201.11.128:8085/users",newCustomer)

  				.then((response) => {

  					console.log(response);

  					this.$router.push({path:"/",query:{alert:"用户信息添加成功!"}});

  				})

  			e.preventDefault();

  		}

  		e.preventDefault();

  	}

  },

  components:{

  	Alert

  }

}

</script>
所有页面中带有一个alert组件
<template>

  <div class="alert alert-warning alert-dismissible" role="alert">

  <button type="button" class="close" data-dismiss="alert" aria-label="Close"><span aria-hidden="true">×</span></button>

  {{message}}

</div>

</template>

<script>

export default {

  name: 'alert',

  props:["message"],

  data () {

    return {

    }

  }

}

</script>
Vue + Springboot 开发的简单的用户管理系统的更多相关文章
- php+js实现一个简单的用户管理系统
php + js 实现一个简单的用户管理系统 说实话,我对PHP是抵触的,但是我们的WEB课程刚好学的就是这个,不得已看了看,下面是用PHP实现的一个简单的用户管理系统. 我们首先来看一下目录结构 a ...
- Vue+SpringBoot+Mybatis的简单员工管理项目
本文项目参考自:https://github.com/boylegu/SpringBoot-vue 为了完成此项目你需要会springBoot,mybatis的一些基本操作 运行界面 第一步:搭建前端 ...
- springmvc05-Spring+Springmvc+Hibernate实现简单的用户管理系统
1, 导入\spring-framework-3.2.4.RELEASE\libs\disk下所有包; hibernate-distribution-3.6.7.Final\lib\required下 ...
- C#-MVC开发微信应用(7)--在管理系统中同步微信用户分组信息
在前面几篇文章中,逐步从原有微信的API封装的基础上过渡到微信应用平台管理系统里面,逐步介绍管理系统中的微信数据的界面设计,以及相关的处理操作过程的逻辑和代码.希望从一个更高的层次介绍微信的开发. 在 ...
- vue springboot利用easypoi实现简单导出
vue springboot利用easypoi实现简单导出 前言 一.easypoi是什么? 二.使用步骤 1.传送门 2.前端vue 3.后端springboot 3.1编写实体类(我这里是dto, ...
- Django开发简单采集用户浏览器信息的小功能
Django开发简单采集用户浏览器信息的小功能 Centos环境准备 yum install –y python-pip export http_proxy=http://10.11.0.148:80 ...
- [Abp vNext 入坑分享] - 3.简单的用户模块功能开发
一.简要说明 本篇文章开始进行业务模块的开发模拟,借助user模块来进行业务开发,主要是用户相关的基础操作.主要是先使用Users来体验整个开发的流程.主要是先把一个基础流程跑顺利,在这里我并不会过于 ...
- Vue基础开发入门之简单语法知识梳理(思维导图详解)
基于个人写的以下关于Vue框架基础学习的三篇随笔,在此基础上,做一个阶段性的知识总结,以此来检验自己对Vue这一段时间学习的成果,内容不多,但很值得一看.(思维导图详解)
- Springboot - 建立简单的用户登录系统
在开始编码前,先建立几个Package(可以按个人习惯命名),如图 1.Controllers 用于存放控制器类 2.Models 用于存放数据实体类 3.Repositories 用于存放数据库操作 ...
随机推荐
- 《MySQL必知必会》学习笔记——附录A MySQL入门
附录A MySQL入门 如果你是MySQL的初学者,本附录是一些需要的基础知识. A.1 你需要什么 为使用MySQL和学习本书中各章的内容,你需要访问MySQL服务器和客户机应用(用来访问服务器的软 ...
- 01点睛Spring4.1-依赖注入
转载:https://www.iteye.com/blog/wiselyman-2210252 1.1 声明bean 使用上例建立的testMavenSpring项目,将pom.xml文件中的 < ...
- lua . 命令收集
io.popen()## 原型:io.popen ([prog [, mode]]) 解释:在额外的进程中启动程序prog,并返回用于prog的文件句柄.通俗的来说就是使用这个函数可以调用一个命令(程 ...
- kafka生产者消费者
import org.apache.kafka.clients.consumer.ConsumerRecord; import org.apache.kafka.clients.consumer.Co ...
- Redis从认识安装到实现增删改查
Redis从一无所知,到知道一点点 Redis是一个使用ANSI C编写的开源.支持网络.基于内存.可选持久性的键值对存储数据库 --维基百科 可以简单的说,Redis就是一款高性能的NoSQL数据库 ...
- QT 创建本地数据库(SQLite数据库)存储数据
注意:QT自带SQLITE数据库,不需要再安装 1.创建一个包含创建.查询.修改和删除数据库的数据库类(DataBase) DataBase.h头文件 #pragma once #include &l ...
- 关于python的一次性能调优过程
问题 这两天在公司帮老大写一个程序功能,要求抓取从elasticsearch和kibana服务器上返回的数据,统计所有hits的数据字段ret_code为0的hit,并计算其占有率等一些功能. 功能倒 ...
- 作业练习P194,jieba应用,读取,分词,存储,生成词云,排序,保存
import jieba #第一题 txt='Python是最有意思的编程语言' words=jieba.lcut(txt) #精确分词 words_all=jieba.lcut(txt,cut_al ...
- SAS学习笔记51 SAS数据集
结构 SAS数据集是关系型的,包含两个部分:描述部分(变量)和数据部分(观察值) 形式 SAS系统中共有两种类型的数据集: 1.SAS 数据文件(SAS datafiles) 2.SAS 数据视窗(S ...
- SSM整合所需的maven配置文件
<?xml version="1.0" encoding="UTF-8"?> <project xmlns="http://mave ...