HP Notebook PCs - Updating the BIOS
HP Notebook PCs - Updating the BIOS
NOTE:
The term "ROMPaq" refers to the BIOS for Compaq Presario computers prior to 2002.
- The update fixes a problem with your computer.
- The update enhances your computer's performance in a desired way.
- You are planning to change the operating system, processor, or other feature(s), and the current BIOS version will not support the new configuration.
- An HP Support Agent, or an HP support document, recommends that you download and install a specific updated BIOS.
CAUTION:
Only install BIOS updates from HP. Do not install BIOS updates from the motherboard manufacturer's website. Doing so might prevent the computer from accepting an HP System Recovery.
- Product number
NOTE:
The product number is usually located on a sticker on the bottom of the computer. For help finding the product number, refer to the HP support document, How Do I Find My Model Number or Product Number?. - An Internet connectionIf your computer does not have an Internet connection, use another computer with an Internet connection to download the update and save it to removable media (for example, a CD or thumb drive).
- A printout of this document
- Pencil and paper
- In Windows search for msinfo32.exe, and click msinfo32.exe in the list of results.
- In the System Information window under the System Summary category, look for the BIOS Version/Date entry. This is your current BIOS version.Figure : System Information BIOS Version/Date
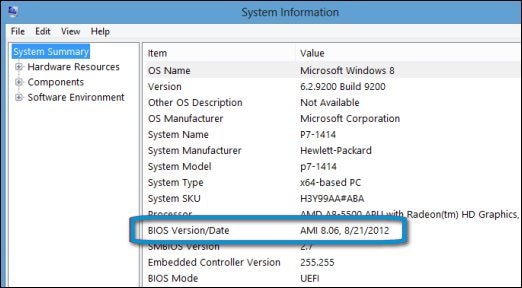
- Write down the BIOS version and continue with the next section to find the processor type.
- In Windows search for msinfo32.exe, and click msinfo32.exe in the list of results.
- In the System Information window under the System Summary category, look for the Processor entry. This is the type of processor in your computer.Figure : System Information Processor entry

- Write down the processor information. Take the time to ensure that the BIOS you are about to install is one meant to be used with your specific processor. Continue with finding and downloading BIOS updates.
- Go to the HP Software & Driver Downloads webpage.
- Navigate to the product page for your computer model.For help finding the product number of your notebook, refer to the HP support document How Do I Find My Model Number or Product Number?
- Select the operating system (such as Microsoft Windows 8.1 (64-bit)) your computer is running, and then click Submit.
NOTE:
If the operating system that you need is not listed, updates for your computer are not available from HP at this time. - The webpage lists the available updates for your computer. If a BIOS category is listed, select BIOS.
- If a BIOS category is not listed on the webpage, the original BIOS version already on the computer might be the latest available.
- If the update is newer than your current BIOS version, choose the correct download for your processor and follow the on-screen instructions.
- If the version of the listed BIOS is the same or older than the current BIOS on the computer, you may exit this procedure. The computer does not require a BIOS update at this time.
- Click More details to view the overview, installation instructions, and system requirements for the BIOS update.It is important to read the Overview and System requirements sections to verify that the BIOS update applies to your computer. Installing a BIOS that is not designed for the processor or operating system in your computer could cause the computer to stop working.
- Click Download, and when prompted, click Save as to save the file to a convenient location, such as your desktop.
CAUTION:
Do not select the option to Run a BIOS update over the network.The BIOS image is now saved to the computer. Continue to the next section to install the BIOS update.
- Connect the AC power supply to the notebook. Do not disconnect the power supply during the BIOS update process.
- Close any open programs and temporarily disable your antivirus software. Remember to re-enable the antivirus software after the installation is complete.
- Locate the BIOS file (example filename: sp12345.exe) that you downloaded and saved to a convenient location on your computer.
- Double-click the file to start the installation and follow the on-screen instructions.
- Wait for the installation to complete, and then restart the computer when prompted.The latest version of the BIOS is now installed on the computer.
NOTE:
If your computer does not feature UEFI, update the BIOS using the other method described in this document.
- Product number
NOTE:
The product number is usually located on a sticker on the bottom of the computer. For help finding the product number, refer to the HP support document, How Do I Find My Model Number or Product Number?. - An Internet connectionIf your computer does not have an Internet connection, use another computer with an Internet connection to download the update and save it to removable media (for example, a CD or thumb drive).
- A blank USB drive
- Connect a blank USB drive to the computer.
- Go to the HP Software & Driver Downloads webpage.
- Navigate to the product page for your computer model.For help finding the product number of your notebook, refer to the HP support document How Do I Find My Model Number or Product Number?
- Select the operating system (such as Microsoft Windows 8.1 (64-bit)) your computer is running, and then click Submit.
- The webpage lists the available updates for your computer. If a BIOS category is listed, click BIOS.
- Click More details to view the overview, installation instructions, and system requirements for the BIOS update.It is important to read the Overview and System requirements sections to verify that the BIOS update applies to your computer. Installing a BIOS that is not designed for the processor or operating system in your computer could cause the computer to stop working.
- Click the file name, and then click Run.
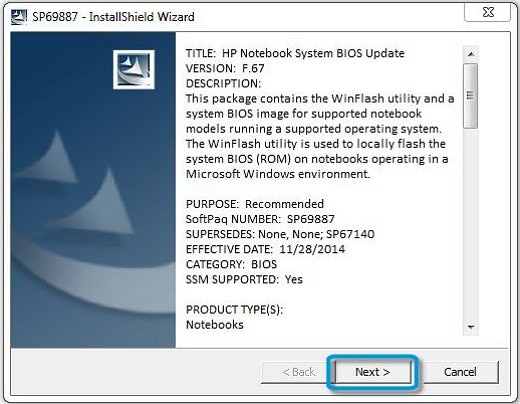
- In the InstallShield Wizard window, click Next.Figure : InstallShield Wizard
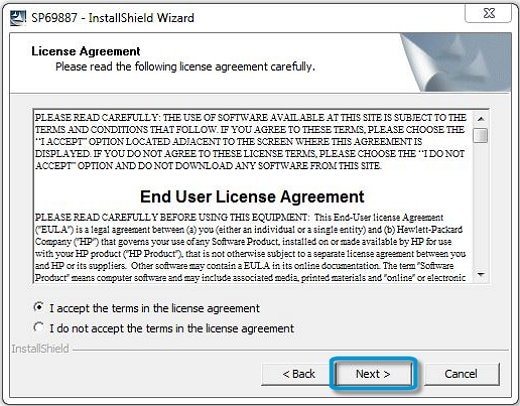
- Select I accept the terms in the license agreement, and then click Next.Figure : End User License Agreement
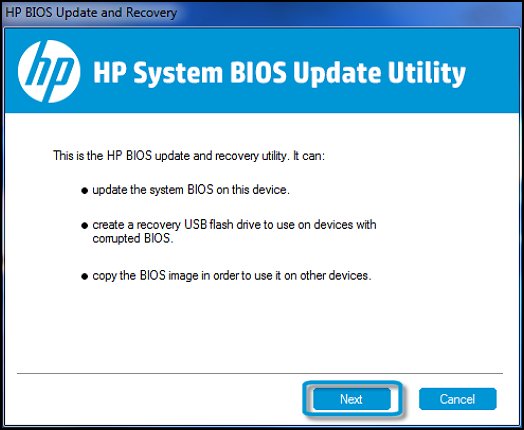
- The HP System BIOS Update Utility opens. Click Next.Figure : HP System BIOS Update Utility
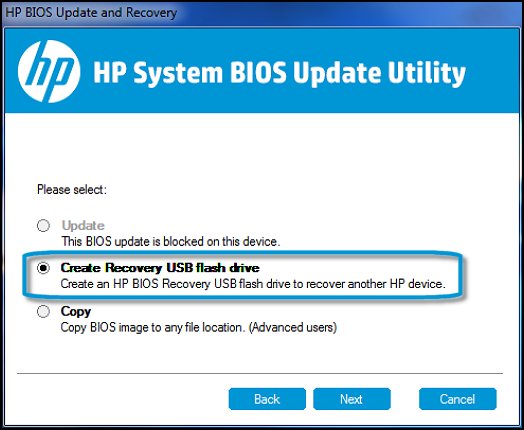
- Select Create Recovery USB flash drive, and then click Next.Figure : Create Recovery USB flash drive
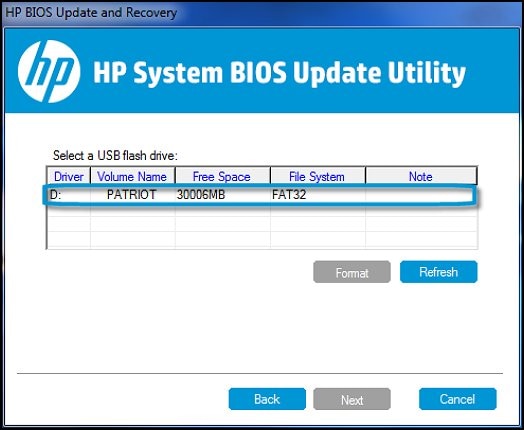
- Select your USB drive in the list, and then click Next.Figure : USB flash drive
- Wait while the BIOS files are copied to your USB drive. When the message The recovery flash drive was created successfully displays, clickFinish.Figure : The recovery flash drive was created successfully
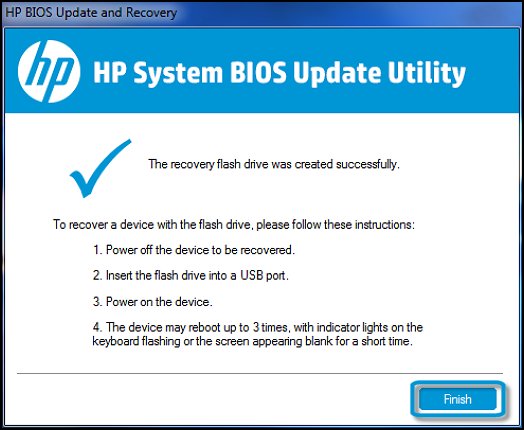
- Click Cancel to close the HP System BIOS Update Utility.The BIOS recovery USB drive is ready to use. Proceed to the next step.
- Turn on the computer and, while the display is blank, press the F10 key to enter the BIOS settings menu.
NOTE:
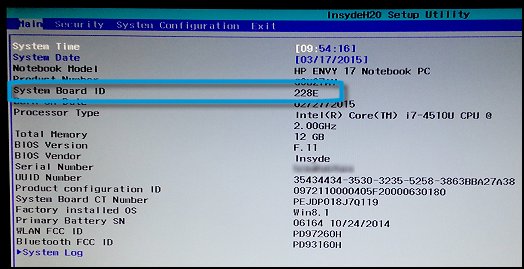
The BIOS settings menu is accessible by pressing the F2 or F6 key on some computers. - On the Main tab, find the System Board ID, and write it down to reference during the BIOS update process.Figure : System Board ID
- Press the F10 key to exit BIOS.
- Connect the AC power supply to the notebook. Do not disconnect the power supply during the BIOS update process.
- Connect the USB drive that contains the BIOS file to the notebook.
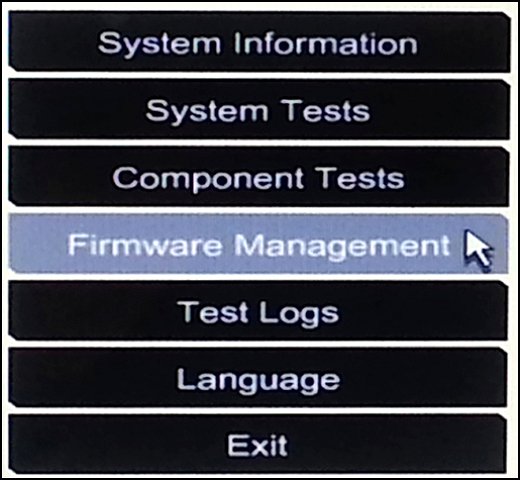
- On the HP PC Hardware Diagnostics UEFI screen, click Firmware Management or BIOS Management.Figure : Firmware Management
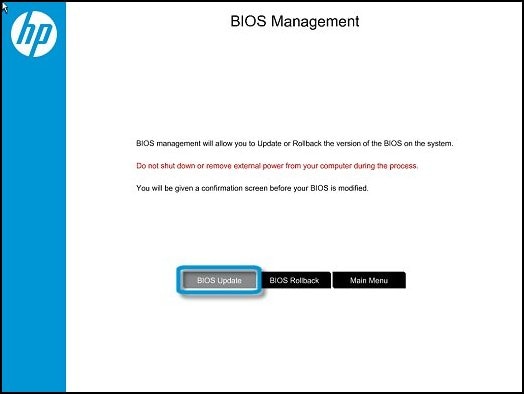
- Click BIOS Update.Figure : BIOS Update
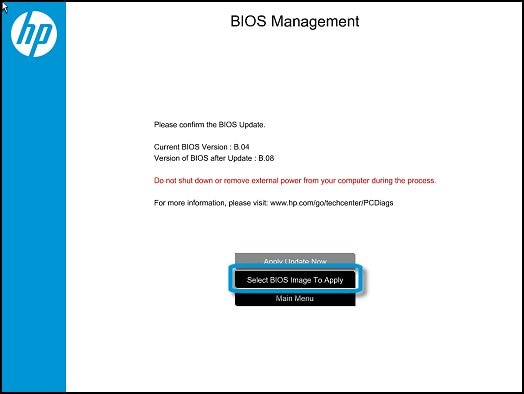
- The BIOS Management screen shows the current BIOS version. Click Select BIOS Image To Apply.Figure : Select BIOS Image To Apply
- Click HP_TOOLS, and then click HEWLETT_PACKARD.
- Navigate to the BIOS image. The file is stored in a folder named either BIOSUpdate, CURRENT, NEW, or PREVIOUS.
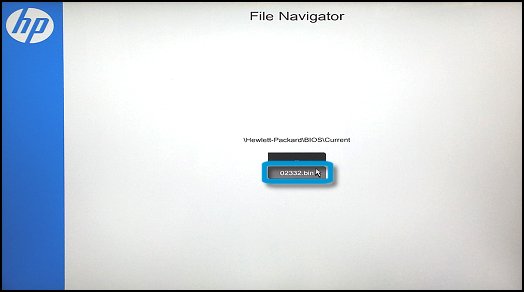
- Select the BIOS update file that matches the System Board ID, with a "0" before the four-digit number (for example, if the System Board ID is 2291, select the 02291.bin file).Figure : BIOS update file selection
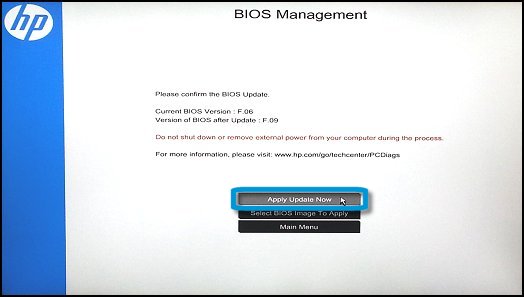
- A confirmation screen displays the current BIOS version and the version of BIOS after the update. Click Apply Update Now to confirm and begin the update.Figure : Apply Update Now
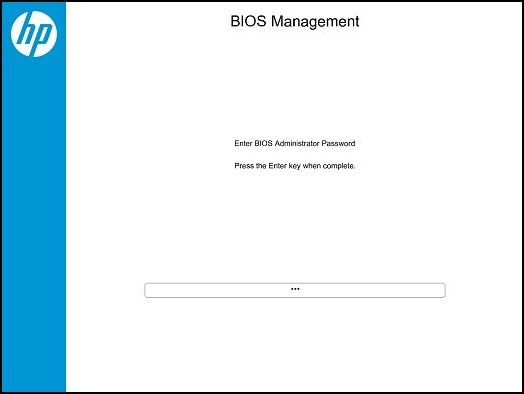
- If the BIOS is locked with an administrator password, type the password, and then press Enter.Figure : Enter BIOS Administrator Password
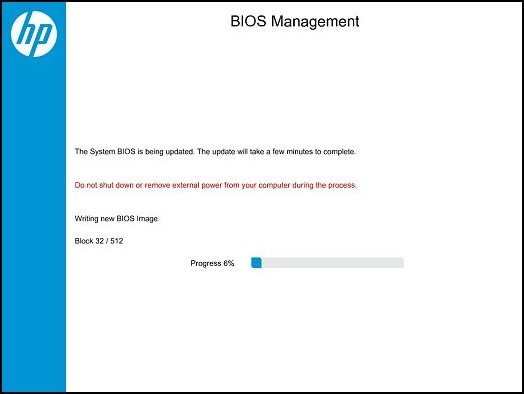
- The BIOS Management screen shows the write and verify progress. Wait for the update to complete.Figure : Writing new BIOS Image progress
- If the BIOS update is successful, a screen shows the completion status, and the system restarts automatically after 30 seconds. Do not attempt to turn off your computer while the system restarts.The BIOS update process is complete.Figure : System BIOS update is complete
 If the BIOS update fails, a failure screen displays, and the system restarts automatically after 30 seconds.Additional information about the failure is displayed if available. If the BIOS was written, the system will execute a BIOS recovery after a restart. Do not attempt to turn off your computer while the system restarts.Figure : System BIOS update failed
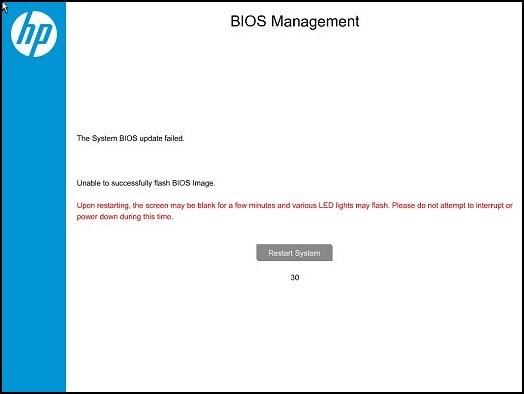
HP Notebook PCs - Updating the BIOS的更多相关文章
- 记一次 在 HP zbook G3 笔记本上安装Ubuntu16.04LTS 的 心(填)路(坑)旅程
背景 同事MM申请的新笔记本暂时没有用,问我需不需要用. 本着 “宇宙都是xx的”(厚颜无耻~~)思想就接受了. 拿到本本一看,HP zbook G3, 配置还不错(500G SSD, 16G mem ...
- 黑苹果引导工具 Clover 配置详解及Clover Configurator使用
黑苹果引导工具 Clover 配置详解及Clover Configurator使用 2017-03-11 14:01:40 by SemiconductorKING 转自:@三个表哥 简介: 可 ...
- VueJs项目笔记
======================知识点总结=========================== 一.keep-alive(实现页面的缓存) 二. 移动端固定定位的解决方案 三. Vue表 ...
- VMware Workstation 常见问题解决
本文以FAQ的方式进行整理,大家可以根据关键字进行查找即可. 问题一:VMware 安装64位操作系统报错“此主机支持Intel VT-x, 但Intel VT-x处于禁用状态” 问题二:This v ...
- 自动化测试 ubuntu多设备连接不识别
环境: ubuntu系统 usb2.0 16个口集线器 遇到问题: 连接手机到第11台设备时出现adb devices不显示的现象导致无法通过adb操作 问题排除思路; 1.通过dmesg查看设备连接 ...
- Linux Hardening Guide
文章转载自:https://madaidans-insecurities.github.io/guides/linux-hardening.html 1. Choosing the right Lin ...
- HP Server BIOS实验报告
原文链接http://www.hpiss.com/3924.html 注意:红色字体为HP手册中查找到的资源,及个人感觉应该注意的一些信息,个人翻译的也为红字体,网络中自行查找到的资源,以及询问各位师 ...
- HP PCS 云监控大数据解决方案
——把数据从分散统一集中到数据中心 基于HP分布式并行计算/存储技术构建的云监控系统即是通过“云高清摄像机”及IaaS和PaaS监控系统平台,根据用户所需(SaaS)将多路监控数据流传送给“云端”,除 ...
- HP ProLiant DL380 G6 服务器 - 清 BIOS 的方法
问题 HP ProLiant DL380 G6服务器的BIOS位置在哪里? 如何清BIOS,具体步骤是什么? 解决方案 DL380 G6服务器清BIOS过程分为三步: 1. 为服务器断电(拔掉电源线) ...
随机推荐
- C++的那些事 1
最近在看c++的一些库文件,里面的一些比较陌生但看起来挺有用的一些东西,在此记下,以免日后看到再翻找资料. template <size_t _Nb> 这是在看bitset的时候看到的,之 ...
- [原创]jQuery Validation范例
上班无事,学习jQuery Validation,于是手写一公共范例,并收藏以便后用 验证操作类formValidatorClass.js }); 测试页index.html * {} ...
- Redis Scan命令
原地址:https://www.cnblogs.com/tekkaman/p/4887293.html [Redis Scan命令] SCAN cursor [MATCH pattern] [COUN ...
- jQuery-介绍
一:什么是jQuery jQuery 是一个 JavaScript 库. 二:安装 http://jquery.com/download/ http://jquery.cuishifeng.cn/ j ...
- 局域网搭建https局域网
局域网搭建https局域网 1.使用tomcat作为服务器搭建局域网访问https 需要使用java jdk\bin下的keytool.exe来创建证书 使用命令:keytool -genkenpai ...
- NET WebAPi之断点续传下载(下)
NET WebAPi之断点续传下载(下) 前言 上一篇我们穿插了C#的内容,本篇我们继续来讲讲webapi中断点续传的其他情况以及利用webclient来实现断点续传,至此关于webapi断点续传下载 ...
- Vue开源
Vue开源 - 为移动而生的Vue JS 2组件框架 vonic ★1494 - 快速构建移动端单页应用 eme ★1390 - 优雅的Markdown编辑器 vue-multiselect ★116 ...
- 【AtCoder】ARC088
C - Multiple Gift 题解 首项是X,每次乘个2,暴力统计 代码 #include <bits/stdc++.h> #define fi first #define se s ...
- 【AtCoder】AGC020
A - Move and Win 题解 看两个人相遇的时候谁先手即可,相遇之后第一个移动的人必输 代码 #include <bits/stdc++.h> #define fi first ...
- 【Java】 大话数据结构(9) 树(二叉树、线索二叉树)
本文根据<大话数据结构>一书,对Java版的二叉树.线索二叉树进行了一定程度的实现. 另: 二叉排序树(二叉搜索树) 平衡二叉树(AVL树) 二叉树的性质 性质1:二叉树第i层上的结点数目 ...