android 开发 实现一个自定义布局的AlertDialog对话框
对话框有很多实现方法,最常见的是在一个点击事件中代码直接写出对话框。如下:
package com.example.lenovo.mydemo2;
import android.content.DialogInterface;
import android.support.v7.app.AlertDialog;
import android.support.v7.app.AppCompatActivity;
import android.os.Bundle;
import android.view.View;
import android.widget.Button;
public class MainActivity extends AppCompatActivity {
private Button mButton;
@Override
protected void onCreate(Bundle savedInstanceState) {
super.onCreate(savedInstanceState);
setContentView(R.layout.activity_main);
mButton = (Button)findViewById(R.id.button1);
mButton.setOnClickListener(new View.OnClickListener() {
@Override
public void onClick(View v) {
AlertDialog.Builder dialog = new AlertDialog.Builder(MainActivity.this);
//对话框标题设置
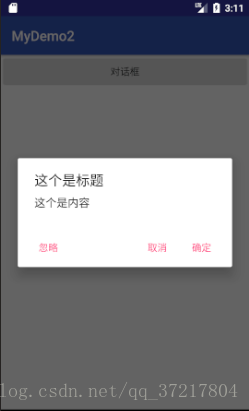
dialog.setTitle("这个是标题");
//对话框内容设置
dialog.setMessage("这个是内容");
//对话框设置不可以用Back键退出
dialog.setCancelable(false);
// dialog.clone()
/*
三种Button
Positive Button 正面按键
Negative Button 负面按键
Neutral Button 中性按键
*/
dialog.setPositiveButton("确定", new DialogInterface.OnClickListener() {
@Override
public void onClick(DialogInterface dialog, int which) {
//关闭对话框
dialog.dismiss();
}
});
dialog.setNegativeButton("取消", new DialogInterface.OnClickListener() {
@Override
public void onClick(DialogInterface dialog, int which) {
//关闭对话框
dialog.dismiss();
}
});
dialog.setNeutralButton("忽略", new DialogInterface.OnClickListener() {
@Override
public void onClick(DialogInterface dialog, int which) {
dialog.dismiss();
: }
});
//不要忘记了给对话框添加显示。
dialog.show();
}
});
}
}运行效果:
以上就是直接在代码上实现对话框,但是这样实现对话框有一个缺点,那就是真心不好看,在实际项目中对话框与项目的主题不配套,所以我们就需要自定义实现对话框布局了:
1.我们首先需要写一个在对话框后点击效果的背景布局图片:
<?xml version="1.0" encoding="utf-8"?>
<selector xmlns:android="http://schemas.android.com/apk/res/android">
<item
android:state_pressed="false">
<color android:color="@color/colorWhite"/>
</item>
<item
android:state_pressed="true">
<color android:color="@color/colorWhiteGray"/>
</item>
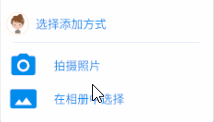
</selector>2.然后需要写一个用于对话框的布局:
<?xml version="1.0" encoding="utf-8"?>

<LinearLayout xmlns:android="http://schemas.android.com/apk/res/android"

    android:orientation="vertical"

    android:layout_width="match_parent"

    android:layout_height="wrap_content">

    <LinearLayout

        android:orientation="vertical"

        android:layout_width="match_parent"

        android:layout_height="wrap_content"

        android:padding="10dp">

    <LinearLayout

        android:orientation="horizontal"

        android:layout_width="match_parent"

        android:layout_height="wrap_content"

        android:layout_marginTop="10dp">

        <ImageView

            android:layout_width="wrap_content"

            android:layout_height="wrap_content"

            android:src="@drawable/ic_woman_default"/>

         <TextView

             android:layout_width="match_parent"

             android:layout_height="wrap_content"

             android:text="选择添加方式"

             android:textSize="@dimen/BigTextSize"

             android:textColor="@color/colorBlue"

             android:layout_gravity="center"

             android:layout_marginLeft="10dp"/>

    </LinearLayout>

    <LinearLayout

        android:layout_width="match_parent"

        android:layout_height="1px"

        android:background="@color/colorBlue"

        android:layout_margin="10dp">

    </LinearLayout>

     <LinearLayout

         android:id="@+id/PersonalDataModification_Dialog_CameraButton"

         android:orientation="horizontal"

         android:layout_width="match_parent"

         android:layout_height="wrap_content"

         android:background="@drawable/button_background_white_change_gray">

         <ImageView

             android:layout_width="wrap_content"

             android:layout_height="wrap_content"

             android:src="@mipmap/ic_camera"/>

         <TextView

             android:layout_width="wrap_content"

             android:layout_height="wrap_content"

             android:text="拍摄照片"

             android:textSize="@dimen/BigTextSize"

             android:textColor="@color/colorBlue"

             android:layout_gravity="center"

             android:layout_marginLeft="20dp"

             />

     </LinearLayout>

        <LinearLayout

            android:id="@+id/PersonalDataModification_Dialog_GalleryButton"

            android:orientation="horizontal"

            android:layout_width="match_parent"

            android:layout_height="wrap_content"

            android:background="@drawable/button_background_white_change_gray">

            <ImageView

                android:layout_width="wrap_content"

                android:layout_height="wrap_content"

                android:src="@mipmap/ic_gallery"/>

            <TextView

                android:layout_width="wrap_content"

                android:layout_height="wrap_content"

                android:text="在相册中选择"

                android:textColor="@color/colorBlue"

                android:textSize="@dimen/BigTextSize"

                android:layout_gravity="center"

                android:layout_marginLeft="20dp"/>

        </LinearLayout>

    </LinearLayout>

</LinearLayout>
效果图:

3.下面是实现对话框的Java代码部分:
   public void dialogueBox(){

        AlertDialog.Builder dialog = new AlertDialog.Builder(PersonalDataModification.this);

        View view = LayoutInflater.from(this.getBaseContext()).inflate(R.layout.dialog_layout,null,false);

        dialog.setView(view);

        mDialog_CameraButton = (LinearLayout)view.findViewById(R.id.PersonalDataModification_Dialog_CameraButton);

        mDialog_GalleryButton = (LinearLayout)view.findViewById(R.id.PersonalDataModification_Dialog_GalleryButton);

        mDialog_CameraButton.setOnClickListener(new View.OnClickListener() {

            @Override

            public void onClick(View v) {

                Toast.makeText(PersonalDataModification.this,"点了进入相机",Toast.LENGTH_SHORT).show();

            }

        });

        mDialog_GalleryButton.setOnClickListener(new View.OnClickListener() {

            @Override

            public void onClick(View v) {

                Toast.makeText(PersonalDataModification.this,"点了进入相册",Toast.LENGTH_SHORT).show();

            }

        });

        dialog.show();

    }
将上面的方法添加到一个点击事件中,就可以实现对话框了。下面我们来看看运行效果:
android 开发 实现一个自定义布局的AlertDialog对话框的更多相关文章
- android 开发 写一个RecyclerView布局的聊天室,并且添加RecyclerView的点击事件
实现思维顺序: 1.首先我们需要准备2张.9的png图片(一张图片为左边聊天泡泡,一个图片为右边的聊天泡泡),可以使用draw9patch.bat工具制作,任何图片导入到drawable中. 2.需要 ...
- android开发 写一个自定义形状的按键
步骤: 1.在drawable 文件夹中创建一个xml布局文件. 2.修改布局文件 3.在需要使用背景的按键中导入布局. 创建布局文件: 修改布局文件: <?xml version=" ...
- android 开发 实现一个带图片Image的ListView
注意:这种实现方法不是实现ListView的最优方法,只是希望通过练习了解ListView的实现原理 思维路线: 1.创建drawable文件夹将要使用的图片导入进去 2.写一个类,用于存放图片ID数 ...
- android 开发 实现一个app的引导页面,使用ViewPager组件(此引导的最后一页的Button会直接写在最后一页布局里,跟随布局滑进滑出)
基本ViewPager组件使用方式与我之前写的https://blog.csdn.net/qq_37217804/article/details/80332634 这篇博客一致. 下面我们将重点详细解 ...
- 2016 校招, Android 开发,一个本科应届的坎坷求职之路(转)
转载出处:http://www.nowcoder.com/discuss/3244?type=2&order=0&pos=1&page=1 和大多数的面经不同,我不是大牛,手头 ...
- [Android Pro] Android开发实践:自定义ViewGroup的onLayout()分析
reference to : http://www.linuxidc.com/Linux/2014-12/110165.htm 前一篇文章主要讲了自定义View为什么要重载onMeasure()方法( ...
- .Net程序猿玩转Android开发---(3)登陆页面布局
这一节我们来看看登陆页面如何布局.对于刚接触到Android开发的童鞋来说.Android的布局感觉比較棘手.须要结合各种属性进行设置,接下来我们由点入面来 了解安卓中页面如何布局,登陆页面非常eas ...
- android 开发 实现一个进入相机拍照后裁剪图片或者进入相册选中裁剪图片的功能
实现思维路径: 以进入相机拍照的思维路线为例子: 1.进入app 2.判断之前是否保存头像,如果有就显示历史图像 (下面代码中在getOldAvatar();方法中执行这个逻辑) 3.点击更换图像的B ...
- android开发 RecyclerView 瀑布列表布局
1.写一个内容的自定义小布局: <?xml version="1.0" encoding="utf-8"?> <LinearLayout xm ...
随机推荐
- mysql二进制日志详解
一.什么是二进制日志 二进制日志主要记录mysql数据库的变化,二进制日志包含所有更新了数据或者潜在更新了数据(如没有匹配到任何行的delete语句),语句以时间的形式保存,描述了数据的更改.二进制日 ...
- zabbix 3.4监控mysql,提示mysql: [Warning] Using a password on the command line interface can be insecure.
mysql从5.6版本开始,如果是命令行直接出现了数据库连接密码就会有以下警告: mysql: [Warning] Using a password on the command line inter ...
- SSH实现隧道功能穿墙
Putty和SSH tunnel 目前寻求FQ的方式无非就几种: 寻找web代理(这个可以进我放置的在线代理进行测试) 自行寻找http/sock5代理(这个可以去网上搜索代理ip) vpnFQ(目前 ...
- scp命令拷贝
文件拷贝,将172.16.1.2中的文件拷贝到本机中 scp root@172.16.1.2:/home/root/others/music/1.mp3 /home/space/music/1.mp3 ...
- CentOS 7.4 初次手记:第三章 CentOS基础了解
第三章 CentOS基础了解... 36 第一节 语言编码.终端... 36 I 查看语言编码... 36 II Tty?.pts/?. 36 第二节 bash/sh command. 38 I 查找 ...
- ALGO-139_蓝桥杯_算法训练_s01串(递归)
问题描述 s01串初始为" 按以下方式变换 0变1,1变01 输入格式 1个整数(~) 输出格式 n次变换后s01串 样例输入 样例输出 数据规模和约定 ~ 记: 题目给出的信息带有误导性, ...
- 【Https】Spring RestTemplete支持Https安全请求
实现步骤 Step1: 自定义ClientHttpRequestFactory package com.example.demo.https; import org.springframework.h ...
- bzoj5017: [Snoi2017]炸弹
Description 在一条直线上有 N 个炸弹,每个炸弹的坐标是 Xi,爆炸半径是 Ri,当一个炸弹爆炸时,如果另一个炸弹所在位置 Xj 满足: Xi−Ri≤Xj≤Xi+Ri,那么,该炸弹也会被 ...
- 筛选法求n以内所有的素数
求n以内所有的素数? 筛选法:将2到n中所有的数都列出来,然后从2开始,先化掉所有2的倍数,然后每次从下一个剩下的数(必然是素数)开始,划掉其内所有的倍数,最后剩下来的数就都是素数 例:13 红色为 ...
- sudo 命令报错的解决方法
尝试着用终端打开Mac的安全权限(sudo spctl --master-disable),却显示以下提示,望高手解答. sudo: /etc/sudoers is world writablesud ...