
element-ui inputNumber、Card 、Breadcrumb组件源码分析整理笔记(三)
inputNumber组件
<template>

    <!--@dragstart.prevent禁止input中数字的拖动-->

  <div

    @dragstart.prevent

    :class="[

      'el-input-number',

      inputNumberSize ? 'el-input-number--' + inputNumberSize : '',

      { 'is-disabled': inputNumberDisabled },

      { 'is-without-controls': !controls },

      { 'is-controls-right': controlsAtRight }

    ]">

    <span

      class="el-input-number__decrease"

      role="button"

      v-if="controls"

      v-repeat-click="decrease"

      :class="{'is-disabled': minDisabled}"

      @keydown.enter="decrease">

      <i :class="`el-icon-${controlsAtRight ? 'arrow-down' : 'minus'}`"></i>

    </span>

    <span

      class="el-input-number__increase"

      role="button"

      v-if="controls"

      v-repeat-click="increase"

      :class="{'is-disabled': maxDisabled}"

      @keydown.enter="increase">

      <i :class="`el-icon-${controlsAtRight ? 'arrow-up' : 'plus'}`"></i>

    </span>

    <el-input

      ref="input"

      :value="currentInputValue"

      :placeholder="placeholder"

      :disabled="inputNumberDisabled"

      :size="inputNumberSize"

      :max="max"

      :min="min"

      :name="name"

      :label="label"

      @keydown.up.native.prevent="increase"

      @keydown.down.native.prevent="decrease"

      @blur="handleBlur"

      @focus="handleFocus"

      @change="handleInputChange">

    </el-input>

  </div>

</template>

<script>

  import ElInput from 'element-ui/packages/input';

  import Focus from 'element-ui/src/mixins/focus';

  //RepeatClick,用来控制左键按下时不断触发事件

  import RepeatClick from 'element-ui/src/directives/repeat-click';

  export default {

    name: 'ElInputNumber',

    mixins: [Focus('input')],

    inject: {

      elForm: {

        default: ''

      },

      elFormItem: {

        default: ''

      }

    },

    directives: {

      repeatClick: RepeatClick

    },

    components: {

      ElInput

    },

    props: {

      step: { //计数器步长

        type: Number,

        default: 1

      },

      max: { //设置计数器允许的最大值

        type: Number,

        default: Infinity

      },

      min: { //设置计数器允许的最小值

        type: Number,

        default: -Infinity

      },

      value: {}, //绑定值

      disabled: Boolean, //是否禁用计数器

      size: String, //计数器尺寸

      controls: { //是否使用控制按钮

        type: Boolean,

        default: true

      },

      controlsPosition: { //控制按钮位置

        type: String,

        default: ''

      },

      name: String, //原生属性

      label: String, //输入框关联的label文字

      placeholder: String, //输入框默认 placeholder

      precision: { //数值精度

        type: Number,

        validator(val) {

          return val >= 0 && val === parseInt(val, 10);

        }

      }

    },

    data() {

      return {

        currentValue: 0

      };

    },

    watch: {

      value: {

        //确认是否以当前的初始值执行handler的函数。

        immediate: true,

        handler(value) {

          //Number() 函数把对象的值转换为数字。

          let newVal = value === undefined ? value : Number(value);

          if (newVal !== undefined) {

            if (isNaN(newVal)) {

              return;

            }

            if (this.precision !== undefined) {

              //如果数值精度存在,将数字按精度转换

              newVal = this.toPrecision(newVal, this.precision);

            }

          }

          if (newVal >= this.max) newVal = this.max;

          if (newVal <= this.min) newVal = this.min;

          this.currentValue = newVal;

          this.$emit('input', newVal);

        }

      }

    },

    computed: {

      // 返回当前减号是否被禁用

      minDisabled() {

        // 当前值-计数器步长<最小值时,减号被禁用,不能再继续减

        return this._decrease(this.value, this.step) < this.min;

      },

      maxDisabled() {

        return this._increase(this.value, this.step) > this.max;

      },

      //返回数值的精度

      numPrecision() {

         // precision 的值必须是一个非负整数,并且不能小于 step 的小数位数。

        const { value, step, getPrecision, precision } = this;

        const stepPrecision = getPrecision(step);

        if (precision !== undefined) {

          //如果step 的小数位数大于数值精度时,控制台输出警告并返回数值精度

          if (stepPrecision > precision) {

            console.warn('[Element Warn][InputNumber]precision should not be less than the decimal places of step');

          }

          return precision;

        } else {

            //如果step 的小数位数小于数值精度时,再比较数值的精度和step的精度,取最大值

          return Math.max(getPrecision(value), stepPrecision);

        }

      },

      // 控制按钮的位置

      controlsAtRight() {

        //  当控制按钮存在,并且控制按钮的位置为right时,此处通过添加is-controls-right类来改变控制按钮的位置,使控制按钮在右边显示。

        return this.controls && this.controlsPosition === 'right';

      },

      _elFormItemSize() {

        return (this.elFormItem || {}).elFormItemSize;

      },

      //计数器的大小

      inputNumberSize() {

        return this.size || this._elFormItemSize || (this.$ELEMENT || {}).size;

      },

      // 是否禁用计数器

      inputNumberDisabled() {

        return this.disabled || (this.elForm || {}).disabled;

      },

      currentInputValue() {

        const currentValue = this.currentValue;

        if (typeof currentValue === 'number' && this.precision !== undefined) {

          return currentValue.toFixed(this.precision);

        } else {

          return currentValue;

        }

      }

    },

    methods: {

      //按精度转换数值

      toPrecision(num, precision) {

        if (precision === undefined) precision = this.numPrecision;

         //toFixed() 方法可把 Number 四舍五入为指定小数位数的数字,返回字符串;parseFloat()函数可解析一个字符串,并返回一个浮点数。

        return parseFloat(parseFloat(Number(num).toFixed(precision)));

      },

      //获取value的小数位数

      getPrecision(value) {

        if (value === undefined) return 0;

        const valueString = value.toString();

        const dotPosition = valueString.indexOf('.');

        let precision = 0;

        if (dotPosition !== -1) {

          //valueString.length减去小数点前面的位数,剩下的就是小数点后面的位数

          precision = valueString.length - dotPosition - 1;

        }

        return precision;

      },

      _increase(val, step) {

        if (typeof val !== 'number' && val !== undefined) return this.currentValue;

        const precisionFactor = Math.pow(10, this.numPrecision);

        return this.toPrecision((precisionFactor * val + precisionFactor * step) / precisionFactor);

      },

      //返回value减去step后的值

      _decrease(val, step) {

        if (typeof val !== 'number' && val !== undefined) return this.currentValue;

        //Math.pow()计算10的this.numPrecision次方

        const precisionFactor = Math.pow(10, this.numPrecision);

        //这里主要是为了减少误差

        return this.toPrecision((precisionFactor * val - precisionFactor * step) / precisionFactor);

      },

      increase() {

        if (this.inputNumberDisabled || this.maxDisabled) return;

        const value = this.value || 0;

        const newVal = this._increase(value, this.step);

        this.setCurrentValue(newVal);

      },

       //点击减号时触发的事件

      decrease() {

        if (this.inputNumberDisabled || this.minDisabled) return;

        const value = this.value || 0;

        const newVal = this._decrease(value, this.step);

        this.setCurrentValue(newVal);

      },

      handleBlur(event) {

        this.$emit('blur', event);

        this.$refs.input.setCurrentValue(this.currentInputValue);

      },

      handleFocus(event) {

        this.$emit('focus', event);

      },

      setCurrentValue(newVal) {

        const oldVal = this.currentValue;

        if (typeof newVal === 'number' && this.precision !== undefined) {

          newVal = this.toPrecision(newVal, this.precision);

        }

        if (newVal >= this.max) newVal = this.max;

        if (newVal <= this.min) newVal = this.min;

        if (oldVal === newVal) {

          //改变input的当前值

          this.$refs.input.setCurrentValue(this.currentInputValue);

          return;

        }

        this.$emit('input', newVal);

        this.$emit('change', newVal, oldVal);

        this.currentValue = newVal;

      },

      handleInputChange(value) {

        const newVal = value === '' ? undefined : Number(value);

        if (!isNaN(newVal) || value === '') {

          this.setCurrentValue(newVal);

        }

      },

      select() {

        this.$refs.input.select();

      }

    },

    mounted() {

      let innerInput = this.$refs.input.$refs.input;

      innerInput.setAttribute('role', 'spinbutton');

      innerInput.setAttribute('aria-valuemax', this.max);

      innerInput.setAttribute('aria-valuemin', this.min);

      innerInput.setAttribute('aria-valuenow', this.currentValue);

      innerInput.setAttribute('aria-disabled', this.inputNumberDisabled);

    },

    updated() {

      if (!this.$refs || !this.$refs.input) return;

      const innerInput = this.$refs.input.$refs.input;

      innerInput.setAttribute('aria-valuenow', this.currentValue);

    }

  };

</script>
解析:
(1)先看下html结构
 <div class="el-input-number">

        <!--左边的减号-->

       <span class="el-input-number__decrease">

           <i class="el-icon-minus"></i>

       </span>

        <!--右边的加号-->

       <span class="el-input-number__increase">

          <i class="el-icon-plus"></i>

       </span>

        <!--中间的输入框-->

       <el-input ref="input"></el-input>

</div>
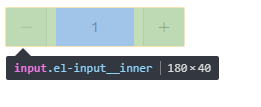
左边的减号和右边的加号是通过绝对定位,设置在input左右的padding位置的,input的css代码如下:
.el-input-number .el-input__inner {

    -webkit-appearance: none;

    padding-left: 50px;

    padding-right: 50px;

    text-align: center;

}
这个inputNumber源码还算简单,多看几遍就懂了
Card 组件
<template>

  <div class="el-card" :class="shadow ? 'is-' + shadow + '-shadow' : 'is-always-shadow'">

      <!--头部:设置 header,也可以通过 slot#header 传入 DOM-->

    <div class="el-card__header" v-if="$slots.header || header">

      <slot name="header">{{ header }}</slot>

    </div>

      <!--内容部分-->

    <div class="el-card__body" :style="bodyStyle">

      <slot></slot>

    </div>

  </div>

</template>

<script>

  export default {

    name: 'ElCard',

    props: {

      header: {}, //设置 header,也可以通过 slot#header 传入DOM

      bodyStyle: {}, //设置 body 的样式

      shadow: {  //设置阴影显示时机

        type: String

      }

    }

  };

</script>
Breadcrumb组件
<template>

  <span class="el-breadcrumb__item">

    <span

      :class="['el-breadcrumb__inner', to ? 'is-link' : '']"

      ref="link"

      role="link">

      <!--插入文字-->

      <slot></slot>

    </span>

      <!--图标分隔符-->

    <i v-if="separatorClass" class="el-breadcrumb__separator" :class="separatorClass"></i>

      <!--分隔符-->

    <span v-else class="el-breadcrumb__separator" role="presentation">{{separator}}</span>

  </span>

</template>

<script>

  export default {

    name: 'ElBreadcrumbItem',

    props: {

      to: {}, //路由跳转对象,同 vue-router 的 to

      replace: Boolean //在使用 to 进行路由跳转时,启用 replace 将不会向 history 添加新记录

    },

    data() {

      return {

        separator: '',

        separatorClass: ''

      };

    },

    inject: ['elBreadcrumb'],

    mounted() {

      //获取父组件的separator

      this.separator = this.elBreadcrumb.separator;

      //获取父组件的separatorClass

      this.separatorClass = this.elBreadcrumb.separatorClass;

      const link = this.$refs.link;

      link.setAttribute('role', 'link');

      //添加点击事件

      link.addEventListener('click', _ => {

        const { to, $router } = this;

        if (!to || !$router) return;

        //根据replace的值确定是replace还是push,replace 将不会向 history 添加新记录

        this.replace ? $router.replace(to) : $router.push(to);

      });

    }

  };

</script>
element-ui inputNumber、Card 、Breadcrumb组件源码分析整理笔记(三)的更多相关文章
- element-ui 组件源码分析整理笔记目录
element-ui button组件 radio组件源码分析整理笔记(一) element-ui switch组件源码分析整理笔记(二) element-ui inputNumber.Card .B ...
- element-ui button组件 radio组件源码分析整理笔记(一)
Button组件 button.vue <template> <button class="el-button" @click="handleClick ...
- element-ui input组件源码分析整理笔记(六)
input 输入框组件 源码: <template> <div :class="[ type === 'textarea' ? 'el-textarea' : 'el-in ...
- element-ui Message组件源码分析整理笔记(八)
Message组件源码: main.js import Vue from 'vue'; import Main from './main.vue'; import { PopupManager } f ...
- element-ui Steps步骤条组件源码分析整理笔记(九)
Steps步骤条组件源码: steps.vue <template> <!--设置 simple 可应用简洁风格,该条件下 align-center / description / ...
- element-ui Rate组件源码分析整理笔记(十三)
Rate组件源码比较简单,有添加部分注释 main.vue <template> <!--valuenow当前的评分 valuetext当前显示的文本--> <div c ...
- element-ui MessageBox组件源码分析整理笔记(十二)
MessageBox组件源码,有添加部分注释 main.vue <template> <transition name="msgbox-fade"> < ...
- element-ui Upload 上传组件源码分析整理笔记(十四)
简单写了部分注释,upload-dragger.vue(拖拽上传时显示此组件).upload-list.vue(已上传文件列表)源码暂未添加多少注释,等有空再补充,先记下来... index.vue ...
- element-ui switch组件源码分析整理笔记(二)
源码如下: <template> <div class="el-switch" :class="{ 'is-disabled': switchDisab ...
随机推荐
- 传输层两大协议:TCP和UDP
1. UDP 1.1 发送方式(如何发送) 面向无连接. 无状态服务. 不保证不丢失,不保证按顺序到达. 1.2 发送形式(发送的是什么) 基于数据报. 一个一个的发送,一个一个的接收. 1.3 使用 ...
- java里面main函数为什么要用static修饰
这学期刚开java,因为之前只写过C++和Python没接触过java,有些写法挺不习惯的,今天写完一个程序,run的时候发现提示the selection can't be launched.... ...
- [工具]Cobalt Strike 3.13 TeamServer for Windows
Cobalt Strike 3.13 TeamServer for Windows 0x001 环境 CS 3.12 或 3.13 Kali或Win最好安装jdk1.8.5或之后版本 设置环境变量,如 ...
- How To Scan QRCode For UWP (2)
这篇随笔主要介绍照相预览功能,重要使用的是MediaCapture对象,MediaCapture对象还可以用来处理录音和录制视频,本文只讨论照相功能. 1:查找摄像头 后置摄像头优先,找不到后置摄像头 ...
- Python动态变量名定义与调用
动态变量名赋值 在使用tkinter时需要动态生成变量,如动态生成var1...var10变量 使用exec动态赋值 exec在python3中是内置函数,它支持python代码的动态执行. 示例: ...
- vue父组件传参给子组件
其实组件之间传参有很多种方法: 1.通过本地存储 2.使用vuex状态管理 今天记录一下第三种方法 1.首页我们先创建一个项目(创建项目自行百度) 2.打开项目,在components文件夹下新建一个 ...
- 目标检测技术演进:R-CNN、Fast R-CNN、Faster R-CNN
看到一篇循序渐进讲R-CNN.Fast R-CNN.Faster R-CNN演进的博文,写得非常好,摘入于此,方便查找和阅读. object detection,就是在给定的图片中精确找到物体所在位置 ...
- Web开发者应知的URL编码知识
原文出处:http://blog.jobbole.com/42246/ 本文首先阐述了人们关于统一资源定位符(URL)编码的普遍的误读,其后通过阐明HTTP场景下的URL encoding 来引出我们 ...
- ExecutorService——<T> Future<T> submit(Callable<T> task)
提交一个有返回值的任务用于执行,且返回一个Future对象,用来表示行将发生的任务的结果. 如果任务执行成功的话,那么Future对象的get方法将会返回任务的执行结果T. 如果你想要立即阻塞,等 ...
- 【学习笔记】浅析Promise函数
一.Promise是什么? 在JavaScript中,所有的代码都是单线程执行,所以javaScript的所有网络操作(“GET”/"POST"/"PUT"/& ...