day63:Linux:nginx基础知识&nginx基础模块
目录
2.3 展示: /work 需要密码 /public 无需密码
1.nginx基础知识
1.1 什么是nginx
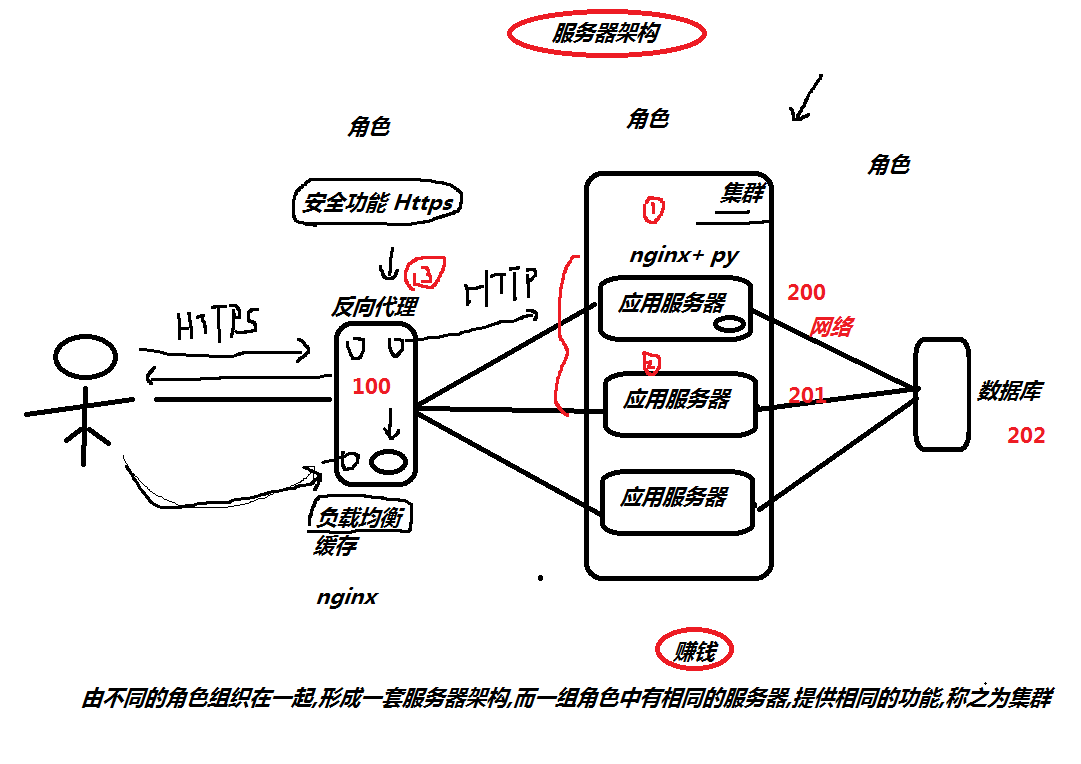
nginx 是一个 web服务器 ( 静态资源 ) 代理服务器
1.2 nginx应用场景
1.web服务器
2.反向代理
2.1) 负载均衡
2.2) 缓存
3.安全服务https
1.3 nginx组成结构
二进制文件: 汽车的基本框架,提供驾驶功能
nginx配置文件: 控制汽车前往的目的地
access_log日志: GPS记录行动轨迹
error_log日志: 黑匣子,分析故障,和定位故障

1.4 nginx安装部署
step1.配置官方yum源 ( epel源获取,使用过程中就会出现权限不足的问题 )
step2.执行以下命令安装nginx
[root@oldboy-pythonedu ~]# wget -O /etc/yum.repos.d/epel.repo http://mirrors.aliyun.com/repo/epel-7.repo

[root@oldboy-pythonedu ~]# yum install nginx -y

[root@oldboy-pythonedu ~]# rpm -q nginx

nginx-1.16.1-1.el7.x86_64
1.5 nginx目录结构
[root@oldboy-pythonedu ~]# rpm -ql nginx
/etc/logrotate.d/nginx 日志轮转 ( 日志切割 )
/etc/nginx/ nginx配置文件目录
/etc/nginx/nginx.conf nginx主配置文件
/var/log/nginx 日志目录
1.6 nginx配置文件
/etc/nginx/nginx.conf
[root@oldboy-pythonedu ~]# cat /etc/nginx/nginx.conf

user nginx;                                            # 运行nginx的用户身份

worker_processes auto;                                # worker进程运行多少个, auto自动与cpu核心保持一致

error_log /var/log/nginx/error.log;                    # 错误日志

pid /run/nginx.pid;                                    # 进程运行后,在该目录下存放一个pid文件,文件中记录的是该进程的ID编号

include /usr/share/nginx/modules/*.conf;            # 包含所有的模块配置文件

events {

    worker_connections 1024;                        # worker的最大连接数   [  worker_connections *  worker_processes ]

}

http {            # 负责http的请求与响应

    log_format  main  '$remote_addr - $remote_user [$time_local] "$request" '

                      '$status $body_bytes_sent "$http_referer" '

                      '"$http_user_agent" "$http_x_forwarded_for"';

    access_log  /var/log/nginx/access.log  main;

    sendfile            on;

    tcp_nopush          on;

    tcp_nodelay         on;

    keepalive_timeout   65;

    types_hash_max_size 2048;

    include             /etc/nginx/mime.types;            # 存放的都是nginx能支持的文件类型

    default_type        application/octet-stream;        # 当 nginx 不支持该类型时,默认以下载的方式回传给用户

    include /etc/nginx/conf.d/*.conf;                    # 包含conf.d/*.conf结尾的文件    [ 定义的一个又一个的网站 ]

}
1.7 test.oldboyedu.com
step1.关闭防火墙
firewalld

        systemctl stop firewalld

        systemctl disable firewalld

selinux

        setenforce 0

        sed -i 's#SELINUX=enforcing#SELINUX=disabled#g' /etc/selinux/config
step2.清除nginx.conf中所有的注释,以及server整个段的内容
step3.新建一个站点
[root@oldboy-pythonedu ~]# cat /etc/nginx/conf.d/test.oldboyedu.com.conf

server {

    listen 80;

    server_name test.oldboyedu.com;

    location / {

        root /code/html;

        index index.html;

    }

}

# 根据配置文件定义的路径,创建该路径,并放入代码

[root@oldboy-pythonedu ~]# mkdir /code/html -p

[root@oldboy-pythonedu ~]# echo "test-oldboyedu.com....." > /code/html/index.html

# 检查配置文件是否有错误的地方

[root@oldboy-pythonedu ~]# nginx -t

nginx: the configuration file /etc/nginx/nginx.conf syntax is ok

nginx: configuration file /etc/nginx/nginx.conf test is successful

# 重载服务,并生效

[root@oldboy-pythonedu ~]# systemctl restart nginx


# 配置Hosts解析  ( 假的域名  )

Windows:  C:\Windows\System32\drivers\etc

    10.0.0.200 test.oldboyedu.com

MacOS:    /etc/hosts

    10.0.0.200 test.oldboyedu.com
1.8 game.oldboyedu.com
step1.编辑nginx配置文件
[root@oldboy-pythonedu ~]# cat /etc/nginx/conf.d/game.oldboyedu.com.conf

server {

    listen 80;

    server_name game.oldboyedu.com;

    location / {

        root /code/game;

        index index.html;

    }

}
step2.根据配置,创建目录,上传代码
[root@oldboy-pythonedu ~]# mkdir /code/game -p

[root@oldboy-pythonedu ~]# cd /code/game/

[root@oldboy-pythonedu game]# rz

[root@oldboy-pythonedu game]# unzip html5_\(1\).zip
step3.检查nginx配置文件语法, 然后重载服务
[root@oldboy-pythonedu game]# nginx -t

nginx: the configuration file /etc/nginx/nginx.conf syntax is ok

nginx: configuration file /etc/nginx/nginx.conf test is successful

[root@oldboy-pythonedu game]# systemctl restart nginx
step4.配置Host解析
Windows电脑没有Hosts文件,  新建出来.

        Windows:  C:\Windows\System32\drivers\etc

                    10.0.0.200 test.oldboyedu.com

                    10.0.0.200 game.oldboyedu.com
Tip:在location中可以可以设置两个默认值
# vim /etc/nginx/conf.d/game.oldboyedu.com.conf            # 定义的第一个网站

server {

    listen 80;                            # 监听的端口

    server_name game.oldboyedu.com;        # 申明域名

    location / {                        # 匹配用户请求的uri路径

        root /code/html;                # 告诉 nginx 站点的代码在哪里目录下

        index index.html index.htm;        # 定义 默认返回的主页面

    }

}
index index.html index.htm
如果找到index.html 就返回index.html页面
如果找不到index.html
如果能找到index.htm 就返回index.htm
如果找不到index.htm 就报错
1.9 nginx整个请求流程
url路径: http://game.oldboyedu.com /game/zuqiu/index.html
真实服务器地址: /code/game/game/zuqiu/index.html
nginx请求流程
1.用户通过浏览器请求game.oldboyedu.com
2.浏览器会添加一些协议头信息,携带上默认的请求uri, http://game.oldboyedu.com/
3.浏览器会发起DNS解析,解析game.oldboyedu.com 对应的真实IP地址
4.浏览器获取到真实的IP地址后, 通过 IP+Prot的方式请求应用程序Nginx
5.Nginx接受到请求后,会进行事件的处理, 将用户请求的 Request 信息中 包含的 Host 字段, 与 Server_name 字段进行匹配
5.1) 如果匹配不成功,则会随机返回一个站点的页面给用户.
5.2) 可以通过 在 listen 80 default_server; 方式来定义具体默认返回哪个站点给用户.
5.3) 如果碰到非法的域名,可以拒绝,也可以做跳转.
拒绝:
return 500;
跳转:
return 302 https://www.jd.com;
6.如果匹配成功, 接下来进行location uri地址匹配, 获取要返回的文件所在的路径 + 默认返回的页面
7.Nginx获取磁盘上的文件, 然后构建响应报文,回传给浏览器,浏览器加载并且渲染最终的结果呈现给用户.

Tip:虚拟主机
虚拟主机: 在一台服务器上,运行多套站点.
2.nginx基础模块
2.1 目录索引 auto_index
什么是目录索引? 能实现和阿里云mirrors.aliyun.com 一样的效果.
[root@oldboy-pythonedu ~]# cat /etc/nginx/conf.d/mirror.oldboyedu.com.conf

server {

    listen 80;

    server_name mirror.oldboyedu.com;

    charset utf8;

    location / {

        root /code/mirror;

        autoindex on;                    # 开启目录索引功能

        autoindex_exact_size off;        # 显示文件具体大小

        autoindex_localtime on;            # 显示本地服务器时间

    }

}

[root@oldboy-pythonedu ~]# nginx -t

[root@oldboy-pythonedu ~]# systemctl restart nginx

[root@oldboy-pythonedu ~]# mkdir -p /code/mirror

[root@oldboy-pythonedu ~]# cd /code/mirror

[root@oldboy-pythonedu ~]# rz
2.2 访问限制
1.基于IP访问限制
1) 仅允许 10.0.0.1 访问,其他访问全部拒绝

            server {

                ...

                allow 10.0.0.1/32;

                deny all;

                ...

            }

2) 拒绝10.0.0.1 访问, 其他全部允许

            server {

                ...

                deny 10.0.0.1/32;

                allow all;

                ...

            }
Tip:测试的curl命令
[root@oldboy-pythonedu mirror]# curl -HHost:mirror.oldboyedu.com http://10.0.0.200/
2.基于用户名和密码限制:auth_basic_module
设置用户名和密码
[root@oldboy-pythonedu ~]# yum install httpd-tools -y

[root@oldboy-pythonedu nginx]# htpasswd -c -b password_file oldboy 123

[root@oldboy-pythonedu nginx]# cat password_file

oldboy:$apr1$7dYbXvco$LSJaBM3HqlK3k1kkRt2Ya.
nginx配置文件
server {

                listen 80;

                server_name mirror.oldboyedu.com;

                charset utf8;

                auth_basic "hello,nginx";                # 描述信息

                auth_basic_user_file password_file;        # 定义密码文件名称

                location / {

                    root /code/mirror;

                    autoindex on;

                    autoindex_exact_size off;

                    autoindex_localtime on;

                }

            }
3.展示: /work 需要密码 /public 无需密码
[root@oldboy-pythonedu ~]# mkdir /basic/{work,public} -p

[root@oldboy-pythonedu mirror]# cat /etc/nginx/conf.d/basic.oldboyedu.com.conf

        server {

            listen 80;

            server_name basic.oldboyedu.com;

            root /basic;

            autoindex on;

            location / {

            }

            location /work {

                auth_basic "test_work";

                auth_basic_user_file password_file;

            }

        }

[root@oldboy-pythonedu mirror]# nginx -t

nginx: the configuration file /etc/nginx/nginx.conf syntax is ok

nginx: configuration file /etc/nginx/nginx.conf test is successful

[root@oldboy-pythonedu mirror]# systemctl restart nginx
day63:Linux:nginx基础知识&nginx基础模块的更多相关文章
- Linux基础知识与基础命令
Linux基础知识与基础命令 系统目录 Linux只有一个根目录,没有盘符的概念,文件目录是一个倒立的树形结构. 常用的目录功能 bin 与程序相关的文件 boot 与系统启动相关 cdrom 与Li ...
- Nginx基础知识之————RTMP模块中的中HLS专题(翻译文档)
一.在Nginx配置文件的RTMP模块中配置hls hls_key_path /tmp/hlskeys; 提示错误信息: nginx: [emerg] the same path name " ...
- Nginx基础知识之————多模块(非覆盖安装、RTMP在线人数实例安装测试)
说明:已经安装好的nginx,需要添加一个未被编译安装的模块,需要怎么弄呢? 具体:这里以安装第三方nginx-rtmp-module和nginx-accesskey-2.0.3模块为例,nginx的 ...
- 【推荐】Nginx基础知识之————多模块(非覆盖安装、RTMP在线人数实例安装测试)
说明:已经安装好的nginx,需要添加一个未被编译安装的模块,需要怎么弄呢? 具体:这里以安装第三方nginx-rtmp-module和nginx-accesskey-2.0.3模块为例,nginx的 ...
- java线程基础知识----线程基础知识
不知道从什么时候开始,学习知识变成了一个短期记忆的过程,总是容易忘记自己当初学懂的知识(fuck!),不知道是自己没有经常使用还是当初理解的不够深入.今天准备再对java的线程进行一下系统的学习,希望 ...
- 这些C++基础知识的基础知识你都学会了吗?
一.C++基础知识 新的数据类型 C语言中的数据类型 C++中新的数据类型 思考:新的数据类型有什么好处?请看下面的代码: 可以见得:新的类型使整个程序更加简洁,程序变得易读易懂!这个就是bool ...
- Nginx基础知识之————RTMP模块专题(实践文档)
on_publish 语法:on_publish url上下文:rtmp, server, application描述:这个可以设置为一个API接口(GET方式接受所有参数),会给这个API接口返回8 ...
- 1.20 Python基础知识 - python常用模块-1
一.time和datetime 1.time模块 1)time.process_time() >>> import time >>> time.process_ti ...
- javascript基础知识-类和模块
在JavaScript中可以定义对象的类,让每个对象都共享这些属性. 在JavaScript中,类的实现是基于其原型继承机制的.如果两个实例都从同一个原型对象上继承了属性,我们就说它们是同一个类的实例 ...
随机推荐
- android MVVM(2)用数据绑定关联VM 与 V
1.官方文档 https://developer.android.com/topic/libraries/data-binding/architecture 2.简介 数据绑定库 可与MVVM 架构组 ...
- 入门的艰难——关于LR的使用
这年头做一件事真是TM不容易啊.做测试也很纠结,不是都说商业工具很强大么,我去,这个不支持那个不支持的,这还有什么搞头,还非要按照你说的这个版本的才行,高一点的就crash了,结果连最初级的录制脚本都 ...
- 文本三剑客之grep的用法
第1章 正则表达式 1.1 正则表达式的介绍 正则是用来过滤文件内容 为处理大量文本|字符串而定义的一套规则和方法. ...
- ctf古典密码从0到
本文首发于“合天智汇”公众号 作者:淡灬看夏丶恋雨 古典密码和现代密码的区别: 代换密码 单表代换密码 字符或数学型 凯撒密码 仿射密码 四方密码 培根密码 图表 标准银河字母 圣堂武士密码 猪圈密码 ...
- Zabbix 5.0切换中文语言小结
最近测试Zabbix 5.0,去修改语言时发现不能选择"Chinese(zh_CN)",这个选项在下拉框中是灰色的(无法选择).提示"You are not able t ...
- vue-cli3项目配置eslint代码规范
前言 最近接手了一个项目,由于之前为了快速开发,没有做代码检查.为了使得代码更加规范以及更易读,所以就要eslint上场了. 安装依赖 安装依赖有两种方法: 1. 在cmd中打上把相应的依赖加到dev ...
- 关于ES6的let、const那些事儿
Babel 转码器 Babel是广泛使用的一个ES6转换器,将ES6代码转换成ES5代码,从而实现在老版本的浏览器执行. let和const命令 let所声明的变量只在let命令所在的代码块内是有效的 ...
- Linux通过命令行将英文改成中文
1.首先查看当前系统是否有中文语言包 locale -a 如果没有zh_CN.utf8,就需要下载中文语言包,否则,如果有中文语言包,跳过第二步. 2.安装中文语言包 Ubuntu: sudo apt ...
- d3力导图绘制节点间多条关系平行线的方法
之前用d3做了多条线之间的绘图是曲线表示的,现在产品要求改成平行线的样式,经过在网上的调研和自己的尝试,实践出一个可用的方法,分享给大家,先展示下结果: 事先声明,本方法是在以下参考网站上进行的结合和 ...
- [剑指Offer]17-打印从1到最大的n位数(递归)
题目 如题,输入n,则从1打印至99. 题解 考虑到n比较大会有大数问题,所以使用字符数组存储数. 由题可用递归求n位全排列,即为所得. 具体地,用临时字符数组用来存答案,每次递归填好一位,都填好后输 ...