day63:Linux:nginx基础知识&nginx基础模块
目录
2.3 展示: /work 需要密码 /public 无需密码
1.nginx基础知识
1.1 什么是nginx
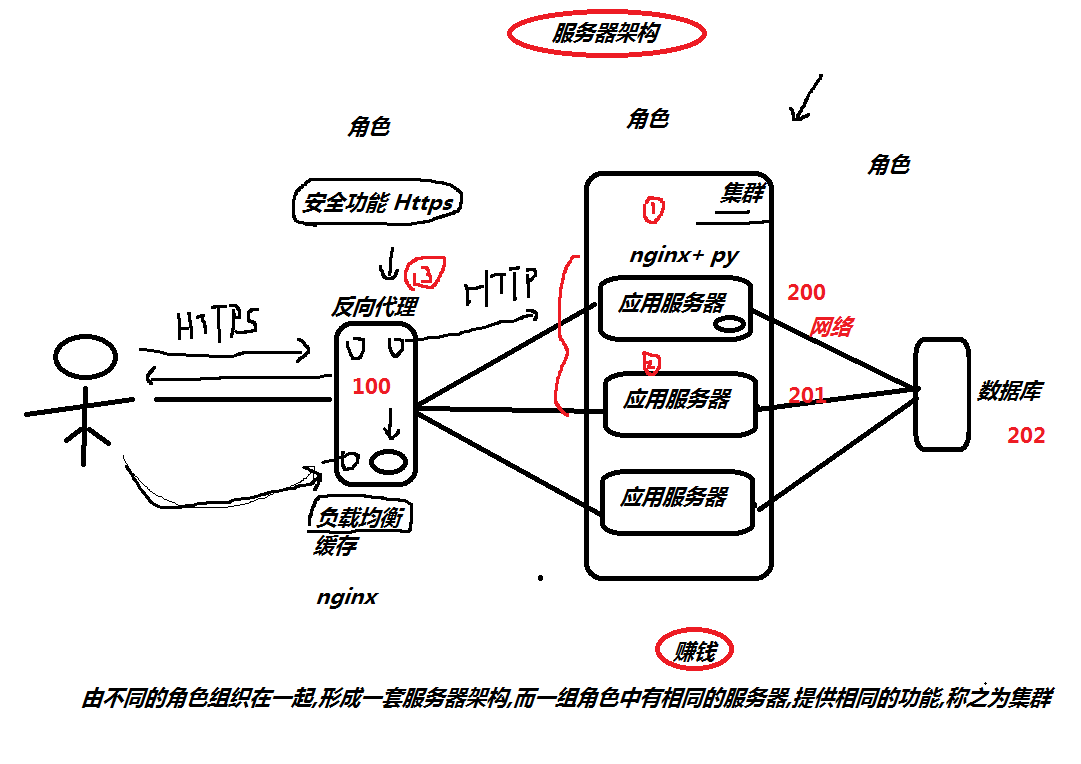
nginx 是一个 web服务器 ( 静态资源 ) 代理服务器
1.2 nginx应用场景
1.web服务器
2.反向代理
2.1) 负载均衡
2.2) 缓存
3.安全服务https
1.3 nginx组成结构
二进制文件: 汽车的基本框架,提供驾驶功能
nginx配置文件: 控制汽车前往的目的地
access_log日志: GPS记录行动轨迹
error_log日志: 黑匣子,分析故障,和定位故障

1.4 nginx安装部署
step1.配置官方yum源 ( epel源获取,使用过程中就会出现权限不足的问题 )
step2.执行以下命令安装nginx
[root@oldboy-pythonedu ~]# wget -O /etc/yum.repos.d/epel.repo http://mirrors.aliyun.com/repo/epel-7.repo

[root@oldboy-pythonedu ~]# yum install nginx -y

[root@oldboy-pythonedu ~]# rpm -q nginx

nginx-1.16.1-1.el7.x86_64
1.5 nginx目录结构
[root@oldboy-pythonedu ~]# rpm -ql nginx
/etc/logrotate.d/nginx 日志轮转 ( 日志切割 )
/etc/nginx/ nginx配置文件目录
/etc/nginx/nginx.conf nginx主配置文件
/var/log/nginx 日志目录
1.6 nginx配置文件
/etc/nginx/nginx.conf
[root@oldboy-pythonedu ~]# cat /etc/nginx/nginx.conf

user nginx;                                            # 运行nginx的用户身份

worker_processes auto;                                # worker进程运行多少个, auto自动与cpu核心保持一致

error_log /var/log/nginx/error.log;                    # 错误日志

pid /run/nginx.pid;                                    # 进程运行后,在该目录下存放一个pid文件,文件中记录的是该进程的ID编号

include /usr/share/nginx/modules/*.conf;            # 包含所有的模块配置文件

events {

    worker_connections 1024;                        # worker的最大连接数   [  worker_connections *  worker_processes ]

}

http {            # 负责http的请求与响应

    log_format  main  '$remote_addr - $remote_user [$time_local] "$request" '

                      '$status $body_bytes_sent "$http_referer" '

                      '"$http_user_agent" "$http_x_forwarded_for"';

    access_log  /var/log/nginx/access.log  main;

    sendfile            on;

    tcp_nopush          on;

    tcp_nodelay         on;

    keepalive_timeout   65;

    types_hash_max_size 2048;

    include             /etc/nginx/mime.types;            # 存放的都是nginx能支持的文件类型

    default_type        application/octet-stream;        # 当 nginx 不支持该类型时,默认以下载的方式回传给用户

    include /etc/nginx/conf.d/*.conf;                    # 包含conf.d/*.conf结尾的文件    [ 定义的一个又一个的网站 ]

}
1.7 test.oldboyedu.com
step1.关闭防火墙
firewalld

        systemctl stop firewalld

        systemctl disable firewalld

selinux

        setenforce 0

        sed -i 's#SELINUX=enforcing#SELINUX=disabled#g' /etc/selinux/config
step2.清除nginx.conf中所有的注释,以及server整个段的内容
step3.新建一个站点
[root@oldboy-pythonedu ~]# cat /etc/nginx/conf.d/test.oldboyedu.com.conf

server {

    listen 80;

    server_name test.oldboyedu.com;

    location / {

        root /code/html;

        index index.html;

    }

}

# 根据配置文件定义的路径,创建该路径,并放入代码

[root@oldboy-pythonedu ~]# mkdir /code/html -p

[root@oldboy-pythonedu ~]# echo "test-oldboyedu.com....." > /code/html/index.html

# 检查配置文件是否有错误的地方

[root@oldboy-pythonedu ~]# nginx -t

nginx: the configuration file /etc/nginx/nginx.conf syntax is ok

nginx: configuration file /etc/nginx/nginx.conf test is successful

# 重载服务,并生效

[root@oldboy-pythonedu ~]# systemctl restart nginx


# 配置Hosts解析  ( 假的域名  )

Windows:  C:\Windows\System32\drivers\etc

    10.0.0.200 test.oldboyedu.com

MacOS:    /etc/hosts

    10.0.0.200 test.oldboyedu.com
1.8 game.oldboyedu.com
step1.编辑nginx配置文件
[root@oldboy-pythonedu ~]# cat /etc/nginx/conf.d/game.oldboyedu.com.conf

server {

    listen 80;

    server_name game.oldboyedu.com;

    location / {

        root /code/game;

        index index.html;

    }

}
step2.根据配置,创建目录,上传代码
[root@oldboy-pythonedu ~]# mkdir /code/game -p

[root@oldboy-pythonedu ~]# cd /code/game/

[root@oldboy-pythonedu game]# rz

[root@oldboy-pythonedu game]# unzip html5_\(1\).zip
step3.检查nginx配置文件语法, 然后重载服务
[root@oldboy-pythonedu game]# nginx -t

nginx: the configuration file /etc/nginx/nginx.conf syntax is ok

nginx: configuration file /etc/nginx/nginx.conf test is successful

[root@oldboy-pythonedu game]# systemctl restart nginx
step4.配置Host解析
Windows电脑没有Hosts文件,  新建出来.

        Windows:  C:\Windows\System32\drivers\etc

                    10.0.0.200 test.oldboyedu.com

                    10.0.0.200 game.oldboyedu.com
Tip:在location中可以可以设置两个默认值
# vim /etc/nginx/conf.d/game.oldboyedu.com.conf            # 定义的第一个网站

server {

    listen 80;                            # 监听的端口

    server_name game.oldboyedu.com;        # 申明域名

    location / {                        # 匹配用户请求的uri路径

        root /code/html;                # 告诉 nginx 站点的代码在哪里目录下

        index index.html index.htm;        # 定义 默认返回的主页面

    }

}
index index.html index.htm
如果找到index.html 就返回index.html页面
如果找不到index.html
如果能找到index.htm 就返回index.htm
如果找不到index.htm 就报错
1.9 nginx整个请求流程
url路径: http://game.oldboyedu.com /game/zuqiu/index.html
真实服务器地址: /code/game/game/zuqiu/index.html
nginx请求流程
1.用户通过浏览器请求game.oldboyedu.com
2.浏览器会添加一些协议头信息,携带上默认的请求uri, http://game.oldboyedu.com/
3.浏览器会发起DNS解析,解析game.oldboyedu.com 对应的真实IP地址
4.浏览器获取到真实的IP地址后, 通过 IP+Prot的方式请求应用程序Nginx
5.Nginx接受到请求后,会进行事件的处理, 将用户请求的 Request 信息中 包含的 Host 字段, 与 Server_name 字段进行匹配
5.1) 如果匹配不成功,则会随机返回一个站点的页面给用户.
5.2) 可以通过 在 listen 80 default_server; 方式来定义具体默认返回哪个站点给用户.
5.3) 如果碰到非法的域名,可以拒绝,也可以做跳转.
拒绝:
return 500;
跳转:
return 302 https://www.jd.com;
6.如果匹配成功, 接下来进行location uri地址匹配, 获取要返回的文件所在的路径 + 默认返回的页面
7.Nginx获取磁盘上的文件, 然后构建响应报文,回传给浏览器,浏览器加载并且渲染最终的结果呈现给用户.

Tip:虚拟主机
虚拟主机: 在一台服务器上,运行多套站点.
2.nginx基础模块
2.1 目录索引 auto_index
什么是目录索引? 能实现和阿里云mirrors.aliyun.com 一样的效果.
[root@oldboy-pythonedu ~]# cat /etc/nginx/conf.d/mirror.oldboyedu.com.conf

server {

    listen 80;

    server_name mirror.oldboyedu.com;

    charset utf8;

    location / {

        root /code/mirror;

        autoindex on;                    # 开启目录索引功能

        autoindex_exact_size off;        # 显示文件具体大小

        autoindex_localtime on;            # 显示本地服务器时间

    }

}

[root@oldboy-pythonedu ~]# nginx -t

[root@oldboy-pythonedu ~]# systemctl restart nginx

[root@oldboy-pythonedu ~]# mkdir -p /code/mirror

[root@oldboy-pythonedu ~]# cd /code/mirror

[root@oldboy-pythonedu ~]# rz
2.2 访问限制
1.基于IP访问限制
1) 仅允许 10.0.0.1 访问,其他访问全部拒绝

            server {

                ...

                allow 10.0.0.1/32;

                deny all;

                ...

            }

2) 拒绝10.0.0.1 访问, 其他全部允许

            server {

                ...

                deny 10.0.0.1/32;

                allow all;

                ...

            }
Tip:测试的curl命令
[root@oldboy-pythonedu mirror]# curl -HHost:mirror.oldboyedu.com http://10.0.0.200/
2.基于用户名和密码限制:auth_basic_module
设置用户名和密码
[root@oldboy-pythonedu ~]# yum install httpd-tools -y

[root@oldboy-pythonedu nginx]# htpasswd -c -b password_file oldboy 123

[root@oldboy-pythonedu nginx]# cat password_file

oldboy:$apr1$7dYbXvco$LSJaBM3HqlK3k1kkRt2Ya.
nginx配置文件
server {

                listen 80;

                server_name mirror.oldboyedu.com;

                charset utf8;

                auth_basic "hello,nginx";                # 描述信息

                auth_basic_user_file password_file;        # 定义密码文件名称

                location / {

                    root /code/mirror;

                    autoindex on;

                    autoindex_exact_size off;

                    autoindex_localtime on;

                }

            }
3.展示: /work 需要密码 /public 无需密码
[root@oldboy-pythonedu ~]# mkdir /basic/{work,public} -p

[root@oldboy-pythonedu mirror]# cat /etc/nginx/conf.d/basic.oldboyedu.com.conf

        server {

            listen 80;

            server_name basic.oldboyedu.com;

            root /basic;

            autoindex on;

            location / {

            }

            location /work {

                auth_basic "test_work";

                auth_basic_user_file password_file;

            }

        }

[root@oldboy-pythonedu mirror]# nginx -t

nginx: the configuration file /etc/nginx/nginx.conf syntax is ok

nginx: configuration file /etc/nginx/nginx.conf test is successful

[root@oldboy-pythonedu mirror]# systemctl restart nginx
day63:Linux:nginx基础知识&nginx基础模块的更多相关文章
- Linux基础知识与基础命令
Linux基础知识与基础命令 系统目录 Linux只有一个根目录,没有盘符的概念,文件目录是一个倒立的树形结构. 常用的目录功能 bin 与程序相关的文件 boot 与系统启动相关 cdrom 与Li ...
- Nginx基础知识之————RTMP模块中的中HLS专题(翻译文档)
一.在Nginx配置文件的RTMP模块中配置hls hls_key_path /tmp/hlskeys; 提示错误信息: nginx: [emerg] the same path name " ...
- Nginx基础知识之————多模块(非覆盖安装、RTMP在线人数实例安装测试)
说明:已经安装好的nginx,需要添加一个未被编译安装的模块,需要怎么弄呢? 具体:这里以安装第三方nginx-rtmp-module和nginx-accesskey-2.0.3模块为例,nginx的 ...
- 【推荐】Nginx基础知识之————多模块(非覆盖安装、RTMP在线人数实例安装测试)
说明:已经安装好的nginx,需要添加一个未被编译安装的模块,需要怎么弄呢? 具体:这里以安装第三方nginx-rtmp-module和nginx-accesskey-2.0.3模块为例,nginx的 ...
- java线程基础知识----线程基础知识
不知道从什么时候开始,学习知识变成了一个短期记忆的过程,总是容易忘记自己当初学懂的知识(fuck!),不知道是自己没有经常使用还是当初理解的不够深入.今天准备再对java的线程进行一下系统的学习,希望 ...
- 这些C++基础知识的基础知识你都学会了吗?
一.C++基础知识 新的数据类型 C语言中的数据类型 C++中新的数据类型 思考:新的数据类型有什么好处?请看下面的代码: 可以见得:新的类型使整个程序更加简洁,程序变得易读易懂!这个就是bool ...
- Nginx基础知识之————RTMP模块专题(实践文档)
on_publish 语法:on_publish url上下文:rtmp, server, application描述:这个可以设置为一个API接口(GET方式接受所有参数),会给这个API接口返回8 ...
- 1.20 Python基础知识 - python常用模块-1
一.time和datetime 1.time模块 1)time.process_time() >>> import time >>> time.process_ti ...
- javascript基础知识-类和模块
在JavaScript中可以定义对象的类,让每个对象都共享这些属性. 在JavaScript中,类的实现是基于其原型继承机制的.如果两个实例都从同一个原型对象上继承了属性,我们就说它们是同一个类的实例 ...
随机推荐
- Selenium使用cookis登录,并临时将cookis存储在本地【shelve数据库】
Python中自带了一个shelve库,可以帮助我们存储一些少量的数据. shelve数据库类似redis,是以[键值对]的方式进行数据的存储,有点像"字典"这种数据结构,存储在本 ...
- 深圳做假证h
深圳做假证[电/薇:187ヘ1184ヘ0909同号]办各类证件-办毕业证-办离婚证,办学位证书,办硕士毕业证,办理文凭学历,办资格证,办房产证不. 这是一个简单的取最大值程序,可以用于处理 i32 数 ...
- 关于action的使用在firefox报错的问题
现在的网站有很多都是鼠标移到上面去才会显示出相应的一些标签之类的东西,然后再进行操作,但是因为要操作的元素一开始是隐藏的,就没办法直接定位,只能调用action来模拟鼠标悬停操作,也就是下面这句代码: ...
- php反序列化总结与学习
基础知识: 1.php类与对象 2.魔术函数 3.序列化方法 类与对象 <?php class test{ public $var = "hello world"; publ ...
- 02 axios
request.js import axios from 'axios' const config = require('@/config') const instance = axios.creat ...
- 虚拟机安装centos常见问题
一.centos下载安装 环境:win10系统,虚拟机vm12, centos6.5 http://vault.centos.org/ 链接打开 选择6.5=>isos/=>x86_64= ...
- (python)生产者消费者模型
生产者消费者模型当中有两大类重要的角色,一个是生产者(负责造数据的任务),另一个是消费者(接收造出来的数据进行进一步的操作). 为什么要使用生产者消费者模型? 在并发编程中,如果生产者处理速度很快,而 ...
- linux下限定连接ip和端口
1.限制端口 vim /etc/ssh/sshd_config 修改连接端口 修改之后重启sshd服务 service sshd restart 再次连接时就需要使用修改后的端口去连接了 备注:判断修 ...
- Netty之旅三:Netty服务端启动源码分析,一梭子带走!
Netty服务端启动流程源码分析 前记 哈喽,自从上篇<Netty之旅二:口口相传的高性能Netty到底是什么?>后,迟迟两周才开启今天的Netty源码系列.源码分析的第一篇文章,下一篇我 ...
- [SpringBoot项目]笔记
request&response 重定向(跳转) 301 永久跳转/302 临时跳转 工业用途 通过url判断来自手机页面,就跳转到手机对应的页面. 活动页面临时改url? 异常处理 定义一个 ...