
ssm框架的整合
首先创建一个web工程,我这里使用的IDE为eclipse。
结果目录如下:
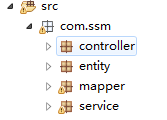
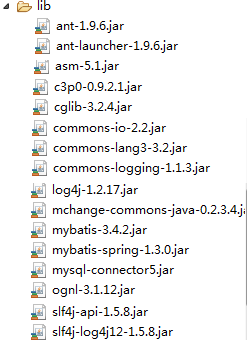
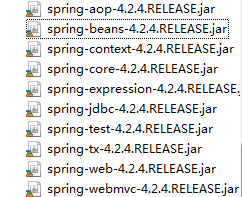
添加相关的jar包:
接下来是完成配置文件
首先我们先配置web.xml:
<?xml version="1.0" encoding="UTF-8"?>
<web-app xmlns:xsi="http://www.w3.org/2001/XMLSchema-instance" xmlns="http://xmlns.jcp.org/xml/ns/javaee" xsi:schemaLocation="http://xmlns.jcp.org/xml/ns/javaee http://xmlns.jcp.org/xml/ns/javaee/web-app_3_1.xsd" id="WebApp_ID" version="3.1">
<display-name>ssm-bbs</display-name>
<welcome-file-list>
<welcome-file>index.jsp</welcome-file>
</welcome-file-list>
<listener>
<listener-class>org.springframework.web.context.ContextLoaderListener</listener-class>
</listener>
<context-param>
<param-name>contextConfigLocation</param-name>
<param-value>classpath:applicationContext.xml</param-value>这里是加载spring的配置文件
</context-param>
<servlet>
<servlet-name>springmvc</servlet-name>
<servlet-class>org.springframework.web.servlet.DispatcherServlet</servlet-class>
<init-param>
<param-name>contextConfigLocation</param-name>
<param-value>classpath:springmvc.xml</param-value>这里是加载springmvc的配置文件
</init-param>
<load-on-startup>1</load-on-startup>
</servlet>
<servlet-mapping>
<servlet-name>springmvc</servlet-name>
<url-pattern>*.do</url-pattern>
</servlet-mapping>
<filter>
<filter-name>encodingFilter</filter-name>
<filter-class>org.springframework.web.filter.CharacterEncodingFilter</filter-class>
<init-param>
<param-name>encoding</param-name>
<param-value>UTF-8</param-value>
</init-param>
</filter>
<filter-mapping>
<filter-name>encodingFilter</filter-name>
<url-pattern>/*</url-pattern>
</filter-mapping>
</web-app>
上面添加了编码过滤。
注意:springmvc的<url-pattern>*.do</url-pattern>配置不能用/*,不然会拦截jsp,页面无法显示。推荐用*.do或者是/
然后我们在src下创建一个config源码包,专门防止配置文件
配置springmvc的配置文件springmvc.xml
<?xml version="1.0" encoding="UTF-8"?>
<beans xmlns="http://www.springframework.org/schema/beans"
xmlns:mvc="http://www.springframework.org/schema/mvc"
xmlns:xsi="http://www.w3.org/2001/XMLSchema-instance"
xmlns:context="http://www.springframework.org/schema/context"
xsi:schemaLocation="
http://www.springframework.org/schema/beans
http://www.springframework.org/schema/beans/spring-beans.xsd
http://www.springframework.org/schema/context
http://www.springframework.org/schema/context/spring-context.xsd
http://www.springframework.org/schema/mvc
http://www.springframework.org/schema/mvc/spring-mvc.xsd">
<!-- 扫描注解的包 -->
<context:component-scan base-package="com.ssm.controller"></context:component-scan>
<!-- 开启注解 -->
<mvc:annotation-driven/>
<!--静态资源访问-->
<mvc:default-servlet-handler/>
<bean class="org.springframework.web.servlet.view.InternalResourceViewResolver">
<property name="prefix" value="/WEB-INF/jsp/"></property>
<property name="suffix" value=".jsp"></property>
</bean>
</beans>
接下来是spring整合mybatis以及数据源,事务管理等
在config源码包中创建applicationContext.xml
<?xml version="1.0" encoding="UTF-8"?>
<beans xmlns="http://www.springframework.org/schema/beans"
xmlns:xsi="http://www.w3.org/2001/XMLSchema-instance"
xmlns:aop="http://www.springframework.org/schema/aop"
xmlns:tx="http://www.springframework.org/schema/tx"
xmlns:context="http://www.springframework.org/schema/context"
xsi:schemaLocation="http://www.springframework.org/schema/beans
http://www.springframework.org/schema/beans/spring-beans.xsd
http://www.springframework.org/schema/tx
http://www.springframework.org/schema/tx/spring-tx.xsd
http://www.springframework.org/schema/aop
http://www.springframework.org/schema/aop/spring-aop.xsd
http://www.springframework.org/schema/context
http://www.springframework.org/schema/context/spring-context.xsd">
<!-- 扫描注解的包 -->
<context:component-scan base-package="com.ssm.service"></context:component-scan>
<!-- 配置数据库 -->
<!-- 加载配置文件 -->
<!-- <context:property-placeholder location="classpath:jdbc.properties"/> -->
<bean id="dataSource" class="com.mchange.v2.c3p0.ComboPooledDataSource">
<property name="driverClass" value="com.mysql.jdbc.Driver"></property>
<property name="jdbcUrl" value="jdbc:mysql://localhost:3306/forum"></property>
<property name="user" value="root"></property>
<property name="password" value="1234"></property>
</bean>
<!-- 配置sqlSessionFactory, 并将数据源注入 -->
<bean id="sqlSessionFactory" class="org.mybatis.spring.SqlSessionFactoryBean">
<!-- 引入数据源 -->
<property name="dataSource" ref="dataSource"></property>
<!--载入配置mapper映射的xml-->
<property name="mapperLocations" value="classpath:com/ssm/mapper/*.xml"/>
</bean>
<!-- 配置映射接口 -->
<bean class="org.mybatis.spring.mapper.MapperScannerConfigurer">
<property name="basePackage" value="com.ssm.mapper"/>
<property name="sqlSessionFactoryBeanName" value="sqlSessionFactory"></property>
</bean>
<!-- 配置声明式事务 -->
<bean id="transactionManager" class="org.springframework.jdbc.datasource.DataSourceTransactionManager">
<property name="dataSource" ref="dataSource"></property>
</bean>
<tx:annotation-driven transaction-manager="transactionManager"/>
</beans>
框架大致为以上内容。另外,mybatis的核心配置文件我这里直接在spring中整合了,你也可以单独创建一个mybatis的配置文件,mybatis-config.xml.
ssm框架的整合的更多相关文章
- SSM框架的整合思路&功能实现
这是我第一篇博客,关于SSM框架的整合思路以及简单功能实现. 首先,最近刚刚学习Spring+SpringMVC+Mybatis,在开发时遇到形形色色的问题,周遭人也为我提供了一些思路,我会一点点整理 ...
- SSM框架——详细整合教程(Spring+SpringMVC+MyBatis)【申明:来源于网络】
SSM框架--详细整合教程(Spring+SpringMVC+MyBatis)[申明:来源于网络] 地址:http://blog.csdn.net/u014662268/article/details ...
- SSM 框架快速整合实例--学生查询
一.快速准备 SSM 框架即 Spring 框架.SpringMVC 框架.MyBatis 框架,关于这几个框架的基础和入门程序,我前面已经写过几篇文章作为基础和入门介绍了.对于这 3 个框架还不熟悉 ...
- SSM框架快速整合实例——学生查询
一.快速准备 SSM 框架即 Spring 框架.SpringMVC 框架.MyBatis 框架,关于这几个框架的基础和入门程序,我前面已经写过几篇文章作为基础和入门介绍了.这里再简单的介绍一下: 1 ...
- SSM框架——详细整合教程
SSM框架——详细整合教程(Spring+SpringMVC+MyBatis) 1.基本概念 1.1.Spring Spring是一个开源框架,Spring是于2003 年兴起的一个轻量级的Jav ...
- SSM框架的整合与使用——实现简单的转账系统
一.整合思路 SSM框架即SpringMVC + Spring + MyBati框架集,是一种轻量级的Web开源框架.它们各自在JAVA三层架构中负责的模块如下图所示: 其中,SpringMVC与Sp ...
- SSM框架——详细整合教程(Spring+SpringMVC+MyBatis)
1.前言 使用框架都是较新的版本: Spring 4.0.2 RELEASE Spring MVC 4.0.2 RELEASE MyBatis 3.2.6 2.Maven引入需要的JAR包 2.1设置 ...
- [转]SSM框架——详细整合教程(Spring+SpringMVC+MyBatis)
原文地址:http://blog.csdn.net/zhshulin/article/details/37956105#comments 使用SSM(Spring.SpringMVC和Mybatis) ...
- SSM框架——详细整合教程(Spring+SpringMVC+MyBatis)【转载】
最近在学习Spring+SpringMVC+MyBatis的整合.以下是参考网上的资料自己实践操作的详细步骤. 1.基本概念 1.1.Spring Spring是一个开源框架,Spring是于20 ...
- 【转】SSM框架——详细整合教程(Spring+SpringMVC+MyBatis)
原文地址:http://blog.csdn.net/zhshulin/article/details/37956105 使用SSM(Spring.SpringMVC和Mybatis)已经有三个多月了, ...
随机推荐
- 云计算之路-阿里云上:访问阿里云CDN上的图片,自动跳转到百度首页
昨天有用户向我们反馈一篇博文(一条语句导致CPU持续100%)中的部分图片不能显示,我们的图片访问用的是阿里云CDN,原以为是某个CDN节点不稳定的问题,但在排查时发现这些图片不能显示竟然是因为请求时 ...
- java 多态(动态绑定)
一.面向对象最核心的机制--动态绑定,也叫多态 1.1.通过下面的例子理解动态绑定,即多态 1 package javastudy.summary; 2 3 class Animal { 4 /** ...
- MySQL所学所思所想
MySQL更改线上配置方案思想:原则上,需要备机.备份工作准备到位,有参数调优配置方案.有配置回退方案.有应急切换备机方案.以上方案评审无问题,然后可以和客户约定实施的时间.服务中断时间,先向客户侧申 ...
- java集合系列——List集合之ArrayList介绍(二)
一:List概述 List是 java.util包下面的类,从<a href="http://blog.csdn.net/u010648555/article/details/5604 ...
- centos 6.5系统下安装ibus及设置开机自启动
先说一下系统环境:centos 6.5,然后我是以root身份执行的,没有权限的用户参见sudo用法 第1步:查找并安装ibus安装包,命令如下: 找到一行: ibus-pinyin.x86_64 : ...
- 如何使用git 发布源码到CodePlex
github 是分布式源码管理系统 codeplex 是微软的开源社区 将git中源码分享到codeplex社区其实很方便,按照如下步骤: 1:注册codeplex 帐号或使用微软的已有的帐号 2:下 ...
- Zabbix(一) : 简介以及Server端安装
一.什么是Zabbix? zabbix由AlexeiVladishev首先开发,目前在维护的是Zabbix SIA.ZABBIX是一个企业级的开源分布式监控解决方案. zabbix为监控网络和服务器的 ...
- Nginx 1.10.1 版本nginx.conf优化配置及详细注释
Nginx 1.10.1 的nginx.conf文件,是调优后的,可以拿来用,有一些设置无效,我备注上了,不知道是不是版本的问题,回头查一下再更正. #普通配置 #==性能配置 #运行用户 user ...
- Centos7虚拟机桥接模式
主机ping不通虚拟机centos7系统的ip大多有以下原因: 1.主机与centos7ip段对应 (关键是网关.dns服务器要一一对应,具体操作见后文) 2.对应后仍然不通的,可关闭主机与cenos ...
- python之HTMLParser解析HTML文档
HTMLParser是Python自带的模块,使用简单,能够很容易的实现HTML文件的分析.本文主要简单讲一下HTMLParser的用法. 使用时需要定义一个从类HTMLParser继承的类,重定义函 ...