从零开始,做一个简单的Vuetify项目,图标安装成功
安装Vuefity的时候,碰到一些坑,经过一番折腾,终于成功,记录正确的姿势如下:
创建一个Vue项目:
vue init webpack-simple vular-admin
进入项目目录:
cd vular-admin
选择:Webpack 安装方式
npm install
npm install vue-router
npm install vuetify
npm install css-loader
npm install material-design-icons-iconfont
npm install vuex --save
npm install stylus-loader stylus --save-dev
npm install sassnpm install sass sass-loader fibers deepmerge -D
src目录下新建文件
import 'material-design-icons-iconfont/dist/material-design-icons.css'
import Vue from 'vue'
import Vuetify from 'vuetify'
import 'vuetify/dist/vuetify.min.css'

Vue.use(Vuetify)

const opts = {
  icons: {
    iconfont: 'md',
  },
}

export default new Vuetify(opts)
在 main.js中添加
import vuetify from './plugins/vuetify'
webpack.config.js 的rules下添加:
module.exports = {
  rules: [
    {
      test: /\.s(c|a)ss$/,
      use: [
        'vue-style-loader',
        'css-loader',
        {
          loader: 'sass-loader',
          // Requires sass-loader@^7.0.0
          options: {
            implementation: require('sass'),
            fiber: require('fibers'),
            indentedSyntax: true // optional
          },
          // Requires sass-loader@^8.0.0
          options: {
            implementation: require('sass'),
            sassOptions: {
              fiber: require('fibers'),
              indentedSyntax: true // optional
            },
          },
        },
      ],
    },
  ],
}
按照Vuetify官方文档,现在就安装完成了
这时候运行:
npm run dev
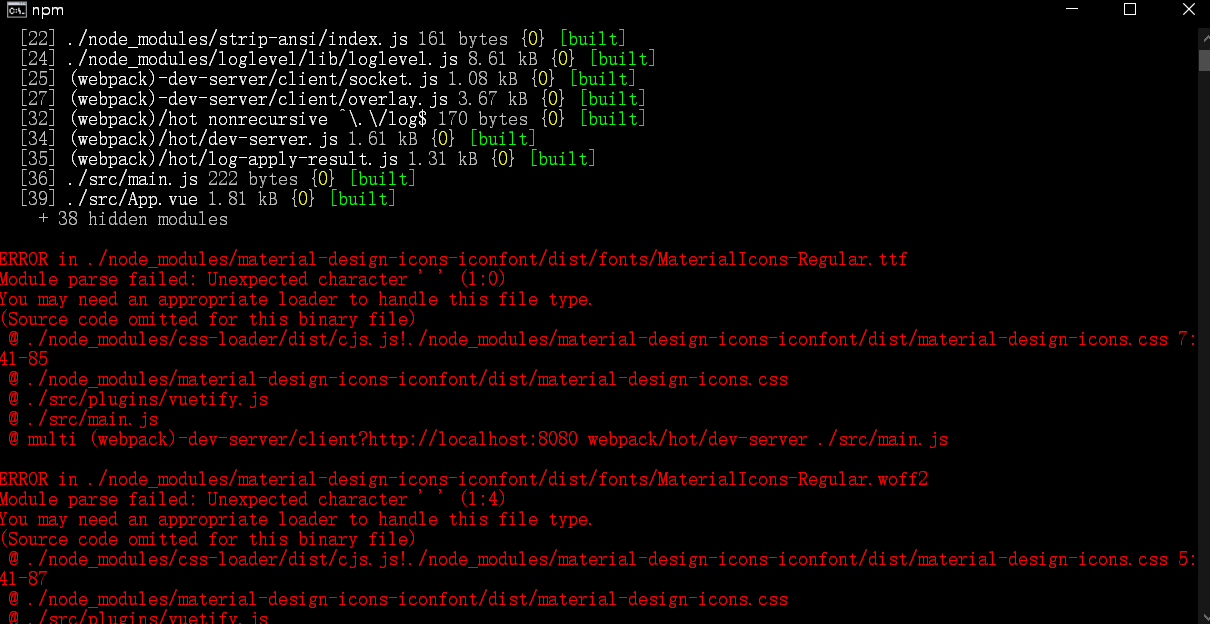
会出现如下错误:
ERROR in ./node_modules/material-design-icons-iconfont/dist/fonts/MaterialIcons-Regular.ttf
Module parse failed: Unexpected character ' ' (1:0)
You may need an appropriate loader to handle this file type.
(Source code omitted for this binary file)
@ ./node_modules/css-loader/dist/cjs.js!./node_modules/material-design-icons-iconfont/dist/material-design-icons.css 7:41-85
@ ./node_modules/material-design-icons-iconfont/dist/material-design-icons.css
@ ./src/plugins/vuetify.js
@ ./src/main.js
@ multi (webpack)-dev-server/client?http://localhost:8080 webpack/hot/dev-server ./src/main.js
ERROR in ./node_modules/material-design-icons-iconfont/dist/fonts/MaterialIcons-Regular.woff2
Module parse failed: Unexpected character ' ' (1:4)
You may need an appropriate loader to handle this file type.
(Source code omitted for this binary file)
@ ./node_modules/css-loader/dist/cjs.js!./node_modules/material-design-icons-iconfont/dist/material-design-icons.css 5:41-87
@ ./node_modules/material-design-icons-iconfont/dist/material-design-icons.css
@ ./src/plugins/vuetify.js
webpack.config.js 的rules下添加:
module.exports = {
    module: {
        rules: [
           {
               test: /\.(woff2?|eot|ttf|otf)$/,
               loader: 'file-loader',
               options: {
                   limit: 10000,
                   name: '[name].[hash:7].[ext]'
               }
            }
        ]
    }
}
到现在为止,才算真正的安装完成
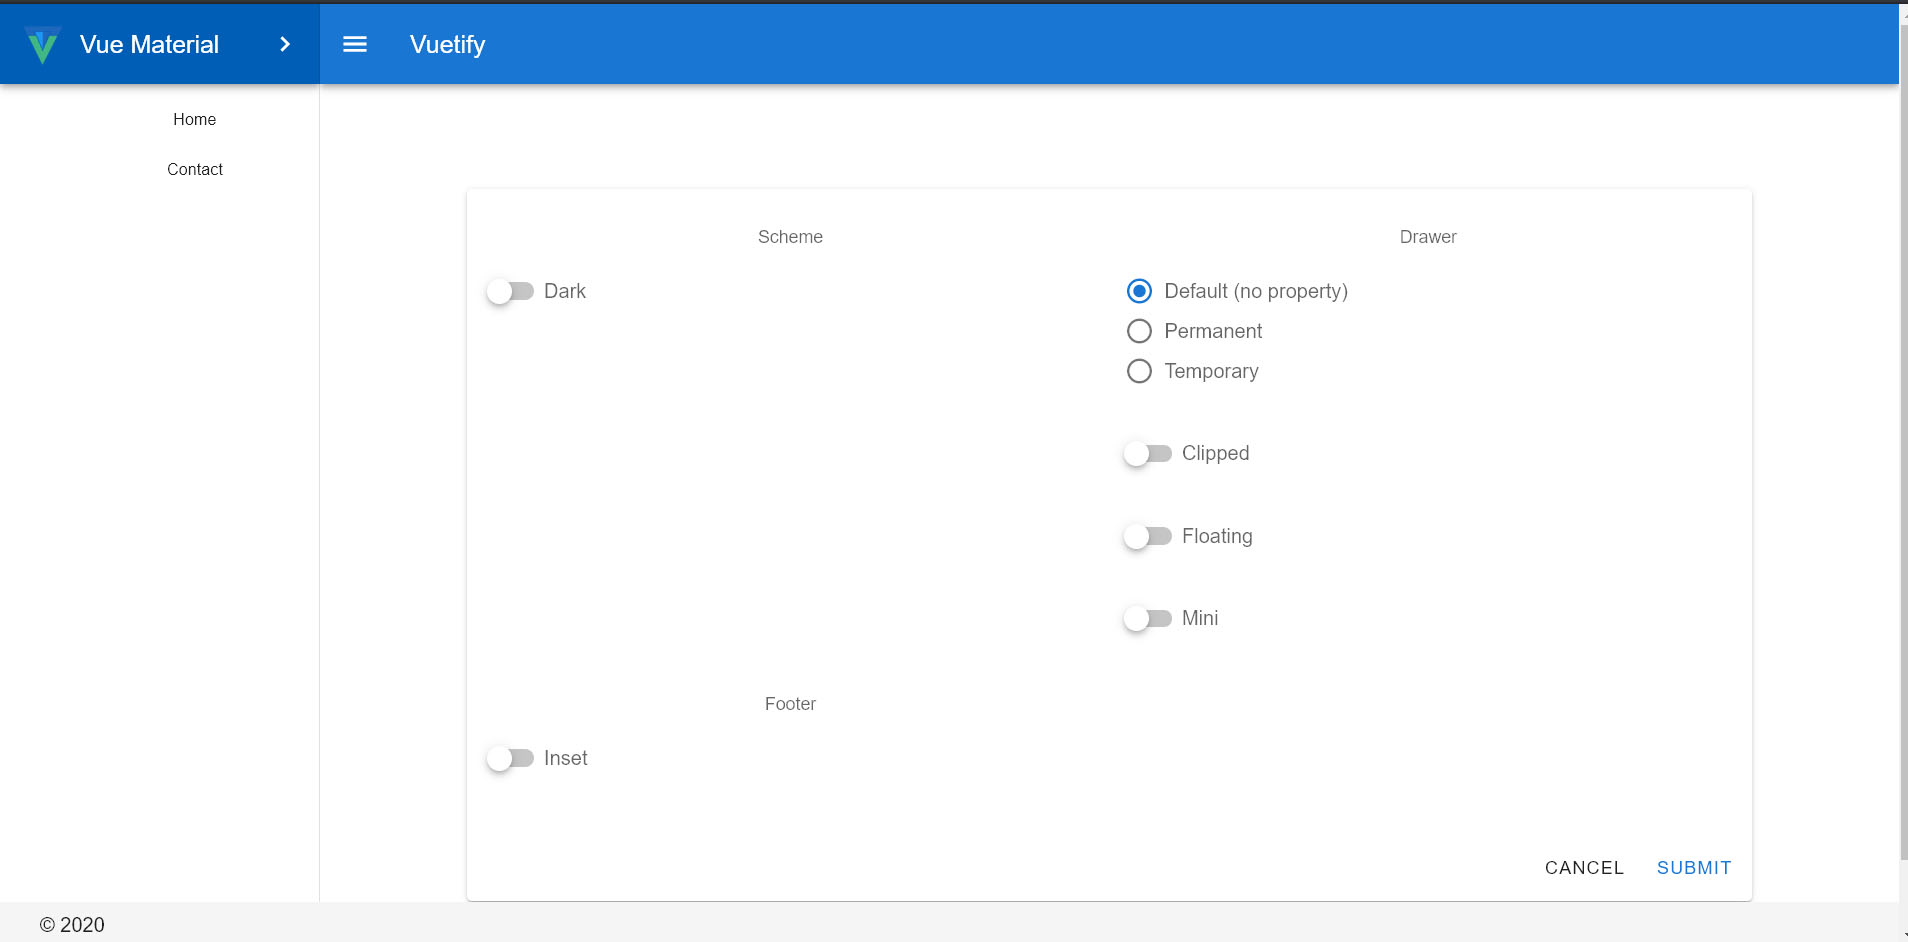
修改App.vue文件:
<template>
<div id="app">
<v-app>
<v-navigation-drawer
v-model="primaryDrawer.model"
:clipped="primaryDrawer.clipped"
:floating="primaryDrawer.floating"
:mini-variant="primaryDrawer.mini"
:permanent="primaryDrawer.type === 'permanent'"
:temporary="primaryDrawer.type === 'temporary'"
app
overflow
>
<v-toolbar color="primary darken-1" dark>
<img src="data:images/logo.png" height="36" alt="Vular Amazing Framework" />
<v-toolbar-title class="ml-0 pl-3">
<span class="hidden-sm-and-down">Vue Material</span>
</v-toolbar-title>
<v-spacer></v-spacer>
<v-btn icon class="hidden-xs-only" >
<v-icon>chevron_right</v-icon>
</v-btn>
</v-toolbar>
<v-list dense>
<v-list-item link>
<v-list-item-action>
<v-icon>mdi-home</v-icon>
</v-list-item-action>
<v-list-item-content>
<v-list-item-title>Home</v-list-item-title>
</v-list-item-content>
</v-list-item>
<v-list-item link>
<v-list-item-action>
<v-icon>mdi-contact-mail</v-icon>
</v-list-item-action>
<v-list-item-content>
<v-list-item-title>Contact</v-list-item-title>
</v-list-item-content>
</v-list-item>
</v-list>
</v-navigation-drawer>
<v-app-bar
:clipped-left="primaryDrawer.clipped"
color="primary"
dark
app
>
<v-app-bar-nav-icon
v-if="primaryDrawer.type !== 'permanent'"
@click.stop="primaryDrawer.model = !primaryDrawer.model"
/>
<v-toolbar-title>Vuetify</v-toolbar-title>
</v-app-bar>
<v-content>
<v-container fluid>
<v-row
align="center"
justify="center"
>
<v-col cols="10">
<v-card>
<v-card-text>
<v-row>
<v-col
cols="12"
md="6"
>
<span>Scheme</span>
<v-switch
v-model="$vuetify.theme.dark"
primary
label="Dark"
/>
</v-col>
<v-col
cols="12"
md="6"
>
<span>Drawer</span>
<v-radio-group
v-model="primaryDrawer.type"
column
>
<v-radio
v-for="drawer in drawers"
:key="drawer"
:label="drawer"
:value="drawer.toLowerCase()"
primary
/>
</v-radio-group>
<v-switch
v-model="primaryDrawer.clipped"
label="Clipped"
primary
/>
<v-switch
v-model="primaryDrawer.floating"
label="Floating"
primary
/>
<v-switch
v-model="primaryDrawer.mini"
label="Mini"
primary
/>
</v-col>
<v-col
cols="12"
md="6"
>
<span>Footer</span>
<v-switch
v-model="footer.inset"
label="Inset"
primary
/>
</v-col>
</v-row>
</v-card-text>
<v-card-actions>
<v-spacer />
<v-btn text>Cancel</v-btn>
<v-btn
text
color="primary"
>Submit</v-btn>
</v-card-actions>
</v-card>
</v-col>
</v-row>
</v-container>
</v-content>
<v-footer
:inset="footer.inset"
app
>
<span class="px-4">© {{ new Date().getFullYear() }}</span>
</v-footer>
</v-app>
</div>
</template>
<script>
export default {
name: 'app',
data: () => ({
drawers: ['Default (no property)', 'Permanent', 'Temporary'],
primaryDrawer: {
model: null,
type: 'default (no property)',
clipped: false,
floating: false,
mini: false,
},
footer: {
inset: false,
},
}),
}
</script>
<style>
#app {
font-family: 'Avenir', Helvetica, Arial, sans-serif;
-webkit-font-smoothing: antialiased;
-moz-osx-font-smoothing: grayscale;
text-align: center;
color: #2c3e50;
margin-top: 60px;
}
h1, h2 {
font-weight: normal;
}
ul {
list-style-type: none;
padding: 0;
}
li {
display: inline-block;
margin: 0 10px;
}
a {
color: #42b983;
}
</style>
运行npm run dev, 完成:
代码地址:
https://github.com/vularsoft/vular-admin
这个代码以后会当作我一个框架的界面,想看空白项目,直接拉取历史版本

从零开始,做一个简单的Vuetify项目,图标安装成功的更多相关文章
- 《从零开始做一个MEAN全栈项目》(2)
欢迎关注本人的微信公众号"前端小填填",专注前端技术的基础和项目开发的学习. 上一节简单介绍了什么是MEAN全栈项目,这一节将简要介绍三个内容:(1)一个通用的MEAN项目的技 ...
- 《从零开始做一个MEAN全栈项目》(3)
欢迎关注本人的微信公众号"前端小填填",专注前端技术的基础和项目开发的学习. 上一篇文章给大家讲了一下本项目的开发计划,这一章将会开始着手搭建一个MEAN项目.千里之行,始于足下, ...
- 《从零开始做一个MEAN全栈项目》(1)
欢迎关注本人的微信公众号"前端小填填",专注前端技术的基础和项目开发的学习. 在本系列的开篇,我打算讲一下全栈项目开发的优势,以及MEAN项目各个模块的概览. 为什么选择全栈开发? ...
- 《从零开始做一个MEAN全栈项目》(4)
欢迎关注本人的微信公众号"前端小填填",专注前端技术的基础和项目开发的学习. 在上一篇中,我们讲了如何去构建第一个Express项目,总结起来就是使用两个核心工具,express和 ...
- 第四章 .net core做一个简单的登录
项目目标部署环境:CentOS 7+ 项目技术点:.netcore2.0 + Autofac +webAPI + NHibernate5.1 + mysql5.6 + nginx 开源地址:https ...
- Vue.js 入门:从零开始做一个极简 To-Do 应用
Vue.js 入门:从零开始做一个极简 To-Do 应用 写作时间:2019-12-10版本信息:Vue.js 2.6.10官网文档:https://cn.vuejs.org/ 前言 学习 Vue ...
- 使用React并做一个简单的to-do-list
1. 前言 说到React,我从一年之前就开始试着了解并且看了相关的入门教程,而且还买过一本<React:引领未来的用户界面开发框架 >拜读.React的轻量组件化的思想及其virtual ...
- 用EF DataBase First做一个简单的MVC3报名页面
使用EF DataBase First做一个简单的MVC3报名网站 ORM(Object Relational Mapping)是面向对象语言中的一种数据访问技术,在ASP.NET中,可以通过ADO. ...
- MUI框架-05-用MUI做一个简单App
MUI框架-05-用MUI做一个简单App MUI 是一个前端框架,前端框架就像 Bootstrap,EasyUI,Vue ,为了做 app 呢,就有了更加高效的 MUI,我觉得前端框架有很多,也没有 ...
随机推荐
- git删除远程仓库中的文件夹
具体操作如下: git rm -r --cached .history #删除目录 git commit -m”删除.history文件夹” git push -r表示递归所有子目录,如果你要删 ...
- JavaScript对象(三)
序列化对象: 对象序列化:对象的状态转化为字符串,也可以将字符串还原为对象.方法:JSON.stringify(),用来序列化,JSON.parse(),用来还原对象. JSON(JavaScript ...
- racket学习-call/cc (let/cc)
Drracket continuation 文中使用let/cc代替call/cc Racket文档中,let/cc说明为: (let/cc k body ...+) Equivalent to (c ...
- css3 HSLA 颜色制造半透明效果
简介 HSL色彩模式是工业界的一种颜色标准,是通过对色调(H).饱和度(S).亮度(L)三个颜色通道的变化以及它们相互之间的叠加来得到各式各样的颜色的,HSL即是代表色调,饱和度,亮度三个通道的颜色, ...
- iview-admin里面的 axios 给包装了一层数据 libs/axios.js 数据做了一层拦截
interceptors (instance, url) { // 请求拦截 instance.interceptors.request.use(config => { // 添加全局的load ...
- 关于BitmapImage EndInit()时报值不在范围内的异常
值不在预期的范围内.ArgumentException 在 System.Windows.Media.ColorContext.GetColorContextsHelper(GetColorConte ...
- Redis(十二):redis请求转发的实现
请求转发一般的原因为: 1. 该请求自身无法处理,需要转发给对应的服务器处理: 2. 为实现负载均衡,使用路由服务,选择目标实例进行转发: 在集群模式下,请求可以打到任何一台redis服务器上.然而并 ...
- mvc5+ET6入门第一章
这一篇主要讲的是MVC也就是Model--View--Controller的缩写,没有讲ET.其中 Model(模型)表示应用程序核心(比如数据库记录列表).通常模型对象在数据库中存取数据. View ...
- IOS抓包工具Stream——让移动端的抓包变得轻而易举
有一天下晚班回家,在地铁上的时候,开发发来信息说,能不能把之前创建的bug再抓包看下数据.顿时心里就想,在地铁上,我上哪抓包去.之后百度了下,发现ios有一款非常实用的抓包工具,大家可以上App St ...
- 为什么我推荐你用Ubuntu开发?
前言: 鱼哥在做多媒体开发时,领导倒逼我们用Ubuntu开发,后来才发现它的牛逼和高效.所以对于还在用Windows上开发的朋友,鱼哥建议,趁周末,搞个双系统,切到Ubuntu上开发, Ubuntu最 ...