24-Java-Spring框架(二)
Spring框架的了解、SpringIOC的部分内容请阅读23-Java-Spring框架(一)
SpringAOP的了解、运用及原理等部分内容请阅读25-Java-Spring框架(三)
三、Spring Web MVC(Model View Controller)
1.SpringMVC了解
Spring提供了一个Web MVC框架,便于开发MVC结构的Java Web程序。Spring MVC属于SpringFrameWork的后续产品,已经融合在Spring Web Flow里面。
Spring 框架提供了构建 Web 应用程序的全功能 MVC 模块。使用 Spring 可插入的 MVC 架构,从而在使用Spring进行WEB开发时,可以选择使用Spring的Spring
MVC框架或集成其他MVC开发框架。
通过策略接口,Spring 框架是高度可配置的,而且包含多种视图技术,例如 JavaServer Pages(JSP)技术、Velocity、Tiles、iText和POI。Spring MVC 框架
并不知道使用的视图,所以不会强迫开发者只使用 JSP 技术。Spring MVC 分离了控制器、模型对象、过滤器以及处理程序对象的角色,这种分离让它们更容易进行
定制。
SpringMVC框架中提供了一个控制器(DispatcherServlet),负责接收客服端的请求,然后将请求分发到不同的处理器进行业务请求,最后由控制器完成转发动作。
2.SpringMVC相关组件
(1)DispatcherServlet(前端控制器,请求入口)
(2)HandlerMapping(控制器,请求派发)
(3)Controller(控制器,请求处理流程)
(4)ModelAndView(模型,封装处理结果和视图)
(5)ViewResolver(视图,视图显示处理器)
3.SpringMVC请求流程:SpringMVC是通过传统的Servlet来实现对框架源代码的封装以及整个流程的控制
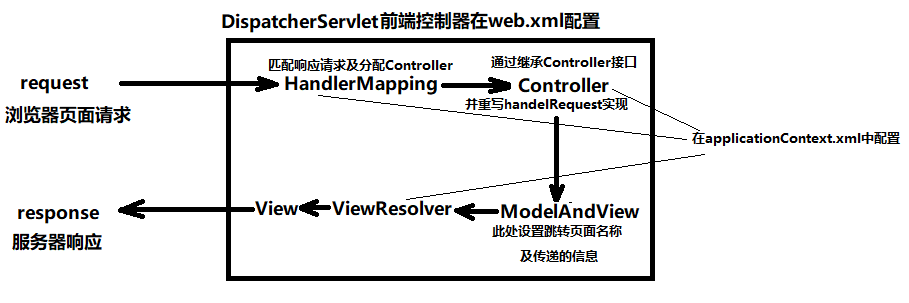
(1)浏览器向服务器(tomcat)发送http请求,web服务器对http请求进行解析,解析后如果URL地址匹配了DispatcherSerlvet的映射路径(serlvet-mapping),
web容器就会将请求交给DispatcherServlet来处理。
(2)DispatcherServet接收到请求后,再次对URL进行解析,得到URI,然后调用相应的方法得到HandlerMapping,再根据URI调用这个对象相对应的方法得
到Handler,此时并不会操作它,需要调用HandlerAdapter对Hander进行调用以及控制。
(3)DispatcherServlet根据得到的Handler对象选择合适的HandlerAdapter创建实例,执行拦截器中的preHander()方法
(4)Handler执行完毕后返回一个ModeAndView对象给DispatcherServlet。
(5)这个ModeAndView只是一个逻辑视图,并不是真正的视图,DispatcherServlet通过ViewResolver视图解析器将逻辑视图转化成一个真正的视图
(6)DispatcherServlet通过Model将ModeAndView中得到的数据解析后渲染视图,将得到的最终的视图通过http响应返回客服端。
4.SpringMVC的运用一(通过XML配置的方式)
第一步:搭建SpringMVC环境
(1)创建web项目
(2)添加SpringIOC和web MVC相关jar包(想要如下jar包的网友评论留言私聊)
ioc相关jar包:
aopalliance-1.0.jar
aspectjweaver-1.5.3.jar
spring-aop-4.1.6.RELEASE.jar
spring-aspects-4.1.6.RELEASE.jar
webmvc相关jar包:
spring-web-4.1.6.RELEASE.jar
spring-webmvc-4.1.6.RELEASE.jar
(3)添加Spring配置文件applicationContext.xml(也可以用注解的方式代替此步骤)
(4)在web.xml中配置DispatcherServlet前端控制器组件
 <?xml version="1.0" encoding="UTF-8"?>

 <web-app version="3.0"

     xmlns="http://java.sun.com/xml/ns/javaee"

     xmlns:xsi="http://www.w3.org/2001/XMLSchema-instance"

     xsi:schemaLocation="http://java.sun.com/xml/ns/javaee

     http://java.sun.com/xml/ns/javaee/web-app_3_0.xsd">

   <display-name></display-name>

   <welcome-file-list>

     <welcome-file>Hello.jsp</welcome-file>

   </welcome-file-list>

   <servlet>

       <servlet-name>springmvc</servlet-name>

       <servlet-class>org.springframework.web.servlet.DispatcherServlet</servlet-class>

       <init-param>

           <param-name>contextConfigLocation</param-name>

           <param-value>classpath:applicationContext.xml</param-value>

       </init-param>

       <load-on-startup>1</load-on-startup>

   </servlet>

   <servlet-mapping>

       <servlet-name>spring</servlet-name>

       <!-- 拦截以.do结尾的请求 -->

       <url-pattern>*.do</url-pattern>

   </servlet-mapping>

 </web-app>
第二步:开发SpringMVC
(1)设计请求到响应的处理流程
(2)编写Controller组件
package com.springmvc.Controller; import javax.servlet.http.HttpServletRequest;
import javax.servlet.http.HttpServletResponse; import org.springframework.web.servlet.ModelAndView;
import org.springframework.web.servlet.mvc.Controller; //XML配置
//首先创建ControllerClass 实现Controller接口返回ModelAndView
public class ControllerClass implements Controller{ //该方法是约定的处理请求的方法,请求进入Controller对象后自动调用该方法
@Override
public ModelAndView handleRequest(HttpServletRequest request,HttpServletResponse response) throws Exception {
System.out.println("进入Controller组件"); //接下来往JSP页面传递一个消息并跳转到Hello.jsp页面
ModelAndView mav = new ModelAndView();
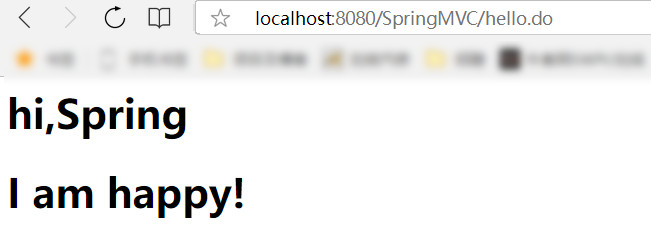
mav.setViewName("Hello");//指定视图名称
mav.getModel().put("msg","I am happy!");
return mav;
}
}
(3)JSP或html页面
 <%@ page language="java" import="java.util.*" pageEncoding="UTF-8"%>

 <%

 String path = request.getContextPath();

 String basePath = request.getScheme()+"://"+request.getServerName()+":"+request.getServerPort()+path+"/";

 %>

 <!DOCTYPE HTML PUBLIC "-//W3C//DTD HTML 4.01 Transitional//EN">

 <html>

   <head>

     <base href="<%=basePath%>">

     <title>My JSP 'Hello.jsp' starting page</title>

     <meta http-equiv="pragma" content="no-cache">

     <meta http-equiv="cache-control" content="no-cache">

     <meta http-equiv="expires" content="0">

     <meta http-equiv="keywords" content="keyword1,keyword2,keyword3">

     <meta http-equiv="description" content="This is my page">

   </head>

   <body>

         <h1>hi,Spring</h1>

         <h1>${msg }</h1>

   </body>

 </html>
(4)在applicationContext.xml中配置Controller组件(也可以用注解的方式代替此步骤)
(5)在applicationContext.xml中配置HandlerMapping组件(也可以用注解的方式代替此步骤)
(6)在applicationContext.xml中配置ViewResolver组件
 <?xml version="1.0" encoding="UTF-8"?>

 <beans xmlns="http://www.springframework.org/schema/beans"

        xmlns:xsi="http://www.w3.org/2001/XMLSchema-instance"

        xmlns:context="http://www.springframework.org/schema/context"

        xmlns:aop="http://www.springframework.org/schema/aop"

        xmlns:tx="http://www.springframework.org/schema/tx"

        xmlns:jdbc="http://www.springframework.org/schema/jdbc"

        xmlns:jee="http://www.springframework.org/schema/jee"

        xmlns:mvc="http://www.springframework.org/schema/mvc"

        xmlns:util="http://www.springframework.org/schema/util"

        xsi:schemaLocation="

             http://www.springframework.org/schema/beans http://www.springframework.org/schema/beans/spring-beans.xsd

             http://www.springframework.org/schema/tx http://www.springframework.org/schema/tx/spring-tx.xsd

             http://www.springframework.org/schema/aop http://www.springframework.org/schema/aop/spring-aop.xsd

             http://www.springframework.org/schema/util http://www.springframework.org/schema/util/spring-util.xsd

             http://www.springframework.org/schema/jdbc http://www.springframework.org/schema/jdbc/spring-jdbc.xsd

             http://www.springframework.org/schema/jee http://www.springframework.org/schema/jee/spring-jee.xsd

             http://www.springframework.org/schema/mvc http://www.springframework.org/schema/mvc/spring-mvc.xsd

             http://www.springframework.org/schema/context http://www.springframework.org/schema/context/spring-context.xsd">

         <!-- 配置Contorller组件 -->

         <bean id="Controller" class="com.springmvc.Controller.ControllerClass"></bean>

         <!-- 配置HandlerMapping组件 -->

         <bean id="simpleurlhandlermapping" class="org.springframework.web.servlet.handler.SimpleUrlHandlerMapping">

             <property name="mappings">

                 <props>

                     <prop key="/hello.do">Controller</prop>

                 </props>

             </property>

         </bean>

         <!-- 配置ViewResolver视图解析器 -->

         <!-- 完整的页面路径:前缀+视图名称+后缀 -->

         <bean id="ViewResolver" class="org.springframework.web.servlet.view.InternalResourceViewResolver">

             <!-- 前缀 -->

             <property name="prefix" value="/"></property>

             <!-- 后缀 -->

             <property name="suffix" value=".jsp"></property>

         </bean>

 </beans>
第三步:测试运行
5.SpringMVC的运用二(通过注解的方式)
第一步:搭建SpringMVC环境
(1)创建web项目
(2)添加SpringIOC、AOP和web MVC相关jar包(想要如下jar包的网友评论留言私聊)
ioc相关jar包:
aopalliance-1.0.jar
aspectjweaver-1.5.3.jar
spring-aop-4.1.6.RELEASE.jar
spring-aspects-4.1.6.RELEASE.jar
aop相关jar包:
aopalliance-1.0.jar
aspectjweaver-1.5.3.jar
spring-aop-4.1.6.RELEASE.jar
spring-aspects-4.1.6.RELEASE.jar
webmvc相关jar包:
spring-web-4.1.6.RELEASE.jar
spring-webmvc-4.1.6.RELEASE.jar
(3)添加Spring配置文件applicationContext.xml(也可以用注解的方式代替此步骤)
(4)在web.xml中配置DispatcherServlet前端控制器组件(同运用一的web.xml)
第二步:开发SpringMVC
(1)设计请求到响应的处理流程
(2)编写Controller组件
package com.springmvc.Controller; import org.springframework.stereotype.Controller;
import org.springframework.web.bind.annotation.RequestMapping;
import org.springframework.web.servlet.ModelAndView; @Controller//此处相当于继承了Controller接口的作用
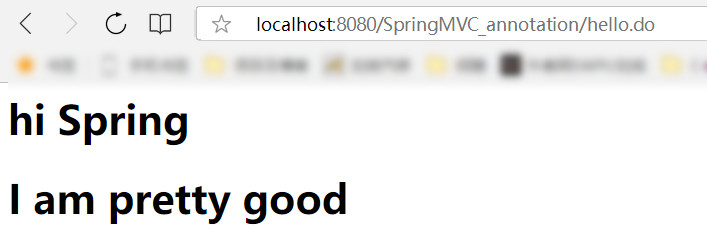
public class ControllerClass { @RequestMapping("/hello.do")//此处等价于applicationContext.xml中的配置HandlerMapping组件
public ModelAndView hello(){
System.out.println("进入Controller组件"); //接下来往JSP页面传递一个消息并跳转到Hello.jsp页面
ModelAndView mav = new ModelAndView();
mav.setViewName("Hello");
mav.getModel().put("msg", "I am pretty good");
return mav;
}
}
(3)JSP或html页面(同运用一的Hello.jsp)
(4)在applicationContext.xml中配置handler组件
(5)在applicationContext.xml中配置组件扫描
(6)在applicationContext.xml中配置ViewResolver组件
 <?xml version="1.0" encoding="UTF-8"?>

 <beans xmlns="http://www.springframework.org/schema/beans"

        xmlns:xsi="http://www.w3.org/2001/XMLSchema-instance"

        xmlns:context="http://www.springframework.org/schema/context"

        xmlns:aop="http://www.springframework.org/schema/aop"

        xmlns:tx="http://www.springframework.org/schema/tx"

        xmlns:jdbc="http://www.springframework.org/schema/jdbc"

        xmlns:jee="http://www.springframework.org/schema/jee"

        xmlns:mvc="http://www.springframework.org/schema/mvc"

        xmlns:util="http://www.springframework.org/schema/util"

        xsi:schemaLocation="

             http://www.springframework.org/schema/beans http://www.springframework.org/schema/beans/spring-beans.xsd

             http://www.springframework.org/schema/tx http://www.springframework.org/schema/tx/spring-tx.xsd

             http://www.springframework.org/schema/aop http://www.springframework.org/schema/aop/spring-aop.xsd

             http://www.springframework.org/schema/util http://www.springframework.org/schema/util/spring-util.xsd

             http://www.springframework.org/schema/jdbc http://www.springframework.org/schema/jdbc/spring-jdbc.xsd

             http://www.springframework.org/schema/jee http://www.springframework.org/schema/jee/spring-jee.xsd

             http://www.springframework.org/schema/mvc http://www.springframework.org/schema/mvc/spring-mvc.xsd

             http://www.springframework.org/schema/context http://www.springframework.org/schema/context/spring-context.xsd">

         <!-- 配置Handler简配 -->

         <mvc:annotation-driven/>

         <!-- 配置组件扫描 -->

         <context:component-scan base-package="com.springmvc"/>

         <!-- 配置ViewResolver视图解析器 -->

         <!-- 完整的页面路径:前缀+视图名称+后缀 -->

         <bean id="ViewResolver" class="org.springframework.web.servlet.view.InternalResourceViewResolver">

             <!-- 前缀 -->

             <property name="prefix" value="/"></property>

             <!-- 后缀 -->

             <property name="suffix" value=".jsp"></property>

         </bean>

 </beans>
第三步:测试运行
24-Java-Spring框架(二)的更多相关文章
- 基于java spring框架开发部标1078视频监控平台精华文章索引
部标1078视频监控平台,是一个庞杂的工程,涵盖了多层协议,部标jt808,jt809,jt1078,苏标Adas协议等,多个平台功能标准,部标796标准,部标1077标准和苏标主动安全标准,视频方面 ...
- 《Java Spring框架》SpringXML配置详解
Spring框架作为Bean的管理容器,其最经典最基础的Bean配置方式就是纯XML配置,这样做使得结构清晰明了,适合大型项目使用.Spring的XML配置虽然很繁琐,而且存在简洁的注解方式,但读懂X ...
- [Java]Spring框架
在这里学习Spring框架: >>spring&struts框架学习 >>spring >>Java回顾之Spring基础 >>IBM Java ...
- 吴裕雄--天生自然JAVA SPRING框架开发学习笔记:SSM(Spring+Spring MVC+MyBatis)框架整合搭建详细步骤
因为 Spring MVC 是 Spring 框架中的一个子模块,所以 Spring 与 SpringMVC 之间不存在整合的问题.实际上,SSM 框架的整合只涉及 Spring 与 MyBatis ...
- 吴裕雄--天生自然JAVA SPRING框架开发学习笔记:SSH框架(Struts2+Spring+Hibernate)搭建整合详细步骤
在实际项目的开发中,为了充分利用各个框架的优点,通常都会把 Spring 与其他框架整合在一起使用. 整合就是将不同的框架放在一个项目中,共同使用它们的技术,发挥它们的优点,并形成互补.一般而言,在进 ...
- 吴裕雄--天生自然JAVA SPRING框架开发学习笔记:Spring使用AspectJ开发AOP基于XML和基于Annotation
AspectJ 是一个基于 Java 语言的 AOP 框架,它扩展了 Java 语言.Spring 2.0 以后,新增了对 AspectJ 方式的支持,新版本的 Spring 框架,建议使用 Aspe ...
- 吴裕雄--天生自然JAVA SPRING框架开发学习笔记:Spring JDK动态代理
JDK 动态代理是通过 JDK 中的 java.lang.reflect.Proxy 类实现的.下面通过具体的案例演示 JDK 动态代理的使用. 1. 创建项目 在 MyEclipse 中创建一个名称 ...
- 吴裕雄--天生自然JAVA SPRING框架开发学习笔记:Spring DI(依赖注入)的实现方式属性注入和构造注入
依赖注入(Dependency Injection,DI)和控制反转含义相同,它们是从两个角度描述的同一个概念. 当某个 Java 实例需要另一个 Java 实例时,传统的方法是由调用者创建被调用者的 ...
- 吴裕雄--天生自然JAVA SPRING框架开发学习笔记:Spring IoC容器BeanFactory和ApplicationContext
IoC 是指在程序开发中,实例的创建不再由调用者管理,而是由 Spring 容器创建.Spring 容器会负责控制程序之间的关系,而不是由程序代码直接控制,因此,控制权由程序代码转移到了 Spring ...
- 吴裕雄--天生自然JAVA SPRING框架开发学习笔记:Spring体系结构详解
Spring 框架采用分层架构,根据不同的功能被划分成了多个模块,这些模块大体可分为 Data Access/Integration.Web.AOP.Aspects.Messaging.Instrum ...
随机推荐
- 29.1 collection层次结构 中的根接口
/* * Collection * boolean add(E e) * void clear() * boolean contains(Object o) * boolean isEmpty() * ...
- 教你爬取腾讯课堂、网易云课堂、mooc等所有课程信息
本文的所有代码都在GitHub上托管,想要代码的同学请点击这里
- Docker-Bridge Network 01 容器间通信
本小节介绍bridge network模式下,单机上的容器网络拓扑及通信. 1.前言 对于单机上的容器,Docker提供了bridge.host.none三种网络.我们首先介绍经典的bridge模式. ...
- 好玩的GeoGebra
目前,在网站上看到好多大牛写的信号方面的笔记,有很多好玩的gif好玩又让人能明白其中的原理,工欲善其事必先利其器,在写我的博客方面先来学一个好玩的数学软件吧. GeoGebra官网如图 它是一个小巧的 ...
- 疲劳驾驶打瞌睡?python保障您的驾驶安全
道路千万条,安全第一条!疲劳驾驶可谓交通事故几大罪魁祸首之一,根据美国一项研究显示,司机睡眠不足4小时,交通事故肇事几率等同于醉驾. 为了减少疲劳驾驶现象,驾驶员疲劳检测应运而生.这是一项安全技术,可 ...
- L9循环神经网络进阶 ModernRNN
GRU RNN存在的问题:梯度较容易出现衰减或爆炸(BPTT) ⻔控循环神经⽹络:捕捉时间序列中时间步距离较⼤的依赖关系 RNN: Ht=ϕ(XtWxh+Ht−1Whh+bh) H_{t} = ϕ(X ...
- 杭电 逃离迷宫 BFS
给定一个m × n (m行, n列)的迷宫,迷宫中有两个位置,gloria想从迷宫的一个位置走到另外一个位置,当然迷宫中有些地方是空地,gloria可以穿越,有些地方是障碍,她必须绕行,从迷宫的一个位 ...
- 胜利大逃亡 BFS
Ignatius被魔王抓走了,有一天魔王出差去了,这可是Ignatius逃亡的好机会. 魔王住在一个城堡里,城堡是一个A*B*C的立方体,可以被表示成A个B*C的矩阵,刚开始Ignatius被关在(0 ...
- Gradle系列之Groovy基础篇
原文发于微信公众号 jzman-blog,欢迎关注交流. 上一篇学习了 Gradle 的入门知识,Gradle 基于 Groovy,今天学习一下 Groovy 的基础知识,Groovy 是基于 JVM ...
- Windows安装Tesseract-OCR 4.00并配置环境变量
一.前言 Tesseract-OCR 是一款由HP实验室开发由Google维护的开源OCR(Optical Character Recognition , 光学字符识别)引擎.与Microsoft O ...